
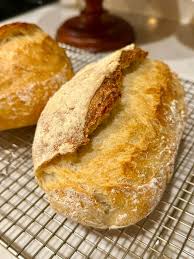
Freshly baked rustic sourdough bread with a beautifully golden crust, a soft and chewy interior, and a delicate tangy flavor. These homemade mini loaves are perfect for sandwiches, toasted bread, or serving warm with butter.
Prep Time: 15–20 minutes | Rising Time: Approximately 2½–3 hours | Bake Time: 20–25 minutes | Yield: 4 mini loaves
1. Introduction
There’s something special about the aroma of freshly baked Rustic Sourdough Bread filling the kitchen.
This homemade recipe creates four beautiful mini loaves with crisp golden crusts, tender interiors, and the mild tangy flavor associated with sourdough.
Inspired by King Arthur Baking’s Rustic Sourdough Bread, the recipe combines active sourdough starter with a small amount of instant yeast to produce a reliable rise without requiring an overnight fermentation.
The dough is made from just five simple ingredients: flour, water, sourdough starter, salt, and optional instant yeast.
After kneading and rising, the dough is shaped into individual oval loaves, lightly dusted with flour, scored, and baked until golden brown.
Whether you’re new to sourdough baking or looking for a simple homemade bread recipe, these rustic mini loaves are a wonderful addition to your kitchen.
2. Origin and Cultural Significance
Sourdough is one of the oldest known methods of leavening bread.
Before commercial baker’s yeast became widely available, bakers relied on naturally fermented mixtures of flour and water to help their dough rise.
These mixtures, now commonly called sourdough starters, contain naturally occurring yeasts and lactic acid bacteria.
Together, they contribute to the bread’s flavor, fermentation, and structure.
Sourdough traditions can be found in many cultures, including European artisan bread-making and the well-known sourdough breads of San Francisco.
Modern rustic sourdough recipes often combine traditional starter fermentation with convenient home-baking techniques.
King Arthur Baking’s version uses a small amount of commercial yeast alongside sourdough starter, making it particularly approachable for beginners. King Arthur Baking
Shaping the dough into four individual mini loaves provides a convenient variation on the traditional larger bread.
3. Ingredients
For the Rustic Sourdough Dough
- 5 cups (600 g) unbleached all-purpose flour or bread flour
- 1½ cups (340 g) lukewarm water
- 1 cup (227 g) ripe, active sourdough starter
- 2½ teaspoons (15 g) fine table salt
- 1–2 teaspoons instant yeast, recommended for the faster version
For Shaping and Baking
- 2–3 tablespoons additional flour, for dusting
- A little oil, for greasing the rising bowl
- Water, for lightly spraying the loaves
- Approximately 1 cup hot water, optional, for oven steam
Ingredient Notes
Flour: Unbleached all-purpose flour produces a tender, chewy loaf. Bread flour can create a slightly stronger, chewier crumb.
Sourdough Starter: Use a ripe starter that is active, bubbly, and has risen noticeably after feeding.
Water: Lukewarm water helps the dough ferment at a comfortable temperature.
Salt: Enhances flavor and supports dough structure.
Instant Yeast: Helps the dough rise more predictably and quickly.
For the original hybrid recipe, King Arthur Baking recommends 1 teaspoon of yeast for a vigorous starter or 2 teaspoons for a faster, more dependable rise. King Arthur Baking
4. Optional Additions
Garlic Herb Sourdough
Add 1 teaspoon dried Italian herbs and ½ teaspoon garlic powder to the dough.
Whole-Wheat Variation
Replace approximately 100–150 g of the white flour with whole-wheat flour. Additional water may be needed.
Sesame Sourdough Rolls
Sprinkle the shaped dough with sesame seeds before baking.
Rosemary Sourdough
Knead 1 tablespoon finely chopped fresh rosemary into the dough.
Olive Sourdough
Fold ½ cup chopped, well-drained olives into the dough during shaping.
Cheese Sourdough
Add ½ cup shredded cheddar to the dough for a savory variation.
5. Tips for Success
1. Use a healthy starter. An active, bubbly starter gives the bread better flavor and helps support fermentation.
2. Weigh the flour. A kitchen scale is more accurate than measuring by cups.
3. Avoid adding too much flour. The dough should be soft, smooth, and slightly tacky, not dry or stiff.
4. Knead until elastic. Proper gluten development helps the mini loaves hold their shape.
5. Watch the dough, not just the clock. Rising times depend on room temperature, starter activity, and whether instant yeast is included.
6. Shape the loaves firmly. Creating surface tension helps the dough rise upward instead of spreading outward.
7. Don’t overproof. Excessive fermentation can cause the dough to collapse or lose oven spring.
8. Cool before slicing. Cutting hot bread releases steam and may leave the center gummy.
6. Instructions
Part 1: Prepare the Sourdough Dough
Step 1: Combine the ingredients.
In a large mixing bowl, combine the flour, lukewarm water, active sourdough starter, salt, and instant yeast if using.
Mix with a wooden spoon or dough scraper until a rough dough forms.
Step 2: Knead the dough.
Transfer the dough to a lightly floured work surface.
Knead for approximately 7–10 minutes, until smooth and elastic.
Alternatively, knead using a stand mixer with a dough hook for 5–7 minutes.
Step 3: Check the consistency.
The dough should feel soft and slightly tacky.
If it is excessively sticky, dust with a small amount of flour.
Avoid adding too much extra flour.
Part 2: First Rise
Step 4: Prepare the rising bowl.
Lightly grease a large bowl with olive oil or another neutral cooking oil.
Place the dough inside and turn once to coat lightly.
Step 5: Cover the dough.
Cover with a clean kitchen towel, lid, or food-safe wrap.
Step 6: Allow the dough to rise.
Leave at room temperature for approximately 90 minutes, or until roughly doubled in size when using instant yeast.
In cooler kitchens, the dough may require additional time.
Part 3: Divide and Shape
Step 7: Transfer the dough.
Place the risen dough on a lightly floured work surface.
Gently press to release some of the large air bubbles.
Step 8: Divide into portions.
Using a bench scraper or sharp knife, divide the dough into four equal pieces.
Each piece will weigh approximately 295–300 g before baking.
Step 9: Preshape the dough.
Gently fold the edges of each portion toward the center.
Turn seam-side down and shape into a loose round.
Cover and rest for approximately 10–15 minutes.
Step 10: Shape into mini batards.
Take one dough portion and gently flatten it into an oval.
Fold the upper edge toward the center, then roll the dough into a short cylinder.
Pinch the seam closed.
Roll gently to create a compact oval loaf with slightly tapered ends.
Repeat with the remaining dough.
Part 4: Second Rise
Step 11: Arrange the loaves.
Line a large baking sheet with parchment paper.
Place the shaped loaves seam-side down, leaving enough space between them for expansion.
Step 12: Cover and proof.
Cover loosely with lightly greased food-safe wrap or a clean towel.
Allow the loaves to rise for approximately 45–75 minutes, until noticeably puffy.
Step 13: Preheat the oven.
Toward the end of the second rise, preheat the oven to 425°F (220°C).
Part 5: Prepare for Baking
Step 14: Dust with flour.
Lightly spray the tops of the loaves with water.
Dust with a little flour for a rustic appearance.
Step 15: Score the bread.
Using a sharp bread lame or serrated knife, make 2–3 diagonal slashes across each loaf.
Aim for cuts approximately ¼ inch deep.
Scoring helps control expansion during baking.
Part 6: Bake the Mini Loaves
Step 16: Create steam, optional.
For a crispier crust, place an empty, oven-safe metal pan on a lower oven rack during preheating.
Carefully add approximately 1 cup of hot water when placing the bread in the oven.
Keep your hands and face away from the rising steam. Never use a glass pan for this method.
Step 17: Bake the bread.
Place the baking sheet in the preheated oven.
Bake for approximately 20–25 minutes, checking toward the end.
The loaves should develop a deep golden-brown crust.
Step 18: Check for doneness.
The bread should sound hollow when tapped underneath.
For an additional check, the internal temperature will often be around 200–210°F (93–99°C).
If necessary, bake for another 3–5 minutes.
Step 19: Cool completely.
Transfer the bread to a wire rack.
Allow the mini loaves to cool for at least 45–60 minutes before slicing.
Optional: Naturally Leavened Version
To make this recipe without commercial yeast, omit the instant yeast and use a vigorous, ripe starter.
Allow approximately 4–8 hours for the first fermentation and 2–4 hours for the shaped loaves to proof, depending on temperature and starter strength.
Perform three or four sets of stretch-and-folds during the first two hours of fermentation.
These are approximate ranges, not guaranteed timings. Bake when the dough has developed sufficient volume and feels airy and elastic.
7. Description
Rustic Sourdough Bread is known for its crisp exterior, soft interior, and pleasantly tangy flavor.
The baked mini loaves develop a deep golden crust with attractive flour-dusted surfaces and scored openings.
Inside, the crumb is tender, slightly chewy, and filled with small to medium air pockets.
The sourdough starter contributes mild acidity and a more complex flavor than plain commercially yeasted bread.
| Component | Flavor and Texture |
|---|---|
| Outer crust | Golden, crisp, lightly chewy |
| Bread interior | Soft, elastic, airy |
| Sourdough starter | Mildly tangy, complex |
| Flour | Subtle, wheaty |
| Salt | Savory, balanced |
| Finished mini loaves | Rustic, crusty, tender |
The result is a versatile bread suitable for both sweet and savory toppings.
8. Nutritional Information
Approximate nutritional values per slice, assuming the four mini loaves are cut into 16 equal slices in total:
| Nutrient | Estimated Amount |
|---|---|
| Calories | 155–175 kcal |
| Protein | 5–6 g |
| Carbohydrates | 32–35 g |
| Total Fat | 0.5–1 g |
| Dietary Fiber | 1–2 g |
| Sugar | Less than 1 g |
| Sodium | Approximately 350–400 mg |
Nutrition varies with flour type, starter hydration, loaf size, and slice thickness. Toppings are not included.
9. Recipe Details
| Detail | Information |
|---|---|
| Recipe Name | Rustic Sourdough Bread |
| Cuisine | European-Inspired Artisan Baking |
| Course | Bread, Breakfast, Side Dish |
| Preparation Time | 15–20 minutes |
| First Rise | Approximately 90 minutes |
| Rest and Shaping | 15–20 minutes |
| Second Rise | 45–75 minutes |
| Baking Time | 20–25 minutes |
| Total Time | Approximately 3½–4 hours, plus cooling |
| Yield | 4 mini loaves or 2 standard loaves |
| Difficulty | Easy to Moderate |
| Oven Temperature | 425°F (220°C) |
| Best Served | Fresh or Toasted |
These timings apply to the hybrid version using instant yeast. A naturally leavened version requires substantially longer fermentation. For two standard loaves, allow approximately 25–30 minutes of baking. King Arthur Baking
10. Conclusion
Rustic Sourdough Bread is a satisfying homemade recipe that combines simple ingredients with traditional bread-making techniques.
The sourdough starter provides flavor, while the optional instant yeast makes the recipe more approachable for beginners.
Shaping the dough into four mini loaves creates convenient individual portions with beautifully crisp crusts and tender interiors.
Whether enjoyed warm, toasted for breakfast, or used for sandwiches, these homemade loaves bring the comforting flavor of artisan-style sourdough to your kitchen.
11. Serving and Storage Recommendations
Best Ways to Serve
Rustic sourdough tastes delicious with:
- Salted butter
- Olive oil and herbs
- Honey or fruit jam
- Scrambled eggs
- Grilled cheese
- Creamy vegetable soup
- Roasted chicken sandwiches
Storing at Room Temperature
Allow the bread to cool completely before storing.
Keep it in a bread bag or loosely wrapped at room temperature for approximately 2–3 days.
Avoid sealing warm bread in plastic, which traps moisture and softens the crust.
Freezing
Wrap cooled mini loaves tightly in freezer-safe packaging.
Freeze for up to three months for best quality.
Thaw at room temperature before reheating.
Reheating
For a crisp crust, place the bread in a preheated oven at 350°F (175°C) for approximately 5–10 minutes.
Individual slices can also be reheated in a toaster.
Make-Ahead Tips
For the naturally leavened version, the shaped dough can be refrigerated overnight for a longer, colder proof.
The fermentation schedule must be adjusted according to dough activity and refrigerator temperature.
12. Embracing Healthful Indulgence
Rustic Sourdough Bread is made from a short list of familiar ingredients.
Flour provides carbohydrates for energy, while the fermentation process contributes to sourdough’s characteristic flavor and texture.
The recipe contains very little added fat or sugar.
For a more fiber-rich variation, consider replacing part of the white flour with whole-wheat flour.
You can also serve the bread with protein-rich foods and vegetables to create a balanced meal.
Sourdough fermentation may affect digestibility for some people, but ordinary wheat sourdough is not gluten-free and is unsuitable for people with celiac disease.
The beauty of this bread lies in its simplicity: flour, water, starter, salt, and time come together to produce a fragrant loaf with a delicious crust.
With their beautiful golden crusts, soft chewy centers, and distinctive sourdough flavor, these Rustic Sourdough Mini Loaves are perfect for homemade breakfasts, sandwiches, soups, and family meals.
#RusticSourdoughBread #HomemadeSourdough #ArtisanBread #MiniBreadLoaves #BreadBaking