
1. Introduction
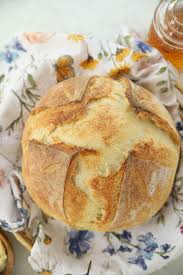
This Overnight Rustic Sourdough Bread features a beautifully golden, crackling crust and a soft, chewy interior with a naturally tangy flavor. Made with just four simple ingredients, this artisan-style loaf develops its delicious taste through slow fermentation. The overnight refrigeration also makes it easier to create beautiful decorative scoring patterns.
2. Origin and Cultural Significance
Sourdough is one of the oldest forms of naturally fermented bread.
Unlike conventional bread made with commercial yeast, traditional sourdough relies on a living starter containing wild yeasts and lactic acid bacteria.
These microorganisms ferment the dough, helping it rise while developing its distinctive flavor.
Today, rustic sourdough bread remains popular among artisan bakers because of its crisp crust, chewy texture, and complex taste.
3. Ingredients
For the Sourdough Bread
- 100 g active sourdough starter, fed and bubbly
- 350 g lukewarm filtered water
- 500 g strong bread flour
- 10 g fine sea salt
For Shaping and Baking
- Extra flour for dusting
- Rice flour for the proofing basket
- Baking parchment suitable for high temperatures
Recommended Equipment
- Large mixing bowl
- Dough scraper
- Banneton proofing basket or towel-lined bowl
- Dutch oven with an oven-safe lid
- Bread lame or sharp razor blade
- Wire cooling rack
4. Optional Additions
Customize your sourdough loaf with:
- Fresh rosemary: Adds a fragrant herbal flavor.
- Roasted garlic: Creates a rich, savory variation.
- Sesame seeds: Provide extra texture and flavor.
- Sunflower seeds: Add a pleasant nutty crunch.
- Whole-wheat flour: Replace a small portion of the bread flour for a heartier loaf.
- Kalamata olives: Add a Mediterranean-inspired flavor.
If you’re making sourdough for the first time, it’s best to begin with the original four-ingredient recipe.
5. Tips for Success
- Use an active starter: It should be bubbly and show a noticeable rise after feeding.
- Watch the dough, not just the clock: Fermentation speed depends on starter strength and room temperature.
- Keep your hands slightly wet: This helps prevent sticking during stretch-and-folds.
- Avoid adding too much flour: The dough should remain slightly tacky.
- Don’t overproof: Shape the dough when it has risen noticeably and feels airy.
- Use a well-floured basket: Rice flour helps prevent sticking during the overnight proof.
- Preheat your Dutch oven: A hot covered vessel helps trap steam and develop a crisp crust. King Arthur Baking
- Allow the loaf to cool: Slicing hot sourdough can leave the interior gummy.
6. Step-by-Step Instructions
Step 1: Mix the Dough
In a large mixing bowl, combine the active sourdough starter and lukewarm water.
Stir until the starter is dispersed.
Add the bread flour and fine sea salt.
Mix with a dough whisk or your hands until a rough, shaggy dough forms.
Ensure that no dry flour remains.
Cover the bowl and allow the dough to rest for 30 minutes.
This initial rest helps hydrate the flour and makes the dough easier to handle.
Note: Because the starter and salt are already included, this is a dough rest rather than a traditional autolyse, which normally involves only flour and water. King Arthur Baking
Step 2: Perform the Stretch-and-Folds
Lightly wet your hands.
Grab one edge of the dough and gently stretch it upward.
Fold it toward the center of the bowl.
Rotate the bowl 90 degrees and repeat.
Continue until you’ve folded all four sides.
Cover the bowl and allow the dough to rest for 30 minutes.
Repeat this process until you’ve completed four sets over approximately 2 hours.
The dough should gradually become smoother, stronger, and more elastic.
Step 3: Complete Bulk Fermentation
After the stretch-and-folds, leave the dough covered at room temperature.
Aim for a room temperature of approximately 70–75°F (21–24°C).
Allow the dough to ferment until it has increased in volume by approximately 40–50% and feels noticeably airy.
At this temperature, bulk fermentation may take around 4–6 hours in total, including the folding period, although a cooler kitchen or slower starter may require additional time.
The dough should show:
- Small bubbles near the surface
- A slightly rounded top
- Noticeable expansion
- A soft, elastic texture
The amount of rise is a useful indicator of fermentation progress, alongside dough temperature and appearance. The Perfect Loaf
Step 4: Shape the Sourdough
Lightly flour a clean work surface.
Carefully transfer the dough onto it.
Gently fold the edges toward the center to create a round shape.
Turn the dough seam-side down.
Using your hands or a dough scraper, gently pull it across the work surface to create surface tension.
Shape it into a smooth, round boule.
Step 5: Prepare for Overnight Proofing
Generously dust a banneton proofing basket with rice flour.
Place the shaped dough into the basket with the smooth side facing downward and the seam facing upward.
Cover the basket.
Transfer it to the refrigerator for approximately 12–15 hours.
The cold fermentation allows the dough to develop additional flavor while becoming firmer and easier to score.
Step 6: Preheat the Oven
The following morning, place your Dutch oven and its lid inside the oven.
Preheat to 450°F (232°C) for approximately 40–45 minutes.
Check that your Dutch oven is suitable for empty preheating at this temperature.
Keep the dough refrigerated until you’re ready to bake.
Step 7: Create the Floral Scoring Pattern
Remove the chilled dough from the refrigerator.
Carefully invert it onto a sheet of baking parchment.
Lightly dust the surface with flour if desired.
Using a sharp bread lame, create a decorative design:
- Score a small flower in the center.
- Add curved lines to form petals.
- Draw delicate leaf shapes around the flower.
- Add shallow decorative lines to complete the design.
Keep decorative cuts approximately ⅛ inch (3 mm) deep.
For more controlled expansion, make one slightly deeper functional score in an unobtrusive area of the loaf.
Step 8: Bake the Sourdough
Carefully remove the preheated Dutch oven from the oven.
Lower the dough into the pot using the parchment.
Cover immediately with the lid.
Bake at 450°F (232°C) for 20 minutes.
Remove the lid and reduce the temperature to 410°F (210°C).
Continue baking uncovered for approximately 15–25 minutes, until the loaf develops a deep golden-brown crust.
If the crust remains pale, extend the baking time slightly.
Step 9: Cool the Bread
Carefully remove the baked loaf from the Dutch oven.
Transfer it to a wire cooling rack.
Allow it to cool completely for approximately 1–2 hours.
Once cooled, slice with a serrated bread knife and enjoy.
7. Description
This Overnight Rustic Sourdough Bread delivers the distinctive characteristics of artisan baking.
The exterior is deeply golden, crisp, and lightly blistered.
Inside, the crumb is soft and chewy, with irregular air pockets created during fermentation.
The flavor combines subtle acidity with the natural richness of fermented wheat.
The decorative floral scoring adds an elegant, handmade appearance, making this loaf as attractive as it is delicious.
8. Nutritional Information
Estimated nutritional values per slice, assuming 10 equal slices:
| Nutrient | Approximate Amount |
|---|---|
| Calories | 190–210 kcal |
| Protein | 6–8 g |
| Carbohydrates | 39–43 g |
| Total Fat | 1–2 g |
| Fiber | 1–3 g |
| Sodium | 350–420 mg |
These estimates assume a starter made with equal weights of flour and water. Actual values depend on flour type and slice size.
9. Recipe Details
Preparation Time
20–30 minutes
Bulk Fermentation
Approximately 4–6 hours
Cold Proof
12–15 hours
Baking Time
35–45 minutes
Yield
1 artisan loaf
Difficulty
Intermediate
10. Conclusion
This Overnight Rustic Sourdough Bread is a rewarding recipe for anyone interested in traditional artisan baking.
Its simple ingredients, slow fermentation, and Dutch oven baking method produce a flavorful loaf with a beautifully crisp crust and tender interior.
The overnight proof also provides a convenient baking schedule while allowing the dough to develop additional complexity.
Whether you’re a beginner exploring sourdough or an experienced home baker, this recipe is a wonderful addition to your baking routine.
11. Recommendation
Enjoy your homemade sourdough with:
- Salted butter
- Olive oil and herbs
- Avocado and eggs
- Homemade hummus
- Fresh tomato and mozzarella
- Soup or stew
- Grilled cheese sandwiches
Storage tip: Keep the cooled loaf wrapped in a clean bread bag or stored in a bread box at room temperature for approximately 2–3 days.
Avoid refrigerating the bread, as refrigeration can accelerate staling.
For longer storage, slice the loaf and freeze individual portions for up to 2–3 months.
Toast frozen slices directly when needed.
12. Embracing Healthful Indulgence
Homemade sourdough bread offers a simple way to enjoy traditional baking with minimal ingredients.
The fermentation process contributes to its distinctive flavor and affects the structure of the dough.
Unlike many enriched breads, this recipe requires no added sugar, butter, or oil.
For additional fiber, you can experiment with replacing a portion of the bread flour with whole-wheat flour, adjusting the water and fermentation as needed.
Served with vegetables, eggs, legumes, or other nutritious ingredients, rustic sourdough can be part of a balanced and satisfying meal.