
1. Introduction
This Creamy Vanilla Wafer Cheesecake is a rich, elegant dessert featuring a buttery biscuit crust, smooth vanilla cheesecake filling, delicate wafer layers, and fluffy whipped cream.
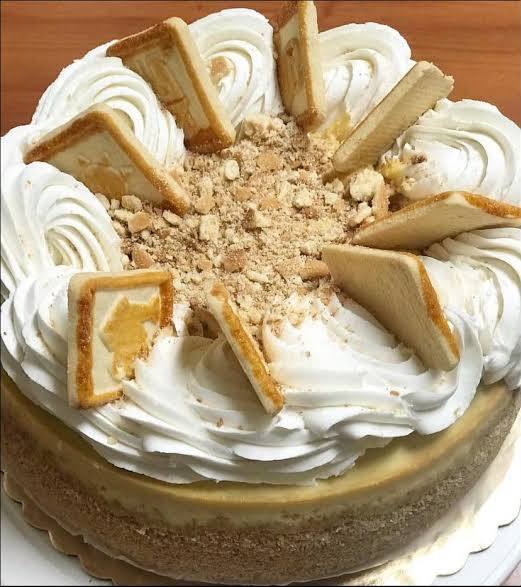
Finished with crushed vanilla wafers and decorative biscuits, this beautiful cheesecake combines creamy and crunchy textures in every bite.
Inspired by the dessert in your photo, this homemade version recreates its visible layers and decorations. The exact original ingredients cannot be determined from the image alone.
2. Origin and Cultural Significance
Cheesecake has a long culinary history, with variations enjoyed throughout Europe and North America.
Modern no-bake cheesecakes have become especially popular because they offer the richness of traditional cheesecake without requiring an oven.
Biscuit-based cheesecakes combine a buttery crumb crust with a soft cream cheese filling. Decorative wafers, cookie crumbs, and whipped cream transform a simple dessert into an impressive centerpiece.
This vanilla wafer variation is particularly suitable for birthdays, celebrations, family gatherings, and special occasions.
3. Ingredients
Yield: 10–12 slices | Pan: 9-inch (23 cm) springform pan
For the Biscuit Crust
- 240 g vanilla wafer biscuits or graham crackers, finely crushed
- 100 g unsalted butter, melted
For the Cheesecake Filling
- 600 g full-fat cream cheese, softened
- 110 g powdered sugar, sifted
- 300 ml cold heavy whipping cream
- 2 teaspoons vanilla extract
- 100 g vanilla wafer biscuits, roughly crushed
For the Whipped Cream Topping
- 150 ml cold heavy whipping cream
- 1 tablespoon powdered sugar
- ½ teaspoon vanilla extract
For Decoration
- 6–8 rectangular vanilla wafer biscuits
- 60 g crushed vanilla wafers
- Extra whipped cream for decorative swirls
4. Optional Additions
You can customize this cheesecake with several delicious variations:
- White chocolate: Add 100 g melted and cooled white chocolate to the cheesecake filling for extra richness.
- Caramel sauce: Drizzle a little caramel over the top before serving.
- Creamy biscuit spread: Add a thin layer between the cheesecake filling and crust.
- Crushed sandwich cookies: Replace the vanilla wafers with your favorite cream-filled biscuits.
- Lemon zest: Add a teaspoon for a subtle citrus flavor.
- Toasted almonds: Sprinkle lightly over the top for extra crunch.
For a dessert closer to the photograph, keep the decoration simple with vanilla wafers, whipped cream swirls, and plenty of biscuit crumbs.
5. Tips for Success
- Use full-fat cream cheese: It creates a richer, firmer filling.
- Soften the cream cheese: Room-temperature cream cheese blends more smoothly and helps prevent lumps.
- Keep the whipping cream cold: Cold cream is easier to whip into stable peaks.
- Whip the cream properly: Firm peaks help the cheesecake maintain its shape without baking.
- Avoid overmixing: Fold the whipped cream gently into the cheese mixture to preserve its light texture.
- Chill overnight: Refrigerating the cheesecake for at least 8–12 hours helps it set firmly enough for clean slices.
- Add decorative biscuits shortly before serving: This helps preserve their crisp texture.
These techniques are consistent with established no-bake cheesecake methods, particularly the importance of whipped cream and sufficient chilling time. Sally’s Baking+1
6. Step-by-Step Instructions
Step 1: Prepare the Biscuit Crust
Crush the vanilla wafer biscuits into fine crumbs using a food processor or rolling pin.
Transfer the crumbs to a mixing bowl and add the melted butter.
Stir until the mixture resembles wet sand.
Line the bottom of a 9-inch springform pan with parchment paper.
Press the biscuit mixture firmly into the bottom of the pan, creating an even layer.
Refrigerate for approximately 20–30 minutes while preparing the filling.
Step 2: Prepare the Cream Cheese Mixture
Place the softened cream cheese in a large mixing bowl.
Add the powdered sugar and vanilla extract.
Beat with an electric mixer until smooth, creamy, and free from lumps.
Set aside.
Step 3: Whip the Heavy Cream
Pour the cold heavy whipping cream into a separate mixing bowl.
Using an electric mixer, beat until stiff peaks form.
The cream should hold its shape when the beaters are lifted.
Avoid whipping beyond this point, as the cream can become grainy.
Step 4: Combine the Cheesecake Filling
Gently fold the whipped cream into the cream cheese mixture.
Work in two or three additions, using a spatula and slow folding motions.
Continue until the mixture is smooth, airy, and evenly combined.
Step 5: Create the First Cheesecake Layer
Remove the chilled biscuit crust from the refrigerator.
Spoon approximately half of the cheesecake filling over the crust.
Spread evenly with an offset spatula.
Tap the pan gently against the countertop to release large air pockets.
Step 6: Add the Wafer Layer
Scatter the roughly crushed vanilla wafers evenly over the cheesecake filling.
Press them very lightly into the cream.
This creates the delicate biscuit layer visible when the finished cheesecake is sliced.
Step 7: Add the Remaining Filling
Spoon the remaining cheesecake filling over the wafer layer.
Smooth the surface carefully to create an even, flat top.
Cover the pan and refrigerate for at least 8–12 hours, preferably overnight, until completely firm.
Step 8: Prepare the Whipped Cream Topping
Pour 150 ml cold heavy cream into a mixing bowl.
Add the powdered sugar and vanilla extract.
Whip until firm peaks form.
Transfer some of the whipped cream into a piping bag fitted with a large star nozzle.
Reserve the remaining cream for spreading over the cheesecake.
Step 9: Decorate the Cheesecake
Carefully release the chilled cheesecake from its springform pan.
Spread a thin layer of whipped cream over the top.
Sprinkle crushed vanilla wafers across the center, creating a generous crumb topping.
Pipe decorative whipped cream swirls around the outside edge.
Gently insert rectangular vanilla wafer biscuits into selected swirls, standing them at a slight angle.
The finished cheesecake should have a creamy white surface, golden biscuit crumbs, and upright wafer decorations.
Step 10: Slice and Serve
Refrigerate the decorated cheesecake briefly if the topping has softened.
Use a sharp knife dipped in warm water and wiped dry to cut clean slices.
Serve chilled for the best texture and flavor.
7. Description
This Vanilla Wafer Cheesecake features several delicious layers.
The bottom consists of a golden biscuit crust that provides a firm, buttery foundation.
Above the crust sits a thick, creamy vanilla cheesecake filling with a delicate layer of crushed wafers in the center.
The top is covered with fluffy whipped cream, golden biscuit crumbs, and decorative vanilla wafers.
The result is a beautifully layered dessert with a soft, rich interior and contrasting biscuit textures.
Each slice delivers the sweetness of vanilla, the tanginess of cream cheese, and the satisfying crunch of buttery wafers.
8. Nutritional Information
The following values are approximate estimates per slice when the cheesecake is divided into 12 portions.
| Nutrient | Estimated Amount |
|---|---|
| Calories | 500–650 kcal |
| Protein | 6–9 g |
| Carbohydrates | 35–45 g |
| Total Fat | 38–48 g |
| Saturated Fat | 22–29 g |
| Sugar | 23–32 g |
Actual nutritional values depend on the specific biscuits, cream cheese, whipping cream, and portion sizes.
9. Recipe Details
| Details | Information |
|---|---|
| Preparation Time | 30 minutes |
| Crust Chilling Time | 20–30 minutes |
| Cheesecake Chilling Time | 8–12 hours |
| Total Time | Approximately 9–13 hours |
| Servings | 10–12 slices |
| Difficulty | Easy to Intermediate |
| Cooking Method | No-Bake |
| Dessert Type | Layered Vanilla Cheesecake |
10. Conclusion
This Creamy Vanilla Wafer Cheesecake is an impressive dessert that combines a rich cream cheese filling, buttery biscuit crust, and beautifully decorated whipped cream topping.
Although it looks like a bakery-style creation, the recipe uses straightforward techniques and everyday ingredients.
The secret to its beautiful presentation is allowing enough time for the cheesecake to chill and carefully arranging the wafer decorations.
Perfect for celebrations, family gatherings, or weekend desserts, this cheesecake is sure to become a favorite among vanilla and biscuit lovers.
11. Recommendation
For the best results, prepare this cheesecake one day before serving.
Allowing it to chill overnight improves its firmness and makes slicing easier.
Serving Suggestions
- Serve chilled with a hot cup of coffee.
- Pair with fresh strawberries or raspberries.
- Drizzle individual slices with caramel sauce.
- Add extra crushed vanilla wafers immediately before serving.
Storage Instructions
- Refrigerator: Store covered in the refrigerator for up to 3–4 days.
- Freezer: Freeze undecorated portions for up to 2 months, tightly wrapped.
- Serving: Thaw frozen cheesecake in the refrigerator overnight.
For the best presentation, add the whipped cream swirls and upright biscuits shortly before serving.
12. Embracing Healthful Indulgence
Vanilla Wafer Cheesecake is a rich dessert intended to be enjoyed as an occasional treat.
Its cream cheese and whipping cream provide a luxurious texture, while the biscuit layers contribute sweetness and crunch.
For a lighter variation, you can reduce the powdered sugar slightly, use fewer decorative biscuits, or serve smaller portions alongside fresh fruit.
However, maintaining enough full-fat cream cheese and properly whipped cream is important for the cheesecake’s structure.
Enjoyed in moderation, this dessert offers a satisfying way to celebrate special moments without giving up the pleasure of a beautifully prepared homemade sweet.
With its creamy layers, golden biscuit topping, and elegant wafer decorations, this no-bake Vanilla Wafer Cheesecake makes a stunning centerpiece for any dessert table.