
1. Introduction
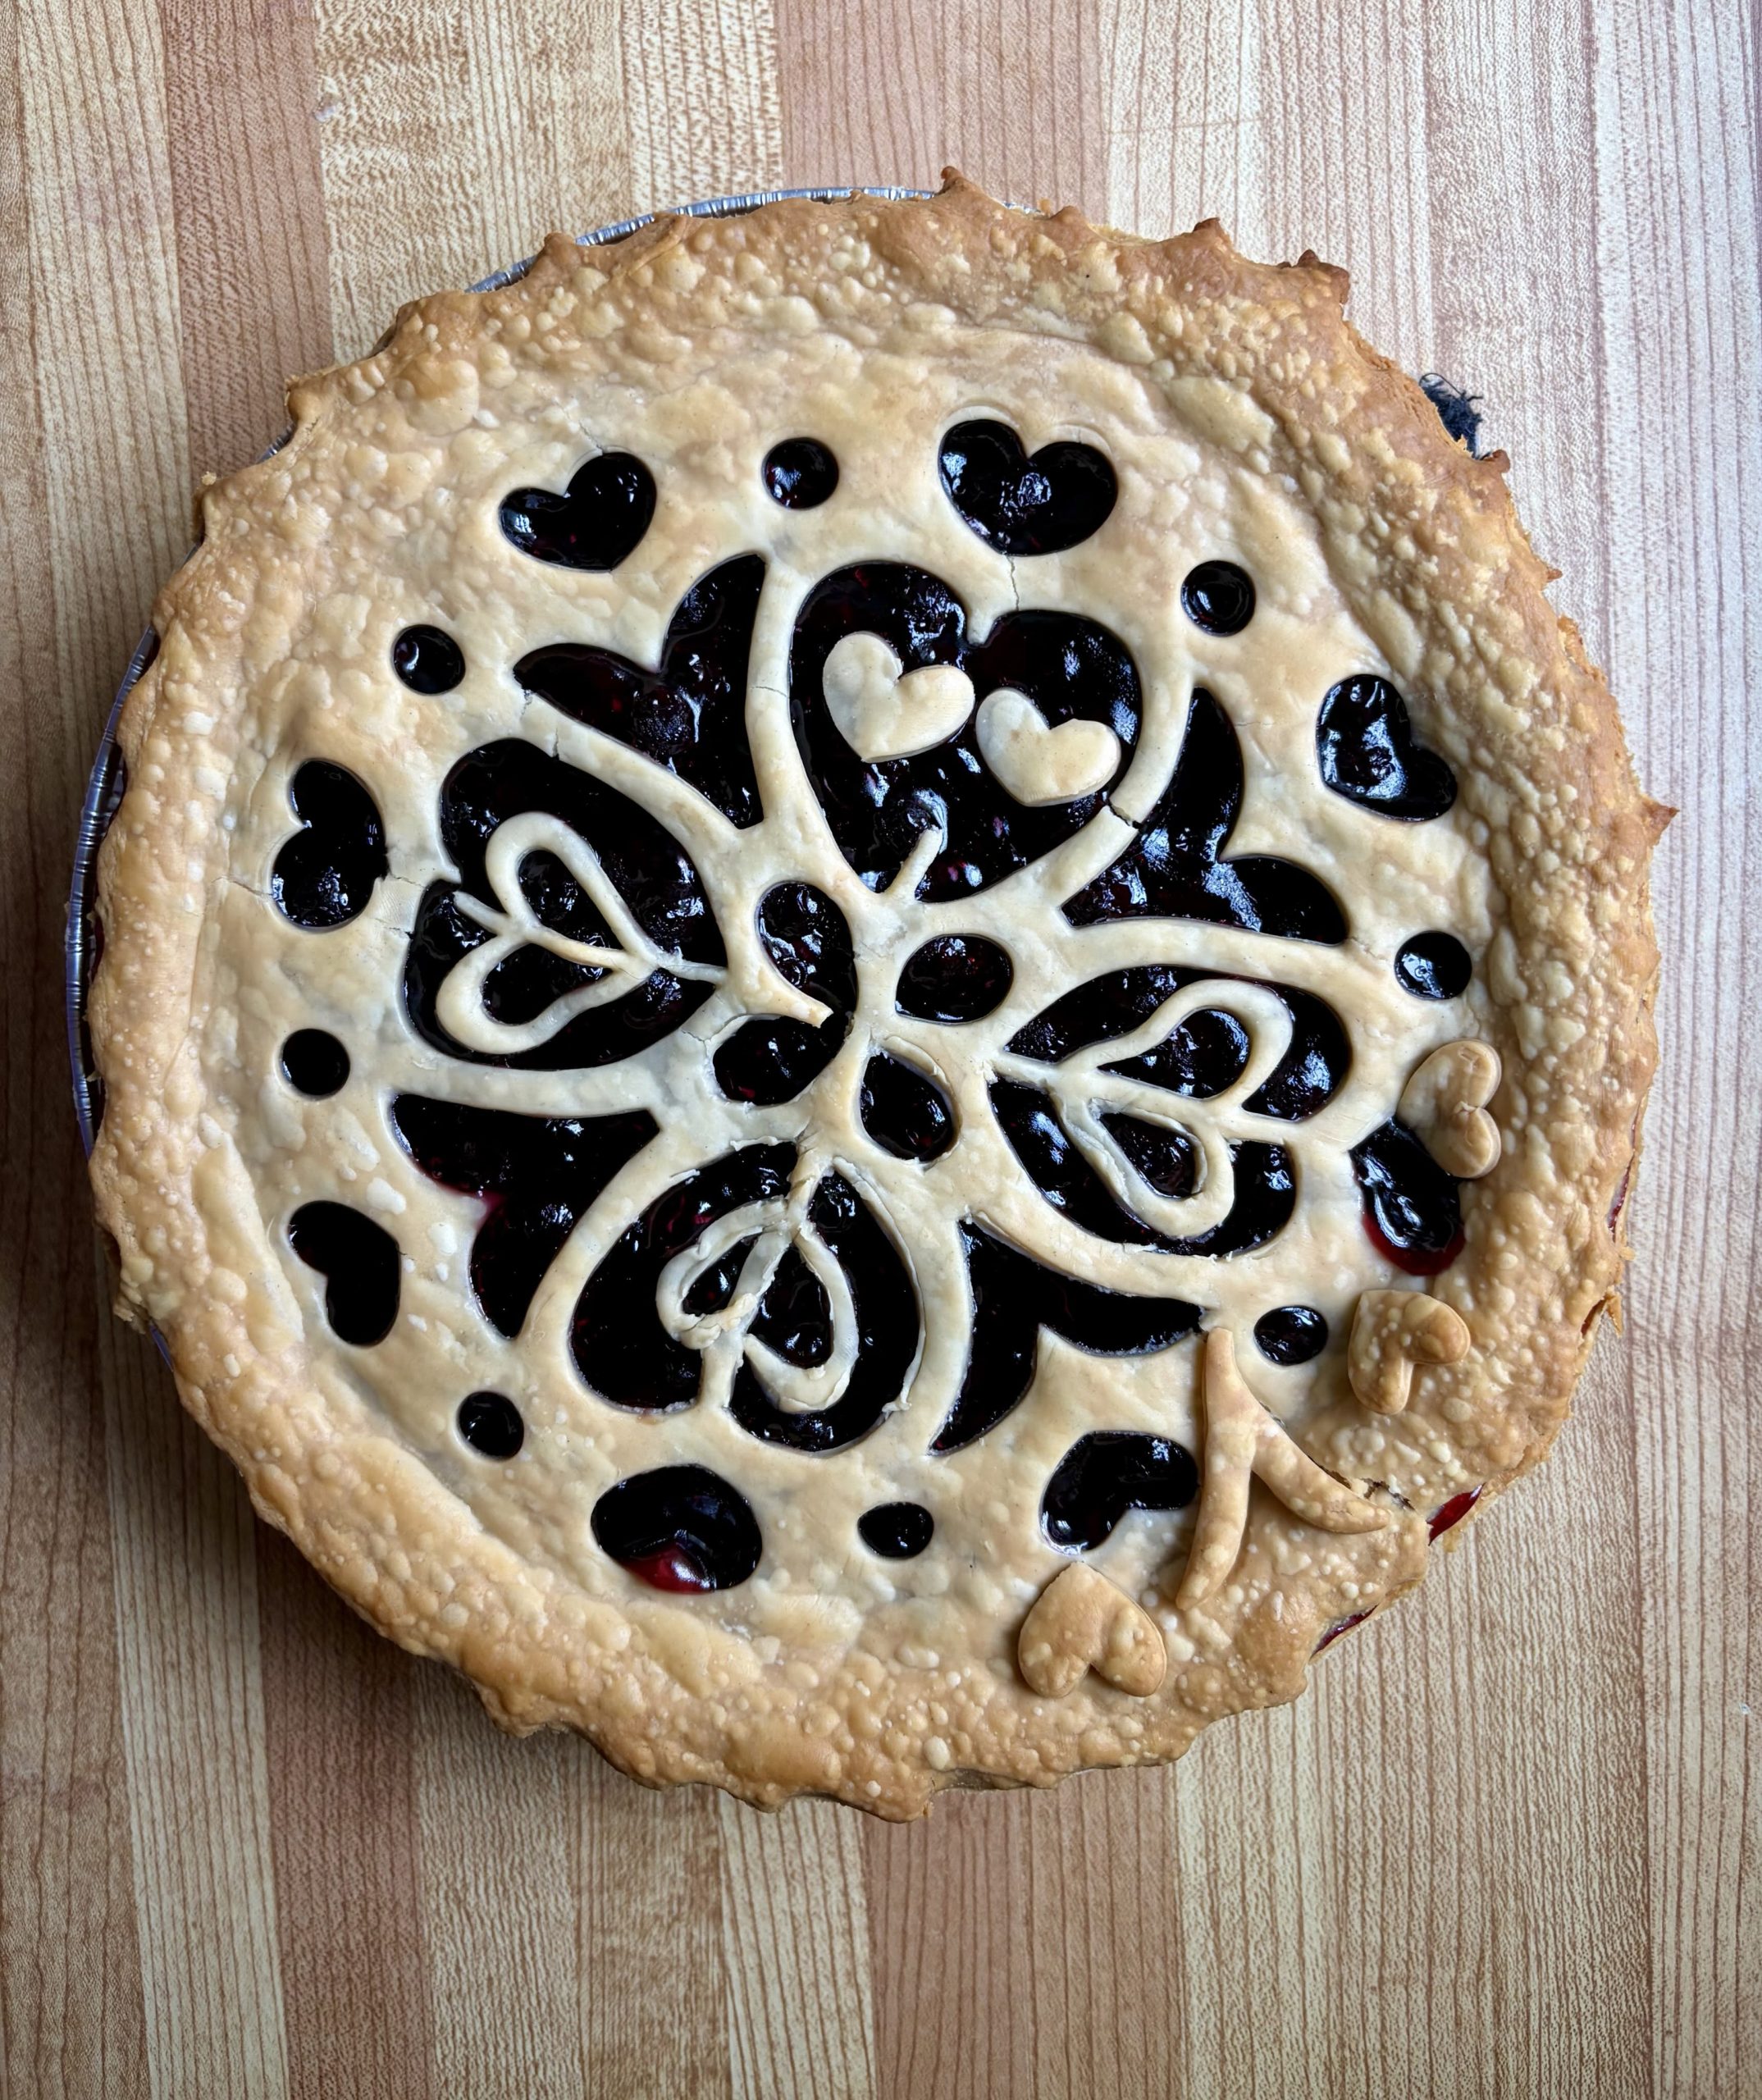
Wild Berry Pie with Decorative Heart-Shaped Crust is a beautiful homemade dessert that combines a buttery, flaky pastry with a sweet, juicy berry filling and an intricately decorated top crust.
This showstopping pie features a symmetrical arrangement of delicate heart-shaped cutouts and pastry decorations, creating an elegant presentation perfect for special occasions, family celebrations, or cozy weekend baking.
The filling combines fresh or frozen berries with granulated sugar, brown sugar, lemon juice, and a touch of cinnamon. As the pie bakes, the berries soften and release their juices, creating a rich, fruity filling beneath the golden pastry.
The homemade all-butter crust provides a delicious contrast to the tender berries, offering crisp edges, delicate layers, and a rich buttery flavor.
Although the decorative design looks impressive, it can be created at home with simple heart-shaped cookie cutters and a little patience.
Whether served warm with vanilla ice cream or enjoyed at room temperature, this homemade wild berry pie is a wonderful dessert for anyone who loves classic fruit pies and creative pastry designs.
2. Origin and Cultural Significance
Fruit pies have a long history in European and North American baking traditions.
Early pies were often prepared with seasonal fruits, using pastry as a practical way to contain and bake sweet or savory fillings.
Over time, fruit pies became popular homemade desserts, particularly in North America, where blueberry, blackberry, raspberry, and mixed berry pies remain favorites.
Wild berry pies celebrate the natural sweetness and tartness of berries, which are often harvested during the warmer months.
Decorative pie crusts are also part of a longstanding pastry tradition. Bakers have used lattice patterns, braided edges, leaf shapes, and other pastry cutouts to personalize their desserts.
Heart-shaped pastry decorations are a modern, playful variation that makes a traditional berry pie especially suitable for romantic celebrations, birthdays, anniversaries, and family gatherings.
This recipe combines classic all-butter pastry techniques with an elegant decorative crust.
3. Ingredients
For the All-Butter Pie Crust
- 2½ cups all-purpose flour
- 1 teaspoon salt
- 1 tablespoon granulated sugar
- 1 cup (226 g) unsalted butter, cold and cut into small cubes
- ¼–½ cup ice-cold water
For the Sweet Wild Berry Filling
- 6 cups fresh or frozen berries, such as blueberries, blackberries, raspberries, or saskatoon berries
- ½ cup granulated sugar
- ¼ cup light brown sugar
- ¼ cup cornstarch
- 1 tablespoon fresh lemon juice
- 1 teaspoon finely grated lemon zest
- ½ teaspoon ground cinnamon
For the Egg Wash and Finishing
- 1 large egg yolk
- 1 tablespoon milk or heavy cream
- 1 tablespoon coarse sanding sugar, optional
Optional Serving Ingredients
- Vanilla ice cream
- Fresh whipped cream
- Extra fresh berries
- A light dusting of powdered sugar
4. Optional Additions
Customize your homemade wild berry pie with:
- Fresh raspberries: Add a slightly tart flavor and vibrant color.
- Strawberries: Include sliced strawberries for a sweeter berry combination.
- Vanilla extract: Add ½ teaspoon to the filling for extra aroma.
- Almond extract: Add a few drops for a delicate nutty flavor.
- Orange zest: Replace some of the lemon zest for a citrus variation.
- Ground nutmeg: Add a small pinch for additional warmth.
- Extra pastry decorations: Use small flower, leaf, or star-shaped cutters alongside the hearts.
- Vanilla ice cream: Serve with a scoop for a classic fruit pie dessert.
5. Tips for Success
- Keep the butter and water cold when preparing the pastry.
- Avoid overworking the dough, as excessive handling can make the crust tough.
- Chill the dough for at least 1 hour before rolling.
- Roll the pastry evenly to help it bake consistently.
- Use enough cornstarch to help the juicy berry filling set.
- If using frozen berries, add them while still frozen to avoid excess liquid from thawing.
- Arrange the heart-shaped cutouts symmetrically before transferring the top crust.
- Keep the decorative dough chilled so the heart shapes remain defined.
- Use a small amount of water or egg wash to attach pastry decorations.
- Place the pie on a baking sheet to catch any bubbling juices.
- Allow the pie to cool completely before slicing so the filling can thicken.
6. Step-by-Step Instructions
Step 1: Combine the Dry Pastry Ingredients
In a large mixing bowl, combine:
- 2½ cups all-purpose flour
- 1 teaspoon salt
- 1 tablespoon granulated sugar
Whisk thoroughly until evenly mixed.
This creates the base for the homemade all-butter pastry.
Step 2: Cut in the Cold Butter
Add the cold, cubed unsalted butter to the flour mixture.
Using a pastry cutter, two forks, or your fingertips, work the butter into the flour until the mixture resembles coarse crumbs with some pea-sized butter pieces remaining.
These small pieces of butter help create a flaky texture as the pastry bakes.
Avoid allowing the butter to become too warm.
Step 3: Add the Ice Water
Gradually add the ice-cold water, beginning with ¼ cup.
Mix gently with a fork until the dough starts coming together.
Add additional water, one tablespoon at a time, only as needed.
The dough should hold together when pressed without becoming sticky or overly wet.
Step 4: Divide and Chill the Dough
Transfer the dough onto a lightly floured work surface.
Gently bring it together into a ball.
Divide into two portions, reserving slightly more dough for the decorative top if desired.
Flatten each portion into a disk.
Wrap tightly and refrigerate for at least 1 hour.
Step 5: Prepare the Berry Filling
In a large mixing bowl, combine the fresh or frozen berries with:
- ½ cup granulated sugar
- ¼ cup light brown sugar
- ¼ cup cornstarch
- 1 tablespoon lemon juice
- 1 teaspoon lemon zest
- ½ teaspoon ground cinnamon
Toss gently until the berries are evenly coated.
The cornstarch will help thicken the berry juices during baking.
Set aside while preparing the crust.
Step 6: Preheat the Oven
Preheat the oven to 400°F (200°C).
Position an oven rack in the lower third of the oven.
Place a rimmed baking sheet in the oven while it preheats to help the bottom crust bake thoroughly and catch any filling that bubbles over.
Step 7: Roll Out the Bottom Crust
Remove one pastry disk from the refrigerator.
Place it on a lightly floured work surface.
Roll it into a circle approximately 12 inches in diameter.
Carefully transfer the pastry into a 9-inch deep-dish pie plate.
Gently press the dough into the bottom and sides without stretching it.
Leave a small overhang around the edges.
Step 8: Add the Berry Filling
Spoon the prepared berry mixture into the bottom crust.
Spread it evenly across the pie dish.
Distribute the berries gently so the filling reaches the edges.
Avoid pressing too firmly, as this can crush delicate berries.
Step 9: Roll Out the Decorative Top Crust
Remove the second pastry disk from the refrigerator.
Roll it into a circle large enough to cover the pie, approximately 12 inches in diameter.
Keep the thickness even.
If the pastry becomes soft, refrigerate it briefly before creating the decorative design.
Step 10: Create the Heart-Shaped Cutouts
Using small heart-shaped cookie cutters, carefully cut hearts into the rolled pastry.
Arrange the cutouts in a balanced, symmetrical pattern.
For an elegant design, begin with a central heart and arrange additional hearts around it in evenly spaced rows or circular formations.
Leave enough pastry between the cutouts to maintain the structure of the top crust.
Reserve the removed pastry hearts for decoration.
Step 11: Add Decorative Pastry Hearts
Use the reserved pastry cutouts to create raised heart decorations.
Arrange them over the uncut sections of the top crust.
Lightly brush the underside of each decoration with water or egg wash to help it adhere.
Press gently into place.
For additional detail, use smaller heart cutters to create layered decorations.
Step 12: Transfer the Top Crust
Carefully lift the decorated pastry and place it over the berry filling.
A rolling pin or parchment paper can help support the pastry during transfer.
Center the design over the pie.
Gently adjust the crust so the decorative hearts remain symmetrical.
Step 13: Seal and Crimp the Edges
Trim any excess pastry around the edge of the pie.
Press the top and bottom crusts together to seal.
Use your fingers or a fork to create a decorative crimped border.
Make sure the edges are firmly sealed to reduce filling leakage during baking.
Step 14: Prepare the Egg Wash
In a small bowl, whisk together:
- 1 large egg yolk
- 1 tablespoon milk or cream
Mix until smooth.
Using a pastry brush, gently coat the exposed pastry with a thin, even layer of egg wash.
Avoid allowing excessive egg wash to collect inside the heart-shaped openings.
Step 15: Add the Finishing Sugar
Sprinkle approximately 1 tablespoon of coarse sanding sugar over the top crust.
The sugar adds a delicate crunch and a lightly sparkling finish.
For the cleanest decorative appearance, distribute it evenly without covering the heart shapes too heavily.
Step 16: Bake at High Heat
Carefully place the pie on the preheated baking sheet.
Bake at 400°F (200°C) for 20 minutes.
This initial high temperature helps the pastry begin developing a crisp, golden exterior.
Step 17: Reduce the Oven Temperature
After 20 minutes, reduce the oven temperature to 350°F (175°C).
Continue baking for approximately 35–45 minutes.
The pie is ready when the crust is deeply golden and the berry filling is bubbling visibly through the decorative openings, including near the center.
If the edges brown too quickly, cover them loosely with aluminum foil or a pie shield.
Step 18: Cool the Pie Completely
Remove the pie from the oven and place it on a wire cooling rack.
Allow it to cool for at least 3–4 hours before slicing.
This cooling period is important because the berry filling needs time to thicken and set.
Cutting the pie too early may cause the filling to run.
Step 19: Slice and Serve
Once cooled, use a sharp knife to cut the pie into even slices.
Transfer each slice carefully to a dessert plate.
Serve plain or with vanilla ice cream, whipped cream, or additional fresh berries.
7. Description
Wild Berry Pie with Decorative Heart-Shaped Crust features a beautifully golden, flaky pastry filled with a rich mixture of sweet and slightly tart berries.
The crust is buttery and tender, with crisp edges and delicate layers that contrast with the soft fruit filling.
As the pie bakes, the berries release their natural juices, combining with sugar, lemon, cinnamon, and cornstarch to create a thick, glossy filling.
The lemon juice enhances the berry flavors, while the cinnamon adds a subtle warmth.
The decorative top crust features intricate heart-shaped openings and layered pastry accents that give the pie a handcrafted, elegant appearance.
The golden pastry contrasts beautifully with the deep purple, blue, and red tones of the berry filling visible through the heart cutouts.
Every slice offers a delicious combination of buttery pastry, juicy berries, gentle sweetness, and refreshing tartness.
8. Nutritional Information
Approximate values per slice, assuming the pie is divided into eight servings:
| Nutrient | Estimated Amount |
|---|---|
| Calories | 450–520 kcal |
| Protein | 4–6 g |
| Carbohydrates | 60–70 g |
| Total Fat | 23–26 g |
| Saturated Fat | 14–16 g |
| Fiber | 4–6 g |
| Sugar | 27–33 g |
| Sodium | 250–330 mg |
Values vary depending on the berries used, the thickness of the pastry, and the amount of sugar and butter.
9. Recipe Details
| Category | Details |
|---|---|
| Recipe Name | Wild Berry Pie with Decorative Heart-Shaped Crust |
| Cuisine | American-Inspired |
| Preparation Time | 45 Minutes |
| Dough Chilling Time | 1 Hour |
| Baking Time | 55–65 Minutes |
| Cooling Time | 3–4 Hours |
| Total Time | Approximately 6–7 Hours |
| Yield | One 9-Inch Deep-Dish Pie |
| Servings | 8 |
| Difficulty | Intermediate |
| Main Ingredients | Mixed Berries, Flour, Butter, Sugar |
| Cooking Method | Baking |
| Course | Dessert |
| Flavor Profile | Buttery, Fruity, Sweet, Slightly Tart |
| Best For | Celebrations, Gatherings, Special Occasions |
10. Conclusion
Wild Berry Pie with Decorative Heart-Shaped Crust is a delicious and visually impressive dessert that combines classic homemade pastry with a vibrant, juicy berry filling.
The buttery all-butter crust, sweet-tart berries, and intricate heart-shaped decorations create a beautiful pie suitable for both everyday baking and special celebrations.
Although the decorative crust requires a little extra patience, the process is manageable with simple pastry tools and careful preparation.
The key to success is keeping the pastry cold, allowing the berry filling to bubble thoroughly during baking, and cooling the pie completely before slicing.
Whether served with vanilla ice cream, fresh whipped cream, or enjoyed on its own, this homemade wild berry pie is a delightful way to celebrate the flavors of fresh fruit and traditional baking.
11. Serving and Storage Recommendations
Serve with:
- Vanilla bean ice cream
- Fresh whipped cream
- Extra blueberries or raspberries
- A light dusting of powdered sugar
- Warm vanilla sauce
- Fresh mint leaves
- Hot coffee or tea
Serving: For the neatest slices, allow the pie to cool completely before cutting.
Room Temperature Storage: Once cooled, cover the pie and keep it at room temperature for up to 1 day in a cool environment.
Refrigeration: Store leftover pie covered in the refrigerator for approximately 3–4 days.
Freezing: Wrap the cooled pie or individual slices tightly and freeze for up to 2–3 months for best quality.
Reheating: Warm individual slices in an oven at approximately 300°F (150°C) until heated through. Avoid overheating, which can dry out the crust.
Make-Ahead: Prepare the pastry dough up to 2 days in advance and refrigerate it until ready to roll.
Decorative Crust Tip: If preparing the heart-shaped top crust ahead of time, keep it chilled on parchment paper until ready to assemble the pie.
12. Embracing Healthful Indulgence
Wild Berry Pie with Decorative Heart-Shaped Crust is a comforting homemade dessert that celebrates the natural flavors of berries.
Blueberries, blackberries, raspberries, and other berries provide dietary fiber, vitamins, and naturally occurring plant compounds.
The berry filling offers a combination of sweetness and tartness, while the homemade butter pastry contributes richness and a satisfying flaky texture.
Although the pie contains added sugar and butter, it can still be enjoyed as an occasional treat within a varied, balanced diet.
For a lighter variation, reduce the added sugar slightly when using naturally sweet berries, or serve smaller portions alongside fresh fruit.
You can also experiment with replacing a small portion of the all-purpose flour with whole-wheat pastry flour, although this may change the crust’s texture.
With its beautiful heart-shaped design, golden pastry, and juicy berry filling, this homemade wild berry pie is a wonderful dessert to share with family and friends.