
1. Introduction
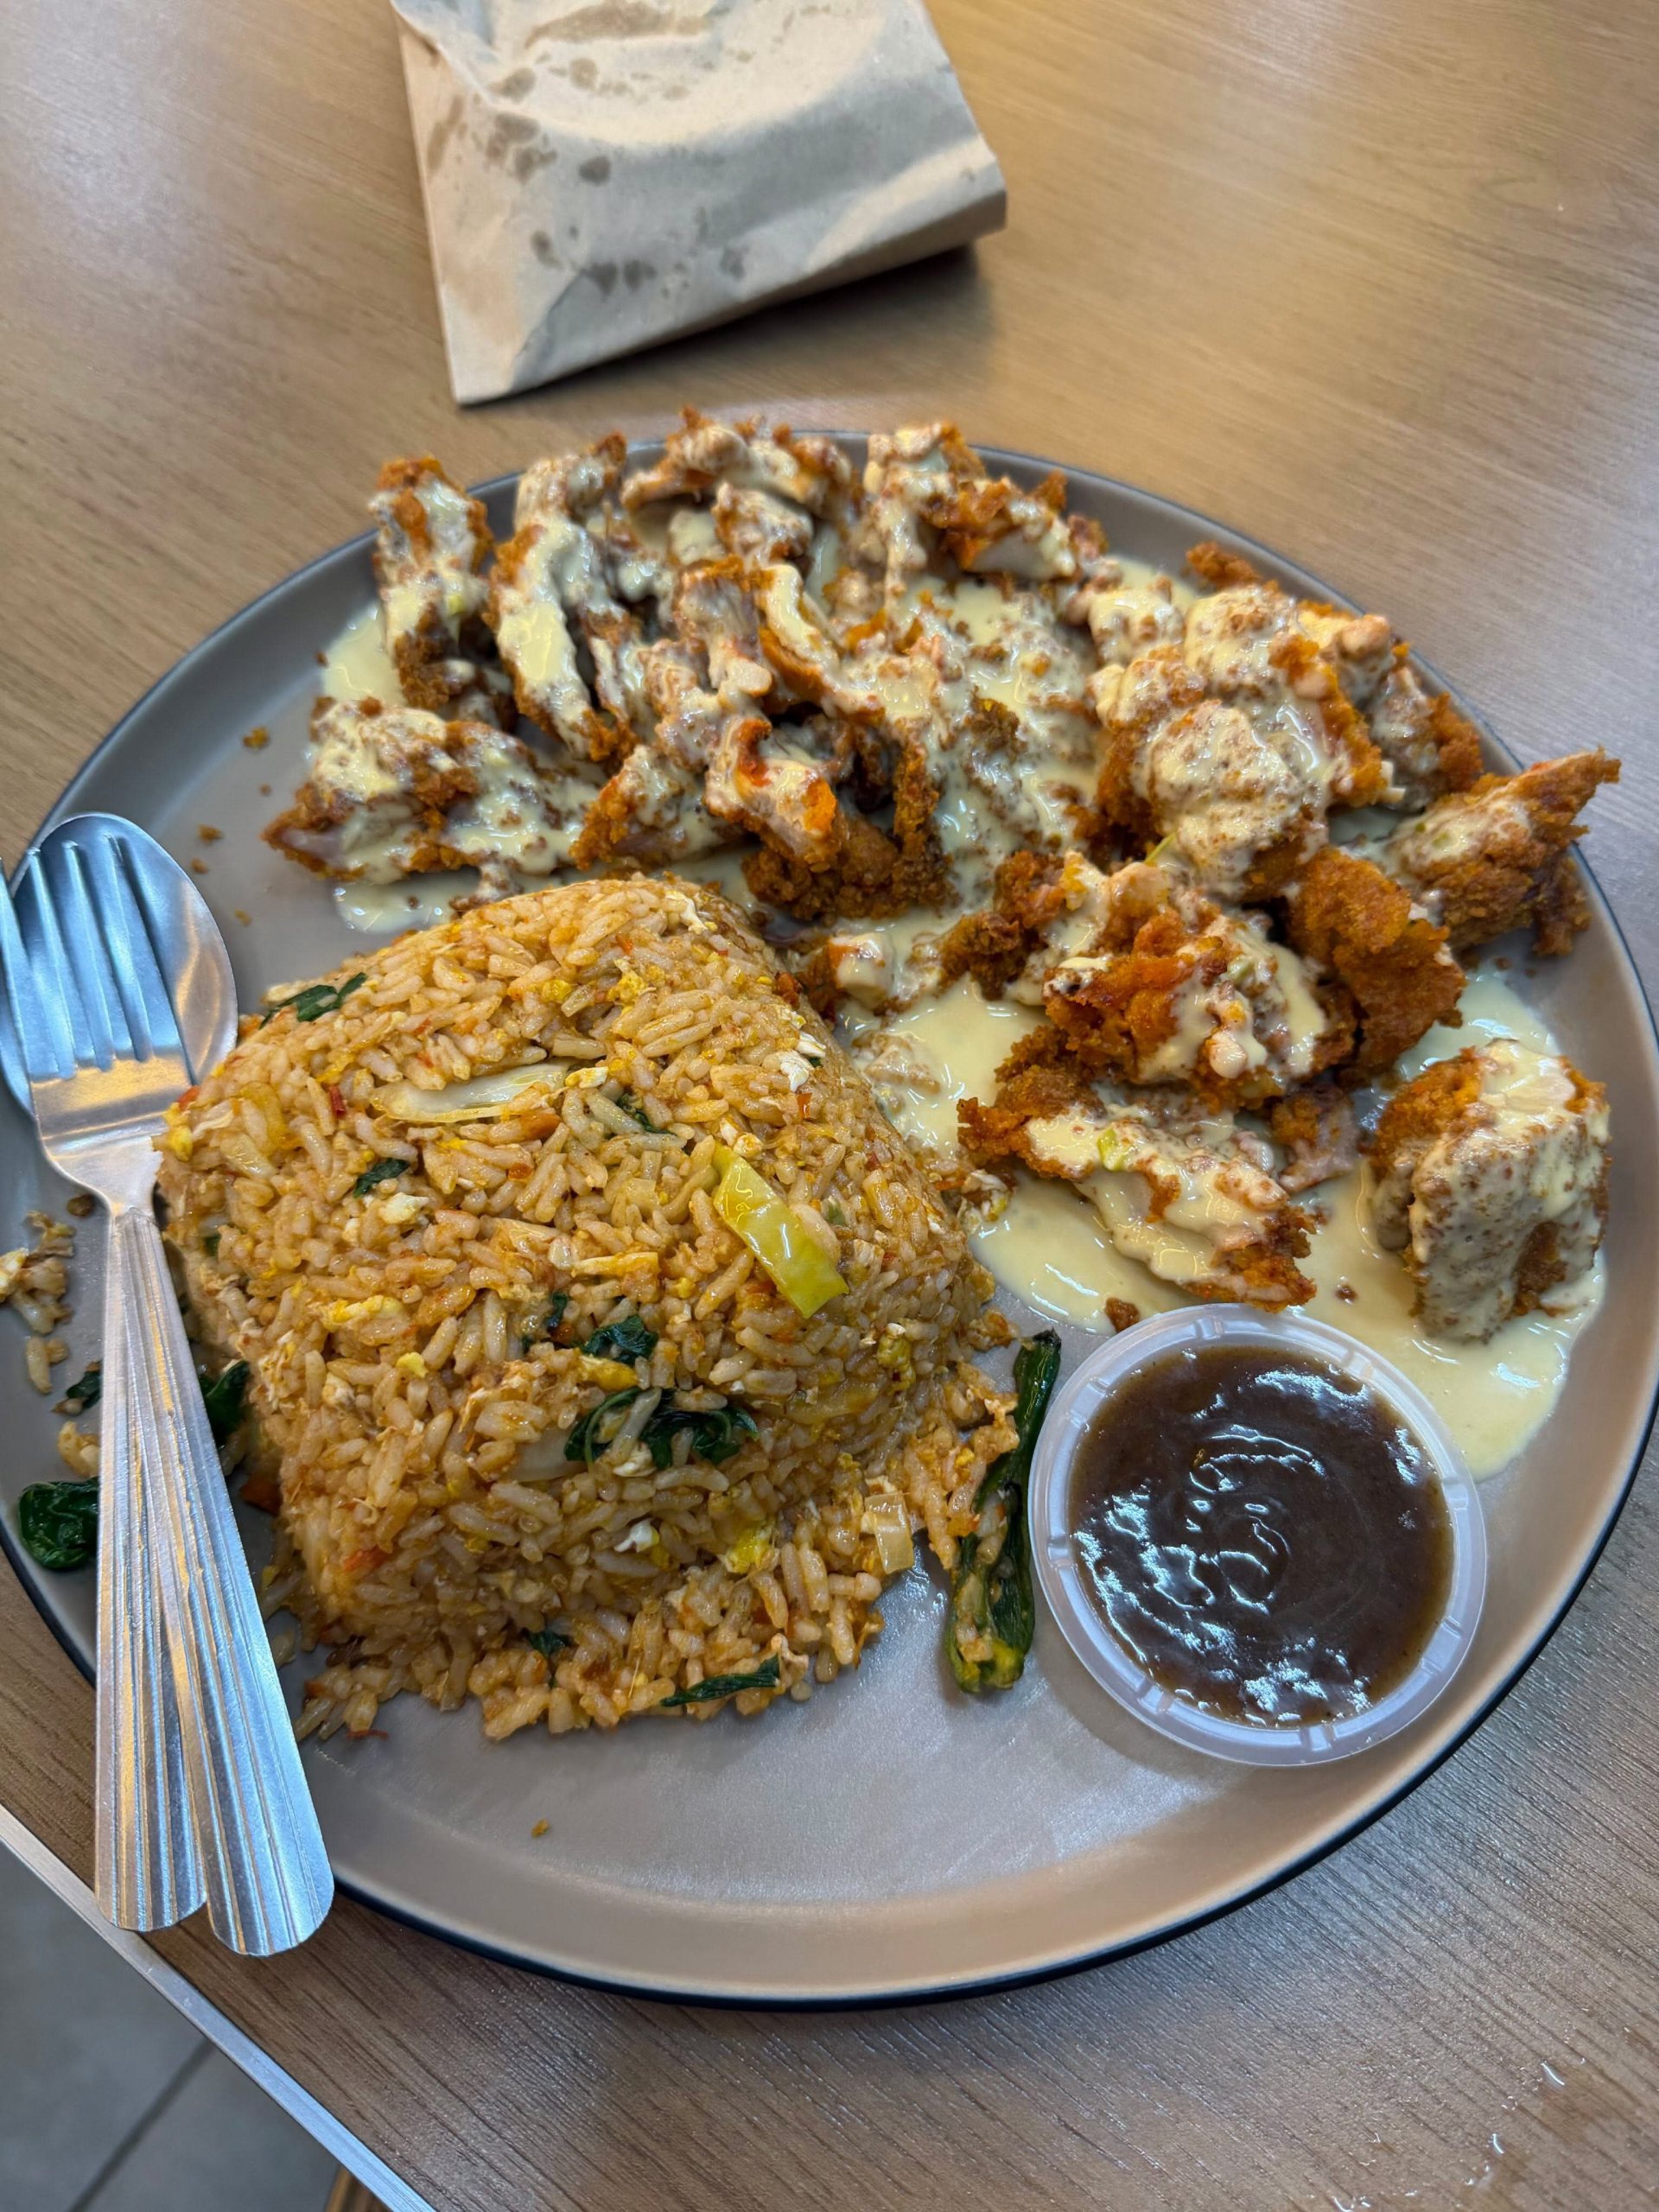
Nasi Goreng Buttermilk Chicken is a delicious Malaysian-inspired comfort food combination featuring fragrant fried rice, golden crispy chicken, and a rich, creamy butter sauce infused with garlic, curry leaves, and spicy bird’s eye chilies.
This satisfying dish brings together two popular elements of Malaysian cooking: nasi goreng, meaning fried rice, and ayam buttermilk, a creamy chicken preparation commonly served in Malaysian restaurants and home kitchens.
The combination is particularly appealing because of its contrasting textures and flavors.
The fried rice is savory, aromatic, and lightly smoky from being tossed over high heat. The chicken is coated in a mixture of flour and cornstarch, then deep-fried until golden and crunchy.
The creamy buttermilk-style sauce brings everything together.
Made with butter, evaporated milk, garlic, curry leaves, and bird’s eye chilies, the sauce has a distinctive balance of richness, sweetness, and gentle heat.
A small amount of condensed milk adds sweetness, while optional chicken bouillon powder enhances the savory flavor.
Despite its name, Malaysian-style buttermilk chicken commonly uses evaporated milk rather than cultured buttermilk.
The term refers to the rich, buttery, milk-based sauce that coats the chicken.
When served alongside freshly prepared nasi goreng, the result is a complete meal that feels both comforting and indulgent.
This recipe is ideal for family lunches, weekend dinners, special homemade meals, or anyone who enjoys flavorful Asian-inspired comfort food.
2. Origin and Cultural Significance
Nasi goreng is one of the most recognizable rice dishes in Southeast Asia.
The name translates directly to “fried rice” in Malay and Indonesian.
Fried rice has long been an important part of everyday cooking throughout the region, partly because it provides a practical way to transform previously cooked rice into a flavorful meal.
In Malaysia, nasi goreng appears in many different forms.
Popular variations include nasi goreng kampung, nasi goreng pattaya, nasi goreng seafood, and nasi goreng ayam.
The ingredients and seasonings vary depending on regional traditions, household preferences, and restaurant styles.
Garlic, eggs, soy sauce, vegetables, and chili paste are common components.
Buttermilk chicken is another popular dish in contemporary Malaysian cuisine.
It is especially familiar in Malaysian Chinese-style restaurants, casual eateries, and modern home cooking.
The dish typically features crispy fried chicken coated in a creamy sauce made with butter, evaporated milk, garlic, curry leaves, and chilies.
Curry leaves are particularly important because they contribute a distinctive herbal and citrus-like fragrance.
Bird’s eye chilies, commonly called cili padi in Malaysia, provide concentrated heat.
Evaporated milk creates a smooth sauce without the need for heavy cream.
Combining nasi goreng with buttermilk chicken produces a satisfying restaurant-style meal that balances savory fried rice with creamy, aromatic chicken.
It is a contemporary comfort-food pairing rather than a single centuries-old traditional recipe.
3. Ingredients
This recipe consists of three preparations: crispy chicken, creamy buttermilk sauce, and Malaysian-style fried rice.
A. For the Crispy Chicken
| Ingredient | Amount |
|---|---|
| Boneless chicken thighs or breast | 300 g |
| Large egg, beaten | 1 |
| All-purpose flour | ½ cup |
| Cornstarch | ½ cup |
| Garlic powder | 1 teaspoon |
| Salt | To taste |
| White pepper | To taste |
| Neutral cooking oil | Enough for deep frying |
Cut the chicken into bite-sized strips or pieces.
B. For the Creamy Buttermilk Sauce
| Ingredient | Amount |
|---|---|
| Butter, preferably salted | 3 tablespoons |
| Garlic cloves, finely minced | 3 |
| Fresh curry leaves | 2–3 sprigs |
| Bird’s eye chilies (cili padi), sliced | 2–4 |
| Evaporated milk | 1 can (390 g) |
| Sweetened condensed milk | 1 tablespoon |
| Chicken bouillon powder, optional | ½ teaspoon |
| Salt | To taste |
Granulated sugar may replace the condensed milk if preferred.
C. For the Nasi Goreng
| Ingredient | Amount |
|---|---|
| Day-old cooked white rice, chilled | 2 cups |
| Garlic cloves, minced | 2 |
| Large egg | 1 |
| Leafy greens, such as choy sum or spinach | 1 handful |
| Soy sauce | 1 tablespoon |
| Oyster sauce | 1 teaspoon |
| Chili paste or sambal, optional | ½ teaspoon |
| Cooking oil | 1 tablespoon |
| Salt | To taste |
| White pepper | To taste |
Equipment
- Wok or large frying pan
- Deep frying pan or heavy-bottomed pot
- Medium saucepan
- Mixing bowls
- Tongs
- Slotted spoon
- Cooking thermometer
- Paper towels or wire rack
- Spatula
- Serving plates
Estimated yield: 2 generous servings, or 3 smaller servings.
4. Optional Additions
Nasi Goreng Buttermilk Chicken can be customized with additional ingredients that complement its creamy, savory flavor.
Extra Curry Leaves: Add another small sprig for a stronger herbal aroma.
Additional Bird’s Eye Chilies: Increase the amount for a spicier sauce.
Fresh Ginger: Add a little grated ginger to the garlic for extra warmth.
Black Pepper: Sprinkle freshly ground black pepper over the chicken before serving.
Lime Juice: Add a few drops to the finished chicken to balance the richness.
Chopped Scallions: Garnish the fried rice with sliced scallions.
Carrots: Add finely diced carrots to the nasi goreng for extra color.
Green Peas: Stir a small handful into the fried rice.
Extra Egg: Add another egg for a more substantial fried rice.
Sambal: Serve additional sambal on the side.
Cucumber Slices: Add fresh cucumber to the serving plate for a cooling contrast.
Fried Shallots: Sprinkle over the fried rice for additional crunch.
Chicken Thighs: Choose thighs rather than breast if you prefer juicier chicken.
These additions are optional. The original recipe already contains the ingredients needed for a flavorful Malaysian-style meal.
5. Tips for Success
The secret to excellent Nasi Goreng Buttermilk Chicken is preparing each component correctly and combining them at the right moment.
For the crispy chicken, cut the pieces into similar sizes so they cook evenly.
Use a mixture of all-purpose flour and cornstarch.
The flour provides structure, while the cornstarch helps create a lighter, crispier coating.
Season the chicken before coating it.
Dip each piece into the beaten egg, then dredge thoroughly in the flour mixture.
Press the coating gently onto the chicken so it adheres.
Heat the frying oil to approximately 350°F (175°C).
Avoid overcrowding the pan because adding too many pieces at once lowers the oil temperature.
Fry until golden brown and fully cooked.
Chicken must reach an internal temperature of 165°F (74°C).
Drain the fried chicken on a wire rack if possible.
This helps preserve the crunchy exterior.
For the buttermilk sauce, use medium-low heat.
Butter and garlic can burn quickly at high temperatures.
Add the curry leaves carefully because moisture on the leaves may cause splattering.
Allow the garlic to become fragrant without turning dark brown.
Pour in the evaporated milk and bring the sauce to a gentle simmer.
Avoid a vigorous boil because it may affect the smooth texture.
Add the condensed milk gradually and taste before adding more sweetness.
For the nasi goreng, use cold, previously cooked rice.
Freshly cooked hot rice contains more surface moisture and may produce a softer, clumpier fried rice.
Break apart any large rice clumps before adding them to the wok.
Use high heat and stir-fry quickly to develop a lightly toasted flavor.
Add the leafy greens near the end so they remain tender without becoming overcooked.
For food safety, cooked rice should be cooled quickly, refrigerated promptly, and kept cold until stir-frying. Rice left at room temperature for extended periods can present a food safety risk.
6. Step-by-Step Instructions
Part A: Preparing the Crispy Chicken
Step 1: Prepare the Chicken
Place 300 g boneless chicken thighs or breast on a clean cutting board.
Step 2: Cut the Chicken
Slice the chicken into bite-sized strips.
Step 3: Check the Size
Keep the pieces relatively uniform so they cook evenly.
Step 4: Transfer to a Bowl
Place the chicken pieces into a medium mixing bowl.
Step 5: Add the Salt
Season with salt to taste.
Step 6: Add White Pepper
Sprinkle a small amount of white pepper over the chicken.
Step 7: Add Garlic Powder
Add 1 teaspoon garlic powder.
Step 8: Mix the Seasonings
Toss the chicken until evenly coated.
Step 9: Prepare the Egg
Crack 1 large egg into a separate bowl.
Step 10: Beat the Egg
Whisk until the yolk and white are combined.
Step 11: Measure the Flour
Place ½ cup all-purpose flour into a shallow bowl.
Step 12: Add the Cornstarch
Add ½ cup cornstarch.
Step 13: Combine the Coating
Mix the flour and cornstarch thoroughly.
Step 14: Dip the Chicken
Place a few chicken pieces into the beaten egg.
Step 15: Coat with Egg
Turn the pieces until covered.
Step 16: Transfer to the Flour Mixture
Move the egg-coated chicken into the flour and cornstarch mixture.
Step 17: Dredge Thoroughly
Coat each piece on all sides.
Step 18: Press the Coating
Press the flour mixture gently onto the chicken.
Step 19: Repeat
Continue until all the chicken pieces are coated.
Step 20: Prepare the Frying Pan
Place a heavy-bottomed pot or deep frying pan over medium heat.
Step 21: Add the Oil
Pour in enough neutral oil for deep frying, leaving plenty of room to prevent overflow.
Step 22: Heat the Oil
Heat to approximately 350°F (175°C).
Step 23: Check the Temperature
Use a cooking thermometer if available.
Step 24: Add the Chicken
Carefully lower a few coated chicken pieces into the hot oil.
Step 25: Fry in Batches
Avoid overcrowding the pan.
Step 26: Allow the Coating to Crisp
Fry until the coating begins turning golden.
Step 27: Turn the Pieces
Gently turn the chicken as needed for even cooking.
Step 28: Continue Frying
Cook until the chicken is golden brown and crunchy.
Step 29: Check for Doneness
Ensure the thickest pieces reach 165°F (74°C) internally.
Step 30: Remove the Chicken
Transfer the cooked chicken to a wire rack or paper towel-lined plate.
Step 31: Repeat the Process
Fry the remaining chicken in batches.
Step 32: Set Aside
Keep the chicken warm while preparing the sauce.
Part B: Preparing the Creamy Buttermilk Sauce
Step 33: Prepare the Garlic
Peel and finely mince 3 garlic cloves.
Step 34: Prepare the Chilies
Wash and slice 2–4 bird’s eye chilies.
Step 35: Prepare the Curry Leaves
Rinse 2–3 sprigs fresh curry leaves.
Dry them thoroughly.
Step 36: Heat the Saucepan
Place a medium saucepan or skillet over medium-low heat.
Step 37: Add the Butter
Add 3 tablespoons butter.
Step 38: Melt the Butter
Allow the butter to melt gently.
Step 39: Add the Garlic
Stir in the minced garlic.
Step 40: Sauté Briefly
Cook until the garlic becomes fragrant.
Step 41: Add the Curry Leaves
Carefully add the curry leaves to the melted butter.
Step 42: Release the Aroma
Stir gently until the leaves become fragrant.
Step 43: Add the Chilies
Add the sliced bird’s eye chilies.
Step 44: Combine the Aromatics
Sauté briefly so the garlic, chilies, and curry leaves flavor the butter.
Step 45: Add the Evaporated Milk
Slowly pour in 1 can (390 g) evaporated milk.
Step 46: Stir the Sauce
Mix gently until the butter and milk are combined.
Step 47: Bring to a Gentle Simmer
Increase the heat slightly if needed.
Avoid boiling vigorously.
Step 48: Add the Condensed Milk
Stir in 1 tablespoon sweetened condensed milk.
Step 49: Add Optional Bouillon
If using, add ½ teaspoon chicken bouillon powder.
Step 50: Season with Salt
Taste the sauce before adding salt, especially if using salted butter and bouillon.
Step 51: Simmer the Sauce
Cook gently for approximately 3–5 minutes.
Step 52: Stir Occasionally
Stir to prevent the sauce from sticking to the bottom.
Step 53: Check the Consistency
The sauce should become slightly thicker and silky.
Step 54: Taste and Adjust
Adjust the salt or sweetness if necessary.
Step 55: Add the Crispy Chicken
Place the fried chicken into the sauce just before serving.
Step 56: Coat the Chicken
Gently toss until the pieces are coated.
Step 57: Avoid Overcooking
Do not simmer the coated chicken for too long because the crust will soften.
Step 58: Keep Warm
Remove from the heat and prepare to serve.
Part C: Preparing the Nasi Goreng
Step 59: Prepare the Rice
Measure 2 cups cold, day-old cooked white rice.
Step 60: Break Up Clumps
Use a spoon or clean hands to separate large rice clumps.
Step 61: Prepare the Garlic
Peel and mince 2 garlic cloves.
Step 62: Prepare the Greens
Wash a handful of choy sum or spinach.
Step 63: Drain the Greens
Remove excess water.
Step 64: Prepare the Egg
Crack 1 large egg into a small bowl or keep it ready to crack into the wok.
Step 65: Measure the Sauces
Measure 1 tablespoon soy sauce and 1 teaspoon oyster sauce.
Step 66: Prepare the Sambal
Measure ½ teaspoon chili paste or sambal if using.
Step 67: Heat the Wok
Place a wok or large skillet over high heat.
Step 68: Add the Oil
Pour in 1 tablespoon cooking oil.
Step 69: Add the Garlic
Add the minced garlic.
Step 70: Add the Sambal
If using, add the chili paste or sambal.
Step 71: Sauté the Aromatics
Stir-fry briefly until fragrant.
Step 72: Push the Aromatics Aside
Move the garlic mixture to one side of the wok.
Step 73: Add the Egg
Crack the egg into the empty space.
Step 74: Scramble the Egg
Stir gently until mostly cooked.
Step 75: Combine with the Aromatics
Mix the scrambled egg with the garlic mixture.
Step 76: Add the Rice
Place the cold cooked rice into the wok.
Step 77: Break Apart Remaining Clumps
Use a spatula to separate the grains.
Step 78: Stir-Fry the Rice
Toss rapidly over high heat.
Step 79: Add the Soy Sauce
Drizzle 1 tablespoon soy sauce over the rice.
Step 80: Add the Oyster Sauce
Add 1 teaspoon oyster sauce.
Step 81: Mix Thoroughly
Toss until the sauces coat the rice evenly.
Step 82: Continue Stir-Frying
Cook until the rice is hot throughout and lightly toasted.
Step 83: Add the Greens
Place the prepared leafy greens into the wok.
Step 84: Toss the Greens
Stir-fry for approximately 1 minute.
Step 85: Season with Salt
Taste before adding additional salt.
Step 86: Add White Pepper
Sprinkle in white pepper to taste.
Step 87: Finish the Fried Rice
Toss everything together until evenly combined and piping hot.
Step 88: Remove from the Heat
Turn off the burner.
Part D: Assembling the Meal
Step 89: Prepare the Plates
Place two or three serving plates on your work surface.
Step 90: Add the Fried Rice
Spoon a generous portion of nasi goreng onto each plate.
Step 91: Shape the Rice
Arrange the fried rice neatly on one side.
Step 92: Add the Chicken
Place the crispy buttermilk chicken alongside the rice.
Step 93: Spoon Over the Sauce
Add extra creamy curry leaf sauce over the chicken.
Step 94: Garnish
Add a few curry leaves or sliced chilies if desired.
Step 95: Serve Immediately
Enjoy the dish while the rice is hot and the chicken retains some of its crisp texture.
7. Description
Nasi Goreng Buttermilk Chicken is a rich and satisfying Malaysian-style meal featuring savory fried rice and crispy chicken coated in a creamy, aromatic sauce.
The fried rice is fragrant and lightly smoky, with garlic, egg, soy sauce, oyster sauce, and leafy greens contributing savory depth.
Optional sambal adds gentle heat and a reddish color.
The chicken has a golden, crunchy coating made from flour and cornstarch.
Inside, the meat remains tender and juicy.
The buttermilk-style sauce is smooth, buttery, and creamy.
Fresh curry leaves give the sauce its distinctive fragrance, while bird’s eye chilies provide a spicy kick.
Evaporated milk creates the silky consistency, and condensed milk adds subtle sweetness.
The combination of hot fried rice, crunchy chicken, and creamy sauce creates a comforting contrast of textures.
Each bite delivers savory, buttery, slightly sweet, and spicy flavors.
8. Nutritional Information
Approximate nutritional values per serving, assuming the recipe makes 2 generous portions:
| Nutrient | Estimated Amount |
|---|---|
| Calories | 1,100–1,450 kcal |
| Protein | 45–60 g |
| Carbohydrates | 90–120 g |
| Total Fat | 60–85 g |
| Saturated Fat | 25–35 g |
| Fiber | 3–5 g |
| Sugar | 15–22 g |
| Sodium | 1,100–1,700 mg |
These are broad estimates. Actual values depend on the chicken cut, frying oil absorption, amount of coating, evaporated milk brand, and how much sauce is consumed. Dividing the recipe into 3 portions will reduce the amount per serving.
9. Recipe Details
| Category | Details |
|---|---|
| Recipe Name | Nasi Goreng Buttermilk Chicken |
| Cuisine | Malaysian-Inspired |
| Preparation Time | 20 Minutes |
| Chicken Frying Time | Approximately 10–15 Minutes |
| Sauce Cooking Time | 5–8 Minutes |
| Fried Rice Cooking Time | 5–8 Minutes |
| Total Time | Approximately 40–50 Minutes |
| Servings | 2 Generous or 3 Smaller Portions |
| Difficulty | Intermediate |
| Main Ingredients | Chicken, Rice, Evaporated Milk, Curry Leaves |
| Cooking Methods | Deep Frying, Simmering, Stir-Frying |
| Course | Lunch / Dinner |
| Flavor Profile | Creamy, Savory, Buttery, Spicy |
| Texture | Crispy Chicken, Tender Rice, Silky Sauce |
| Best For | Family Meals, Weekend Dinners, Comfort Food |
10. Conclusion
Nasi Goreng Buttermilk Chicken is a flavorful Malaysian-style comfort food combination that brings together crispy fried chicken, creamy curry leaf sauce, and savory fried rice.
The chicken provides a satisfying crunch, while the rich butter sauce adds creaminess, sweetness, and aromatic spice.
The nasi goreng balances the richness with its savory, wok-tossed flavor.
Although the dish includes several components, each one is straightforward to prepare.
The chicken is seasoned, coated, and fried until golden.
The sauce is made by gently simmering butter, garlic, curry leaves, chilies, and evaporated milk.
The fried rice is quickly stir-fried with egg, garlic, sauces, and greens.
When served together, the result is a satisfying meal that feels like a restaurant favorite made at home.
11. Serving and Storage Recommendations
Serving Suggestions: Serve the buttermilk chicken alongside freshly cooked nasi goreng.
Presentation: Arrange the rice on one side of the plate and the creamy chicken on the other.
Extra Sauce: Serve additional sauce separately so diners can control how much they add.
Fresh Vegetables: Add cucumber slices or a simple salad to balance the richness.
Spicy Accompaniments: Serve with sambal or extra sliced bird’s eye chilies.
Refrigeration: Store cooked chicken, sauce, and fried rice in separate airtight containers when possible.
Storage Duration: Refrigerate promptly and consume within approximately 3–4 days. For rice, using it within 24 hours is a more conservative approach.
Reheating Chicken: Reheat the chicken until it reaches 165°F (74°C).
Reheating Sauce: Warm gently over low heat, stirring occasionally.
Reheating Fried Rice: Reheat rapidly until piping hot throughout. Avoid reheating rice repeatedly.
Freezing: Cooked chicken can be frozen, but the crispy coating may soften. Creamy evaporated milk sauce may separate after thawing.
Make-Ahead: Prepare the sauce ingredients and chicken coating ingredients ahead of time, but fry the chicken close to serving.
Food Safety: Cool cooked rice rapidly and refrigerate promptly. Do not leave cooked rice at room temperature for extended periods.
Allergen Information: This recipe contains eggs, wheat, milk, and soy. Oyster sauce also contains shellfish ingredients.
12. Embracing Healthful Indulgence
Nasi Goreng Buttermilk Chicken combines protein-rich chicken, rice, vegetables, eggs, and aromatic seasonings.
Chicken provides protein and nutrients such as niacin, vitamin B6, and phosphorus.
Eggs contribute additional protein and choline.
Leafy greens provide vitamins, minerals, and small amounts of dietary fiber.
Rice supplies carbohydrates that the body uses for energy.
Garlic, curry leaves, and chilies contribute flavor and aroma without requiring large quantities of additional seasoning.
However, this recipe is rich because the chicken is deep-fried and the sauce contains butter, evaporated milk, and condensed milk.
For a lighter variation, the chicken can be air-fried or oven-baked, although the texture will differ from the original deep-fried version.
The sauce can also be served in smaller portions rather than coating every piece heavily.
Adding more leafy greens to the nasi goreng increases vegetable content.
Dividing the recipe into three portions instead of two can help moderate the overall calorie intake.
Nasi Goreng Buttermilk Chicken is best enjoyed as a satisfying occasional comfort meal, with its rich sauce and crispy chicken balanced by vegetables and sensible portions.
Its combination of fragrant fried rice, golden chicken, and creamy curry leaf butter sauce makes it a delicious example of contemporary Malaysian-inspired home cooking.