
1. Introduction
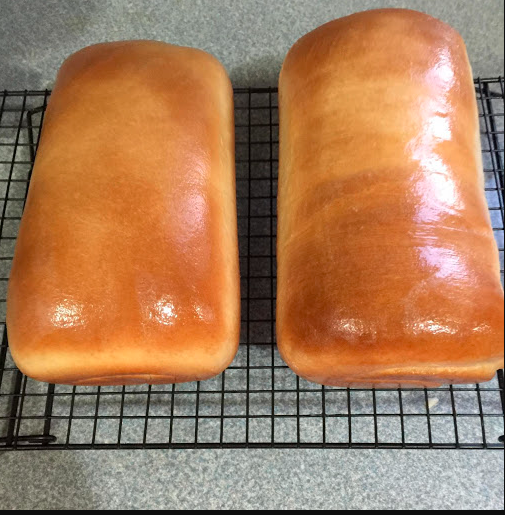
Homemade Soft White Sandwich Bread is a classic bakery-style bread featuring a beautifully golden, glossy crust and a soft, fluffy interior.
Prepared with simple ingredients such as flour, yeast, warm water, butter, sugar, and salt, this traditional bread develops a light texture and delicate flavor.
The dough is carefully kneaded, allowed to rise until doubled in size, shaped into loaves, and baked until the exterior becomes golden brown while the inside remains tender and airy.
A final brushing of melted butter gives the loaves an attractive shine and creates a softer crust.
Perfect for breakfast, sandwiches, toast, and everyday family meals, this homemade bread brings the comforting taste and aroma of freshly baked bread straight to your kitchen.
2. Origin
White sandwich bread has developed through centuries of bread-making traditions, particularly in Europe and North America.
Traditional bread-making techniques originally relied on flour, water, salt, and natural fermentation to produce everyday loaves.
During the 19th and 20th centuries, improvements in milling, commercial yeast production, and baking technology helped popularize softer, lighter white bread.
The introduction of rectangular loaf pans also contributed to the development of the familiar sandwich bread shape.
Today, homemade white sandwich bread remains popular because of its simple preparation, versatile uses, and soft texture.
3. Cultural Significance
Homemade white bread holds an important place in everyday food culture across many countries.
It is commonly associated with family breakfasts, homemade sandwiches, school lunches, and traditional bakery products.
In many households, baking bread is also a familiar culinary tradition passed down through generations.
Its versatility makes it suitable for both sweet and savory preparations, from buttered toast and jam sandwiches to grilled cheese and hearty lunch sandwiches.
The aroma of freshly baked bread is often associated with comfort, hospitality, and the pleasure of sharing homemade food.
4. Ingredients and Quantities
MAKES 2 LOAVES · TWO 9 × 5-INCH LOAF PANS
For the Bread Dough:
| Ingredient | Quantity |
|---|---|
| Warm water (105–110°F / 40–43°C) | 2 cups |
| Active dry yeast | 1 tbsp |
| Granulated sugar or honey | 3 tbsp |
| Salt | 2 tsp |
| Unsalted butter, melted | 3 tbsp |
| Bread flour or all-purpose flour | 5½–6 cups |
For Finishing:
- 1–2 tbsp melted butter for brushing the warm loaves.
- Additional butter or oil for greasing the loaf pans.
- A little flour for dusting the work surface.
5. Optional Additions
Customize your homemade white bread with these delicious ingredients:
- Honey: Replace the granulated sugar with 3 tbsp honey for a delicate sweetness.
- Milk powder: 2 tbsp for a softer, richer crumb.
- Olive oil: Replace the melted butter with 3 tbsp olive oil for a different flavor.
- Sesame seeds: 1–2 tbsp for a decorative topping.
- Poppy seeds: 1 tbsp for additional texture.
- Rolled oats: ¼ cup for a rustic bread variation.
- Garlic powder: ½ tsp for a savory flavor.
- Dried rosemary: 1 tsp for an aromatic herbal variation.
- Whole-wheat flour: Replace up to 1 cup of white flour for a heartier loaf.
- Sunflower seeds: ¼ cup for additional crunch.
- Cinnamon: ½ tsp for a lightly spiced breakfast bread.
6. Tips for Success
- Use the correct water temperature: Water should be approximately 105–110°F (40–43°C). Excessively hot water can damage the yeast.
- Check yeast activity: Active dry yeast should become foamy after being mixed with warm water and sugar.
- Measure flour carefully: Too much flour can produce a dry, dense loaf.
- Add flour gradually: Begin with approximately 5 cups and add more only when necessary.
- Knead thoroughly: Proper kneading develops gluten, creating an elastic dough that produces a soft bread structure.
- Avoid overly dry dough: The dough should feel soft, smooth, and slightly tacky rather than stiff.
- Allow sufficient rising time: The first rise should continue until the dough approximately doubles in size.
- Shape tightly: Rolling the dough into firm logs helps create evenly shaped loaves.
- Do not overproof: The second rise should bring the dough approximately 1 inch above the edges of the loaf pans.
- Preheat the oven properly: A fully heated oven helps the bread bake evenly.
- Check internal temperature: The center of the finished bread should reach approximately 190–200°F (88–93°C).
- Brush with melted butter: This creates a beautiful glossy finish and softens the crust.
- Cool completely: Allow the bread to cool before slicing to prevent a gummy interior.
7. Instructions
Step 1: Activate the Yeast
In a large mixing bowl, combine the warm water, granulated sugar or honey, and active dry yeast.
Stir gently until combined.
Allow the mixture to rest for approximately 5–10 minutes until a foamy layer develops on the surface.
This indicates that the yeast is active and ready to use.
Step 2: Prepare the Dough
Add the melted and slightly cooled butter and salt to the yeast mixture.
Stir gently to combine.
Gradually add approximately 5 cups of flour, one cup at a time, mixing continuously until a rough, shaggy dough forms.
Add additional flour gradually if the dough remains excessively sticky.
Step 3: Knead the Dough
Transfer the dough onto a lightly floured work surface.
Knead by pushing the dough forward with the heel of your hand, folding it back, and repeating the movement.
Continue kneading for approximately 8–10 minutes until the dough becomes smooth, elastic, and slightly tacky.
Step 4: First Rise
Lightly grease a large mixing bowl with butter or oil.
Place the kneaded dough inside and turn it once to coat the surface lightly.
Cover the bowl with a clean, damp kitchen towel or plastic wrap.
Leave it in a warm place for approximately 1–1½ hours, or until the dough doubles in size.
Step 5: Divide and Shape the Loaves
Gently press down the risen dough to release excess air.
Transfer it to a lightly floured surface and divide it into two equal portions.
Working with one portion at a time, roll the dough into a rectangular shape.
Fold the sides inward if necessary, then roll it tightly from one end into a log.
Pinch the seam closed and tuck the ends underneath to create a neat loaf shape.
Repeat with the second portion.
Step 6: Prepare for the Second Rise
Lightly grease two 9 × 5-inch loaf pans with butter or cooking oil.
Place each shaped dough log inside its prepared pan, seam-side down.
Cover loosely with a clean kitchen towel or plastic wrap.
Allow the dough to rise for approximately 45–60 minutes, or until it crowns about 1 inch above the edges of the pans.
Step 7: Bake the Bread
Preheat the oven to 350°F (175°C).
Place the loaf pans on the center oven rack.
Bake for approximately 30–35 minutes until the tops develop a deep golden-brown color.
Check that the center of each loaf reaches approximately 190–200°F (88–93°C).
Step 8: Brush with Butter
Remove the baked loaves from the oven.
While they are still warm, brush the tops generously with melted butter.
This gives the bread its beautiful glossy appearance and helps create a soft crust.
Step 9: Cool the Loaves
Allow the bread to cool inside the pans for approximately 10 minutes.
Carefully remove each loaf and transfer it to a wire cooling rack.
Allow the bread to cool completely before slicing.
Step 10: Slice and Serve
Once cooled, use a serrated bread knife to cut the loaves into even slices.
Serve with butter, jam, honey, or your favorite sandwich fillings.
8. Description
Homemade Soft White Sandwich Bread features beautifully rounded tops with a smooth, glossy golden-brown exterior.
The crust is delicate and lightly buttery, while the interior is exceptionally soft, fluffy, and airy.
Its fine, tender crumb makes it easy to slice evenly without crumbling.
The combination of yeast, butter, and a touch of sugar creates a pleasant aroma and a mild, slightly sweet flavor.
The rectangular loaf shape makes it especially convenient for preparing sandwiches, toast, and breakfast dishes.
Freshly brushed with melted butter, these loaves have an attractive bakery-style appearance and a delicious homemade taste.
9. Nutritional Information
APPROXIMATE VALUES PER SERVING · 1 SLICE · ASSUMING 16 SLICES PER LOAF
| Nutrient | Amount |
|---|---|
| Calories | 130–155 kcal |
| Protein | 4–5 g |
| Carbohydrates | 24–28 g |
| Total Fat | 2–3 g |
| Dietary Fiber | 1 g |
| Sugars | 2–3 g |
Nutritional Benefits:
- Flour: Provides carbohydrates that supply energy.
- Yeast: Contributes small amounts of B vitamins and helps develop the bread’s characteristic texture.
- Butter: Adds flavor and contributes to the soft crumb.
- Milk-free dough: Provides an alternative for people avoiding milk ingredients, provided the selected ingredients are dairy-free.
- Honey or sugar: Provides fermentable sugars that support yeast activity and contribute to flavor.
Nutritional values are estimates and vary according to flour type, slice thickness, and the amount of butter used.
10. Conclusion
Homemade Soft White Sandwich Bread is a classic baking recipe that transforms simple pantry ingredients into two beautiful, golden loaves.
The combination of properly activated yeast, carefully kneaded dough, and sufficient rising time produces a soft, fluffy interior with a delicate buttery crust.
Its versatility, straightforward preparation, and satisfying texture make it an excellent addition to everyday family meals.
Whether enjoyed as toast, sandwiches, or freshly sliced bread with butter, this recipe delivers the comforting taste of homemade baking.
11. Recommendation
This homemade white bread is highly recommended for anyone who enjoys fresh bakery-style loaves with a soft texture and mild buttery flavor.
For the best serving experience:
- Serve warm with butter and strawberry jam.
- Pair with honey or homemade fruit preserves.
- Use for classic grilled cheese sandwiches.
- Prepare breakfast sandwiches with eggs and vegetables.
- Serve alongside homemade soups and stews.
- Toast slices and top with avocado.
- Use for French toast or bread pudding.
For an especially attractive presentation, place the two golden loaves on a wooden bread board and slice one loaf to reveal its soft, fluffy interior.
The bread can be stored in an airtight container at room temperature for approximately 3–4 days or sliced and frozen for longer storage.
12. Embracing Healthful Indulgence
Homemade Soft White Sandwich Bread demonstrates how traditional baking can produce a versatile everyday food using simple ingredients.
Flour provides energy through carbohydrates, while yeast supports fermentation and creates the bread’s characteristic airy structure.
For a more fiber-rich variation, replace part of the white flour with whole-wheat flour. You can also incorporate oats or seeds for additional texture and nutritional variety.
Reducing the added sugar slightly or using olive oil instead of butter are other ways to customize the recipe.
Pairing homemade bread with vegetables, eggs, lean proteins, or nutritious spreads can help create satisfying and varied meals.
The goal is to enjoy the flavor and pleasure of homemade baking while incorporating different ingredients into everyday meals.
Ultimately, Homemade Soft White Sandwich Bread is more than a simple loaf; it is a celebration of traditional baking, simple ingredients, and the irresistible aroma of freshly baked bread shared around the family table. 🍞