
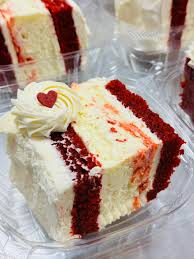
Red Velvet Cheesecake Cake is the ultimate combination of two beloved desserts: soft, cocoa-infused red velvet cake and rich, creamy vanilla cheesecake.
This stunning layered cake features two moist red velvet cake layers surrounding a thick, velvety baked cheesecake center. Everything is covered in smooth, tangy cream cheese frosting, creating a beautiful dessert with contrasting colors and textures.
Perfect for birthdays, anniversaries, family celebrations, or special occasions, this bakery-style cake looks impressive and tastes wonderfully indulgent.
Although it requires several preparation stages, the results are well worth the effort.
1. Introduction
If you love red velvet cake and cheesecake, this recipe brings the best of both desserts together.
Traditional red velvet cake is known for its soft texture, subtle cocoa flavor, and tangy cream cheese frosting.
Cheesecake, meanwhile, offers a dense, creamy texture and rich vanilla flavor.
By combining these two desserts, you create a layered cake with a beautiful presentation and a delicious contrast between fluffy cake and creamy cheesecake.
The cheesecake center is baked separately, chilled, and frozen until firm enough to handle.
It is then layered between two cooled red velvet cakes before the entire dessert is covered in cream cheese frosting.
The finished cake reveals a striking red-and-white layered appearance when sliced.
2. Origin and Cultural Significance
Red velvet cake is closely associated with American baking traditions, particularly in the Southern United States.
Its distinctive appearance comes from its red coloring, subtle chocolate flavor, and creamy frosting.
Cheesecake has a much longer culinary history, with numerous variations developed across Europe and North America.
The combination of red velvet cake and cheesecake became especially popular through bakery-style desserts and restaurant menus.
Today, layered Red Velvet Cheesecake Cake is a popular celebration dessert because of its impressive appearance and rich texture.
Home bakers have developed versions that feature a separately baked cheesecake center surrounded by red velvet cake layers, including recipes published by Cooking LSL and Recipe Girl. cookinglsl.com+1
3. Ingredients
Yield: 12–16 slices | Active preparation: Approximately 45–60 minutes | Baking: 75–80 minutes | Chilling: Overnight recommended
For the Vanilla Cheesecake Layer
- 16 oz (450 g) full-fat brick cream cheese, softened
- ⅔ cup (135 g) granulated sugar
- 1½ tablespoons all-purpose flour
- ⅓ cup (80 g) sour cream, at room temperature
- 1 teaspoon alcohol-free vanilla flavoring
- 2 large eggs, at room temperature
- 1 large egg yolk, at room temperature
For the Red Velvet Cake Layers
- 2½ cups (310 g) all-purpose flour
- 1½ cups (300 g) granulated sugar
- 2 tablespoons unsweetened cocoa powder
- 1 teaspoon baking soda
- ½ teaspoon salt
- 1 cup (240 ml) buttermilk, at room temperature
- ¾ cup (180 ml) vegetable oil
- 2 large eggs, at room temperature
- Red gel food coloring, added gradually to achieve the desired shade
- 2 teaspoons alcohol-free vanilla flavoring
- 1 teaspoon white distilled vinegar
For the Cream Cheese Frosting
- 16 oz (450 g) full-fat brick cream cheese, softened
- 1 cup (226 g) unsalted butter, softened
- 4 cups (480 g) powdered sugar, sifted
- 2 teaspoons alcohol-free vanilla flavoring
- Pinch of salt
Optional Decorations
- Red velvet cake crumbs
- Fresh strawberries
- White chocolate shavings
- Cream cheese frosting swirls
Ingredient note: For a halal-friendly cake, use alcohol-free vanilla flavoring and food coloring made without carmine or other unsuitable ingredients.
4. Optional Additions
You can customize this dessert with several delicious variations.
- Strawberry decoration: Add fresh strawberry halves around the top.
- White chocolate: Sprinkle white chocolate curls over the frosting.
- Extra cocoa: Increase the cocoa powder slightly for a stronger chocolate flavor.
- Chocolate drizzle: Add melted white or dark chocolate over the finished cake.
- Red velvet crumbs: Reserve some trimmed cake pieces and crumble them for decoration.
- Vanilla bean: Replace vanilla flavoring with the seeds from a vanilla bean.
- Mini cakes: Prepare smaller individual versions using appropriately sized pans and adjusted baking times.
For the most classic bakery-style appearance, use smooth white cream cheese frosting with a few red velvet crumbs on top.
5. Tips for Success
Use room-temperature ingredients. Softened cream cheese, eggs, and dairy products help create smooth batters without lumps.
Don’t overmix the cheesecake. Excessive mixing after adding the eggs can introduce too much air and contribute to cracking.
Use matching pan sizes. The cheesecake and red velvet cake layers should have approximately the same diameter.
Bake the cheesecake gently. A water bath promotes even cooking and reduces the likelihood of cracking. King Arthur Baking
Freeze the cheesecake before stacking. A firm cheesecake layer is much easier to transfer without breaking.
Avoid overbaking the red velvet cake. Remove the cakes once a toothpick inserted into the center comes out with a few moist crumbs.
Cool everything completely. Warm cake layers can melt the frosting and cause the assembled cake to slide.
Apply a crumb coat. A thin initial layer of frosting helps trap loose cake crumbs before the final frosting layer.
Allow enough time to thaw. After assembly, refrigerate the cake overnight so the frozen cheesecake center becomes creamy and sliceable.
6. Step-by-Step Instructions
Step 1: Prepare the Cheesecake Pan
Preheat the oven to 325°F (160°C).
Grease a 9-inch springform pan and line its bottom with parchment paper.
Wrap the outside of the pan tightly with two layers of heavy-duty aluminum foil to help prevent water from entering during baking.
Alternatively, place the springform pan inside a slightly larger solid cake pan before setting it in the water bath.
Step 2: Beat the Cream Cheese
Place the softened cream cheese in a large mixing bowl.
Beat with an electric mixer on medium-low speed until smooth and creamy.
Add the granulated sugar and flour.
Continue mixing until fully combined.
Scrape down the sides of the bowl to ensure no lumps remain.
Step 3: Add the Remaining Cheesecake Ingredients
Add the sour cream and alcohol-free vanilla flavoring.
Mix gently until incorporated.
Add the two eggs, one at a time, mixing on low speed after each addition.
Add the extra egg yolk.
Mix only until the batter becomes smooth.
Avoid overbeating.
Step 4: Prepare the Water Bath
Pour the cheesecake batter into the prepared springform pan.
Smooth the top with a spatula.
Place the pan inside a larger roasting pan.
Carefully pour hot water into the roasting pan until it reaches approximately 1 inch up the outside of the cheesecake pan.
Make sure no water enters the batter.
Step 5: Bake the Cheesecake
Bake at 325°F (160°C) for approximately 45–50 minutes.
The edges should appear set while the center retains a slight jiggle.
The cheesecake will continue firming as it cools.
Remove it carefully from the water bath.
Allow it to cool on a wire rack for approximately 1 hour, then refrigerate until completely chilled.
Step 6: Freeze the Cheesecake Layer
Once the cheesecake is cold, cover it securely and place it in the freezer for at least 3–4 hours.
The cheesecake should become firm enough to remove from its pan and transfer without cracking.
Do not attempt to stack a warm or soft cheesecake.
Step 7: Prepare the Red Velvet Cake Pans
Preheat the oven to 350°F (175°C).
Grease two 9-inch round cake pans.
Line the bottoms with parchment paper.
Lightly flour the sides if necessary.
Step 8: Mix the Dry Ingredients
In a large mixing bowl, whisk together:
- All-purpose flour
- Granulated sugar
- Cocoa powder
- Baking soda
- Salt
Mix thoroughly until evenly combined.
Step 9: Combine the Wet Ingredients
In a separate bowl, whisk together:
- Buttermilk
- Vegetable oil
- Eggs
- Red gel food coloring
- Alcohol-free vanilla flavoring
- White vinegar
Mix until smooth.
Start with a small amount of red gel food coloring and add more gradually according to its concentration.
The batter should have a vibrant red appearance.
Step 10: Prepare the Red Velvet Batter
Pour the wet ingredients into the dry mixture.
Stir gently until the batter becomes smooth and no dry flour remains.
Avoid excessive mixing, which can make the cake dense.
Divide the batter evenly between the two prepared pans.
Step 11: Bake the Red Velvet Cakes
Place both cake pans in the preheated oven.
Bake at 350°F (175°C) for 25–30 minutes.
Insert a toothpick into the center of each cake.
The cakes are ready when the toothpick comes out clean or with a few moist crumbs.
Allow the cakes to cool in their pans for approximately 10–15 minutes.
Carefully transfer them to wire racks and cool completely.
Step 12: Prepare the Cream Cheese Frosting
Place the softened butter in a large mixing bowl.
Beat until smooth and creamy.
Add the softened cream cheese and mix until combined.
Gradually add the sifted powdered sugar.
Mix on low speed initially to prevent the sugar from scattering.
Add the alcohol-free vanilla flavoring and a pinch of salt.
Beat briefly until the frosting becomes smooth and fluffy.
If the frosting is too soft to spread, refrigerate it for 15–20 minutes.
Step 13: Level the Cake Layers
Once the red velvet cakes are completely cooled, inspect their tops.
If either cake has a rounded dome, carefully level it using a serrated knife.
Reserve the trimmed pieces if you want to use red velvet crumbs for decoration.
Step 14: Assemble the First Layers
Place one red velvet cake layer onto a serving plate or cake board.
Spread a thin, even layer of cream cheese frosting over the top.
Remove the frozen cheesecake from its pan.
Carefully peel away the parchment paper.
Center the cheesecake over the first red velvet cake layer.
If necessary, trim the cheesecake edges slightly so they align with the cake beneath.
Step 15: Add the Second Cake Layer
Spread another thin layer of cream cheese frosting over the cheesecake.
Carefully position the second red velvet cake layer on top.
Press very gently to secure the layers.
Avoid applying too much pressure, which could damage the cake.
Step 16: Apply the Crumb Coat
Spread a thin layer of cream cheese frosting over the top and sides of the assembled cake.
This initial layer seals in loose crumbs.
Refrigerate the cake for approximately 20–30 minutes until the crumb coat firms.
Step 17: Apply the Final Frosting
Remove the cake from the refrigerator.
Spread the remaining cream cheese frosting evenly over the top and sides.
Smooth the frosting using an offset spatula or cake scraper.
For a decorative finish, pipe frosting swirls around the top edge.
Step 18: Decorate
Sprinkle red velvet cake crumbs around the sides or top.
Add fresh strawberries or white chocolate shavings if desired.
Keep the decorations simple to highlight the beautiful layered cake.
Step 19: Chill Before Serving
Transfer the completed cake to the refrigerator.
Chill for approximately 6–8 hours, preferably overnight, allowing the frozen cheesecake center to thaw completely and the layers to stabilize.
Step 20: Slice and Serve
Remove the cake from the refrigerator shortly before serving.
Dip a large, sharp knife into warm water and wipe it dry.
Slice the cake carefully.
Clean the knife between cuts to preserve the distinct red velvet and cheesecake layers.
Serve chilled or allow each slice to stand briefly until slightly softened.
7. Description
Red Velvet Cheesecake Cake is a rich, beautiful dessert with three distinct layers.
The upper and lower layers consist of moist, soft red velvet cake with a subtle chocolate flavor.
The center is filled with thick, creamy vanilla cheesecake, creating a luxurious contrast in texture.
Smooth cream cheese frosting surrounds the cake, adding a tangy sweetness that complements both the red velvet and cheesecake layers.
When sliced, the cake reveals a striking combination of deep red cake and creamy white cheesecake.
Its tall appearance, smooth frosting, and layered structure make it an impressive centerpiece for any celebration.
8. Nutritional Information
The following values are approximate and depend on whether the cake is divided into 12 or 16 slices.
| Nutrient | Approximate Amount per Slice |
|---|---|
| Calories | 700–950 kcal |
| Protein | 8–12 g |
| Carbohydrates | 65–90 g |
| Total Fat | 45–65 g |
| Saturated Fat | 25–35 g |
| Fiber | 1–2 g |
| Sugars | 50–70 g |
| Sodium | Varies by ingredients |
These estimates include the red velvet cake, cheesecake filling, and cream cheese frosting.
Nutritional Highlights
Cream cheese: Provides the rich texture that defines the cheesecake layer and frosting.
Eggs: Contribute protein and help give both cake and cheesecake their structure.
Buttermilk: Adds subtle tanginess and helps create tender red velvet cake layers.
Cocoa powder: Provides a mild chocolate flavor.
Because this cake is rich in sugar and fat, smaller portions are a practical way to enjoy it as an occasional dessert.
9. Recipe Details
| Detail | Information |
|---|---|
| Recipe Name | Red Velvet Cheesecake Cake |
| Cuisine | American |
| Course | Dessert |
| Preparation Time | 45–60 minutes |
| Baking Time | Approximately 75–80 minutes |
| Cheesecake Cooling and Freezing | Approximately 5–6 hours |
| Final Chilling Time | 6–8 hours |
| Recommended Preparation | Make Ahead |
| Servings | 12–16 |
| Difficulty | Intermediate to Advanced |
| Equipment | 9-Inch Springform Pan and Two 9-Inch Cake Pans |
| Cheesecake Temperature | 325°F (160°C) |
| Cake Temperature | 350°F (175°C) |
| Best Served | Chilled |
10. Conclusion
Red Velvet Cheesecake Cake is a spectacular dessert that combines two classic favorites into one unforgettable creation.
The soft red velvet cake layers, creamy cheesecake center, and tangy cream cheese frosting work beautifully together.
Although preparing the cake involves several steps, the process becomes manageable when divided into stages.
Baking the cheesecake ahead of time, allowing the red velvet cakes to cool completely, and assembling everything carefully are the keys to achieving a professional-looking dessert.
Whether served at a birthday party, family celebration, or special gathering, this bakery-style cake is sure to impress.
11. Serving and Storage Recommendations
Serving Suggestions
Enjoy Red Velvet Cheesecake Cake with:
- Fresh strawberries
- Raspberries
- A small scoop of vanilla ice cream
- Freshly whipped cream
- Hot coffee
- Unsweetened tea
- Fresh fruit on the side
For the best presentation, cut clean slices using a warm knife.
Storage Instructions
Refrigeration: Because the cake contains baked cheesecake and cream cheese frosting, it must be stored in the refrigerator.
Storage duration: Keep the cake covered and refrigerated for up to 3–4 days.
Freezing: Individual slices can be frozen for up to 2 months for best quality.
How to freeze: Place slices on a parchment-lined tray until firm, then wrap each slice tightly and transfer to an airtight freezer-safe container.
Thawing: Transfer frozen slices to the refrigerator and allow them to thaw slowly.
Make-ahead option: Prepare the cheesecake layer one day before baking the red velvet cakes. Assemble the cake the following day and refrigerate overnight before serving.
Avoid leaving the finished cake at room temperature for extended periods.
12. Embracing Healthful Indulgence
Some desserts are meant to be enjoyed as special treats, and Red Velvet Cheesecake Cake is a wonderful example.
Its combination of fluffy red velvet cake, creamy baked cheesecake, and rich frosting creates a satisfying dessert with multiple flavors and textures.
The recipe also offers an opportunity to practice several baking techniques, including preparing cheesecake in a water bath, baking tender cake layers, and assembling a beautiful frosted cake.
While this is a rich, indulgent dessert, it can still be enjoyed occasionally as part of a varied and balanced diet.
A modest slice served with fresh fruit makes a lovely ending to a special meal.
Whether you’re sharing it with family or preparing it for a celebration, this cake is a memorable homemade dessert.
Moist red velvet cake, a thick creamy cheesecake center, and silky cream cheese frosting—three irresistible layers in every beautiful slice! ❤️🍰✨
#RedVelvetCheesecake #CheesecakeCake #RedVelvetCake #HomemadeDesserts #CakeRecipes