
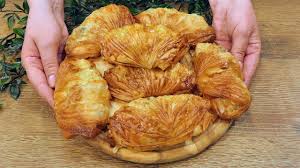
These crispy 1000-layer pastries are beautifully golden on the outside, soft and tender on the inside, and filled with delicate, buttery layers that separate with every bite. Inspired by traditional Moroccan msemen and other layered pastries, this homemade recipe creates impressive bakery-style treats using simple pantry ingredients.
Whether you enjoy them with honey, powdered sugar, melted cheese, or a savory filling, these flaky pastries are perfect for breakfast, afternoon snacks, and family gatherings.
Recipe Overview
- Prep Time: 35–45 minutes
- Resting Time: 30 minutes
- Baking Time: 25–30 minutes
- Total Time: Approximately 1 hour 30 minutes
- Servings: 10–12 pastries
- Difficulty: Intermediate
- Cooking Method: Oven-Baked
1. Introduction
Few homemade baked goods are as satisfying as freshly baked, golden pastries with beautifully defined layers.
These Crispy 1000-Layer Pastries combine a soft, elastic dough with generous layers of butter and oil to create an irresistible flaky texture.
The dough is stretched into thin sheets, brushed with butter, stacked, rolled into logs, and shaped into beautiful little pastries before baking.
As they bake, the moisture between the layers creates steam, helping the dough separate and develop its characteristic flaky structure.
The finished pastries feature a golden, slightly crisp exterior and a soft interior with delicate layers.
Despite their impressive appearance, this recipe uses basic ingredients such as flour, water, milk, butter, and oil.
With a little patience and careful shaping, you can create beautiful homemade pastries that look like they came straight from a bakery.
2. Origin and Cultural Significance
Layered pastries appear in many culinary traditions around the world, particularly throughout North Africa, the Middle East, Turkey, and Europe.
This recipe is inspired by the layering techniques found in traditional Moroccan msemen and Turkish börek.
Moroccan msemen is a popular square-shaped flatbread prepared by stretching dough into thin layers, coating it with butter or oil, and folding it before cooking on a griddle. Marrakech.Cooking
Turkish börek includes a variety of pastries made with thin sheets of dough layered with butter, oil, and sometimes cheese, vegetables, or meat. ktb.gov.tr
Unlike traditional msemen, which is usually pan-cooked, this recipe uses an oven to produce a puffier, more pastry-like result.
The name 1000-layer pastry is a popular descriptive nickname rather than a literal count of the layers.
The appeal comes from the beautiful layered appearance and the contrast between the crispy exterior and tender interior.
3. Ingredients
For the Pastry Dough
- 4 cups (500 g) all-purpose flour: Provides structure and elasticity.
- 1–1¼ cups (240–300 ml) warm water: Added gradually to form a soft dough.
- ¼ cup (60 ml) lukewarm milk: Helps produce a softer interior.
- 2 tablespoons neutral vegetable oil: Improves flexibility and makes stretching easier.
- 1 tablespoon granulated sugar: Adds subtle sweetness and encourages browning.
- 1 teaspoon salt: Balances the flavor.
- ½ teaspoon instant yeast: Optional, for a slightly softer, puffier pastry.
For the Butter Layers
- 1 cup (225 g) unsalted butter: Melted and cooled slightly.
- ¼ cup (60 ml) neutral oil: Mixed with the butter for easier spreading.
- 2 tablespoons cornstarch: Used sparingly between the layers.
For the Egg Wash
- 1 egg yolk
- 1 tablespoon milk
Optional Sweet Toppings
- Honey
- Powdered sugar
- Simple syrup
- Cinnamon sugar
Optional Savory Fillings
- Feta cheese
- Mozzarella cheese
- Cooked seasoned ground beef
- Cooked spinach and cheese
- Sautéed onions
For a halal-friendly recipe, use halal-compatible cheeses and fully cooked halal meat fillings.
4. Optional Additions
These pastries are incredibly versatile and can be prepared in both sweet and savory variations.
Honey Butter Pastries
Brush the freshly baked pastries with a mixture of warm honey and melted butter.
This creates a glossy, lightly sweet finish.
Cinnamon Sugar Pastries
Sprinkle a mixture of cinnamon and sugar between some of the buttered layers for a sweet, aromatic variation.
Cheese-Filled Pastries
Place a small cube of mozzarella or a spoonful of crumbled feta in the center before shaping.
The cheese melts during baking, creating a rich, savory center.
Spiced Beef Pastries
Prepare a filling using cooked ground beef, onions, garlic, paprika, cumin, and black pepper.
Allow the filling to cool before placing it inside the dough.
Chocolate-Filled Pastries
Add a small piece of chocolate or a teaspoon of chocolate spread to the center before sealing.
Sesame-Topped Pastries
Sprinkle sesame seeds over the egg-washed pastries before baking for extra flavor and texture.
5. Tips for Success
Use soft, elastic dough.
The dough should be smooth and flexible rather than stiff. Add the water gradually until it stretches easily.
Allow the dough to rest.
Resting relaxes the gluten, making the dough easier to stretch into thin sheets without tearing.
Stretch the dough very thinly.
Thin layers are essential for creating a delicate, flaky texture.
Avoid excessively hot butter.
The butter should be melted but not hot enough to damage the dough.
Apply the butter evenly.
Spread a thin, consistent layer of butter across the entire dough surface.
Use cornstarch sparingly.
A light dusting can help separate the layers, but too much may leave a powdery texture.
Avoid compressing the dough.
During shaping, press gently so the layered structure remains visible.
Seal filled pastries carefully.
If adding cheese or another filling, pinch the edges securely to reduce leakage.
Bake until deeply golden.
The pastries should develop a golden-brown exterior with visibly separated layers.
Cool slightly before serving.
Allowing the pastries to rest for a few minutes helps their structure settle.
6. Step-by-Step Instructions
Step 1: Prepare the Dough
In a large mixing bowl, combine:
- 4 cups all-purpose flour
- 1 tablespoon sugar
- 1 teaspoon salt
- ½ teaspoon instant yeast, if using
Mix the dry ingredients until evenly distributed.
Add the lukewarm milk and 2 tablespoons of vegetable oil.
Gradually pour in the warm water while mixing.
Continue adding water until a soft, slightly tacky dough forms.
Step 2: Knead the Dough
Transfer the dough onto a lightly oiled work surface.
Knead for approximately 8–10 minutes.
Continue kneading until the dough becomes smooth, elastic, and easy to stretch.
If it feels too sticky, allow it to rest briefly before continuing rather than adding excessive flour.
The finished dough should be soft and flexible.
Step 3: Divide and Rest
Divide the dough into 6–8 equal portions.
Shape each portion into a smooth ball.
Lightly coat the dough balls with vegetable oil.
Arrange them on a tray, leaving a little space between each one.
Cover with plastic wrap or a clean kitchen towel.
Allow the dough to rest for 30 minutes at room temperature.
This resting period helps the gluten relax, making the dough easier to stretch.
Step 4: Prepare the Butter Mixture
Melt the unsalted butter in a small saucepan or microwave-safe bowl.
Allow it to cool until warm but not hot.
Add the vegetable oil and mix until combined.
Set the mixture aside.
Keep a pastry brush nearby for spreading the butter between the dough layers.
Step 5: Stretch the First Dough Sheet
Lightly coat a clean work surface with oil.
Place one rested dough ball in the center.
Using your fingertips, gently press and stretch the dough outward.
Continue stretching until you have a large, thin rectangular sheet.
The dough should be almost translucent without tearing excessively.
Brush the surface evenly with the butter-oil mixture.
Lightly dust with a small amount of cornstarch.
Step 6: Create Multiple Layers
Stretch a second dough ball into a similar thin rectangle.
Carefully place it over the first buttered sheet.
Brush the second layer with more butter-oil mixture.
Add another light dusting of cornstarch.
Repeat the process until you have a stack of 3–4 thin dough sheets.
Try to align the layers evenly.
Avoid pressing them together too firmly because the butter between the sheets helps create the flaky texture.
Step 7: Roll the Layered Dough
Starting from the long edge of the rectangle, carefully roll the layered dough into a log.
Roll snugly enough to maintain the shape without squeezing out excessive butter.
The result should be a long cylinder containing multiple spiraling dough layers.
Repeat with the remaining dough sheets to create another log.
Step 8: Cut the Dough
Using a sharp knife, cut each log into approximately 2-inch (5 cm) sections.
Work carefully to avoid flattening the layers.
Each piece should reveal a beautiful spiral pattern when viewed from the cut end.
If the dough feels too soft to cut neatly, refrigerate the logs for approximately 10–15 minutes before slicing.
Step 9: Shape the Pastries
Take one cut section and position it upright so its spiral layers face upward.
Gently press the dough with your palm to flatten it slightly.
Carefully draw four sides or corners inward to create a compact, ruffled square shape.
Pinch the meeting edges lightly to hold the shape together while leaving the visible folds intact.
Avoid pressing too firmly because this can compress the delicate layers.
Repeat with the remaining dough pieces.
Step 10: Add Optional Fillings
For filled pastries, gently open the center of each flattened dough piece.
Add a small amount of your chosen filling.
Suitable options include:
- A small cube of mozzarella
- Crumbled feta cheese
- Cooked seasoned ground beef
- Cooked spinach and cheese
- A small piece of chocolate
Fold and pinch the dough around the filling.
Avoid overfilling because the pastries may open during baking.
If using ground beef, cook it fully to 160°F (71°C) before adding it to the pastries. FoodSafety.gov
Step 11: Prepare for Baking
Preheat your oven to 375°F (190°C).
Line a baking sheet with parchment paper.
Arrange the shaped pastries on the prepared tray.
Leave approximately 1–2 inches of space between each piece.
In a small bowl, whisk together the egg yolk and milk.
Lightly brush the tops of the pastries with the egg wash.
Be careful not to flood the exposed cut layers, which could make them stick together.
Step 12: Bake Until Golden
Transfer the baking sheet to the preheated oven.
Bake for approximately 25–30 minutes.
The pastries should gradually puff and develop a beautiful golden-brown exterior.
Check them during the final minutes.
They are ready when the outside is deeply golden, the layers look crisp, and the centers are fully baked.
If needed, bake for a few additional minutes, especially for thicker or filled pastries.
Step 13: Cool and Serve
Remove the pastries from the oven.
Transfer them to a wire rack and allow them to cool for approximately 5–10 minutes.
For sweet pastries, drizzle with warm honey or dust lightly with powdered sugar.
For savory pastries, serve warm with your favorite dipping sauce.
Enjoy while the exterior is crisp and the inside remains soft and flaky.
7. Description
These homemade 1000-layer pastries are beautifully golden, crispy, and rich with buttery flavor.
Their most distinctive feature is the visible layered structure created by stretching, buttering, stacking, and rolling the dough.
During baking, the layers separate slightly, producing a delicate, flaky texture.
The exterior becomes golden brown with crisp edges, while the interior remains soft and tender.
Each bite reveals layers of buttery dough with a satisfying contrast between crunchiness and softness.
Sweet versions pair beautifully with honey and powdered sugar, while savory versions can be filled with cheese, vegetables, or seasoned beef.
These pastries are especially appealing because of their beautiful folded appearance and versatile flavor possibilities.
8. Nutritional Information
The following nutritional values are approximate estimates per pastry, assuming the recipe produces 12 plain pastries.
| Nutrient | Estimated Amount |
|---|---|
| Calories | 350–450 kcal |
| Protein | 5–7 g |
| Carbohydrates | 35–45 g |
| Total Fat | 22–30 g |
| Saturated Fat | 10–15 g |
| Fiber | 1–2 g |
Actual nutritional values depend on the amount of butter and oil used, pastry size, and optional fillings or toppings.
Sweet toppings such as honey and chocolate will increase the sugar and calorie content.
Cheese or meat fillings may increase the protein and fat content.
9. Recipe Details
| Category | Details |
|---|---|
| Recipe Name | Crispy 1000-Layer Pastries |
| Alternative Name | Baked Msemen-Style Layered Pastries |
| Cuisine | North African / Turkish-Inspired |
| Course | Breakfast / Snack / Pastry |
| Preparation Time | 35–45 minutes |
| Resting Time | 30 minutes |
| Baking Time | 25–30 minutes |
| Total Time | Approximately 1 hour 30 minutes |
| Servings | 10–12 pastries |
| Difficulty | Intermediate |
| Cooking Method | Oven-Baked |
| Main Ingredients | Flour, Butter, Milk, Oil |
| Best Served | Warm |
10. Conclusion
These Crispy 1000-Layer Pastries are a wonderful example of how simple ingredients can be transformed into impressive homemade baked goods.
The combination of soft dough, generous butter layers, careful shaping, and oven baking creates pastries that are beautifully golden and deliciously flaky.
Although preparing the thin layers requires a little patience, the result is well worth the effort.
Whether you prefer a sweet version drizzled with honey or a savory variation filled with cheese or seasoned beef, this recipe offers endless possibilities.
Perfect for breakfast, afternoon tea, family gatherings, or special occasions, these layered pastries are a delicious addition to any homemade baking collection.
11. Serving and Storage Recommendations
Serving Suggestions
These pastries taste best when served warm, shortly after baking.
For a sweet breakfast or afternoon snack, pair them with:
- Warm honey
- Powdered sugar
- Strawberry jam
- Melted chocolate
- Fresh fruit
- Moroccan mint tea
- Coffee
For a savory option, serve alongside:
- Cream cheese
- Feta cheese
- Olive tapenade
- Garlic yogurt sauce
- Fresh tomato salad
- Harissa sauce
Storage Instructions
Room Temperature: Store plain, unfilled pastries in an airtight container for up to 2 days.
Refrigerator: Store pastries containing cheese or cooked meat fillings in an airtight container for up to 3–4 days. Refrigerate within 2 hours of baking.
Freezer: Freeze cooled pastries in freezer-safe containers for up to 2 months for best quality.
Place parchment paper between layers to prevent sticking.
Reheating Instructions
To restore the crispy texture:
- Preheat the oven to 350°F (175°C).
- Arrange the pastries on a baking sheet.
- Heat plain pastries for approximately 7–10 minutes.
- Allow them to cool slightly before serving.
For filled pastries, allow additional time as needed and ensure the filling is heated thoroughly.
Avoid reheating in the microwave when possible, as it may soften the flaky exterior.
12. Embracing Healthful Indulgence
Homemade layered pastries are a delicious treat that can be enjoyed as part of a balanced eating routine.
While the butter and oil contribute to their rich flavor and flaky texture, portion sizes can be adjusted to suit individual preferences.
Preparing these pastries at home allows you to choose the ingredients, experiment with fillings, and adjust the amount of sweetness.
For a more balanced snack, consider pairing one pastry with fresh fruit, yogurt, or a protein-rich filling.
Savory versions featuring vegetables, spinach, or lean cooked beef can provide additional nutrients.
You can also reduce the amount of butter slightly, although this may affect the distinct layered texture.
The beauty of homemade pastries is the flexibility to experiment while enjoying the satisfaction of creating something delicious from scratch.
Enjoy these golden, buttery, beautifully layered pastries fresh from the oven!
#LayeredPastries #1000LayerPastry #MsemenInspired #HomemadePastries #FlakyPastryRecipe