
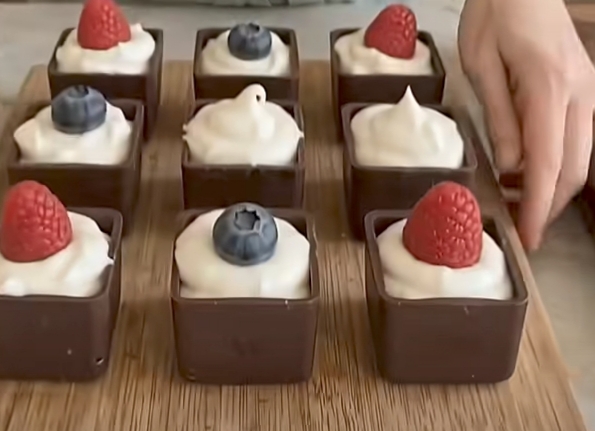
These elegant mini chocolate desserts feature crisp, rich chocolate shells filled with light, fluffy vanilla whipped cream. Topped with fresh raspberries and blueberries, they’re beautiful bite-sized treats perfect for parties, afternoon tea, dessert tables, or special occasions.
🛒 Ingredients
For the Chocolate Cups:
- 8 oz (225g) dark or semi-sweet chocolate, chopped
- 1 tsp coconut oil (optional)
For the Vanilla Whipped Cream Filling:
- 1 cup (240ml) heavy whipping cream, chilled
- 2–3 tbsp powdered sugar, sifted
- 1 tsp vanilla extract
- 2 oz (55g) mascarpone or cream cheese, softened (optional)
For the Berry Topping:
- 5–6 fresh raspberries
- 5–6 fresh blueberries
- Extra berries for decoration (optional)
- A little powdered sugar for dusting (optional)
👩🍳 How to Make It
1. Melt the Chocolate
Place the chopped chocolate in a heatproof bowl.
Melt gently using a microwave in short intervals, stirring between each one, or use a double boiler until completely smooth.
Add the coconut oil if desired and mix well.
2. Prepare the Silicone Mold
Use a clean square silicone ice cube or brownie bite mold.
Make sure the mold is completely dry before adding the chocolate.
3. Create the Chocolate Shells
Spoon approximately 1–2 tablespoons of melted chocolate into each mold cavity.
Use the back of a small spoon or a pastry brush to coat the bottom and sides evenly.
4. Chill the Chocolate Cups
Place the mold in the refrigerator for approximately 10–15 minutes until the chocolate becomes firm.
For stronger shells, apply a second thin layer of melted chocolate and refrigerate again.
5. Prepare the Whipped Cream
Pour the chilled heavy cream into a mixing bowl.
Add the powdered sugar and vanilla extract.
6. Whip Until Fluffy
Using an electric mixer, beat the mixture until soft-to-medium peaks form.
If using mascarpone or cream cheese, add it and continue mixing until the filling becomes smooth, thick, and stable.
Avoid overwhipping.
7. Unmold the Chocolate Cups
Once completely firm, carefully peel back the silicone mold to release the chocolate shells.
Arrange them on a serving tray.
8. Fill the Chocolate Cups
Transfer the whipped cream into a piping bag fitted with a decorative nozzle.
Pipe the creamy filling generously into each chocolate cup.
9. Add the Fresh Berries
Place a fresh raspberry and blueberry on top of each filled chocolate cup.
Arrange them attractively to create a colorful contrast against the white cream.
10. Chill Before Serving
Refrigerate the finished desserts for approximately 20–30 minutes to allow the filling to set.
Serve chilled.
💡 Tips for Success
- Use good-quality chocolate for a rich flavor and sturdy shells.
- Make sure the silicone mold is completely dry.
- Apply two chocolate layers for stronger, more durable cups.
- Chill the chocolate shells thoroughly before unmolding.
- Use very cold whipping cream for better volume.
- Add mascarpone for a thicker, more stable filling.
- Dry the berries thoroughly before decorating.
- Fill the cups shortly before serving to preserve their crisp texture.
- Store covered in the refrigerator for up to 2 days.
⏱️ Recipe Details
- Prep Time: 25 minutes
- Chilling Time: 45 minutes
- Total Time: Approximately 1 hour 10 minutes
- Yield: 9–12 mini chocolate cups
- Difficulty: Easy
- Calories: Approximately 180–250 kcal per cup
- Protein: Approximately 2–4g per cup
🍓 Final Touch: Enjoy these beautiful Mini Chocolate Cups with their crisp chocolate shells, silky vanilla whipped cream, and fresh juicy berries. A simple yet elegant bite-sized dessert that looks just like something from a professional pastry shop!