
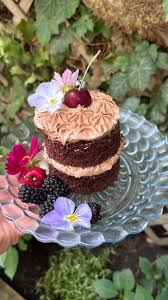
Two layers of soft, moist chocolate cake filled with rich chocolate cream cheese frosting, topped with fresh blackberries and delicate flowers for a beautiful rustic bakery-style finish.
Beginner-Friendly
Mini Layer Cake
Rustic Design
If you love beautiful homemade cakes but don’t want to spend hours creating complicated decorations, this Mini Chocolate Naked Cake with Blackberries is the perfect recipe.
Inspired by a rustic cake-decorating tutorial shared by Farah Sooji on TikTok, this elegant little cake combines two layers of moist chocolate sponge with generous chocolate frosting.
Unlike traditional fully frosted cakes, a naked cake leaves the sides exposed, allowing the chocolate layers and creamy filling to become part of the design.
Fresh blackberries and delicate food-safe flowers complete the presentation, creating a beautiful dessert that’s ideal for birthdays, small celebrations, afternoon tea, or intimate gatherings.
The best part? This rustic style is surprisingly forgiving, making it an excellent project for beginner bakers.
1. Introduction
A beautiful cake doesn’t always require complicated piping techniques or perfectly smooth frosting.
This mini chocolate naked cake proves that a simple design can look elegant and impressive.
The cake features two soft chocolate layers made with cocoa powder, buttermilk, and vegetable oil.
These ingredients create a moist, tender crumb with a rich chocolate flavor.
The filling is a creamy chocolate frosting made with butter, cream cheese, powdered sugar, and cocoa powder.
Instead of covering the entire cake, the frosting is spread generously between the layers and over the top.
The sides remain exposed, creating the signature rustic naked-cake appearance.
The finishing decorations include:
- Fresh blackberries
- Chocolate frosting
- Delicate food-safe flowers
- Beautifully visible chocolate cake layers
- A natural, slightly imperfect finish
This recipe is particularly suitable for anyone learning how to assemble and decorate layer cakes.
2. Origin and Cultural Significance
Naked cakes became especially popular in modern celebration-cake design because of their natural appearance and minimalist decorating style.
Unlike traditional cakes covered completely in buttercream or fondant, naked cakes allow the cake layers to remain visible.
This creates a rustic aesthetic often associated with garden parties, intimate weddings, birthdays, and handmade desserts.
The style emphasizes simplicity, natural ingredients, and elegant presentation.
Fresh fruit and flowers are commonly used as decorations because they add color and texture without requiring elaborate piping skills.
Miniature versions have become particularly popular for small gatherings and individual celebrations.
Their compact size makes them easier to assemble, transport, and decorate.
This chocolate version combines the familiar comfort of homemade chocolate cake with the understated elegance of rustic cake decorating.
3. Ingredients
For the Mini Chocolate Cake Layers
| Ingredient | Quantity |
|---|---|
| All-purpose flour | 1 cup (120 g) |
| Granulated sugar | ¾ cup (150 g) |
| Unsweetened cocoa powder | ⅓ cup (30 g) |
| Baking soda | ¾ teaspoon |
| Baking powder | ¼ teaspoon |
| Salt | ¼ teaspoon |
| Buttermilk | ½ cup (120 ml) |
| Vegetable oil | ¼ cup (60 ml) |
| Large egg | 1 |
| Alcohol-free vanilla extract | 1 teaspoon |
| Hot water or brewed coffee | ½ cup (120 ml) |
For the Chocolate Cream Cheese Frosting
| Ingredient | Quantity |
|---|---|
| Unsalted butter, softened | ½ cup (115 g) |
| Cream cheese, softened | 4 oz (115 g) |
| Powdered sugar, sifted | 2 cups (240 g) |
| Unsweetened cocoa powder | ⅓ cup (30 g) |
| Heavy cream or milk | 1–2 tablespoons |
| Salt | A small pinch |
For classic chocolate buttercream, replace the cream cheese with an additional ½ cup softened butter.
For Decoration
| Ingredient | Quantity |
|---|---|
| Fresh blackberries | 6–8 |
| Food-grade edible flowers | A few small blossoms |
| Additional chocolate frosting | As needed |
Important: Only use flowers positively identified as edible and grown for food use. Ordinary florist flowers may contain pesticide residues and should not be placed directly on a cake. Colorado State University Extension
4. Optional Additions
There are several delicious ways to customize this mini chocolate cake.
Chocolate Ganache Drizzle
Drizzle a small amount of cooled chocolate ganache over the top frosting.
This creates an extra-rich chocolate finish.
Raspberry Chocolate Cake
Replace the blackberries with fresh raspberries.
Their bright color and tart flavor complement the chocolate.
Strawberry Naked Cake
Use halved fresh strawberries for a colorful alternative.
Chocolate Hazelnut Filling
Spread a thin layer of chocolate hazelnut cream between the cake and frosting.
Vanilla Cream Cheese Frosting
Omit the cocoa powder from the frosting and add ½ teaspoon alcohol-free vanilla extract.
This creates a beautiful contrast between the dark cake layers and pale filling.
Coffee Chocolate Cake
Use freshly brewed coffee instead of hot water in the batter.
Coffee can enhance the depth of the chocolate flavor without making the cake taste strongly of coffee.
5. Tips for Success
Choose the right cake pans.
Two 5-inch round pans at least 2 inches deep are a practical choice.
For 4-inch pans, use sufficiently deep pans or divide excess batter into additional small cakes or cupcakes.
Never fill cake pans more than approximately halfway to two-thirds full, as overfilled pans may overflow during baking. King Arthur Baking
Use room-temperature ingredients.
Room-temperature eggs and buttermilk blend more evenly into the batter.
Do not overmix.
Mix only until the ingredients are combined.
Expect a thin batter.
The addition of hot water or coffee creates a relatively fluid chocolate cake batter.
This is normal.
Cool the cake completely.
Warm cake layers can melt the frosting and cause the cake to slide.
Level the cake layers.
Flat layers make stacking easier.
Use thick, stable frosting.
The frosting should be soft enough to spread but firm enough to support the upper cake layer.
Keep the sides exposed.
A true naked cake requires little or no frosting on the outside.
Dry the blackberries thoroughly.
Water on the fruit can stain or soften the frosting.
6. Step-by-Step Instructions
Step 1: Prepare the Oven and Cake Pans
Preheat your oven to 350°F (175°C).
Grease two 5-inch round cake pans.
Line the bottoms with parchment paper.
Lightly grease the parchment to make removing the cakes easier.
If using smaller 4-inch pans, make sure they are deep enough and leave sufficient room for the batter to rise.
Step 2: Combine the Dry Ingredients
In a medium mixing bowl, combine:
- 1 cup all-purpose flour
- ¾ cup granulated sugar
- ⅓ cup cocoa powder
- ¾ teaspoon baking soda
- ¼ teaspoon baking powder
- ¼ teaspoon salt
Whisk until evenly mixed.
Sift the cocoa powder if necessary to remove lumps.
Step 3: Add the Wet Ingredients
Add:
- ½ cup buttermilk
- ¼ cup vegetable oil
- 1 large egg
- 1 teaspoon alcohol-free vanilla extract
Mix gently until the wet and dry ingredients are combined.
Avoid excessive beating.
Step 4: Add the Hot Water or Coffee
Slowly pour in ½ cup hot water or freshly brewed coffee.
Stir until the batter becomes smooth.
The mixture will look thinner than many traditional cake batters.
This helps produce a moist chocolate cake.
Step 5: Divide the Batter
Pour the batter evenly between the prepared pans.
Do not fill either pan more than two-thirds full.
If there is excess batter, bake it separately in a small cupcake pan.
Tap the pans gently on the countertop to release large air bubbles.
Step 6: Bake the Chocolate Cake Layers
Place the pans on the middle oven rack.
Bake for approximately 22–32 minutes, depending on the pan size, depth, and amount of batter.
Begin checking at 22 minutes.
Insert a toothpick into the center of each cake.
The cakes are ready when the toothpick comes out clean or with a few moist crumbs.
The tops should spring back gently when touched.
Step 7: Cool the Cakes
Remove the pans from the oven.
Allow the cakes to cool in their pans for approximately 10 minutes.
Carefully turn them out onto a wire rack.
Remove the parchment paper.
Let the cake layers cool completely before decorating.
Step 8: Prepare the Chocolate Frosting
In a large mixing bowl, combine:
- ½ cup softened butter
- 4 oz softened cream cheese
Beat using an electric mixer until smooth and creamy.
Gradually add the sifted powdered sugar and cocoa powder.
Mix on low speed initially to prevent the dry ingredients from scattering.
Add a pinch of salt.
Step 9: Adjust the Frosting Consistency
Add 1 tablespoon heavy cream or milk.
Beat for approximately 2 minutes until smooth and fluffy.
If the frosting feels too thick, add another small splash of cream.
If it becomes too soft, refrigerate briefly until it firms up.
The frosting should hold its shape when spread or piped.
Step 10: Level the Cake Layers
Place the cooled cakes on a clean work surface.
If the tops have domed during baking, carefully trim them with a serrated knife.
This creates flat surfaces for stacking.
Brush away loose crumbs.
Step 11: Add the First Frosting Layer
Place the first chocolate cake layer onto a small cake stand or serving plate.
Spread a generous layer of chocolate frosting across the top.
You can use an offset spatula or a piping bag.
Keep the frosting approximately even.
Leave the outside edges slightly rustic rather than perfectly smooth.
Step 12: Stack the Second Cake Layer
Carefully place the second chocolate cake layer over the frosting.
Center it as evenly as possible.
Press very gently to secure it.
Avoid applying too much pressure, which could squeeze the frosting out.
Step 13: Frost the Top
Spread another generous layer of chocolate frosting over the upper cake layer.
Create gentle swirls using the back of a spoon or an offset spatula.
Leave the sides of the cake exposed.
The visible chocolate layers and filling should create the signature naked-cake appearance.
Step 14: Add the Blackberries
Wash the blackberries gently.
Pat them completely dry.
Arrange 6–8 whole berries in a small cluster near the center or slightly off-center on the top of the cake.
An asymmetrical arrangement often creates a more natural rustic appearance.
Step 15: Decorate with Flowers
Add a few small, food-grade edible blossoms around the blackberries.
Choose flowers that are safe for consumption and sourced specifically for culinary use.
If using non-edible decorative flowers, keep them entirely separate from the food using suitable food-safe decorative holders, and remove them before cutting or serving.
Do not insert ordinary florist stems or floral tape directly into the cake.
Step 16: Chill and Serve
Refrigerate the finished cake for approximately 20–30 minutes to help the frosting firm up.
Remove it from the refrigerator shortly before serving.
Slice carefully using a sharp knife.
Enjoy!
7. Description
This mini chocolate naked cake has a charming rustic appearance.
The two dark chocolate layers are clearly visible from the sides.
Between them sits a thick layer of rich chocolate frosting.
The top is covered with soft frosting swirls rather than a perfectly smooth surface.
Fresh blackberries provide a beautiful contrast with their deep purple-black color.
Delicate flowers add softness and elegance to the presentation.
Flavor Profile
- Rich chocolate: From cocoa powder in the cake and frosting.
- Creamy: From the butter and cream cheese frosting.
- Lightly tangy: From cream cheese and buttermilk.
- Fruity: From fresh blackberries.
- Sweet: From the chocolate frosting and tender cake layers.
Texture
The cake is moist and tender.
The frosting is thick, creamy, and smooth.
Fresh blackberries add a juicy contrast to the rich chocolate.
Together, the ingredients create an indulgent yet elegant dessert.
8. Nutritional Information
The following values are estimates based on dividing the cake into eight small slices.
| Nutrient | Approximate Amount Per Slice |
|---|---|
| Calories | 450–550 kcal |
| Protein | 4–6 g |
| Carbohydrates | 55–70 g |
| Total fat | 25–35 g |
| Dietary fiber | 2–4 g |
| Total sugars | 40–50 g |
Actual values depend on the amount of frosting used, cake dimensions, and serving size.
For smaller portions, divide the cake into ten slices instead of eight.
9. Recipe Details
| Detail | Information |
|---|---|
| Recipe Name | Mini Chocolate Naked Cake with Blackberries |
| Cuisine | Modern Bakery-Style |
| Course | Dessert |
| Preparation Time | 25 minutes |
| Baking Time | 22–32 minutes |
| Cooling Time | 60 minutes |
| Decorating Time | 20 minutes |
| Total Time | Approximately 2 hours |
| Servings | 6–8 |
| Difficulty | Beginner-Friendly |
| Cake Style | Two-Layer Naked Cake |
| Pan Size | Two 5-inch Round Pans |
| Baking Temperature | 350°F (175°C) |
| Frosting | Chocolate Cream Cheese |
| Main Garnish | Blackberries and Edible Flowers |
10. Conclusion
This Mini Chocolate Naked Cake with Blackberries is proof that beautiful cake decorating doesn’t have to be complicated.
The combination of moist chocolate cake, creamy frosting, fresh fruit, and delicate flowers creates an elegant dessert with minimal decorating techniques.
The exposed sides give the cake its distinctive rustic appearance.
Its small size makes it especially suitable for intimate celebrations or beginner bakers looking to practice assembling layer cakes.
With simple ingredients and a little patience, you can create a homemade dessert that looks like something from a specialty bakery.
11. Serving and Storage Recommendations
Best Ways to Serve
1. With Fresh Berries
Serve slices alongside additional blackberries, raspberries, or strawberries.
2. With Coffee
The chocolate flavor pairs beautifully with freshly brewed coffee.
3. With Vanilla Ice Cream
A small scoop of vanilla ice cream creates a delicious contrast.
4. For Small Celebrations
The mini cake is ideal for birthdays, anniversaries, and intimate gatherings.
5. With Hot Chocolate
Serve with a warm cup of hot chocolate for an especially rich dessert experience.
Storage Instructions
Refrigerator: Because the cake contains cream cheese frosting and fresh fruit, store it covered in the refrigerator.
For best quality, enjoy within 3–4 days.
Room Temperature: Do not leave the decorated cream cheese cake at room temperature for more than 2 hours.
FoodSafety.gov recommends refrigerating perishable cakes containing cream cheese frosting promptly. FoodSafety.gov
Freezer: Unfrosted cake layers can be wrapped tightly and frozen for up to 2 months for best quality.
Thaw in the refrigerator before decorating.
Make-Ahead Tips
The chocolate cake layers can be baked one day in advance.
Once completely cooled, wrap them tightly and refrigerate.
Prepare the frosting separately and keep it refrigerated.
Assemble the cake shortly before the event.
Add the blackberries and edible flowers near serving time to keep the decorations fresh.
12. Embracing Healthful Indulgence
Mini Chocolate Naked Cake is a rich dessert made with cocoa powder, sugar, butter, cream cheese, and flour.
The cake provides a delicious balance of chocolate flavor and creamy texture.
The blackberries add freshness, dietary fiber, and naturally occurring plant compounds.
However, the frosting and cake contain a substantial amount of sugar and fat, so portion size is worth considering.
For a lighter variation:
- Reduce the amount of frosting between the layers.
- Use smaller slices.
- Add more fresh berries.
- Replace part of the cream cheese frosting with a lighter yogurt-based topping, keeping the cake refrigerated.
- Serve with unsweetened tea or coffee.
Homemade baking allows you to control the ingredients and customize the presentation.
With its rich chocolate layers, creamy frosting, fresh blackberries, and charming rustic decorations, this Mini Chocolate Naked Cake is a beautiful dessert that proves simplicity can be truly elegant.
#MiniChocolateCake #NakedCake #ChocolateLayerCake #RusticCakeDesign #EasyCakeRecipes