
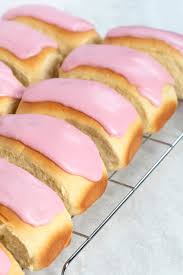
Fluffy, bakery-style sweet rolls topped with silky pink icing and delicate pressed flowers—a beautiful homemade treat for afternoon tea, celebrations, or a special dessert.
1. Introduction
There is something irresistible about freshly baked finger buns. Their soft, pillowy texture, delicate sweetness, and colorful icing make them a favorite in traditional bakeries.
These Pink Iced Finger Buns take the classic sweet bread roll and give it an elegant floral finish.
Each bun is made with a soft, buttery yeast dough, baked until lightly golden, and topped with a smooth pink glaze. Carefully arranged edible flowers add a charming finishing touch.
The result is a beautiful pastry that tastes as delightful as it looks.
Despite their decorative appearance, these buns are surprisingly achievable at home. With a little patience during the rising process, you can create 12 bakery-style buns with a tender crumb and glossy icing.
2. Origin and Cultural Significance
Iced finger buns have a long association with British and Australian bakeries.
Traditionally, they consist of elongated sweet bread rolls finished with a thick layer of icing. Some versions feature pink or white icing, while others include dried fruit, coconut, jam, or whipped cream.
Their simple preparation and soft texture have made them popular as an afternoon snack, school treat, and bakery favorite.
Modern versions often introduce fruit-flavored icing, creative fillings, and elegant decorations.
For example, raspberry-and-rose iced buns combine the familiar finger-bun shape with fruity and floral flavors. Sainsbury’s Magazine
This recipe builds on that idea by pairing a lightly sweetened bread dough with pastel berry icing and food-safe flowers.
The result is a traditional bakery treat with a contemporary, delicate appearance.
3. Ingredients
Makes 12 buns
Intermediate
For the Soft Sweet Buns
- 350 g strong white bread flour
- 150 g all-purpose flour
- 7 g instant dried yeast
- 50 g granulated sugar
- 1 teaspoon fine salt
- 250–270 ml lukewarm whole milk
- 1 large egg, at room temperature
- 50 g unsalted butter, softened
- 1 tablespoon milk, for brushing before baking
Baking note: The milk quantity is slightly higher than in the original draft to help produce a softer, more workable dough. Start with 250 ml and add more only if the dough feels unusually stiff.
For the Pink Berry Glaze
- 250 g powdered sugar, sifted
- 15 g unsalted butter, melted
- 3–4 tablespoons strained raspberry or strawberry puree, added gradually
- 1–2 teaspoons milk or water, if needed
- 1–2 drops pink gel food coloring, optional
- ½ teaspoon vanilla extract, optional
For Decoration
- 12–24 small, food-grade edible flowers
- Edible viola flowers, pansies, or culinary rose petals
- Optional freeze-dried raspberry powder for additional color
Optional Filling
Choose one of the following:
- ½ cup raspberry jam
- ½ cup strawberry jam
- 150 g sweetened whipped mascarpone
- 150 ml whipped cream, lightly sweetened
Important: Use only flowers specifically sold or grown for culinary use. Avoid hydrangeas, which are not suitable for edible cake decorations. Culinary violas, pansies, and rose petals are safer choices when properly identified and grown without unsuitable pesticides. RHS Advice
4. Optional Additions
These finger buns are easy to customize according to your preferred flavor and decoration style.
Strawberry glaze
Replace the raspberry puree with smooth, strained strawberry puree.
This creates a lighter pink icing with a gentle sweetness.
Blackberry glaze
Use strained blackberry puree for a deeper pink-purple color and slightly tangy flavor.
Lemon icing
Replace the berry puree with fresh lemon juice and enough milk to achieve the desired consistency.
Raspberry jam filling
Pipe a small amount of raspberry jam into the cooled buns before glazing.
This creates a fruity center that complements the soft bread.
Vanilla cream filling
Split each cooled bun lengthwise and pipe sweetened whipped cream into the middle.
This variation is best served shortly after assembly.
Coconut topping
Sprinkle a little desiccated coconut over the wet icing for a more traditional bakery-style finish.
5. Tips for Success
Use bread flour for a soft, structured dough
Strong bread flour contains more gluten-forming protein than ordinary all-purpose flour.
It helps the dough develop enough elasticity to hold its elongated shape while rising.
Combining bread flour with all-purpose flour creates a balance between structure and tenderness.
Keep the milk lukewarm
The milk should feel comfortably warm, not hot.
A temperature of approximately 100–110°F (38–43°C) works well for mixing with yeast dough.
Excessively hot liquid can damage the yeast.
Add the butter gradually
Knead the dough briefly before incorporating the softened butter.
Adding the butter gradually helps create a smooth, elastic dough with an even texture.
Allow the dough to rise fully
The first rise develops volume and flavor.
The second rise gives the shaped buns their fluffy, bakery-style appearance.
Avoid rushing either stage.
Keep the buns close together while baking
Arrange the shaped buns with approximately 2 cm of space between them.
As they rise and bake, they may gently touch.
This helps create soft sides when they are pulled apart.
Cool completely before icing
Warm bread will cause the glaze to melt and slide off.
Let the buns reach room temperature before decorating.
Use thick but spreadable icing
The glaze should slowly flow from a spoon without immediately becoming transparent or running off the bun.
If it becomes too thin, add a little more powdered sugar.
If it is too thick, add a few drops of milk or berry puree.
6. Step-by-Step Instructions
Step 1: Combine the Dry Ingredients
In a large mixing bowl, combine:
- Bread flour
- All-purpose flour
- Instant yeast
- Granulated sugar
- Salt
Whisk gently to distribute the ingredients evenly.
If using a stand mixer, attach the dough hook.
Step 2: Add the Milk and Egg
In a separate bowl, lightly beat the egg.
Pour 250 ml of lukewarm milk into the flour mixture, followed by the beaten egg.
Mix until a rough dough forms.
If the dough appears too dry to come together, add a little more milk, one tablespoon at a time.
Step 3: Incorporate the Butter
Begin kneading the dough.
Add the softened butter in small portions, allowing each addition to become incorporated before adding more.
Continue kneading for approximately 8–12 minutes by hand or 7–10 minutes in a stand mixer.
The dough should become smooth, stretchy, and slightly tacky.
Avoid adding excessive flour, as this can produce dense buns.
Step 4: Let the Dough Rise
Shape the dough into a ball.
Place it in a lightly greased bowl and cover with a clean kitchen towel or plastic wrap.
Leave it in a warm, draft-free place for approximately 60–90 minutes.
The dough should roughly double in size.
Step 5: Divide the Dough
Transfer the risen dough to a lightly floured work surface.
Gently press it down to release large air bubbles.
Divide it into 12 equal pieces.
Each piece should weigh approximately 75–78 g, depending on the final milk quantity.
For evenly sized buns, use a kitchen scale.
Step 6: Shape the Finger Buns
Take one piece of dough and flatten it into a small rectangle.
Fold the longer edges toward the middle and pinch them together.
Roll gently with your palms to form an elongated bun approximately 10–12 cm long.
Repeat with the remaining dough.
Try to make all the buns similar in size so they bake evenly.
Step 7: Arrange and Proof
Line a large baking tray with parchment paper.
Place the buns on the tray, leaving approximately 2 cm between them.
Cover loosely with a clean kitchen towel.
Allow them to rise for another 35–45 minutes, or until visibly puffy.
The buns should feel light and airy.
Step 8: Preheat the Oven
Preheat the oven to:
- 375°F (190°C) conventional
- 340°F (170°C) fan-assisted
Lightly brush the tops of the buns with milk.
This encourages a gentle golden color during baking.
Step 9: Bake Until Golden
Place the baking tray on the middle rack.
Bake for approximately 14–18 minutes, depending on the size of the buns and your oven.
The tops should become lightly golden, and the buns should feel firm enough to hold their shape while remaining soft.
Avoid overbaking, as this can dry out the bread.
Step 10: Cool Completely
Remove the buns from the oven.
Let them rest on the tray for approximately 5 minutes before transferring them to a cooling rack.
Allow them to cool completely before applying the icing.
Step 11: Prepare the Pink Glaze
Place the sifted powdered sugar in a medium bowl.
Add the melted butter and 3 tablespoons of strained berry puree.
Mix until smooth.
Gradually add more puree or a few drops of milk until the glaze becomes thick, glossy, and spreadable.
For a stronger pastel pink, add a small amount of pink gel food coloring.
Stir until the color is uniform.
Step 12: Add an Optional Filling
If using raspberry or strawberry jam, create a small opening in one end of each cooled bun.
Transfer the jam to a piping bag fitted with a narrow tip.
Carefully pipe a small amount into each bun.
Avoid overfilling, as the jam may escape through the sides.
For a cream filling, split the buns lengthwise instead and pipe the cream inside.
Step 13: Dip the Buns in Pink Icing
Hold one bun gently by its sides.
Dip the top into the prepared glaze, coating the upper surface evenly.
Lift the bun and let the excess icing drip back into the bowl.
Alternatively, use a small offset spatula to spread the icing across the top.
Repeat with the remaining buns.
Step 14: Decorate with Edible Flowers
While the icing remains wet, carefully arrange one or two small edible flowers on each bun.
Press the flowers gently into the icing so they adhere without becoming damaged.
For the prettiest result, choose a mixture of pale pink, lavender, purple, and white edible petals.
Allow the icing to set for approximately 20–30 minutes before serving.
7. Description
These Pink Iced Finger Buns have a delicate, bakery-style appearance.
The bread is soft, fluffy, and lightly buttery, with a tender golden exterior and pale interior.
A smooth layer of pastel pink icing covers each bun, creating a beautiful contrast with the warm bread underneath.
The berry glaze contributes a subtle fruity sweetness that complements the rich dough.
The edible flowers add visual elegance, making each bun look like a handcrafted pastry from a boutique bakery.
When sliced or pulled apart, the interior reveals a soft, airy crumb.
If filled with raspberry jam, the buns also contain a bright fruity center.
They offer a pleasant balance between soft bread, sweet glaze, and delicate berry flavor.
8. Nutritional Information
The following values are approximate estimates for one bun without optional jam or cream filling.
| Nutrient | Approximate Amount |
|---|---|
| Calories | 300–330 kcal |
| Carbohydrates | 55–59 g |
| Protein | 5–7 g |
| Total Fat | 7–9 g |
| Saturated Fat | 4–5 g |
| Sugar | 24–27 g |
| Fiber | 1–2 g |
| Sodium | 150–200 mg |
Actual values depend on ingredient brands, icing thickness, and individual bun size.
Adding jam or cream will increase the calorie and sugar or fat content.
9. Recipe Details
| Detail | Information |
|---|---|
| Recipe Name | Pink Iced Finger Buns |
| Cuisine | British-Inspired Bakery |
| Course | Dessert, Sweet Snack |
| Preparation Time | 30 minutes |
| First Rise | 60–90 minutes |
| Second Rise | 35–45 minutes |
| Baking Time | 14–18 minutes |
| Cooling and Decorating | 40–60 minutes |
| Total Time | Approximately 3–4 hours |
| Yield | 12 buns |
| Difficulty | Intermediate |
| Main Ingredients | Flour, milk, yeast, butter, powdered sugar |
| Flavor Profile | Sweet, buttery, lightly fruity |
| Texture | Soft bread with smooth icing |
| Best Served | Fresh, at room temperature |
10. Conclusion
Pink Iced Finger Buns combine the comforting taste of homemade sweet bread with the beauty of elegant bakery decorations.
Their soft, buttery texture provides the perfect foundation for a smooth berry-flavored glaze.
The pastel icing and delicate edible flowers transform a simple bread roll into an attractive dessert suitable for celebrations, afternoon tea, or homemade gifts.
With carefully measured ingredients, proper kneading, and enough time for the dough to rise, these buns can be recreated successfully in a home kitchen.
Whether enjoyed plain or filled with raspberry jam, they are a charming and delicious treat.
11. Serving and Storage Recommendations
Best Ways to Serve
These buns taste best when freshly baked and decorated.
Serve them at room temperature once the icing has set.
They pair wonderfully with:
- Hot tea
- Coffee
- Cappuccino
- Fresh strawberries or raspberries
- A small bowl of whipped cream
Storage at Room Temperature
For unfilled buns or buns filled only with shelf-stable jam, store in a clean, airtight container in a cool, dry place.
Enjoy within 1–2 days for the best texture.
Keep the decorated buns in a single layer whenever possible to protect the icing and flowers.
Refrigerating Cream-Filled Buns
Buns filled with whipped cream or mascarpone must be refrigerated.
Store them in a covered container at 40°F (4°C) or below.
For the best quality, consume within 1–2 days.
Freezing
For best results, freeze the baked buns before adding the icing.
Allow them to cool completely, wrap individually, and place in a freezer-safe container.
Freeze for up to 2 months for optimal quality.
Thaw at room temperature before adding the glaze and floral decorations.
Make-Ahead Tip
The buns can be baked the day before serving.
Once fully cooled, store them tightly covered.
Prepare the glaze and decorate shortly before serving for the freshest appearance.
12. Embracing Healthful Indulgence
Homemade pastries offer a wonderful opportunity to enjoy a special dessert while controlling the ingredients and portion sizes.
These pink iced finger buns use familiar baking ingredients, including flour, milk, eggs, butter, and sugar.
The enriched dough provides satisfying flavor and texture, while the fruit-based glaze adds sweetness and color.
For a slightly lighter variation, consider:
- Applying a thinner layer of icing.
- Using natural berry puree instead of additional food coloring.
- Choosing a modest amount of jam rather than a rich cream filling.
- Making 14 smaller buns instead of 12 larger ones.
- Serving with fresh fruit.
Although these buns are a sweet treat rather than an everyday nutritional staple, they can certainly be enjoyed as part of a balanced eating pattern.
Their homemade quality, delicate flavor, and beautiful presentation make them especially rewarding to prepare and share.
#PinkIcedBuns #FingerBuns #HomemadeBaking #BerryGlaze #SweetBread