
Introduction
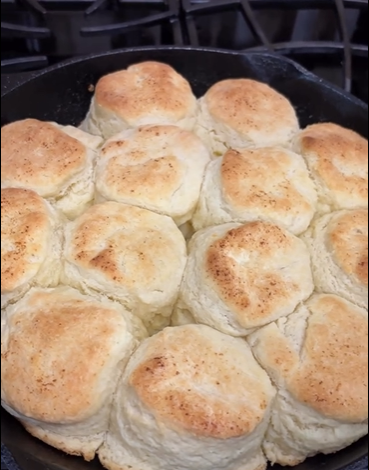
Fluffy Cast-Iron Buttermilk Biscuits are a classic homemade comfort food, featuring tender, buttery layers, soft centers, and beautifully golden tops. Made with simple pantry ingredients, these biscuits rise in the oven to create a light texture and a rich, buttery flavor.
Baking the biscuits close together in a cast-iron skillet helps keep their sides soft while allowing the tops to develop a delicate golden crust. Cold butter and tangy buttermilk are the secrets to creating biscuits that are both flavorful and flaky.
Perfect for breakfast, brunch, or dinner, these homemade biscuits pair wonderfully with honey, jam, sausage gravy, fried chicken, or a simple pat of butter. With just 33 minutes from preparation to serving, they are an excellent choice whenever you want fresh, homemade bread without yeast.
Origin
Buttermilk biscuits have a long history in Southern American cooking, where quick breads made with flour, fat, and chemical leavening became everyday staples. Before modern baking powder became widely available, cooks often relied on other leavening methods to create lighter breads.
The development of baking powder and baking soda made biscuits easier to prepare without yeast or lengthy rising times. Buttermilk became a popular ingredient because its acidity works with baking soda to help the dough rise while contributing a distinctive tangy flavor.
Cast-iron cookware also became closely associated with traditional Southern kitchens because it distributes heat effectively and can last for generations. Although biscuit recipes differ from household to household, the combination of cold fat, buttermilk, and gentle handling remains central to many classic versions.
Cultural Significance
In Southern American food culture, biscuits are more than a simple baked side dish. They are often served at family breakfasts, holiday gatherings, Sunday dinners, and community meals.
Their versatility has helped make them a staple across generations. A freshly baked biscuit can be enjoyed with butter and preserves in the morning, served alongside fried chicken at dinner, or covered with creamy sausage gravy for a hearty brunch.
Cast-iron skillets add a traditional, rustic touch to the preparation. Baking biscuits together in one pan creates soft sides and a welcoming presentation that makes them especially appealing for sharing with family and friends.
Ingredients and Quantities
For 10–12 biscuits:
- 3 cups all-purpose flour
- 1 tablespoon baking powder
- ½ teaspoon baking soda
- 1 teaspoon salt
- 1 tablespoon granulated sugar, optional
- ¾ cup cold unsalted butter, cubed
- 1¼ cups cold buttermilk
- 2 tablespoons melted butter, for brushing
- Extra flour, for shaping
Optional Additions
Customize your homemade biscuits with these simple variations:
- Cheddar cheese: Fold in ¾ cup shredded cheddar for savory, cheesy biscuits.
- Fresh herbs: Add 1–2 tablespoons of chopped chives, parsley, or thyme.
- Garlic butter: Mix a little garlic powder into the melted butter used for brushing.
- Honey: Replace the optional sugar with 1 tablespoon of honey for a subtle sweetness, adjusting the liquid slightly if necessary.
- Black pepper: Add freshly ground black pepper for a savory finish.
- Whole-wheat flour: Replace a small portion of the all-purpose flour with whole-wheat flour for a nuttier flavor and slightly denser texture.
For the fluffiest traditional biscuits, keep the basic recipe simple and avoid adding too many ingredients that could weigh down the dough.
Tips for Success
1. Keep the butter cold.
Cold butter creates small pockets in the dough that help produce tender, flaky layers during baking. If the butter begins to soften while you work, refrigerate the mixture briefly before continuing.
2. Use cold buttermilk.
Cold buttermilk helps keep the butter firm and contributes moisture and flavor. Measure it before beginning so it is ready when you need it.
3. Avoid overworking the dough.
Mix only until the ingredients come together. Excessive mixing can develop too much gluten, resulting in biscuits that are tough rather than tender.
4. Fold the dough gently.
Folding the dough two or three times creates layers without requiring complicated techniques. Handle it gently and avoid pressing out all the air.
5. Cut without twisting.
Use a sharp, floured biscuit cutter and press straight down. Twisting the cutter can seal the edges of the dough and interfere with an even rise.
6. Arrange the biscuits close together.
Placing the biscuits so their sides touch slightly encourages them to rise upward and keeps their sides soft. For crispier sides, leave a little space between them.
7. Preheat the oven properly.
A hot oven helps the biscuits rise quickly and develop golden tops. Make sure the oven reaches 425°F (220°C) before placing the skillet inside.
8. Avoid overbaking.
Check the biscuits after 15 minutes. Remove them when they are fully risen and lightly golden, adjusting the baking time to suit your oven.
Instructions
Step 1: Prepare the oven and skillet
Preheat the oven to 425°F (220°C). Lightly grease a 10-inch (25-cm) cast-iron skillet or a similarly sized round baking pan.
Step 2: Combine the dry ingredients
In a large mixing bowl, whisk together the all-purpose flour, baking powder, baking soda, salt, and optional sugar. Make sure the leavening agents are evenly distributed throughout the flour.
Step 3: Cut in the butter
Add the cold, cubed butter to the flour mixture. Use a pastry cutter or your fingertips to work it in until the mixture resembles coarse crumbs, with several pea-sized pieces of butter remaining.
Avoid warming the butter too much while mixing.
Step 4: Add the buttermilk
Pour the cold buttermilk into the bowl. Stir gently with a fork until a soft, slightly sticky dough forms.
If the dough looks a little shaggy, that is fine. Avoid adding too much extra flour or mixing until completely smooth.
Step 5: Fold the dough
Transfer the dough to a lightly floured surface. Gently pat it into a rectangle, then fold it in half.
Repeat this folding process two or three times to build flaky layers. Handle the dough gently and use only enough flour to prevent sticking.
Step 6: Cut the biscuits
Pat the dough to a thickness of approximately ¾–1 inch (2–2.5 cm). Use a floured round cutter to cut out the biscuits, pressing straight down without twisting.
Gather any remaining dough scraps gently, pat them together, and cut additional biscuits.
Step 7: Arrange the biscuits
Place the biscuits in the prepared skillet, arranging them close together so their sides touch slightly. Brush the tops with melted butter.
Step 8: Bake until golden
Bake for 15–20 minutes, or until the biscuits have risen and their tops are lightly golden. If your oven heats unevenly, rotate the skillet carefully near the end of baking.
Step 9: Brush and serve
Remove the skillet from the oven and brush the hot biscuits with a little additional melted butter if desired.
Allow them to cool for a few minutes before serving. Enjoy warm with butter, honey, jam, sausage gravy, or your favorite savory dishes.
Description
Fluffy Cast-Iron Buttermilk Biscuits are soft, buttery, and wonderfully tender, with delicate layers and golden tops. The combination of cold butter, tangy buttermilk, and baking powder creates a light texture without requiring yeast or lengthy preparation.
Baking the biscuits together in a cast-iron skillet gives them soft sides and a beautiful rustic appearance. Their mild, buttery flavor makes them suitable for both sweet and savory accompaniments, from honey and fruit preserves to fried chicken and creamy gravy.
Simple enough for everyday cooking and delicious enough for a special brunch, these biscuits are a timeless addition to any homemade meal.
Nutritional Information
Estimated nutrition per biscuit, assuming 12 biscuits:
- Calories: 250
- Protein: 5 g
- Carbohydrates: 29 g
- Fat: 13 g
- Fiber: 1 g
- Sugar: 2–3 g
- Sodium: Approximately 250–350 mg
These values are estimates and will vary depending on the flour brand, butter quantity, buttermilk type, biscuit size, and amount of melted butter used for brushing. Larger biscuits will contain more calories and nutrients per serving.
Conclusion
Fluffy Cast-Iron Buttermilk Biscuits are a delicious example of how simple ingredients can produce exceptional homemade baking. Their tender centers, buttery layers, and golden tops make them a versatile favorite for breakfast, brunch, and dinner.
The recipe relies on a few essential techniques: keeping the butter cold, mixing the dough gently, folding it to create layers, and baking at a high temperature. Once you master these steps, you can easily adapt the biscuits with herbs, cheese, or other favorite ingredients.
Fresh from the oven and served with your preferred toppings, these biscuits bring warmth and comfort to any meal.
Recommendation
For a traditional Southern-inspired breakfast, serve these biscuits with butter, honey, fruit preserves, or creamy sausage gravy. They are also excellent alongside fried chicken, roasted vegetables, soups, and hearty stews.
If you’re preparing breakfast for guests, mix the dry ingredients in advance and measure the butter and buttermilk before starting. For the best texture, combine the ingredients and bake the biscuits shortly before serving.
Store cooled leftovers in an airtight container at room temperature for up to two days, or refrigerate them for longer storage. Reheat briefly in a 300°F (150°C) oven until warmed through. Avoid overheating, as this can dry out the biscuits.
Embracing Healthful Indulgence
Homemade buttermilk biscuits can be enjoyed as part of a varied eating pattern. Flour provides carbohydrates, while butter contributes richness and flavor. Buttermilk adds moisture and helps create the biscuits’ characteristic tender crumb.
For a savory variation, serve a biscuit with eggs and vegetables. You can also experiment with fresh herbs or a small amount of cheese to introduce additional flavor without changing the preparation significantly.
The beauty of homemade baking lies in enjoying fresh food, sharing it with others, and adapting recipes to your preferences. These fluffy biscuits offer a comforting, versatile addition to the table that can be enjoyed in both sweet and savory ways.