
Introduction
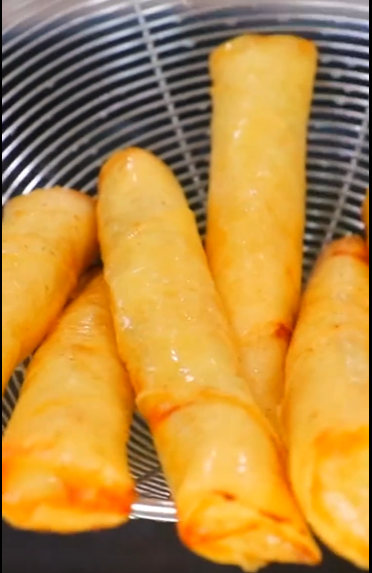
Crispy golden chicken spring rolls are a delicious appetizer featuring a crunchy exterior and a savory filling made with tender chicken, fresh vegetables, garlic, and aromatic seasonings. Each roll is fried until golden brown, creating a satisfying contrast between the crisp wrapper and the flavorful filling inside.
This homemade recipe combines shredded chicken with cabbage, carrots, and onions, while soy sauce, oyster sauce, sesame oil, and ginger add depth and a savory aroma. Served with sweet chili sauce, these spring rolls make a wonderful starter, party snack, or addition to an Asian-inspired meal.
With straightforward preparation and readily available ingredients, this recipe is suitable for home cooks who want to prepare restaurant-style spring rolls in their own kitchen. The filling can also be prepared ahead of time, making assembly and frying easier when serving guests.
Origin
Spring rolls have a long culinary history in China and are associated with seasonal celebrations, particularly the Spring Festival. Early versions were connected with the tradition of eating thin pancakes filled with seasonal vegetables to celebrate the arrival of spring.
Over time, spring rolls developed into many different forms throughout East and Southeast Asia. Their wrappers, fillings, cooking methods, and dipping sauces vary considerably by region.
Some versions are served fresh, while others are fried until crisp. Fillings may include vegetables, pork, chicken, shrimp, tofu, or other locally available ingredients.
This crispy chicken version is a modern variation inspired by the broader tradition of filled and fried rolls. The combination of chicken, cabbage, carrots, and savory sauces creates a convenient appetizer that draws on familiar Asian-inspired flavors without representing one specific traditional regional recipe.
Cultural Significance
Spring rolls are enjoyed in many Asian cuisines and have become popular worldwide as appetizers, snacks, and party foods. Their versatility makes them suitable for everyday meals as well as festive gatherings.
In Chinese food culture, spring rolls are particularly associated with springtime celebrations. Their golden color is sometimes connected symbolically with prosperity and good fortune, especially when served during festive occasions.
Across different countries, cooks have adapted spring rolls to local ingredients and preferences. Some emphasize vegetables and herbs, while others feature meat, seafood, or noodles.
Chicken spring rolls are a convenient variation for family gatherings because they can be prepared in batches and served alongside different dipping sauces. Their crunchy texture and savory filling also make them a popular choice for sharing.
Ingredients and Quantities
This recipe makes approximately 12 spring rolls and serves 6 people, assuming two rolls per serving.
For the Spring Rolls
- 12 spring roll wrappers
- 1 lb boneless, skinless chicken breast, approximately 450 g
- 1 cup finely shredded cabbage, approximately 70–90 g
- 1 medium carrot, grated
- 1 small onion, finely chopped
- 2 cloves garlic, minced
- 2 tablespoons soy sauce
- 1 tablespoon oyster sauce
- 1 teaspoon sesame oil
- 1/2 teaspoon ground ginger
- 1/2 teaspoon paprika
- 1/2 teaspoon ground black pepper
- 1/2 teaspoon salt, or to taste
- 2 tablespoons vegetable oil, for cooking the filling
- Vegetable oil, as needed for deep-frying
For Sealing the Wrappers
- 2 tablespoons all-purpose flour
- 3 tablespoons water
Mix the flour and water together to make a smooth paste that helps seal the spring rolls.
For Serving
- Sweet chili sauce, as desired
- Optional additional dipping sauces, such as soy-based dipping sauce or a mild garlic sauce
Check the labels of the spring roll wrappers and sauces if you have dietary restrictions. Oyster sauce typically contains oyster extract, and some wrappers may contain egg or other ingredients.
Optional Additions
These spring rolls are delicious as written, but additional ingredients can provide different flavors and textures.
Bean sprouts: Add a small handful for a light crunch. Cook them briefly and allow excess moisture to evaporate before filling the wrappers.
Bell peppers: Finely sliced red or yellow bell peppers add sweetness and color.
Mushrooms: Finely chopped mushrooms provide an earthy, savory flavor. Cook them until their moisture has evaporated.
Green onions: Add chopped green onions near the end of cooking for a fresh, mild onion flavor.
Fresh cilantro: Mix a small amount of chopped cilantro into the cooled filling for an herbal note.
Chili flakes: Add a pinch to the chicken mixture if you prefer a spicier filling.
Rice noodles: A small amount of cooked, finely cut rice noodles can add texture and make the filling more substantial.
Garlic dipping sauce: Serve the rolls with a mild garlic sauce for an alternative to sweet chili sauce.
Tips for Success
1. Cut the Chicken Finely
Small, evenly sized pieces of chicken distribute more easily through the filling and make the spring rolls easier to shape.
You can finely chop the chicken before cooking or cook it first and shred it afterward. If using a whole chicken breast, ensure it is cooked completely before assembling the rolls.
2. Cook the Filling Thoroughly
Cook the chicken until its internal temperature reaches 165°F (74°C). Stir frequently so the pieces cook evenly.
After adding the vegetables and seasonings, continue cooking until the vegetables soften slightly and excess liquid evaporates.
3. Cool the Filling Completely
Allow the filling to cool completely before assembling the spring rolls. Warm filling can soften or tear the wrappers and may cause steam to build up inside the rolls.
Cooling also makes the mixture easier to handle and roll tightly.
4. Avoid Excess Moisture
A dry filling is essential for crispy spring rolls. If the vegetables release too much liquid, continue cooking until the excess moisture evaporates.
Avoid adding unnecessary sauce to the wrappers, as moisture can make them fragile and increase the chance of splitting during frying.
5. Roll Tightly but Gently
Place the filling near one corner of the wrapper, fold the corner over it, tuck in both sides, and roll toward the opposite corner.
Keep the roll snug enough to hold its shape without stretching or tearing the wrapper.
6. Seal the Edge Properly
Apply a thin layer of flour paste to the final corner before closing the roll. Press gently to ensure the wrapper sticks.
Avoid using too much paste, which can make the edge gummy.
7. Maintain the Correct Oil Temperature
Heat the frying oil to approximately 350°F (175°C). If the oil is too cool, the wrappers may absorb excess oil. If it is too hot, the outside can brown before the inside becomes thoroughly hot.
Use a kitchen thermometer whenever possible.
8. Fry in Small Batches
Add only a few spring rolls at a time. Overcrowding the pan lowers the oil temperature and prevents the wrappers from crisping evenly.
Allow the oil to return to the target temperature between batches.
9. Drain on a Wire Rack
A wire rack allows excess oil to drain while air circulates around the rolls. This helps preserve their crisp texture.
If using paper towels, transfer the rolls off the towels after draining so their undersides do not become damp.
10. Serve Fresh
Spring rolls are at their crispiest shortly after frying. Serve them warm with the dipping sauce on the side rather than pouring sauce directly over the rolls.
Instructions
Step 1: Prepare the Chicken
Finely chop the chicken breast into small pieces or cook it and shred it into thin strands.
Heat two tablespoons of vegetable oil in a large skillet over medium heat. Add the chopped onion and garlic, then sauté for approximately two minutes until fragrant and slightly softened.
Add the chicken and cook for six to eight minutes, stirring frequently, or until it reaches an internal temperature of 165°F (74°C).
Step 2: Add the Vegetables and Seasonings
Add the shredded cabbage and grated carrot to the skillet.
Stir in the soy sauce, oyster sauce, sesame oil, ground ginger, paprika, black pepper, and salt.
Cook for another three to four minutes, stirring regularly, until the vegetables soften slightly and excess moisture evaporates.
Taste the mixture and adjust the seasoning if needed. Remove the skillet from the heat and allow the filling to cool completely.
Step 3: Prepare the Sealing Paste
In a small bowl, combine the flour and water.
Mix until smooth, forming a thick but spreadable paste. Set it aside for sealing the wrappers.
Step 4: Position the Wrappers
Place one spring roll wrapper on a clean work surface with one corner pointing toward you, creating a diamond shape.
Keep the remaining wrappers covered with a clean, slightly damp towel according to the package instructions so they do not dry out while you work.
Step 5: Add the Filling
Spoon approximately two to three tablespoons of the cooled chicken mixture near the bottom corner of the wrapper.
Shape the filling into a short horizontal line, leaving enough space around the edges to fold the wrapper securely.
Avoid overfilling, as too much filling can make the wrapper difficult to seal.
Step 6: Roll the Spring Rolls
Fold the bottom corner over the filling and tuck it underneath gently.
Fold the left and right corners toward the center, enclosing the sides of the filling.
Roll the wrapper tightly toward the remaining corner. Brush a little flour paste onto the final edge and press it closed.
Repeat with the remaining wrappers and filling.
Step 7: Heat the Oil
Pour enough vegetable oil into a deep, heavy-bottomed saucepan or deep skillet to submerge the spring rolls safely.
Heat the oil to 350°F (175°C), checking with a kitchen thermometer.
Use a pan with plenty of room above the oil to reduce the risk of splashing. Never leave hot oil unattended.
Step 8: Fry Until Golden
Carefully lower a few spring rolls into the hot oil, working in small batches.
Fry for approximately three to five minutes, turning occasionally, until the wrappers are evenly golden brown and crisp.
Because the chicken was cooked before assembly, the main goal is to heat the filling thoroughly while crisping the wrapper. If the rolls were refrigerated after assembly, check that the centers are hot before serving.
Step 9: Drain the Spring Rolls
Using a slotted spoon or tongs, transfer the cooked spring rolls to a wire rack or a paper towel-lined plate.
Allow them to drain for about two minutes. Avoid covering them while hot, as trapped steam can soften the wrappers.
Step 10: Serve and Enjoy
Arrange the spring rolls on a serving platter.
Serve warm with sweet chili sauce or your preferred dipping sauce. For a complete meal, pair them with steamed rice, stir-fried vegetables, or a fresh salad.
Description
Crispy golden chicken spring rolls combine a delicate, crunchy wrapper with a flavorful filling of tender chicken, cabbage, carrots, and aromatic seasonings.
The chicken provides a satisfying savory base, while the cabbage and carrot add texture and mild sweetness. Garlic, ginger, soy sauce, oyster sauce, and sesame oil bring the ingredients together with a rich, Asian-inspired flavor.
Deep-frying creates the characteristic golden exterior, delivering a crisp bite that contrasts beautifully with the soft filling inside. Sweet chili sauce adds a balance of sweetness, gentle heat, and tanginess.
These spring rolls work well as an appetizer, party snack, or part of a larger meal. They can be served on their own or accompanied by rice, noodles, and vegetables.
For the best results, serve them immediately after frying while the wrappers are still crisp and the filling is warm.
Nutritional Information
The following values are approximate per serving, assuming the recipe makes 12 spring rolls and each serving contains two rolls. The estimate includes some oil absorbed during frying but excludes additional dipping sauce.
- Calories: approximately 300–380
- Protein: approximately 18–22 g
- Carbohydrates: approximately 25–35 g
- Fat: approximately 12–20 g
- Saturated fat: approximately 2–4 g
- Sugar: approximately 2–5 g
- Fiber: approximately 2–4 g
- Sodium: approximately 500–900 mg
Actual nutrition will depend on the spring roll wrappers, amount of oil absorbed, chicken portion, sauces, and serving size. Soy sauce and oyster sauce can contribute substantial sodium, while sweet chili sauce adds additional sugar and calories.
These figures are estimates rather than laboratory-tested values. For a more accurate calculation, use the nutrition information for your exact ingredients and divide the total by the number of servings.
Conclusion
Crispy golden chicken spring rolls are a delicious homemade appetizer that combines a crunchy exterior with a tender, savory chicken and vegetable filling.
Although the recipe involves several steps, preparing the filling in advance makes assembly straightforward. By keeping the filling cool and relatively dry, sealing the wrappers carefully, and maintaining the correct frying temperature, you can achieve crisp, golden results.
These spring rolls are ideal for family meals, gatherings, celebrations, or whenever you want a flavorful snack with a satisfying crunch. Serve them fresh with sweet chili sauce for a simple and crowd-pleasing dish.
Recommendation
For the crispiest results, fry the spring rolls shortly before serving and keep the dipping sauce separate until they reach the table.
If you want to prepare ahead, make the filling earlier in the day and refrigerate it promptly. Assemble the rolls once the filling has cooled, then refrigerate them in a covered container until you are ready to fry them.
For longer storage, freeze assembled, uncooked spring rolls in a single layer until firm, then transfer them to a freezer-safe container. Follow the wrapper manufacturer’s guidance and cook them thoroughly from frozen or partially thaw them according to the wrapper instructions. Frozen rolls may require a different cooking time, so check that the filling is hot throughout and avoid adding ice-covered rolls to hot oil.
Leftover cooked spring rolls should be refrigerated promptly and eaten within three to four days. Reheat them in an oven or air fryer until crisp and thoroughly hot, rather than using a microwave if you want to preserve their crunch.
Pair the rolls with fresh vegetables or a light salad to create a more varied meal.
Embracing Healthful Indulgence
Deep-fried spring rolls are a satisfying treat that can be enjoyed as part of a varied eating pattern. The chicken contributes protein, while the vegetables provide flavor, texture, and some fiber.
To introduce more vegetables, increase the amount of cabbage and carrot or add mushrooms, spinach, or bell peppers. Keep the filling relatively dry so the wrappers remain crisp.
If you prefer to use less oil, you can experiment with baking the spring rolls or cooking them in an air fryer. Lightly brush or spray the wrappers with oil and cook until golden and crisp, turning as needed. Results may vary depending on the wrapper type and appliance, so follow the package instructions where available.
You can also serve the rolls with a moderate amount of dipping sauce and add a fresh salad or vegetable side.
The goal is to enjoy the flavors and textures you love while creating meals with variety. With their crispy wrappers and savory chicken filling, these homemade spring rolls are a versatile option for sharing with family and friends.