
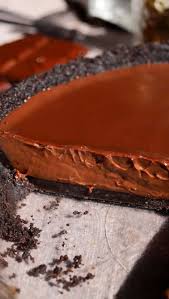
A rich, creamy chocolate pie featuring a crunchy Oreo cookie crust, a thick and silky dark chocolate filling, and a fluffy whipped cream topping. This indulgent dessert sets beautifully in the refrigerator without ever needing an oven.
12 servings · 30–40 minutes preparation and cooking · At least 6 hours chilling
1. Introduction
If you’re a chocolate lover searching for a rich, creamy dessert, this Ultimate No-Bake Chocolate Pie is a wonderful choice.
Inspired by the recipe from Scientifically Sweet, this dessert combines a buttery Oreo cookie crust with a luxurious chocolate custard made from bittersweet chocolate, milk chocolate, cream, and egg yolks.
Unlike traditional baked chocolate pies, this version requires no oven. The crust firms up in the refrigerator, while the chocolate filling is gently cooked on the stovetop before chilling into a smooth, sliceable consistency.
The combination of dark and milk chocolate creates a balanced flavor that’s rich without being overwhelmingly bitter.
Finished with fluffy whipped cream and optional chocolate shavings, this pie makes an elegant dessert for celebrations, family gatherings, or weekend treats.
2. Origin and Cultural Significance
Chocolate cream pies have long been popular in American baking, particularly as comforting diner-style desserts.
Traditional chocolate cream pies typically feature a pastry or cookie crust filled with cooked chocolate custard and topped with whipped cream.
No-bake variations simplify the process by replacing the traditional baked pastry crust with crushed cookies and melted butter.
The chocolate filling is still cooked, but the assembled pie sets through refrigeration instead of baking.
This particular version, developed by Christina Marsigliese of Scientifically Sweet, uses a combination of bittersweet and milk chocolate to create a texture between silky chocolate pudding and rich ganache. Scientifically Sweet
Its appeal lies in the contrast between the crisp cookie crust, smooth chocolate filling, and light whipped cream topping.
3. Ingredients
A. For the Oreo Cookie Crust
- 22 whole Oreo cookies (approximately 265 g), including the cream filling
- 5 tablespoons (70 g) salted butter, melted
If using unsalted butter, add a small pinch of salt.
B. For the Chocolate Custard Filling
- 7 oz (200 g) bittersweet chocolate, approximately 70% cocoa solids, finely chopped
- 3 oz (85 g) milk chocolate, finely chopped
- ⅓ cup (65 g) granulated sugar
- 2 tablespoons (16 g) cornstarch
- 2 tablespoons (12 g) Dutch-processed cocoa powder
- ⅛ teaspoon salt
- 1¼ cups (300 ml) whole milk
- 1 cup (237 ml) heavy whipping cream
- 3 large egg yolks
- 2 tablespoons (28 g) cold unsalted butter, cubed
- ½ teaspoon alcohol-free vanilla flavoring
C. For the Optional Whipped Cream Topping
- 1 cup (237 ml) cold heavy whipping cream
- 2 tablespoons powdered sugar
- ¼ teaspoon alcohol-free vanilla flavoring
Optional Garnishes
- Dark chocolate shavings
- Chocolate curls
- Crushed Oreo cookies
- A light dusting of cocoa powder
4. Optional Additions
Extra Dark Chocolate Pie: Replace a small portion of the milk chocolate with additional bittersweet chocolate for a more intense flavor, noting that the sweetness and consistency may change.
Oreo Crumb Topping: Sprinkle crushed Oreo cookies over the whipped cream for additional crunch.
Salted Chocolate Variation: Finish each slice with a tiny pinch of flaky sea salt.
Coffee Chocolate Pie: Add ½ teaspoon instant espresso powder to the custard mixture to enhance the chocolate flavor.
Peanut Butter Chocolate Pie: Spread a thin layer of peanut butter over the chilled Oreo crust before adding the chocolate filling.
Vanilla Whipped Cream: Add a little extra alcohol-free vanilla flavoring to the whipped topping for a more pronounced aroma.
5. Tips for Success
Crush the Cookies Finely
The Oreo cookies should resemble fine crumbs.
Large cookie pieces can make the crust difficult to press evenly into the pie dish.
Press the Crust Firmly
Use the flat bottom of a measuring cup or drinking glass to press the crumbs into the pan.
The crust should be compact enough to hold together without becoming excessively hard.
Use High-Quality Chocolate
The chocolate is the main flavor in this recipe.
Using good-quality bittersweet and milk chocolate helps create a smooth filling with a balanced taste.
Keep the Heat Gentle
Cook the custard over medium-low heat while stirring constantly.
High heat can cause the eggs to curdle and the filling to become grainy.
Reach the Correct Temperature
The original recipe recommends cooking the custard to approximately 185°F (85°C), while stirring constantly and avoiding a vigorous boil. This helps the cornstarch thicken the mixture properly. Scientifically Sweet
Egg-based custards should also reach at least 160°F (71°C) for food safety. USAPEEC
Don’t Skip the Chilling Time
The pie needs at least six hours in the refrigerator to set.
Overnight chilling provides the most reliable texture for neat slices.
Whip the Cream Just Before Serving
Fresh whipped cream creates a light contrast to the rich chocolate filling.
Avoid overwhipping, which can make it grainy.
6. Instructions
Part 1: Prepare the Oreo Cookie Crust
Step 1: Crush the Oreo cookies.
Place the whole Oreo cookies, including their cream filling, into a food processor.
Pulse until they become fine crumbs.
Alternatively, place the cookies in a sealed plastic bag and crush them with a rolling pin.
Step 2: Add the melted butter.
Transfer the cookie crumbs to a mixing bowl.
Pour in the melted butter.
Stir until all the crumbs are evenly coated and resemble damp sand.
Step 3: Form the crust.
Transfer the mixture into a 9-inch (23 cm) pie dish, approximately 1½–2 inches deep.
Press evenly across the bottom and up the sides.
Step 4: Refrigerate.
Place the prepared crust in the refrigerator for 30 minutes to firm up.
Part 2: Prepare the Chocolate Filling
Step 5: Chop the chocolate.
Finely chop the bittersweet and milk chocolate.
Place both in a large heatproof mixing bowl.
Set aside.
Step 6: Combine the dry ingredients.
In a medium heavy-bottomed saucepan, whisk together:
- Granulated sugar
- Cornstarch
- Cocoa powder
- Salt
Mix until evenly combined.
Step 7: Add the milk and cream.
Gradually pour in the milk while whisking.
Add the heavy whipping cream and continue mixing until smooth.
Step 8: Add the egg yolks.
Add the egg yolks one at a time, whisking thoroughly after each addition.
Make sure the mixture is completely blended before turning on the heat.
Part 3: Cook the Chocolate Custard
Step 9: Heat gently.
Place the saucepan over medium-low heat.
Whisk continuously as the mixture warms.
Step 10: Thicken the custard.
Continue cooking for approximately 10–15 minutes, stirring constantly.
The custard will gradually become thicker and smoother.
Once it begins thickening, switch to a wooden spoon or silicone spatula to scrape the bottom and sides thoroughly.
Step 11: Check the consistency.
Continue cooking until the custard produces gentle bubbles and reaches approximately 185°F (85°C).
It should be thick enough to coat the back of a spoon.
Avoid a vigorous boil.
Part 4: Make the Silky Chocolate Filling
Step 12: Strain the custard.
Immediately pour the hot custard through a fine-mesh sieve into the bowl containing the chopped chocolate.
This removes any small lumps and helps create a smooth texture.
Step 13: Melt the chocolate.
Allow the hot custard to sit over the chocolate for approximately 2 minutes.
Then whisk gently until the chocolate melts completely.
Step 14: Add butter and vanilla.
Stir in the cold cubed butter and vanilla flavoring.
Continue mixing until the filling becomes smooth, glossy, and evenly combined.
Part 5: Assemble and Chill the Pie
Step 15: Fill the Oreo crust.
Allow the filling to cool for approximately 5 minutes.
Pour it into the chilled cookie crust.
Smooth the surface using a spatula.
Step 16: Cool briefly.
Allow the pie to stand at room temperature for approximately 20 minutes.
Step 17: Refrigerate.
Transfer the pie to the refrigerator uncovered for the first hour.
Once the surface has firmed slightly, cover loosely with foil or food-safe wrap without touching the filling.
Step 18: Chill until set.
Refrigerate for at least 6 hours, preferably overnight.
The chocolate filling should become firm enough to slice while remaining creamy.
Part 6: Prepare the Whipped Cream
Step 19: Whip the cream.
Place the cold heavy whipping cream and powdered sugar into a chilled mixing bowl.
Beat with an electric mixer until soft-to-medium peaks form.
Step 20: Add vanilla.
Mix in the vanilla flavoring.
Avoid whipping until the cream becomes stiff and grainy.
Part 7: Decorate and Serve
Step 21: Slice the pie.
Remove the chilled pie from the refrigerator.
Use a sharp knife to cut it into 12 slices.
Wipe the knife between cuts for neat portions.
Step 22: Add whipped cream.
Spoon or pipe a generous dollop of whipped cream onto each slice.
Step 23: Garnish.
Finish with chocolate shavings, chocolate curls, or crushed Oreo cookies.
Serve immediately while chilled.
7. Description
This Ultimate No-Bake Chocolate Pie features a beautiful contrast between its dark cookie crust and silky chocolate filling.
The Oreo crust is firm, buttery, and slightly crunchy.
The chocolate filling is dense yet exceptionally smooth, offering a texture between creamy pudding and rich chocolate ganache.
Bittersweet chocolate contributes depth, while milk chocolate adds sweetness and creaminess.
The whipped cream topping introduces a light, airy contrast that balances the richness of the pie.
| Component | Flavor and Texture |
|---|---|
| Oreo crust | Crunchy, buttery, chocolatey |
| Bittersweet chocolate | Rich, intense, slightly bitter |
| Milk chocolate | Sweet, creamy |
| Chocolate custard | Silky, dense, smooth |
| Whipped cream | Light, airy, delicate |
| Finished pie | Rich, creamy, indulgent |
8. Nutritional Information
Approximate nutritional values per slice, assuming 12 servings with the optional whipped cream topping:
| Nutrient | Estimated Amount |
|---|---|
| Calories | 450–550 kcal |
| Protein | 5–7 g |
| Carbohydrates | 40–50 g |
| Total Fat | 30–38 g |
| Saturated Fat | 17–23 g |
| Sugar | 27–35 g |
| Fiber | 2–4 g |
Values depend on the chocolate, cookie, butter, and cream brands and the amount of topping used.
9. Recipe Details
| Detail | Information |
|---|---|
| Recipe Name | Ultimate No-Bake Chocolate Pie |
| Cuisine | American-Inspired |
| Course | Dessert |
| Preparation Time | 15–20 minutes |
| Custard Cooking Time | 10–15 minutes |
| Crust Chilling | 30 minutes, overlapping with filling preparation |
| Final Chilling Time | At least 6 hours |
| Total Time | Approximately 7 hours |
| Servings | 12 slices |
| Pan Size | 9-inch deep pie dish |
| Difficulty | Easy to Moderate |
| Cooking Method | Stovetop Cooking and Refrigeration |
| Best Served | Chilled |
10. Conclusion
Ultimate No-Bake Chocolate Pie is a delicious dessert for anyone who enjoys rich chocolate flavors and smooth, creamy textures.
The buttery Oreo crust creates a crunchy base, while the combination of bittersweet and milk chocolate produces a luxurious filling.
Because the pie sets in the refrigerator, there’s no need to turn on the oven.
Although the custard requires careful stirring, the preparation is straightforward and well suited to home bakers.
With its glossy chocolate filling and fluffy whipped cream topping, this dessert is a wonderful choice for special occasions, dinner parties, or chocolate cravings.
11. Serving and Storage Recommendations
Best Ways to Serve
Serve the pie well chilled for the cleanest slices and smoothest texture.
It pairs beautifully with:
- Fresh strawberries
- Raspberries
- Hot coffee
- Unsweetened tea
- Additional whipped cream
Refrigerating Leftovers
Because the pie contains eggs, milk, and cream, it must remain refrigerated.
Store covered at 40°F (4°C) or below.
Consume within 3–4 days, consistent with refrigerated custard pie guidance. FoodSafety.gov
Avoid leaving the pie at room temperature for more than two hours.
Freezing
The original recipe allows the chocolate pie to be frozen without the whipped cream topping for up to three months.
Wrap the chilled pie securely before freezing.
Thaw overnight in the refrigerator, then garnish with freshly whipped cream. Scientifically Sweet
Make-Ahead Tips
Prepare the pie one or two days before serving.
Keep it refrigerated and covered.
Add the whipped cream and chocolate decorations shortly before serving for the freshest appearance.
12. Embracing Healthful Indulgence
This No-Bake Chocolate Pie is a rich dessert best enjoyed as an occasional treat.
The chocolate, cream, butter, and cookie crust contribute its indulgent flavor and creamy texture.
Dark chocolate also contains cocoa-derived compounds, although the finished pie remains high in added sugar and saturated fat.
For a slightly lighter serving, consider:
- Cutting the pie into 12 smaller slices rather than 8 large ones.
- Using a smaller dollop of whipped cream.
- Serving with fresh berries.
- Reducing the powdered sugar in the topping.
- Enjoying a modest portion after a balanced meal.
Because the chocolate proportions help the filling set correctly, it’s best not to make major substitutions to the chocolates or dairy without adjusting the recipe.
The beauty of this dessert lies in the contrast between its crisp Oreo crust, velvety chocolate filling, and delicate whipped cream.
With its rich chocolate flavor, silky custard texture, and irresistible cookie crust, this Ultimate No-Bake Chocolate Pie is a wonderful homemade dessert for chocolate lovers.
#NoBakeChocolatePie #ChocolateDessert #OreoCrust #EasyNoBakeDesserts #HomemadePie