
Introduction
Filipino celebrations are known for their generous food spreads, vibrant flavors, and comforting dishes that bring family and friends together. From birthdays and holidays to reunions and neighborhood gatherings, certain recipes have become beloved staples of Filipino party tables.
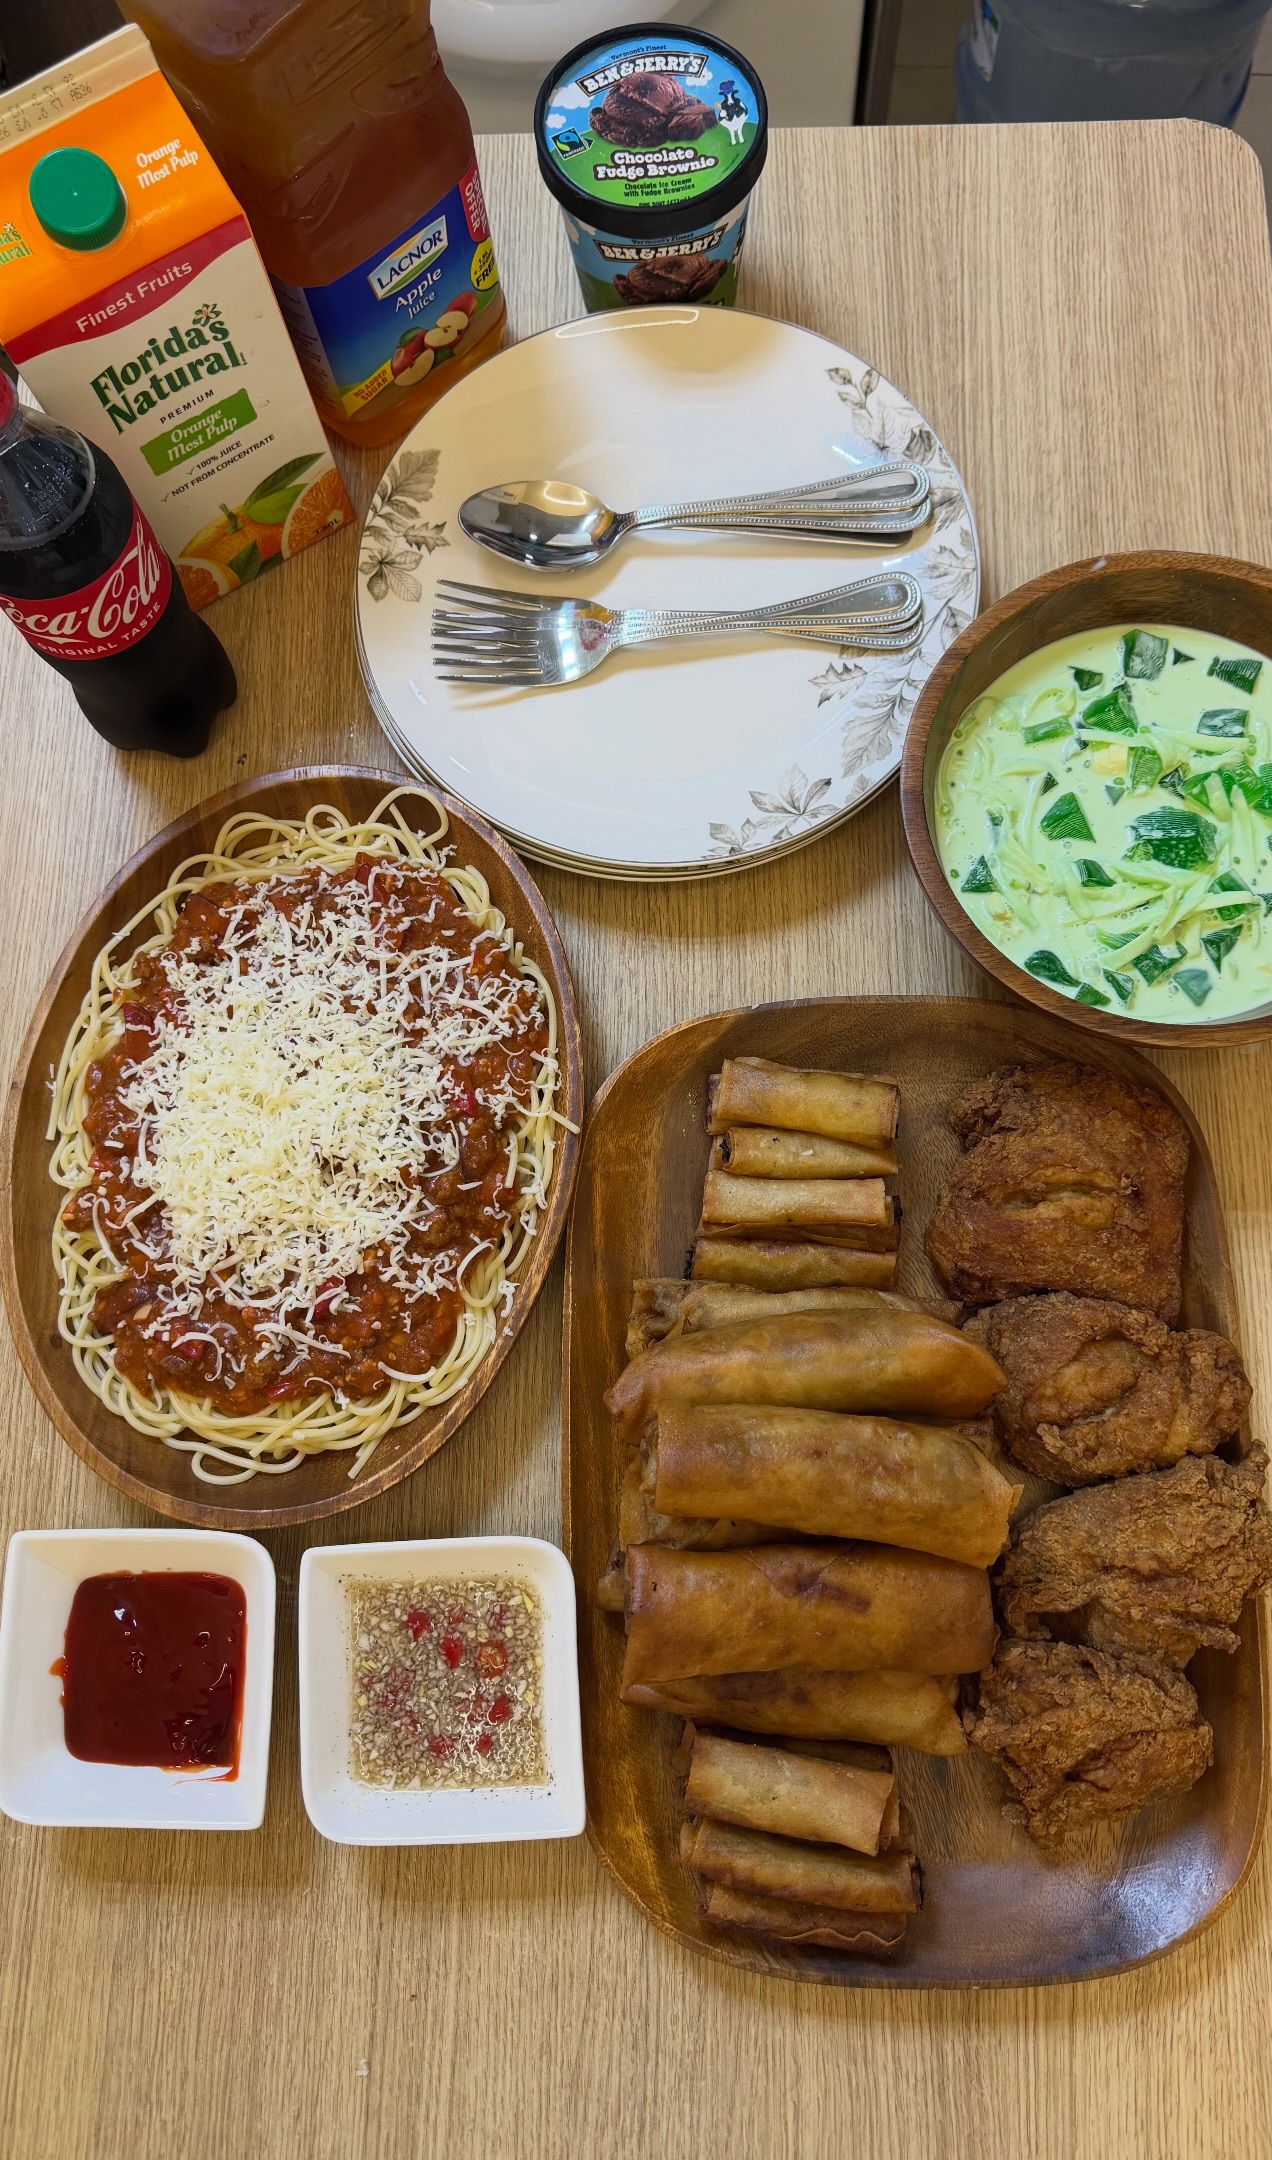
This collection features four classic Filipino-inspired celebration favorites: sweet-style spaghetti, crispy Lumpiang Shanghai, golden Pinoy fried chicken, and creamy Buko Pandan Salad.
Each dish offers a different flavor and texture. Filipino spaghetti combines a sweet tomato-based meat sauce with sliced hot dogs and shredded cheese. Lumpiang Shanghai delivers a satisfying crunch with its savory meat filling and delicate fried wrapper. Pinoy fried chicken adds a crispy, juicy centerpiece, while Buko Pandan Salad provides a refreshing tropical dessert.
Together, these recipes create a colorful and satisfying celebration menu that reflects the warmth, hospitality, and food traditions of the Philippines.
Origin and Cultural Significance
Filipino party food reflects the country’s diverse culinary history, shaped by Indigenous traditions and centuries of cultural exchange.
Filipino-style sweet spaghetti is a distinctive adaptation of Italian-inspired pasta. Its sweet tomato sauce, sliced hot dogs, ground meat, and generous cheese topping have made it particularly popular at children’s birthday parties and family celebrations.
Lumpiang Shanghai reflects Chinese culinary influence on Filipino cuisine. These small, crispy spring rolls have become a staple of celebrations and are commonly served with sweet chili sauce or seasoned vinegar.
Pinoy fried chicken is another popular celebration dish. Although fried chicken appears in many culinary traditions, Filipino versions often feature garlic-forward marinades, flavorful coatings, and an especially crisp exterior.
Buko Pandan Salad combines young coconut, pandan-flavored jelly, sweetened milk, and cream. Its refreshing flavor and distinctive green color make it a familiar dessert at Filipino gatherings.
These dishes are more than everyday meals. They are associated with sharing food, welcoming guests, and celebrating important moments with loved ones.
Recipe 1: Filipino-Style Sweet Spaghetti
Introduction
Filipino-Style Sweet Spaghetti is a comforting pasta dish featuring a rich, sweet-savory tomato sauce, tender ground beef, sliced hot dogs, and plenty of shredded cheese.
Unlike traditional Italian spaghetti, this Filipino favorite is known for its noticeably sweeter sauce, often prepared with banana ketchup and Filipino sweet-style spaghetti sauce.
The combination of sweet tomato flavors, savory meat, and creamy cheese makes this dish especially popular at birthday parties and family celebrations.
Ingredients
For the Spaghetti
- 1 lb (450–500 g) spaghetti noodles
- Water for boiling
- Salt for the pasta water
For the Sweet Meat Sauce
- 1 lb (450 g) ground beef
- 4 beef or chicken hot dogs, sliced diagonally
- 1 can (14 oz / 400 g) tomato sauce
- 1 package (26 oz / 737 g) Filipino sweet-style spaghetti sauce
- ½ cup (120 ml) banana ketchup
- 1 medium yellow onion, finely chopped
- 4 garlic cloves, minced
- 2 tablespoons (28 g) butter
- Up to 2 tablespoons sugar, to taste
- Salt and freshly ground black pepper, to taste
For Topping
– 1 cup (approximately 110 g) shredded cheddar cheese
Optional Additions
- Finely diced red bell pepper
- Additional shredded quick-melt cheese
- A small amount of tomato paste for a thicker sauce
- A pinch of black pepper for additional warmth
- Extra banana ketchup for a sweeter Filipino-style flavor
Tips for Success
- Use Filipino sweet-style spaghetti sauce for the characteristic flavor.
- Choose beef or chicken hot dogs as an alternative to the traditional meat variety.
- Add sugar gradually because the prepared sauce and banana ketchup are already sweet.
- Brown the ground beef thoroughly for a richer sauce.
- Simmer the sauce gently to blend the flavors.
- Cook the pasta just until al dente to prevent it from becoming mushy.
- Add the cheese while the spaghetti is warm so it softens slightly.
Instructions
Step 1: Prepare the Ingredients
Finely chop the onion and mince the garlic.
Slice the hot dogs diagonally into bite-sized pieces.
Measure the tomato sauce, sweet-style spaghetti sauce, and banana ketchup.
Set the ingredients aside.
Step 2: Cook the Spaghetti
Bring a large pot of salted water to a rolling boil.
Add the spaghetti noodles and cook according to the package instructions until al dente.
Drain the pasta and set aside.
Step 3: Sauté the Aromatics
Place a large saucepan over medium heat.
Melt the butter.
Add the chopped onion and cook for approximately 3–4 minutes until softened.
Stir in the minced garlic and cook for another 30–60 seconds until fragrant.
Step 4: Brown the Ground Beef
Add the ground beef to the saucepan.
Break it into small pieces using a wooden spoon.
Cook for approximately 5–7 minutes, or until thoroughly browned.
Drain excess fat if necessary.
Step 5: Add the Hot Dogs
Stir the sliced beef or chicken hot dogs into the browned meat.
Cook for approximately 2–3 minutes until lightly browned and heated through.
Step 6: Build the Sweet Spaghetti Sauce
Pour in the tomato sauce, Filipino sweet-style spaghetti sauce, and banana ketchup.
Stir thoroughly until evenly combined.
Bring the mixture to a gentle simmer.
Step 7: Season and Simmer
Taste the sauce before adding sugar.
Add sugar gradually, only if additional sweetness is desired.
Season with salt and black pepper.
Reduce the heat to low and simmer for approximately 15–20 minutes, stirring occasionally.
The sauce should become thick, rich, and flavorful.
Step 8: Assemble the Spaghetti
Arrange the cooked spaghetti on a large serving platter or individual plates.
Spoon the sweet meat sauce generously over the noodles.
Alternatively, toss the pasta directly into the sauce.
Step 9: Add the Cheese
Sprinkle shredded cheddar cheese over the warm spaghetti.
Allow the cheese to soften slightly from the heat.
Serve immediately.
Description
Filipino-Style Sweet Spaghetti features tender pasta coated in a thick, sweet-savory tomato sauce filled with ground beef and sliced hot dogs.
The banana ketchup and sweet-style spaghetti sauce create the dish’s distinctive flavor, while shredded cheese provides a creamy, salty contrast.
Nutritional Information
Approximate per serving, based on eight servings.
| Nutrient | Estimated Amount |
|---|---|
| Calories | 480–620 kcal |
| Protein | 23–30 g |
| Carbohydrates | 60–75 g |
| Fat | 15–25 g |
| Fiber | 3–5 g |
Recipe Details
- Prep Time: 15 minutes
- Cook Time: 30 minutes
- Total Time: 45 minutes
- Servings: 6–8
- Cuisine: Filipino
- Course: Main dish
- Difficulty: Easy
Conclusion
Filipino-Style Sweet Spaghetti is a beloved celebration dish that combines sweet tomato sauce, savory beef, tender pasta, and plenty of cheese.
Its familiar flavor and generous portions make it a wonderful addition to birthday parties and family gatherings.
Recommendation
Serve warm with crispy fried chicken or Lumpiang Shanghai.
Store leftovers in airtight containers in the refrigerator for up to 3–4 days. Reheat thoroughly to 165°F (74°C).
Embracing Healthful Indulgence
This dish provides protein from ground beef and cheese, along with carbohydrates from pasta.
For a lighter variation, use lean ground beef, reduce the added sugar, and serve alongside vegetables.
Recipe 2: Crispy Filipino Lumpiang Shanghai
Introduction
Lumpiang Shanghai is one of the most recognizable Filipino party appetizers, featuring thin, crispy spring roll wrappers filled with a savory mixture of ground meat, vegetables, and seasonings.
These bite-sized rolls are fried until golden and crunchy, then served with sweet chili sauce, banana ketchup, or seasoned vinegar.
This version uses ground beef or chicken instead of the traditional pork filling, while preserving the familiar garlic, onion, and vegetable flavors.
Ingredients
For the Filling
- 1 lb (450 g) ground beef or ground chicken
- 1 medium carrot, finely minced
- 1 small onion, finely minced
- 3 garlic cloves, finely minced
- 1 large egg
- 2 tablespoons (30 ml) soy sauce
- 1 teaspoon sesame oil
- ½ teaspoon salt, or to taste
- ½ teaspoon ground black pepper
For Wrapping and Frying
- 30–40 spring roll or lumpia wrappers
- 1 tablespoon flour mixed with 2 tablespoons water, for sealing
- Vegetable oil for deep frying
For Serving
- Sweet chili sauce
- Seasoned vinegar
- Banana ketchup, optional
Optional Additions
- Finely chopped green onions
- Minced celery
- Finely diced water chestnuts for crunch
- A small amount of grated ginger
- Chopped parsley
Tips for Success
- Mince the vegetables finely so the filling cooks evenly.
- Use a thin layer of filling rather than overstuffing the wrappers.
- Keep unused wrappers covered with a slightly damp towel.
- Seal each roll securely to prevent it from opening during frying.
- Maintain the frying oil around 350°F (175°C).
- Fry in small batches to avoid lowering the oil temperature.
- Ensure the meat filling is completely cooked before serving.
Instructions
Step 1: Prepare the Vegetables
Peel and finely mince the carrot.
Finely chop the onion and garlic.
Place the prepared vegetables in a large mixing bowl.
Step 2: Make the Filling
Add the ground beef or chicken to the bowl.
Add the egg, soy sauce, sesame oil, salt, and black pepper.
Mix thoroughly until the ingredients are evenly distributed.
Avoid overworking the mixture.
Step 3: Prepare the Wrappers
Place one lumpia wrapper on a clean work surface.
Keep the remaining wrappers covered to prevent drying.
Position the wrapper with one corner facing you if using square wrappers.
Step 4: Add the Filling
Place approximately 1 tablespoon of filling near the lower edge of the wrapper.
Shape the mixture into a thin log.
Leave enough space around the edges for folding.
Step 5: Roll the Lumpia
Fold the bottom corner over the filling.
Roll tightly toward the center.
Fold in the sides.
Continue rolling until almost completely sealed.
Brush the final edge with the flour-water paste.
Press gently to seal.
Step 6: Repeat
Continue filling and rolling until all the meat mixture has been used.
Arrange the prepared rolls in a single layer on a tray.
Avoid stacking them excessively before frying.
Step 7: Heat the Oil
Pour vegetable oil into a deep, heavy-bottomed pot or skillet.
Heat to approximately 350°F (175°C).
Use enough oil to allow the rolls to fry evenly without overcrowding the pot.
Step 8: Fry the Lumpia
Carefully lower several rolls into the hot oil.
Fry for approximately 5–8 minutes, turning occasionally, until golden brown and fully cooked.
The filling should reach 160°F (71°C) for ground beef or 165°F (74°C) for ground chicken.
Step 9: Drain
Remove the cooked lumpia using a slotted spoon or tongs.
Transfer to a wire rack set over a baking sheet.
Allow excess oil to drain.
Step 10: Serve
Arrange the crispy Lumpiang Shanghai on a serving platter.
Serve immediately with sweet chili sauce or seasoned vinegar.
Description
Lumpiang Shanghai features a thin, golden, crunchy wrapper surrounding a flavorful filling of seasoned ground meat, carrots, onions, and garlic.
The savory filling contrasts beautifully with the crispy exterior, making these spring rolls a popular appetizer for parties and family meals.
Nutritional Information
Approximate per roll, assuming 35 rolls.
| Nutrient | Estimated Amount |
|---|---|
| Calories | 65–100 kcal |
| Protein | 3–5 g |
| Carbohydrates | 5–8 g |
| Fat | 3–6 g |
| Fiber | 0–1 g |
Recipe Details
- Prep Time: 30 minutes
- Cook Time: 15–25 minutes, depending on batches
- Total Time: Approximately 45–55 minutes
- Yield: 30–40 rolls
- Cuisine: Filipino
- Course: Appetizer or party snack
- Difficulty: Moderate
Conclusion
Crispy Lumpiang Shanghai is a delicious party favorite with a crunchy exterior and savory filling.
Its bite-sized shape makes it ideal for sharing, while the flavorful filling pairs beautifully with sweet or tangy dipping sauces.
Recommendation
Serve freshly fried for maximum crispness.
Uncooked lumpia can be frozen in a single layer, then transferred to freezer-safe containers. Fry directly from frozen, adjusting the cooking time and verifying that the filling reaches a safe temperature.
Refrigerate cooked leftovers for up to 3–4 days and reheat until thoroughly hot.
Embracing Healthful Indulgence
Lumpiang Shanghai provides protein from its meat filling and small amounts of vegetables.
Using lean ground beef or chicken can reduce fat content, while baking or air-frying offers an alternative to deep frying.
Recipe 3: Extra-Crispy Pinoy Fried Chicken
Introduction
Pinoy Fried Chicken is a flavorful, crispy chicken dish commonly enjoyed at Filipino birthday parties, family celebrations, and casual gatherings.
This version features chicken pieces marinated in garlic, soy sauce, and citrus, then coated in seasoned flour and cornstarch before frying until deeply golden.
The result is juicy, flavorful chicken with a crisp, crunchy exterior.
The original description did not include a separate fried chicken recipe, so the following is a complete complementary recipe developed for this menu.
Ingredients
For the Chicken
- 2 lb (900 g) bone-in chicken pieces, such as drumsticks and thighs
- 3 tablespoons soy sauce
- 2 tablespoons calamansi juice or lemon juice
- 4 garlic cloves, minced
- ½ teaspoon ground black pepper
For the Crispy Coating
- 1½ cups (190 g) all-purpose flour
- ½ cup (65 g) cornstarch
- 1 teaspoon garlic powder
- 1 teaspoon onion powder
- 1 teaspoon paprika
- ½ teaspoon salt
- ½ teaspoon black pepper
- 1 teaspoon baking powder
For Frying
– Vegetable oil, as needed for deep frying
Optional Additions
- Cayenne pepper for a spicy coating
- Extra garlic powder
- Calamansi wedges for serving
- Sweet chili dipping sauce
- Garlic mayonnaise
Tips for Success
- Marinate the chicken for at least 30 minutes.
- Use cornstarch to create a lighter, crispier coating.
- Pat off excess marinade before dredging.
- Press the flour mixture firmly onto the chicken.
- Maintain oil temperature around 325–350°F (163–175°C).
- Avoid overcrowding the fryer.
- Cook chicken to an internal temperature of 165°F (74°C).
- Drain on a wire rack to preserve crispness.
Instructions
Step 1: Prepare the Chicken
Pat the chicken pieces dry with paper towels.
Place them in a large bowl.
Add soy sauce, calamansi or lemon juice, minced garlic, and black pepper.
Mix until the chicken is evenly coated.
Step 2: Marinate
Cover the bowl and refrigerate for at least 30 minutes, preferably 1–2 hours.
The marinade adds savory flavor and a gentle citrus note.
Step 3: Prepare the Coating
In a large shallow bowl, combine flour, cornstarch, garlic powder, onion powder, paprika, salt, black pepper, and baking powder.
Whisk thoroughly.
Step 4: Coat the Chicken
Remove the chicken from the marinade, allowing excess liquid to drip off.
Discard the used marinade.
Dredge each piece in the seasoned flour mixture.
Press firmly to ensure the coating adheres.
For an extra craggy coating, lightly moisten the flour-coated chicken with a few drops of water, then dredge it again.
Step 5: Rest the Coated Chicken
Place the coated chicken pieces on a wire rack.
Allow them to rest for approximately 10 minutes.
This helps the coating hydrate and adhere more securely during frying.
Step 6: Heat the Oil
Pour vegetable oil into a deep, heavy-bottomed pot.
Heat to approximately 325–350°F (163–175°C).
Avoid filling the pot more than halfway with oil.
Step 7: Fry the Chicken
Carefully add the chicken pieces in small batches.
Fry for approximately 12–18 minutes, depending on the size and thickness of the pieces.
Turn occasionally to promote even browning.
The exterior should become deeply golden and crispy.
Step 8: Check for Doneness
Insert a meat thermometer into the thickest part of each piece without touching the bone.
The chicken must reach 165°F (74°C).
If the crust browns before the interior is cooked, reduce the heat slightly and continue cooking.
Step 9: Drain
Transfer the fried chicken to a wire rack.
Allow excess oil to drain for several minutes.
Avoid covering the chicken tightly, as trapped steam can soften the coating.
Step 10: Serve
Arrange the chicken on a large serving platter.
Serve hot with Filipino-style spaghetti, rice, or Lumpiang Shanghai.
Add calamansi or lemon wedges if desired.
Description
Pinoy Fried Chicken features a golden, crunchy coating surrounding juicy, flavorful chicken.
The garlic-soy marinade adds a savory foundation, while citrus provides a subtle brightness.
The combination of flour and cornstarch creates a crisp exterior that contrasts with the tender meat.
Nutritional Information
Approximate per serving, based on four servings.
| Nutrient | Estimated Amount |
|---|---|
| Calories | 450–650 kcal |
| Protein | 35–45 g |
| Carbohydrates | 25–40 g |
| Fat | 22–38 g |
| Fiber | 1–2 g |
Recipe Details
- Prep Time: 20 minutes
- Marinating Time: 30 minutes to 2 hours
- Cook Time: 25–35 minutes for multiple batches
- Total Time: Approximately 1 hour 15 minutes to 3 hours
- Servings: 4
- Cuisine: Filipino-inspired
- Course: Main dish
- Cooking Method: Deep frying
- Difficulty: Moderate
Conclusion
Extra-Crispy Pinoy Fried Chicken is a delicious celebration dish that combines a flavorful marinade with a crunchy, golden coating.
Its juicy interior and satisfying texture make it a perfect addition to a Filipino party menu.
Recommendation
Serve immediately for the crispiest texture.
Store leftovers in the refrigerator for up to 3–4 days.
Reheat in an oven or air fryer until the chicken reaches 165°F (74°C).
Embracing Healthful Indulgence
Chicken provides high-quality protein and important nutrients such as niacin and vitamin B12.
For a lighter version, remove the skin before coating or use an oven-baked preparation.
Serve with vegetables or fresh salad to complement the richness of the fried chicken.
Recipe 4: Creamy Filipino Buko Pandan Salad
Introduction
Buko Pandan Salad is a refreshing Filipino dessert made with tender young coconut strips, pandan-flavored green jelly, nata de coco, sweetened condensed milk, and chilled cream.
This creamy tropical dessert is especially popular at birthdays, holidays, and family gatherings.
Its beautiful green jelly cubes, sweet coconut flavor, and rich cream base create a refreshing contrast to savory celebration foods.
Best served well chilled, Buko Pandan Salad is easy to prepare ahead of time, making it an excellent dessert for entertaining.
Ingredients
For the Pandan Jelly
- 1 sachet (25 g) green gulaman powder, or an equivalent amount appropriate for 3 cups of liquid according to the package instructions
- 3 cups (710 ml) water
- 1 teaspoon pandan extract
For the Coconut Mixture
- 2 cups (approximately 200–250 g) shredded young coconut strips
- 1 cup (approximately 150–200 g) nata de coco, drained
For the Cream Base
- 1 can (10 oz / approximately 300 ml) sweetened condensed milk
- 2 packs (250 ml each) chilled all-purpose cream, or 500 ml heavy cream
Optional Additions
- Additional young coconut strips
- A small amount of coconut milk
- Extra pandan extract, used sparingly
- Sweetened macapuno coconut
- Additional nata de coco
- A small amount of evaporated milk for a thinner cream base
Tips for Success
- Check the gulaman package instructions: Different brands and formulations require different liquid ratios. Some 25 g packages are concentrated and require considerably more than three cups of water.
- Use tender young coconut: Fresh buko provides the characteristic texture.
- Drain the nata de coco thoroughly: Excess syrup can make the salad overly sweet.
- Chill the cream before mixing: Cold cream creates a refreshing dessert.
- Allow the jelly to set completely: Firm jelly is easier to cut into clean cubes.
- Add condensed milk gradually if preferred: Adjust the sweetness to taste.
- Refrigerate before serving: Several hours of chilling help the flavors blend.
Instructions
Step 1: Prepare the Pandan Jelly Mixture
Check the preparation instructions on the gulaman package.
Measure the amount of water required for the specific product.
For a formulation intended for three cups of liquid, combine the gulaman powder and three cups of water in a saucepan.
Add the pandan extract.
Stir thoroughly to dissolve the powder.
Step 2: Cook the Jelly
Place the saucepan over medium heat.
Bring the mixture to a boil while stirring.
Continue cooking according to the package instructions until the gulaman is completely dissolved.
Avoid leaving undissolved powder at the bottom of the saucepan.
Step 3: Set the Pandan Jelly
Carefully pour the hot jelly mixture into a shallow heatproof pan.
Allow it to cool until it begins to set.
Refrigerate until completely firm, if needed.
Step 4: Cut the Jelly into Cubes
Once the jelly is firm, remove it from the pan.
Cut into small, evenly sized cubes.
Aim for approximately ½-inch (1.25 cm) pieces.
Set aside.
Step 5: Prepare the Coconut
If using fresh young coconut, remove the tender flesh and cut it into thin strips.
If using packaged young coconut, drain any excess liquid.
Place the coconut strips in a large mixing bowl.
Step 6: Drain the Nata de Coco
Pour the nata de coco into a fine-mesh strainer.
Drain thoroughly.
If the syrup is particularly sweet, rinse briefly with cold water and drain again.
Add the nata de coco to the bowl containing the young coconut.
Step 7: Prepare the Cream Base
In a separate large bowl, combine the chilled all-purpose cream and sweetened condensed milk.
Whisk gently until smooth and evenly blended.
Taste the mixture.
If it is too sweet, add a little more unsweetened cream.
Step 8: Combine the Ingredients
Add the pandan jelly cubes to the coconut mixture.
Pour the cream base over the jelly, coconut, and nata de coco.
Using a large spatula, gently fold everything together.
Avoid stirring too vigorously, which could break the jelly cubes.
Step 9: Chill the Salad
Cover the bowl tightly.
Refrigerate for at least four hours.
Chilling allows the cream to thicken slightly and the pandan and coconut flavors to blend.
For the best texture, keep the salad refrigerated rather than freezing it.
Step 10: Serve
Stir the chilled salad gently before serving.
Spoon into individual dessert bowls or glasses.
Make sure each portion contains a mixture of pandan jelly, coconut strips, and nata de coco.
Serve cold.
Description
Buko Pandan Salad is a creamy, refreshing dessert with soft young coconut strips, chewy nata de coco, and tender green pandan jelly.
The sweetened condensed milk creates a rich, smooth base, while the chilled cream gives the dessert a luxurious texture.
Pandan contributes a distinctive sweet, fragrant aroma that pairs beautifully with coconut.
The contrast between the soft jelly, chewy coconut gel, and silky cream makes this dessert especially enjoyable.
Nutritional Information
Approximate per serving, based on six servings. Values depend heavily on the cream, condensed milk, and gulaman brands.
| Nutrient | Estimated Amount |
|---|---|
| Calories | 400–550 kcal |
| Protein | 5–8 g |
| Carbohydrates | 45–65 g |
| Fat | 22–35 g |
| Fiber | 1–3 g |
Recipe Details
- Prep Time: 20 minutes
- Jelly Preparation and Setting: Approximately 30–60 minutes
- Chilling Time: At least 4 hours
- Total Time: Approximately 5–5½ hours
- Servings: 6
- Cuisine: Filipino
- Course: Dessert
- Cooking Methods: Boiling, mixing, and chilling
- Difficulty: Easy
Conclusion
Creamy Filipino Buko Pandan Salad is a refreshing tropical dessert that combines fragrant pandan jelly, tender young coconut, chewy nata de coco, and sweet cream.
Its beautiful color, creamy texture, and chilled serving style make it an ideal dessert for celebrations and warm-weather gatherings.
Recommendation
Serve thoroughly chilled in small dessert bowls or glasses.
Prepare the salad several hours in advance for the best flavor.
Store covered in the refrigerator for up to 2–3 days for best quality. Keep it refrigerated until serving and avoid leaving it at room temperature for extended periods.
Freezing is not recommended because the cream and jelly may change texture after thawing.
Embracing Healthful Indulgence
Buko Pandan Salad offers a delicious combination of tropical flavors and creamy textures.
Young coconut provides small amounts of fiber and minerals, while nata de coco adds a distinctive chewy texture.
Because condensed milk and cream contribute substantial sugar and saturated fat, moderate portions are a practical way to enjoy this dessert.
For a lighter version, use less condensed milk or replace part of the cream with a lighter unsweetened dairy option.
Complete Filipino Celebration Menu

Filipino Sweet Spaghetti
Sweet-savory pasta with ground beef, hot dogs, and shredded cheese. A crowd-pleasing main dish.

Lumpiang Shanghai
Golden, crunchy spring rolls with a savory meat filling, perfect for sharing.

Pinoy Fried Chicken
Crispy, juicy chicken with a flavorful garlic-soy marinade.

Buko Pandan Salad
A chilled, creamy coconut and pandan dessert that completes the meal.
These four dishes work especially well together for birthdays, family reunions, and holiday celebrations. The spaghetti provides a hearty main course, the lumpia and fried chicken offer crispy savory favorites, and the Buko Pandan Salad finishes the meal with a cool, sweet tropical flavor.
For an easier party preparation schedule, make the Buko Pandan Salad the day before, assemble the lumpia ahead of time, prepare the spaghetti sauce in advance, and fry the chicken shortly before guests arrive.