
Introduction
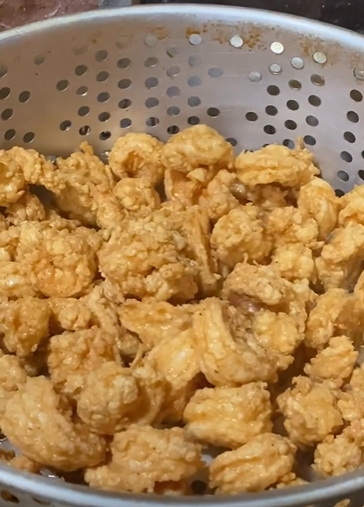
Crispy Golden Popcorn Chicken Bites are the perfect combination of juicy chicken, bold seasonings, and an irresistibly crunchy coating. Made with bite-sized pieces of boneless chicken breast marinated in seasoned buttermilk and coated in a flavorful flour mixture, these homemade chicken bites deliver a satisfying crunch with every bite.
The secret to their delicious texture is the combination of buttermilk, cornstarch, and carefully selected spices. Buttermilk helps keep the chicken tender, while cornstarch contributes to a crispier crust. Garlic powder, onion powder, paprika, and oregano bring plenty of flavor without overpowering the natural taste of the chicken.
These golden bites are ideal for family dinners, game-day snacks, casual gatherings, or homemade fast-food nights. Serve them fresh from the fryer with ranch dressing, honey mustard, barbecue sauce, or your favorite dipping sauce.
Best of all, this recipe uses simple ingredients and straightforward preparation techniques to create a restaurant-style snack right in your own kitchen.
Origin of Popcorn Chicken
Popcorn chicken is a popular style of bite-sized fried chicken that became especially recognizable through American fast-food restaurants. The name describes the small pieces of chicken, which are easy to pick up and eat like popcorn.
Although fried chicken has a much longer culinary history, popcorn chicken represents a more modern convenience-food variation. Its small size, crispy coating, and easy-to-serve portions have made it popular with children and adults alike.
Homemade versions allow cooks to customize the seasoning, coating, and level of spice. This recipe takes inspiration from American-style crispy chicken, using a buttermilk marinade and a seasoned flour coating to produce juicy centers and crunchy golden exteriors.
Cultural Significance
Crispy chicken bites have become a familiar favorite at casual restaurants, family gatherings, parties, and sporting events. Their small size makes them convenient to share, while their crunchy texture and mild, savory flavor appeal to a wide range of tastes.
They are also highly adaptable. Some people prefer a classic garlic-and-paprika seasoning, while others enjoy spicy coatings, sweet dipping sauces, or tangy ranch dressing.
Making popcorn chicken at home offers another advantage: you control the ingredients, seasoning, and portion sizes. You can adjust the heat level, prepare a larger batch for guests, or serve the chicken alongside vegetables, potatoes, and a fresh salad for a more complete meal.
Ingredients and Quantities
This recipe makes approximately 4 servings.
For the chicken marinade
- 1 1/2 pounds boneless, skinless chicken breasts, cut into 1-inch pieces
- 1 cup buttermilk
- 1 tablespoon hot sauce, optional
- 1 teaspoon garlic powder
- 1 teaspoon onion powder
- 1 teaspoon paprika
- 1/2 teaspoon black pepper
- 1 teaspoon salt
For the crispy coating
- 1 1/2 cups all-purpose flour
- 1/2 cup cornstarch
- 1 teaspoon baking powder
- 1 teaspoon paprika
- 1 teaspoon garlic powder
- 1 teaspoon onion powder
- 1/2 teaspoon dried oregano
- 1/2 teaspoon black pepper
- 1/2 teaspoon salt
- 1/2 teaspoon cayenne pepper, optional
For frying
- 3 to 4 cups neutral vegetable oil, or enough for deep-frying safely
For serving
- Ranch dressing
- Honey mustard sauce
- Barbecue sauce
- Spicy mayonnaise, optional
- Fresh parsley, chopped, optional
Ingredient Notes
Chicken breasts: Boneless, skinless chicken breasts are lean and easy to cut into uniform pieces. Chicken thighs also work if you prefer a slightly richer flavor.
Buttermilk: The acidity and thickness of buttermilk help season the chicken and support a tender texture. If needed, combine 1 cup of milk with 1 tablespoon of lemon juice or white vinegar and let it stand for 5–10 minutes before using.
Cornstarch: Cornstarch helps create a light, crisp coating. Combining it with flour produces a texture that is different from using flour alone.
Baking powder: A small amount helps create a lighter, textured crust. Use baking powder rather than baking soda.
Paprika and garlic powder: These ingredients add color and savory flavor. Smoked paprika can be used for a subtle smoky note.
Cayenne pepper and hot sauce: Both are optional, allowing you to control the heat level. Leave them out for a milder family-friendly version.
Vegetable oil: Choose a neutral oil suitable for high-temperature frying, such as canola, sunflower, or peanut oil if allergies are not a concern.
Optional Additions
One of the best features of homemade popcorn chicken is how easily you can personalize it.
- Spicy buffalo style: Toss the cooked chicken lightly with buffalo-style hot sauce just before serving.
- Smoky flavor: Replace the regular paprika with smoked paprika.
- Herb seasoning: Add a small amount of dried thyme or additional oregano to the flour mixture.
- Parmesan coating: Mix finely grated Parmesan into the dry coating for a savory, cheesy variation. Watch the frying temperature because cheese can brown quickly.
- Lemon pepper: Add lemon pepper seasoning to the flour mixture for a bright, zesty flavor.
- Extra-crunchy coating: Create small flakes in the flour mixture by rubbing in a little of the buttermilk marinade before coating the chicken.
- Air-fryer version: Coat the chicken as directed, arrange the pieces in a single layer, spray lightly with oil, and cook at approximately 400°F (200°C), turning halfway through. Cooking time varies with the size of the pieces and the appliance; check that the chicken reaches 165°F (74°C) internally.
- Gluten-free version: Use a suitable gluten-free all-purpose flour blend and verify that the other ingredients are labeled gluten-free.
For the best results, avoid adding too much liquid to the flour mixture. A few small clumps help create a textured crust, but a wet, heavy coating can become dense.
Tips for Success
1. Cut the Chicken into Uniform Pieces
Aim for pieces approximately 1 inch in size. Uniform pieces cook at a similar rate, helping prevent smaller pieces from drying out while larger ones finish cooking.
2. Give the Chicken Time to Marinate
Refrigerate the chicken in the buttermilk mixture for at least 30 minutes and up to 4 hours. This allows the seasoning to distribute throughout the chicken and helps improve tenderness.
Keep the chicken refrigerated during marination. Do not leave raw chicken sitting at room temperature.
3. Season the Flour Thoroughly
Whisk the flour, cornstarch, baking powder, and spices together until evenly combined. This prevents some pieces from tasting more heavily seasoned than others.
4. Create a Textured Coating
For an extra-crispy surface, drizzle 1–2 tablespoons of the marinade into the flour mixture before coating the chicken. Rub the mixture gently with clean fingers or a fork to form small, irregular clumps.
These little flakes cling to the chicken and create a craggy crust when fried.
5. Press the Coating onto the Chicken
Allow excess marinade to drip off, then press each chicken piece into the seasoned flour. Turn it several times to cover all sides.
Shake off loose flour before frying to reduce excess coating in the oil.
6. Maintain the Correct Oil Temperature
Heat the oil to approximately 350°F (175°C). If the oil is too cool, the coating may absorb more oil and become greasy. If it is too hot, the exterior can brown before the chicken is fully cooked.
Use a kitchen thermometer to monitor the temperature between batches.
7. Fry in Small Batches
Adding too many pieces at once lowers the oil temperature and causes the chicken to cook unevenly. Leave enough room for the pieces to move freely in the oil.
Allow the oil to return to the target temperature before adding the next batch.
8. Drain on a Wire Rack
A wire rack set over a baking sheet allows excess oil to drain while air circulates around the chicken. Paper towels can be used if necessary, but a rack generally helps preserve the crunchy coating.
Avoid covering the cooked chicken tightly, as trapped steam can soften the crust.
9. Check the Internal Temperature
The safest way to confirm doneness is to use a food thermometer. Check the thickest pieces and make sure the chicken reaches an internal temperature of 165°F (74°C).
Do not rely on the color of the coating alone to determine whether the chicken is fully cooked.
Instructions
Step 1: Cut and Season the Chicken
Cut the chicken breasts into approximately 1-inch bite-sized pieces.
In a large bowl, whisk together the buttermilk, optional hot sauce, garlic powder, onion powder, paprika, black pepper, and salt.
Add the chicken pieces and stir until every piece is coated with the marinade.
Step 2: Marinate Until Tender
Cover the bowl and refrigerate for at least 30 minutes, or up to 4 hours.
During this time, the chicken absorbs the seasoning and develops a more tender texture. If you are preparing the recipe ahead, keep the bowl covered and refrigerated until you are ready to coat the chicken.
Step 3: Prepare the Seasoned Coating
In a wide bowl, combine the all-purpose flour, cornstarch, baking powder, paprika, garlic powder, onion powder, dried oregano, black pepper, salt, and optional cayenne pepper.
Whisk thoroughly to distribute the spices evenly.
For a more textured crust, drizzle 1–2 tablespoons of the buttermilk marinade into the flour mixture and rub it in gently to form small clumps. Only use marinade that has been handled safely with the raw chicken; never use leftover marinade as a dipping sauce unless it has been thoroughly cooked.
Step 4: Coat the Chicken Pieces
Remove a few pieces of chicken from the marinade, allowing excess liquid to drip back into the bowl.
Transfer the pieces to the seasoned flour mixture. Toss them thoroughly and press the coating onto all sides.
For a thicker crust, briefly return each floured piece to the marinade and coat it in the flour mixture a second time. This optional double coating creates extra texture but may require slightly longer cooking.
Place the coated pieces on a clean tray in a single layer while you prepare the oil.
Step 5: Heat the Oil
Pour the vegetable oil into a heavy-bottomed pot or deep fryer. Never fill the pot more than halfway, leaving sufficient space for the oil to bubble safely.
Heat the oil to 350°F (175°C), using a kitchen thermometer to check the temperature.
Keep the cooking area clear and dry, and carefully lower the chicken into the oil to avoid splashing.
Step 6: Fry Until Golden and Crispy
Working in small batches, carefully add the coated chicken pieces to the hot oil.
Fry for approximately 4–6 minutes, turning the pieces occasionally so they brown evenly. The exact cooking time depends on their size, the coating thickness, and how well the oil temperature is maintained.
The coating should become golden brown and crisp. Confirm that the chicken reaches an internal temperature of 165°F (74°C) before removing it from the oil.
Step 7: Drain and Keep the Chicken Crispy
Use a slotted spoon or suitable metal strainer to transfer the cooked chicken to a wire rack set over a baking sheet.
Allow excess oil to drain and avoid stacking the pieces while they are still hot. If preparing several batches, keep the cooked chicken warm in an oven set to a low temperature, around 200°F (95°C), while ensuring it does not sit out for an extended period.
Allow the oil to return to approximately 350°F (175°C) before frying the next batch.
Step 8: Prepare the Dipping Sauces
Arrange ranch dressing, honey mustard, barbecue sauce, or spicy mayonnaise in small serving bowls.
If desired, chop fresh parsley for garnish. You can also offer lemon wedges for a fresh contrast to the rich, crispy coating.
Step 9: Serve Immediately
Transfer the hot popcorn chicken to a serving basket or large platter. Sprinkle with chopped parsley if desired and serve with the dipping sauces.
For a complete meal, pair the chicken with roasted potatoes, corn on the cob, coleslaw, or a crisp green salad.
Description
Crispy Golden Popcorn Chicken Bites are bite-sized pieces of juicy chicken wrapped in a crunchy, golden coating seasoned with garlic, onion, paprika, oregano, and black pepper. A buttermilk marinade helps keep the chicken tender, while the combination of flour and cornstarch creates a satisfying exterior.
Each piece delivers a delicious contrast between the crisp crust and the succulent chicken inside. Optional cayenne pepper adds a gentle kick, while the choice of dipping sauces allows you to customize every bite.
These homemade chicken bites are ideal for casual meals, party platters, and family-friendly snacks. They are best enjoyed freshly fried, when the coating is at its crunchiest and the chicken is still warm.
Nutritional Information
The following nutrition estimates are for one serving, assuming the recipe makes 4 servings. They include the chicken, marinade, coating, and an estimated amount of oil absorbed during frying, but exclude dipping sauces. Actual values will vary depending on the quantity of coating retained and oil absorbed.
- Calories: Approximately 500–600
- Protein: Approximately 38–45 grams
- Carbohydrates: Approximately 35–45 grams
- Fat: Approximately 20–30 grams
- Saturated fat: Approximately 3–6 grams
- Sugar: Approximately 3–6 grams
- Sodium: Approximately 700–1,100 milligrams
These chicken bites provide protein, while the flour coating and frying oil contribute carbohydrates and fat. For a different preparation, air-frying with a light coating of oil may reduce the amount of added fat, although the final nutrition will depend on the ingredients and cooking method.
Storage and Food Safety
Proper storage helps maintain food quality and reduces the risk of foodborne illness.
- Refrigeration: Place leftover chicken in a shallow, airtight container and refrigerate within 2 hours of cooking. Use within 3–4 days.
- Reheating: Reheat in an oven or air fryer until the chicken reaches 165°F (74°C) internally. These methods generally preserve the crisp coating better than a microwave.
- Freezing: Freeze fully cooked and cooled chicken in a suitable airtight container for up to about 2–3 months for best quality. Reheat from frozen or thaw in the refrigerator, ensuring the chicken reaches 165°F (74°C).
- Raw chicken: Keep raw chicken separate from ready-to-eat foods. Wash hands, utensils, and surfaces after contact with raw chicken.
- Used marinade: Discard marinade that has contacted raw chicken, unless it is thoroughly cooked before any further use.
- Frying safety: Never leave hot oil unattended, avoid adding wet food to hot oil, and never pour water onto a cooking-oil fire.
For the best eating experience, serve the chicken soon after frying. Although leftovers can be reheated safely, the coating is usually crunchiest when freshly prepared.
Conclusion
Crispy Golden Popcorn Chicken Bites with Seasoned Crunchy Coating are a delicious homemade alternative to restaurant-style fried chicken. With tender chicken, a flavorful buttermilk marinade, and a crisp, golden crust, this recipe delivers satisfying texture and plenty of savory flavor.
The preparation is straightforward, and the seasoning can be adjusted to suit your preferences. Whether you keep the recipe mild, add a little cayenne for heat, or experiment with different dipping sauces, these bite-sized pieces are sure to be a welcome addition to your meal rotation.
For the best results, marinate the chicken properly, create a lightly textured coating, fry in small batches, and always check that the chicken reaches a safe internal temperature.
Recommendation
Serve these popcorn chicken bites hot with two or three dipping sauces so everyone can choose a favorite. Ranch provides a cool, creamy contrast, honey mustard adds sweetness and tang, and barbecue sauce brings a smoky flavor.
For a family dinner, serve the chicken with oven-roasted potatoes and a fresh salad. For parties, arrange the bites on a platter with toothpicks and small bowls of sauce for easy sharing.
If you are preparing a larger batch, fry the chicken in stages and keep the cooked pieces warm on a wire rack in a low-temperature oven. This helps prevent the coating from becoming soggy while you finish cooking.
Embracing Healthful Indulgence
Homemade popcorn chicken can fit into a balanced eating pattern when enjoyed in portions that suit your needs and paired with a variety of other foods.
For a lighter preparation, try air-frying the coated chicken with a light spray of oil. You can also serve it with fresh vegetables, a green salad, or roasted vegetables instead of relying entirely on fried sides.
The recipe is flexible enough to accommodate different spice preferences and cooking methods without sacrificing its central appeal: tender chicken surrounded by a flavorful, crunchy coating.
Enjoy these crispy chicken bites as an occasional treat, share them with family and friends, and experiment with seasonings and sauces to create a version you love.