
Introduction
If you are looking for the perfect birthday cake, this Ultimate Chocolate Birthday Layer Cake is a dessert worth celebrating. Featuring soft, moist chocolate cake layers and rich, creamy chocolate buttercream, this homemade cake delivers deep chocolate flavor in every bite.
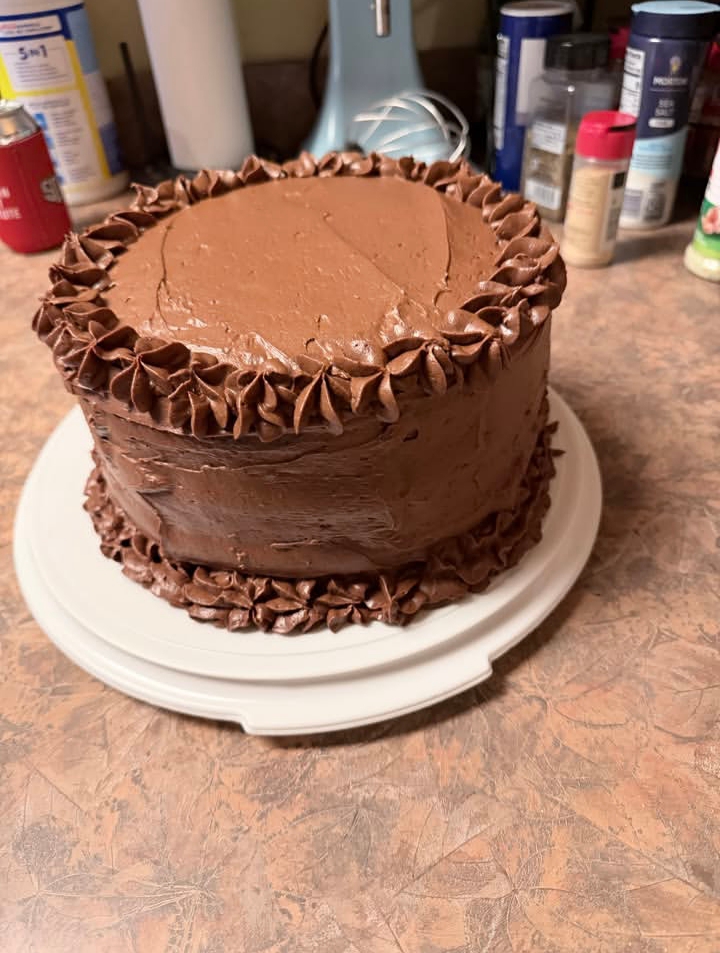
The cake has a tender crumb, a beautiful layered appearance, and a smooth frosting finish that makes it ideal for birthdays, anniversaries, holidays, and other special occasions. Decorative piped shell borders add a classic bakery-style touch, while the fluffy chocolate buttercream creates an elegant finish without requiring complicated decorating techniques.
Whether you are baking for a chocolate lover or preparing a memorable celebration dessert, this recipe combines dependable ingredients with straightforward instructions to create a beautiful cake that tastes as impressive as it looks.
Origin of Chocolate Birthday Layer Cake
Chocolate cake has evolved considerably since chocolate first became widely available for baking. Early chocolate cakes were often simpler than the elaborate layered desserts enjoyed today. As cocoa powder, baking techniques, and home ovens became more accessible, chocolate cake gradually became a popular choice for celebrations.
Layer cakes became especially fashionable as bakers learned to stack multiple cake layers with frosting or filling between them. Buttercream frosting later became a favorite for decorating cakes because it can be spread smoothly, piped into decorative shapes, and adapted with different flavors and colors.
This recipe draws inspiration from the modern American chocolate layer cake tradition, combining cocoa-rich cake layers with chocolate buttercream for a classic birthday dessert.
Cultural Significance
Birthday cakes are an important part of celebrations in many cultures. They often serve as the centerpiece of a gathering, bringing family and friends together to mark a special occasion.
Chocolate birthday cakes are particularly popular because chocolate is widely loved and pairs beautifully with creamy frosting. Their rich flavor makes them suitable for both simple family celebrations and elaborate parties.
The decorative shell borders on this cake evoke the traditional style of bakery birthday cakes. Although the design looks professional, it can be created at home with a piping bag and a star-shaped piping tip.
Making a birthday cake from scratch also offers the opportunity to personalize the dessert with favorite decorations, candles, chocolate curls, or a customized message.
Ingredients Quantity
For the Chocolate Cake Layers
- 1¾ cups (220 g) all-purpose flour: Provides the cake’s structure.
- 1¾ cups (350 g) granulated sugar: Sweetens the cake and helps retain moisture.
- ¾ cup (65 g) unsweetened natural cocoa powder: Gives the cake its rich chocolate flavor.
- 2 teaspoons baking soda: Helps the cake rise and creates a tender texture.
- 1 teaspoon baking powder: Provides additional lift.
- 1 teaspoon salt: Balances the sweetness and enhances the chocolate flavor.
- 2 teaspoons espresso powder (optional): Intensifies the chocolate flavor without making the cake taste strongly of coffee.
- ½ cup (120 ml) vegetable or canola oil: Helps keep the cake moist.
- 2 large eggs, at room temperature: Add structure and richness.
- 2 teaspoons pure vanilla extract: Enhances the overall flavor.
- 1 cup (240 ml) buttermilk, at room temperature: Adds moisture and tenderness while reacting with the baking soda.
- 1 cup (240 ml) hot coffee or boiling water: Helps hydrate the cocoa powder and produces a smooth, moist batter.
For the Chocolate Buttercream Frosting
The following quantities provide a generous amount of frosting for filling, covering, and decorating a two-layer cake.
- 1¼ cups (280 g) unsalted butter, softened: Creates a creamy frosting base.
- 3½ cups (420 g) confectioners’ sugar, sifted: Sweetens and thickens the buttercream.
- ¾ cup (65 g) unsweetened cocoa powder, sifted: Gives the frosting a deep chocolate flavor.
- ⅓ cup (80 ml) heavy cream or whole milk: Helps create a smooth, spreadable consistency.
- 2 teaspoons pure vanilla extract: Adds warmth and depth.
- ¼ teaspoon salt: Balances the sweetness.
- 2–4 tablespoons additional heavy cream or milk, as needed: Adjusts the frosting’s consistency.
Optional Decorations
- Chocolate shavings or curls
- Chocolate sprinkles
- Birthday candles
- Extra cocoa powder for dusting
- Small chocolate candies
- Additional buttercream for piped shell borders
Optional Additions
Chocolate ganache: Pour a thin layer of chocolate ganache over the top for a glossy finish. Allow it to cool until slightly thickened before applying it to the cake.
Chocolate chips: Fold a small amount of mini chocolate chips into the batter for occasional bursts of chocolate.
Raspberry filling: Spread a thin layer of raspberry jam between the cake layers for a fruity contrast to the rich chocolate.
Caramel filling: Add a thin layer of thick caramel sauce between the cake layers for a sweeter, more indulgent variation.
Chocolate curls: Decorate the top with chocolate curls for a sophisticated finish.
Coffee buttercream: Replace a small amount of the cream in the frosting with cooled espresso for a mocha-inspired variation.
Vanilla buttercream: Use vanilla buttercream for the piped borders to create a contrasting decorative finish.
Tips for Success
Measure the flour correctly. Weighing the flour with a kitchen scale gives the most consistent results. Too much flour can make the cake dense and dry.
Use room-temperature ingredients. Room-temperature eggs and buttermilk combine more easily with the other ingredients and help create a uniform batter.
Do not worry if the batter looks thin. Hot coffee or boiling water creates a relatively thin chocolate cake batter. This helps produce a moist, tender crumb.
Avoid overmixing. Once the dry ingredients have been incorporated, mix only until the batter is smooth. Excessive mixing can make the cake less tender.
Prepare the pans properly. Grease two 9-inch round cake pans and line the bottoms with parchment paper. This makes the baked layers easier to release.
Cool the cake completely. Frosting a warm cake can cause the buttercream to melt and slide. Let the layers cool in their pans briefly, then transfer them to a wire rack.
Chill the cake before decorating. Once the layers are filled and stacked, refrigerate the cake for 20–30 minutes before applying the final frosting coat. A chilled cake is easier to decorate.
Use softened, not melted, butter. Butter that is too cold creates lumpy frosting, while melted butter can make the buttercream too loose.
Adjust the frosting gradually. Add cream one tablespoon at a time until the buttercream is fluffy and spreadable. If it becomes too thin, add a little more sifted confectioners’ sugar.
Instructions
Step 1: Prepare the Oven and Cake Pans
Preheat the oven to 350°F (177°C).
Grease two 9-inch round cake pans and line the bottoms with parchment paper. Lightly grease the parchment as well.
Measure all the ingredients before starting so the mixing process goes smoothly.
Step 2: Combine the Dry Ingredients
In a large mixing bowl, whisk together the flour, granulated sugar, cocoa powder, baking soda, baking powder, salt, and optional espresso powder.
Whisk until the cocoa is evenly distributed and no large lumps remain.
Step 3: Add the Wet Ingredients
Add the vegetable oil, eggs, vanilla extract, and buttermilk to the dry ingredients.
Mix with a hand mixer on medium speed or whisk by hand until the ingredients are combined and the batter looks smooth.
Pour in the hot coffee or boiling water gradually, mixing carefully until incorporated.
The batter will be thin. This is normal for a moist chocolate cake.
Step 4: Bake the Cake Layers
Divide the batter evenly between the prepared pans.
Bake for approximately 25–30 minutes, or until a toothpick inserted into the center comes out with a few moist crumbs but no wet batter.
Begin checking toward the earlier end of the baking time because oven temperatures can vary.
Remove the pans from the oven and let the cakes cool for about 10 minutes.
Carefully turn the layers out onto wire racks, remove the parchment paper, and allow them to cool completely.
Step 5: Prepare the Chocolate Buttercream
Place the softened butter in a large mixing bowl.
Beat with an electric mixer for 2–3 minutes until the butter becomes pale and creamy.
Add the sifted cocoa powder and mix on low speed until incorporated.
Gradually add the confectioners’ sugar, mixing on low speed to prevent it from scattering.
Pour in the vanilla extract, salt, and heavy cream or milk. Beat until combined, then increase the speed to medium-high and whip for another 2–3 minutes until the buttercream is light and fluffy.
If the frosting is too thick, add additional cream one tablespoon at a time. If it is too thin, mix in a little more sifted confectioners’ sugar.
Step 6: Level the Cake Layers
Once the cake layers are completely cool, inspect their tops.
If either layer has a pronounced dome, use a serrated knife to trim it carefully until the surface is relatively level.
Place the first layer on a cake stand or serving plate, with the cut side facing up if you have trimmed it.
Step 7: Fill and Stack the Cake
Spread a generous layer of chocolate buttercream over the first cake layer.
Use an offset spatula to spread the frosting evenly toward the edges.
Place the second cake layer on top, positioning it carefully so the cake remains level.
Press very gently to secure the layers without compressing the cake.
Step 8: Apply a Crumb Coat
Spread a thin layer of buttercream over the top and sides of the cake. This initial layer traps loose crumbs and creates a cleaner final finish.
Refrigerate the cake for approximately 20–30 minutes, or until the crumb coat feels firm.
Step 9: Frost the Cake
Spread the remaining buttercream over the top and sides of the chilled cake.
Use an offset spatula to smooth the frosting, or create gentle swirls and textured patterns for a more rustic appearance.
For a classic birthday-cake finish, keep the top relatively smooth and leave enough frosting for the decorative borders.
Step 10: Pipe the Shell Borders
Transfer some of the remaining buttercream into a piping bag fitted with a medium or large star tip.
To create a shell border, hold the piping bag at a slight angle near the edge of the cake. Apply pressure to form a rounded mound, then ease the pressure while pulling the tip slightly backward to create a tapered tail.
Repeat the movement around the top edge of the cake, keeping the shells similar in size.
If desired, pipe a second border around the bottom edge. Practice a few shells on a piece of parchment paper first to become comfortable with the motion.
Step 11: Add the Final Decorations
Finish the