
Introduction
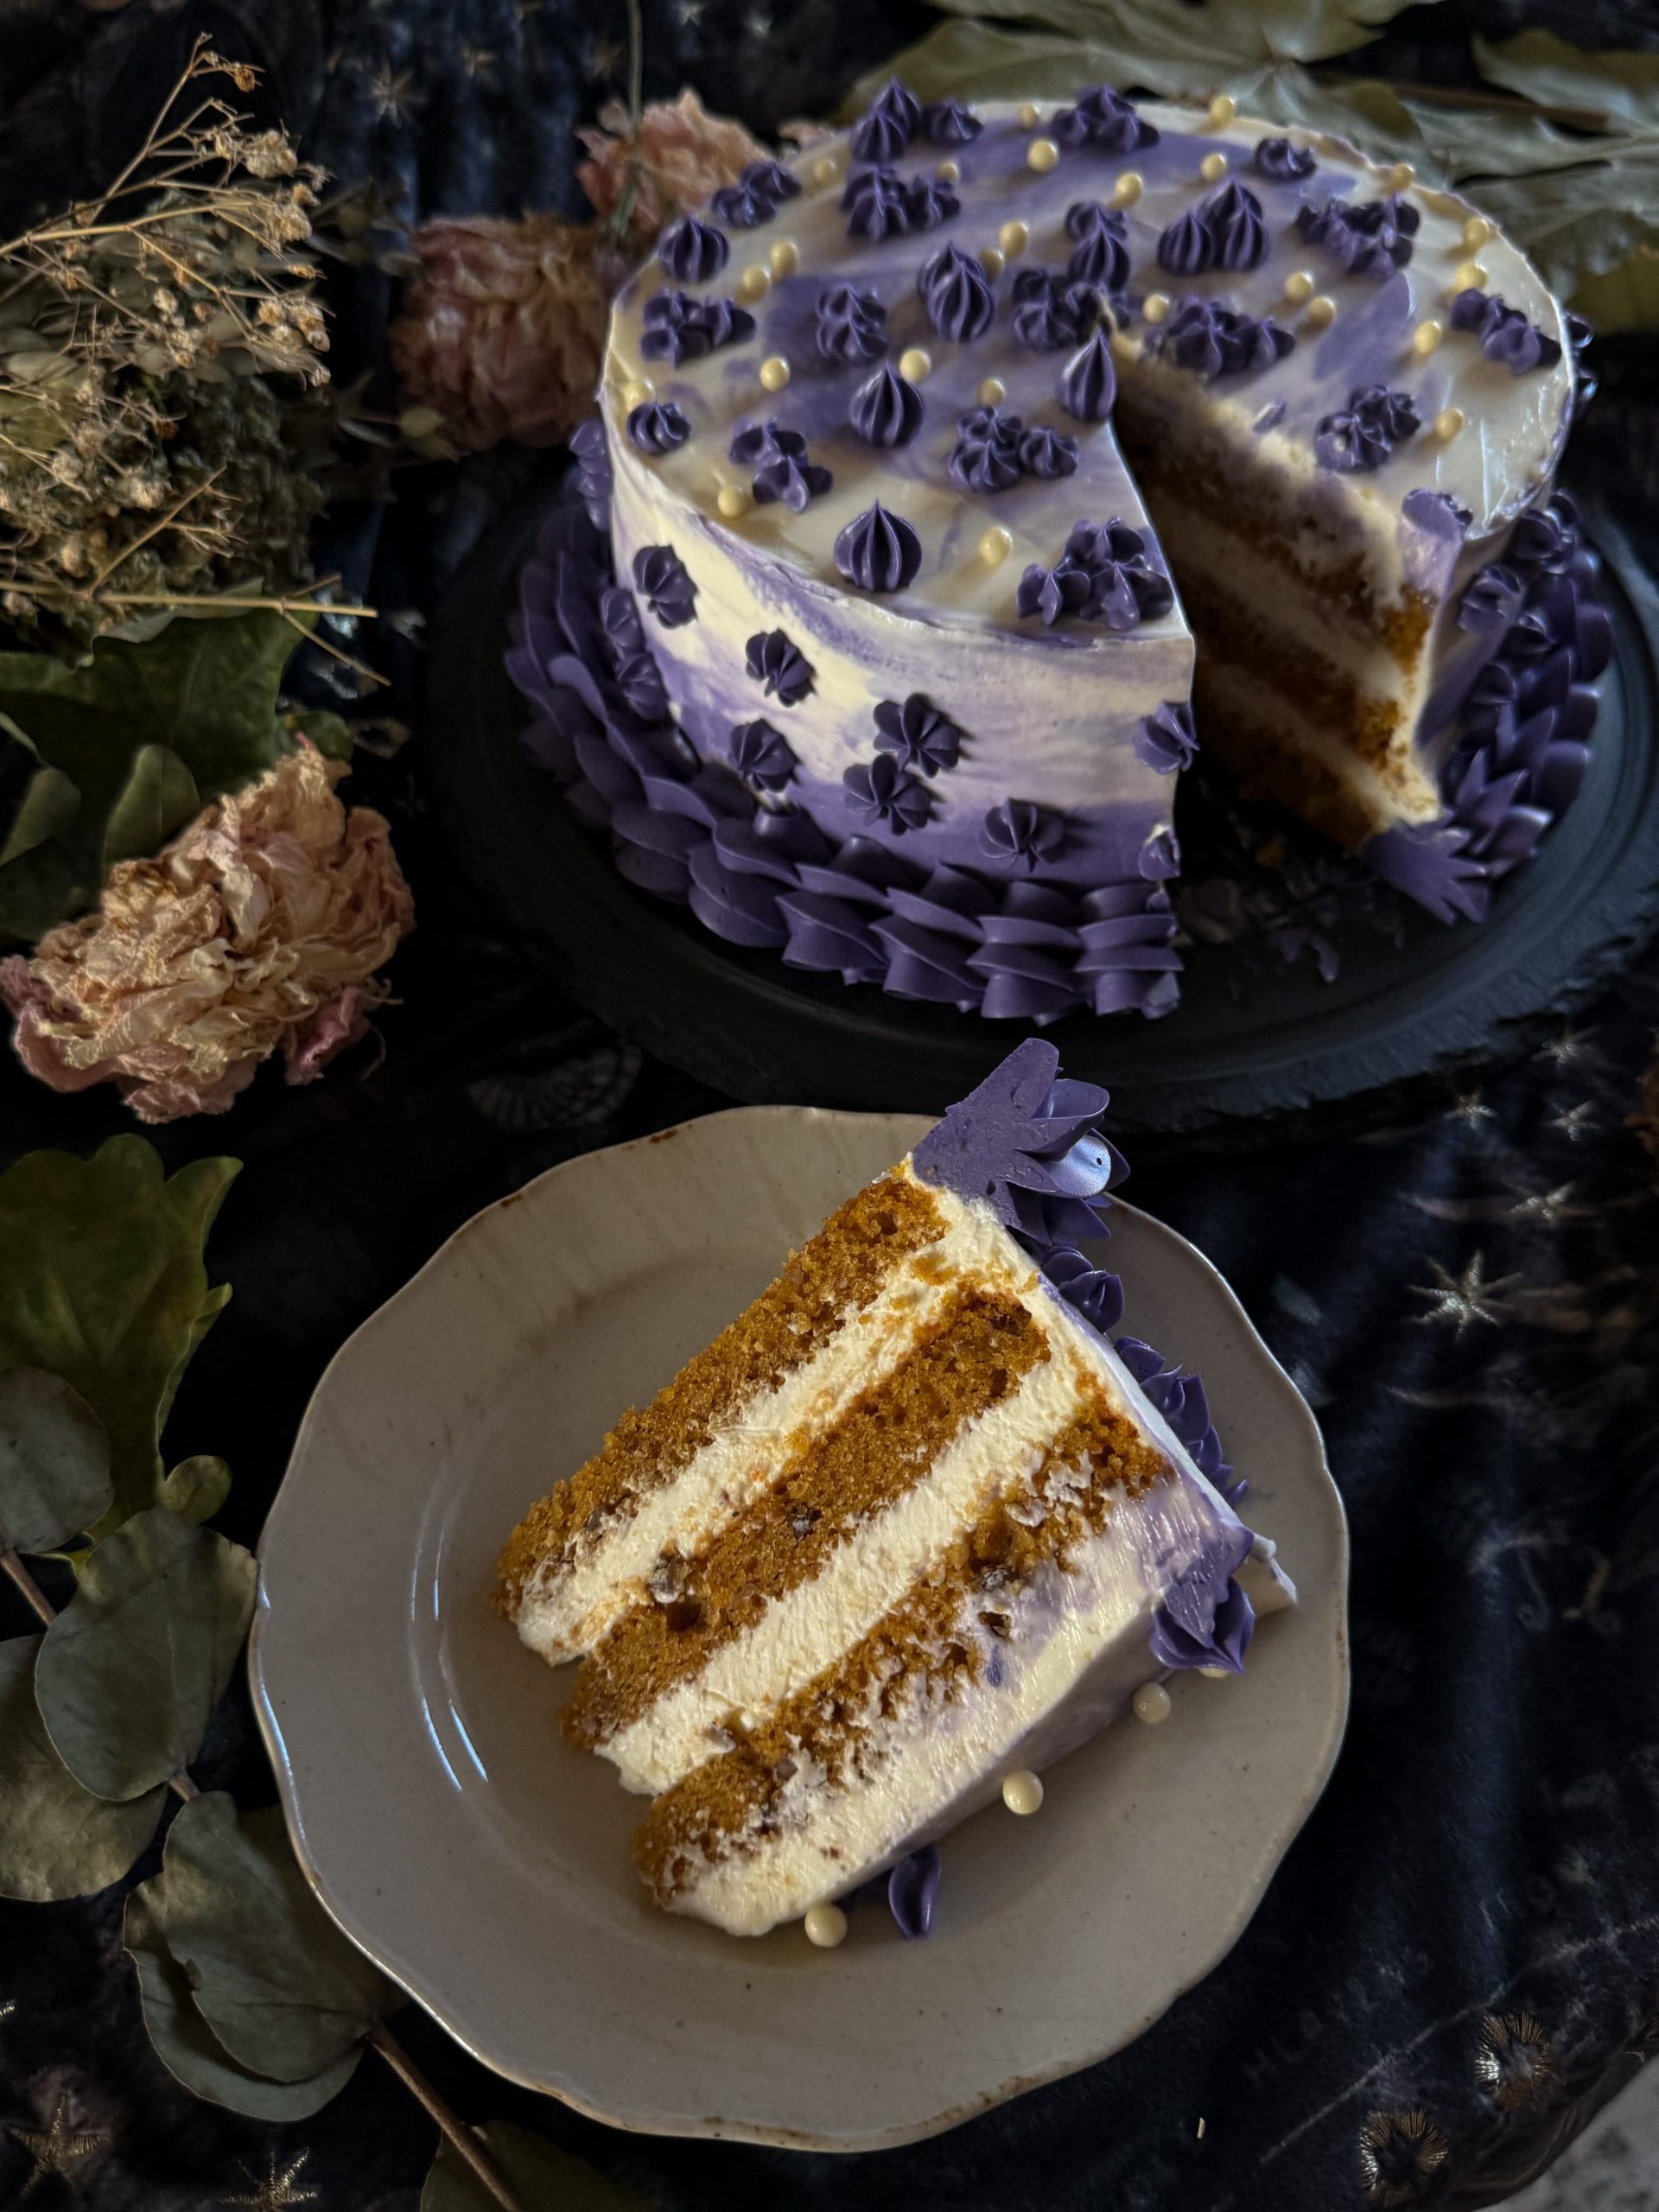
Purple Vanilla Layer Cake with Creamy Buttercream Frosting is an elegant homemade dessert that combines soft golden vanilla sponge, silky buttercream filling, and a beautiful lavender-colored exterior. Finished with decorative purple buttercream rosettes and tiny ivory sugar pearls, this cake is perfect for birthdays, anniversaries, baby showers, afternoon celebrations, and other special occasions.
Each slice features three tender cake layers made with butter, vanilla, milk, and sour cream. The sour cream adds moisture and a subtle richness, while the vanilla gives the sponge its classic bakery-style flavor. Between the layers, smooth vanilla buttercream provides sweetness and a creamy texture. The lavender frosting creates a delicate finish that makes the cake look as impressive as it tastes.
Although the finished design looks like something from a professional bakery, the recipe uses familiar ingredients and manageable decorating techniques. With properly cooled cake layers, a stable buttercream, and a little patience, you can create a beautiful centerpiece for your next celebration.
Origin of Vanilla Layer Cake
Layer cakes have a long history in European and American baking traditions. As ovens, baking ingredients, and cake pans became more accessible, bakers increasingly began stacking multiple cake layers with cream, jam, or frosting between them.
Vanilla cake became especially popular because its mild, fragrant flavor pairs well with many fillings and decorations. Buttercream frosting also became a favorite for celebration cakes because it can be spread smoothly, piped into decorative shapes, and tinted in a wide variety of colors.
This purple vanilla layer cake is a modern interpretation of the classic frosted celebration cake. Its golden sponge and vanilla filling provide a traditional flavor foundation, while the lavender exterior, piped rosettes, and sugar pearls create a contemporary decorative style.
There is no single historical origin for this particular combination of colors and decorations. Instead, it brings together familiar cake-making techniques with modern celebration-cake styling.
Cultural Significance
Decorated layer cakes are often associated with birthdays, weddings, anniversaries, graduations, and family celebrations. Their stacked layers and carefully finished frosting make them natural centerpieces for occasions when people gather to share something special.
Vanilla remains a popular cake flavor because it is familiar, versatile, and easy to pair with other ingredients. Buttercream decorations allow bakers to personalize cakes according to an event’s colors, theme, or preferences.
Purple and lavender shades are frequently chosen for elegant and whimsical designs. Paired with ivory sugar pearls and delicate rosettes, these colors give the cake a refined appearance without requiring complicated fondant work.
This recipe is suitable for home bakers who want a celebration cake that combines a classic vanilla taste with an attractive, bakery-inspired finish.
Ingredients and Quantities
This recipe makes one three-layer, 8-inch round cake with approximately 12 servings.
For the vanilla cake
- 3 cups all-purpose flour
- 2 1/2 teaspoons baking powder
- 1/2 teaspoon salt
- 1 cup unsalted butter, softened
- 1 3/4 cups granulated sugar
- 4 large eggs, at room temperature
- 1 tablespoon vanilla extract
- 1 cup whole milk, at room temperature
- 1/2 cup sour cream, at room temperature
For the vanilla buttercream filling
- 1 cup unsalted butter, softened
- 4 cups powdered sugar, sifted
- 3 tablespoons heavy cream
- 2 teaspoons vanilla extract
- A pinch of salt
For the purple buttercream decoration
- 1 cup unsalted butter, softened
- 4 cups powdered sugar, sifted
- 2–4 tablespoons heavy cream
- 1 teaspoon vanilla extract
- Purple gel food coloring, as needed
- Ivory or white sugar pearls, for decoration
Ingredient Notes
All-purpose flour: Measure the flour carefully to avoid a dense cake. For the most consistent results, weigh it if possible or spoon it into a measuring cup and level the top rather than packing it down.
Unsalted butter: Butter contributes flavor, moisture, and structure. It should be softened enough to indent easily but not melted or greasy.
Eggs: Room-temperature eggs combine more smoothly with the creamed butter and sugar, helping create an even batter.
Sour cream: Sour cream adds moisture and richness, helping the sponge remain tender. Full-fat sour cream generally gives the best texture.
Whole milk: Milk provides moisture and helps bring the batter together. Let it reach room temperature before mixing.
Powdered sugar: Also called confectioners’ sugar, it creates a smooth buttercream that is easy to spread and pipe.
Purple gel food coloring: Gel coloring is concentrated, so a small amount can produce a noticeable shade without significantly thinning the frosting.
Sugar pearls: Small ivory or white pearls add an elegant finish. Choose decorations intended for eating and follow the package instructions.
Optional Additions
This vanilla layer cake can be customized to suit different tastes and occasions.
- Raspberry filling: Spread a thin layer of seedless raspberry jam between the cake layers before adding the buttercream.
- Strawberry filling: Add a layer of thick strawberry preserves for a fruity contrast to the sweet frosting.
- Lemon flavor: Add a small amount of finely grated lemon zest to the cake batter for a brighter flavor.
- Almond extract: Replace a small portion of the vanilla extract with almond extract for a delicate bakery-style aroma.
- White chocolate: Drizzle cooled white chocolate over the top or incorporate a small amount into a suitable buttercream recipe.
- Two-tone frosting: Divide the purple buttercream into separate bowls and create a lighter lavender shade alongside a deeper purple.
- Edible flowers: Decorate the cake with food-safe edible flowers for a garden-inspired appearance.
- Fresh berries: Add a few fresh berries around the cake shortly before serving.
- Gluten-free version: Use a suitable gluten-free baking flour blend formulated for cakes, following its package guidance for substitutions.
For the most stable result, avoid adding watery fruit directly to the buttercream. Thick preserves or a properly prepared fruit filling are better choices.
Tips for Success
1. Bring Ingredients to Room Temperature
Room-temperature butter, eggs, milk, and sour cream combine more evenly than ingredients taken directly from the refrigerator. This helps create a smoother batter and a more consistent crumb.
2. Cream the Butter and Sugar Properly
Beat the butter and sugar for approximately 3–5 minutes until the mixture becomes pale and fluffy. This step incorporates air into the batter and helps the cake develop a lighter texture.
Scrape down the sides of the bowl as needed so the ingredients mix evenly.
3. Avoid Overmixing the Batter
Once the flour is added, mix on low speed only until the ingredients are combined. Excessive mixing can develop too much gluten, resulting in a tougher cake.
4. Divide the Batter Evenly
Use a kitchen scale if available to divide the batter equally among the three pans. Even layers bake more consistently and make stacking easier.
5. Check for Doneness Early
Oven temperatures vary, so begin checking the cakes around the 22-minute mark. A toothpick inserted into the center should come out clean or with a few moist crumbs, not wet batter.
Avoid opening the oven repeatedly during the early stages of baking.
6. Cool the Cake Completely
Never frost warm cake layers. Heat can soften the buttercream, causing the filling to slide and the exterior frosting to lose its shape.
Allow the cakes to cool on wire racks. If necessary, chill the completely cooled layers briefly to make them easier to handle.
7. Make a Crumb Coat
A crumb coat is a thin layer of buttercream that traps loose crumbs before the final frosting is applied. Chill the coated cake for 20–30 minutes before adding the lavender frosting.
This simple step helps create a cleaner finish.
8. Add Food Coloring Gradually
Start with a small amount of purple gel coloring and mix thoroughly before adding more. The color may deepen slightly as the frosting rests, so allow a few minutes before making further adjustments.
9. Use the Right Piping Tip
A medium or large open-star piping tip works well for rosettes. Practice a few on a piece of parchment paper before decorating the cake.
Keep the piping bag comfortably filled rather than overstuffed so you can control the pressure.
10. Chill Before Slicing
Refrigerate the decorated cake briefly to help the buttercream firm up. Use a sharp knife and wipe it clean between cuts for neat slices with visible layers.
Instructions
Step 1: Prepare the Cake Pans
Preheat the oven to 350°F (175°C).
Grease three 8-inch round cake pans and line the bottoms with parchment paper. Lightly grease the parchment as well.
Arrange the pans so there is enough room for air to circulate in the oven. If your oven cannot accommodate all three pans evenly, bake in batches rather than overcrowding them.
Step 2: Mix the Dry Ingredients
In a medium bowl, whisk together the all-purpose flour, baking powder, and salt until evenly combined.
Set the bowl aside while you prepare the wet ingredients.
Step 3: Cream the Butter and Sugar
Place the softened butter and granulated sugar in a large mixing bowl.
Beat with an electric mixer for 3–5 minutes, scraping down the sides of the bowl as necessary, until the mixture looks pale, light, and fluffy.
Add the eggs one at a time, beating well after each addition. Mix in the vanilla extract.
If the mixture looks slightly curdled after adding the eggs, continue gently mixing. It should become more cohesive as the dry ingredients and liquids are incorporated.
Step 4: Prepare the Cake Batter
Add approximately one-third of the dry ingredients to the butter mixture and mix on low speed.
Pour in about half of the milk and mix briefly. Add another portion of the dry ingredients, followed by the remaining milk and sour cream, alternating between wet and dry ingredients.
Finish with the remaining dry ingredients. Mix just until the batter is smooth and no large streaks of flour remain.
Scrape the sides and bottom of the bowl with a spatula to ensure everything is evenly combined. Avoid prolonged mixing.
Step 5: Divide and Bake the Cake Layers
Divide the batter evenly among the three prepared pans.
Smooth the tops gently with a spatula, then place the pans in the preheated oven.
Bake for approximately 22–28 minutes, or until a toothpick inserted into the center comes out clean or with a few moist crumbs.
Remove the pans from the oven and allow the cakes to cool for about 10 minutes. Carefully turn them out onto wire racks, remove the parchment paper, and let the layers cool completely.
Step 6: Prepare the Vanilla Buttercream
Place the softened butter in a clean mixing bowl and beat for 2–3 minutes until creamy.
Gradually add the sifted powdered sugar, mixing on low speed at first to prevent the sugar from scattering. Add the vanilla extract, salt, and heavy cream.
Increase the mixer speed and beat for another 2–3 minutes until the buttercream becomes smooth, fluffy, and easy to spread.
If the frosting is too thick, add a small amount of cream. If it is too soft, mix in a little more sifted powdered sugar.
Step 7: Level and Fill the Cake Layers
Once the cakes are completely cool, check whether their tops are level. If necessary, carefully trim any domed tops with a serrated knife.
Place the first cake layer on a cake stand or serving plate. Spread an even layer of vanilla buttercream across the top, leaving a small margin near the edge if the frosting is very soft.
Place the second cake layer on top and repeat the process. Add the third layer, positioning it carefully so the cake remains level.
Spread a thin layer of buttercream over the top and sides to create a crumb coat.
Refrigerate the cake for 20–30 minutes, or until the crumb coat is firm.
Step 8: Prepare the Lavender Buttercream
Place the softened butter in a clean bowl and beat until creamy.
Gradually add the sifted powdered sugar, followed by the vanilla extract. Add 2 tablespoons of heavy cream initially, then beat until the mixture becomes smooth.
Add more cream, a little at a time, until the frosting reaches a consistency that is easy to spread and pipe.
Add purple gel food coloring in small amounts, mixing thoroughly after each addition until you achieve the desired lavender shade.
If you want darker purple rosettes, reserve some frosting and add a little more coloring to that portion.
Step 9: Frost the Cake
Remove the chilled cake from the refrigerator.
Spread the lavender buttercream over the top and sides, using an offset spatula to distribute it evenly. Smooth the surface with a cake scraper or spatula.
For a softer, more decorative appearance, you can leave subtle swirls in the frosting rather than aiming for perfectly smooth sides.
If the buttercream becomes too soft while working, refrigerate the cake briefly before continuing.
Step 10: Pipe the Decorative Rosettes
Transfer some of the purple buttercream into a piping bag fitted with a star tip.
Starting at the center of each rosette, pipe a small circular swirl while maintaining steady pressure. Release the pressure and lift the tip gently to finish each flower.
Arrange rosettes across the top of the cake and around the lower edge. Alternate larger and smaller decorations if desired to create a more varied design.
For extra dimension, use a lighter lavender shade for some of the swirls.
Step 11: Add the Sugar Pearls
Carefully place small ivory or white sugar pearls between the buttercream rosettes.
Use clean, dry fingers or food-safe tweezers to position them without flattening the decorations.
Avoid adding too many pearls in one area. Spacing them evenly creates a more balanced and elegant finish.
Step 12: Chill, Slice, and Serve
Refrigerate the decorated cake for approximately 20–30 minutes to help the frosting set.
Before serving, let the cake stand at room temperature for around 15–20 minutes, depending on the room temperature, so the sponge and buttercream soften slightly.
Slice with a sharp knife, wiping it clean between cuts to reveal the golden cake layers and creamy vanilla filling.
Serve the cake on its own or alongside fresh berries, tea, or coffee.
Description
Purple Vanilla Layer Cake with Creamy Buttercream Frosting is a beautiful three-layer dessert featuring moist golden vanilla sponge, smooth vanilla filling, and a delicate lavender exterior.
The cake’s flavor is classic and comforting, with fragrant vanilla, buttery richness, and a tender crumb. Its buttercream frosting adds a creamy sweetness, while the purple rosettes and ivory sugar pearls transform the simple vanilla cake into an elegant celebration centerpiece.
Each slice reveals three golden layers separated by pale buttercream, creating an attractive contrast with the lavender exterior. The combination of colors, textures, and familiar flavors makes this cake ideal for birthdays, family celebrations, and special gatherings.
Despite its decorative appearance, the recipe can be made with basic baking equipment and a little patience. Careful cooling, a crumb coat, and gradual coloring help make the decorating process easier for home bakers.
Nutritional Information
The following values are approximate estimates per serving, assuming the cake is divided into 12 slices and includes the vanilla filling, purple buttercream, and a modest amount of sugar pearls. Actual nutrition will vary according to the brands and quantities used, particularly the amount of frosting on each slice.
- Calories: Approximately 650–800
- Protein: Approximately 6–8 grams
- Carbohydrates: Approximately 85–105 grams
- Fat: Approximately 30–42 grams
- Saturated fat: Approximately 18–26 grams
- Sugar: Approximately 55–75 grams
- Sodium: Approximately 250–400 milligrams
This is an indulgent celebration cake, with most of its energy coming from flour, sugar, butter, and frosting. The exact calorie content can vary substantially depending on the thickness of the buttercream and the size of each slice.
For smaller portions, cut the cake into 14–16 slices rather than 12. You can also use a thinner layer of frosting between the cakes while keeping the decorative rosettes on top.
Storage and Food Safety
Because this cake contains buttercream made with butter and cream, proper storage helps maintain its texture and quality.
- Room temperature: If the kitchen is cool and the frosting ingredients are suitable for room-temperature storage, the cake may be kept covered for a short period. When in doubt, refrigerate it, especially in warm weather.
- Refrigeration: Store the cake in an airtight cake carrier or covered container in the refrigerator. For best quality, enjoy it within 3–4 days.
- Serving: Let refrigerated slices soften slightly at room temperature before serving.
- Freezing: Unfrosted cake layers can be wrapped tightly and frozen for up to about 2 months for best quality. Thaw them in the refrigerator before decorating. Fully decorated cake can also be frozen if protected carefully, although the sugar decorations may change in appearance.
- Make-ahead preparation: Bake the layers a day ahead, cool them completely, wrap them securely, and refrigerate or freeze them as appropriate. Prepare the buttercream and decorate closer to serving time.
- Clean decorating equipment: Use clean bowls, beaters, piping bags, and utensils throughout preparation.
If the cake will be displayed for an extended period or served in a warm room, keep it refrigerated until shortly before serving to prevent the buttercream from becoming too soft.
Conclusion
Purple Vanilla Layer Cake with Creamy Buttercream Frosting combines the familiar pleasure of a classic vanilla cake with an elegant lavender design. Its tender golden sponge, silky filling, and decorative purple rosettes make it a memorable dessert for birthdays, celebrations, and special occasions.
The recipe may look elaborate, but the process is manageable when divided into clear stages: bake the layers, prepare the buttercream, assemble the cake, apply the final frosting, and finish with piped decorations.
For the best results, measure ingredients carefully, avoid overmixing the batter, allow the cake layers to cool completely, and add food coloring gradually. These small details help create a cake that looks polished while retaining its soft texture and delicious vanilla flavor.
Recommendation
Serve this cake as the centerpiece of a birthday table, afternoon celebration, or special family meal. Its vanilla flavor pairs beautifully with fresh strawberries, raspberries, or a cup of coffee or tea.
For an especially elegant presentation, arrange a few additional ivory sugar pearls around the base of the cake or add a small cluster of fresh berries beside each slice. If you are preparing the cake for a themed celebration, adjust the lavender shade to match the event’s colors.
If you are new to cake decorating, practice piping the rosettes on parchment paper first. You can scrape the practice frosting back into the bowl and reuse it, making it easier to experiment with the piping pressure and swirl size before decorating the finished cake.
Most importantly, allow enough time for cooling and chilling. A properly cooled cake is easier to stack, frost, and slice, helping you achieve a beautiful result without unnecessary stress.
Embracing Healthful Indulgence
Celebration cakes are often enjoyed for their flavor, appearance, and the memories associated with sharing them. A slice of homemade vanilla cake can fit into a balanced eating pattern when enjoyed in a portion that suits your preferences.
Because buttercream contains substantial amounts of butter and sugar, you can choose a smaller slice or use a little less filling between the layers while preserving the decorative finish. Fresh berries alongside the cake can also add freshness and variety to the dessert plate.
There is no need to remove the ingredients that make this cake special. Instead, focus on enjoying the texture, vanilla aroma, and care that go into preparing it, while balancing richer desserts with a varied diet overall.
With its tender sponge, creamy buttercream, and delicate purple decorations, this vanilla layer cake is a delightful reminder that homemade desserts can be both beautiful and satisfying.