
1. Introduction
Few homemade desserts are as comforting and timeless as a Classic Moist Vanilla Butter Cake. With its golden exterior, soft and tender crumb, rich buttery flavor, and delicate vanilla aroma, this traditional-style cake is a wonderful addition to any dessert table. Made with simple pantry ingredients, it is an approachable recipe that delivers delicious results without complicated techniques or specialty equipment.
The secret to a beautifully textured butter cake lies in the balance of its ingredients and the way they are combined. Creaming softened butter with granulated sugar creates a light mixture that helps give the cake its tender structure. Adding room-temperature eggs gradually encourages a smooth batter, while alternating the dry ingredients with milk helps maintain moisture without overworking the flour.
A simple powdered sugar glaze completes the cake with a light sweetness. You can prepare it with milk for a classic vanilla finish or use fresh lemon juice for a brighter, slightly tangy flavor. Optional lemon zest adds a refreshing citrus note that complements the buttery base.
This cake is perfect for afternoon tea, weekend baking, family celebrations, birthdays, or an everyday dessert when you want something homemade and satisfying. It can be served plain, dressed up with fresh berries, or paired with a scoop of vanilla ice cream.
Whether you are an experienced baker or learning to bake from scratch, this Classic Moist Vanilla Butter Cake is a versatile recipe worth keeping in your collection.
2. Origin
Butter cakes are part of a long tradition of European and American home baking. Their development became closely associated with the wider availability of butter, refined sugar, wheat flour, and reliable ovens.
Before modern baking powder became widely available, many cakes depended on air incorporated through beating eggs or creaming butter and sugar to achieve a lighter texture. The introduction and growing use of chemical leavening agents during the nineteenth century made it easier for home bakers to produce consistently risen cakes without relying entirely on whipped eggs.
Vanilla also became a popular flavoring in cakes, custards, and other desserts as commercial vanilla extracts became more accessible. Over time, simple vanilla butter cakes became familiar in home kitchens, bakeries, and celebration menus.
There is no single documented origin for this exact recipe. Instead, it represents a modern home-baking version of a classic butter cake, combining familiar baking ingredients with a straightforward preparation method.
Its enduring appeal comes from its simplicity. Unlike elaborate desserts that depend on multiple layers or complicated fillings, a well-made vanilla butter cake allows the flavor of butter and vanilla to take center stage.
3. Cultural Significance
Vanilla butter cake holds a familiar place in many home-baking traditions. It is often associated with birthdays, family gatherings, afternoon tea, holidays, and informal celebrations where a homemade dessert brings people together.
In American kitchens, simple butter cakes are commonly served as everyday treats or adapted into decorated celebration cakes. The same basic style can be found in many other countries, although ingredient proportions, flavorings, and finishing techniques vary.
One reason this cake remains popular is its versatility. A plain vanilla cake can be enjoyed with coffee or tea, topped with fruit, covered with buttercream, or served with a light glaze. It can also serve as a foundation for more elaborate desserts.
The recipe is especially useful for beginner bakers because it teaches several essential techniques: creaming butter and sugar, incorporating eggs, alternating wet and dry ingredients, and checking for doneness.
It also encourages creativity without requiring a completely different recipe. A little lemon zest can brighten the flavor, almond extract can introduce a new aroma, or fresh berries can transform the presentation.
Ultimately, this cake represents the simple pleasure of baking something from scratch and sharing it with others.
4. Ingredients and Quantities
This recipe makes approximately 10–12 servings.
For the vanilla butter cake
- 2 cups all-purpose flour, approximately 240–250 grams
- 1 1/2 cups granulated sugar, approximately 300 grams
- 1 cup unsalted butter, softened, approximately 227 grams
- 4 large eggs, at room temperature
- 3/4 cup whole milk, approximately 180 milliliters
- 2 teaspoons vanilla extract
- 2 teaspoons baking powder
- 1/4 teaspoon salt
- 1 tablespoon lemon zest, optional
For the simple glaze
- 1 cup powdered sugar, approximately 120 grams
- 2 tablespoons milk or fresh lemon juice, with a little extra if needed
- 1/2 teaspoon vanilla extract
Understanding the ingredients
All-purpose flour: Flour gives the cake its structure. Measuring by weight is the most reliable method. If using measuring cups, spoon the flour into the cups and level the tops rather than packing it down.
Granulated sugar: Sugar provides sweetness, helps the butter hold air during creaming, and contributes to the cake’s tender texture and golden crust.
Unsalted butter: Butter provides the cake’s rich flavor and soft crumb. Use softened butter rather than melted butter, because the creaming process helps incorporate air into the batter.
Eggs: Eggs provide structure, richness, moisture, and emulsification. Room-temperature eggs generally blend more easily into the butter mixture.
Whole milk: Milk adds moisture and helps create a tender crumb. Whole milk provides richness, although 2% milk can work with a slight difference in texture.
Vanilla extract: Vanilla is the main flavoring, so choose a good-quality extract for the best result.
Baking powder: Baking powder helps the cake rise. Make sure it is fresh and has not been stored open for an extended period.
Salt: A small amount of salt balances the sweetness and brings out the buttery and vanilla flavors.
Lemon zest: Lemon zest is optional, but it adds a subtle citrus fragrance that works especially well with the glaze.
Powdered sugar: Powdered sugar creates a smooth glaze that sets into a delicate coating as it dries.
5. Optional Additions
This classic recipe can be customized in many ways while preserving its buttery vanilla flavor.
Add a stronger citrus flavor
For a lemon-vanilla cake, include the tablespoon of lemon zest and prepare the glaze with fresh lemon juice. You can also add a small amount of finely grated orange zest for a softer citrus aroma.
Avoid adding too much extra liquid to the batter, as excessive moisture can affect the cake’s texture.
Add chocolate chips
Fold approximately 1/2 cup of chocolate chips into the finished batter before baking. Tossing them lightly in a small amount of flour may help distribute them more evenly, although it does not guarantee that they will remain suspended.
Semi-sweet chocolate chips provide a balanced sweetness, while white chocolate creates a sweeter, creamier variation.
Add fresh berries
Serve the cooled cake with sliced strawberries, raspberries, blueberries, or blackberries. Fresh berries add color, acidity, and a refreshing contrast to the rich cake.
If you want to incorporate berries directly into the batter, use a moderate quantity and fold them in gently. Excess moisture from very juicy fruit can affect the final texture.
Add a cream topping
For a more elegant dessert, serve each slice with a spoonful of lightly sweetened whipped cream. Freshly whipped cream is best added just before serving.
If you plan to cover the entire cake with whipped cream, refrigerate it and follow appropriate storage guidance for dairy-based toppings.
Make a richer glaze
For a slightly richer finish, replace the milk in the glaze with a small amount of cream. Add the liquid gradually until the glaze reaches a consistency that drizzles easily from a spoon.
Turn it into a layered cake
You can bake the batter in two appropriately sized round pans if you adjust the baking time and verify that the layers cook through. Once completely cooled, sandwich the layers with vanilla buttercream, whipped frosting, or a thin layer of fruit preserves.
The exact baking time will depend on the pan size and the depth of the batter.
6. Tips for Success
1. Use properly softened butter
Butter should be soft enough to leave a slight indentation when pressed, but it should not look oily or melted.
Butter that is too cold will not cream effectively with the sugar. Butter that is too warm may fail to hold enough air, resulting in a heavier cake.
2. Bring the eggs and milk to room temperature
Cold ingredients can cause the butter mixture to look curdled or separated. Let the eggs and milk sit out briefly before beginning, while keeping food safety in mind.
If the mixture looks slightly separated after adding the eggs, adding the flour gradually may help bring the batter together.
3. Cream the butter and sugar thoroughly
Beat the softened butter and sugar for approximately 3–5 minutes using an electric mixer at medium speed. The mixture should become noticeably lighter in color and fluffy in texture.
This step helps incorporate air, contributing to the cake’s rise and tenderness.
4. Add the eggs one at a time
Beat in each egg until it is incorporated before adding the next. Scrape down the sides of the bowl as needed to ensure the ingredients are evenly mixed.
Adding eggs gradually helps create a more stable batter.
5. Alternate the flour mixture and milk
Add the dry ingredients in three additions, alternating with the milk. Begin and finish with the flour mixture.
Mix on low speed and stop as soon as the ingredients are combined. Overmixing after adding flour can develop excess gluten, potentially making the cake firm or chewy.
6. Prepare the pan carefully
Grease and lightly flour a 9-inch round cake pan. For additional protection against sticking, line the bottom with a circle of parchment paper.
Make sure the pan has enough capacity for the batter to rise without overflowing.
7. Avoid opening the oven too early
Keep the oven door closed during the early stages of baking. Opening it too soon can cause a temperature drop that interferes with the cake’s rise.
Begin checking for doneness near the end of the estimated baking time.
8. Check for doneness correctly
Insert a toothpick into the center of the cake. It should come out clean or with a few moist crumbs, but not with wet batter.
The top should be golden, and the cake should spring back lightly when gently pressed.
If the surface browns too quickly before the center is ready, check your oven temperature and avoid extending the baking time without assessing the cake.
9. Cool before glazing
Allow the cake to rest in the pan for 10–15 minutes, then transfer it to a wire rack.
Wait until the cake is completely cool before adding the glaze. Glazing a warm cake can cause the mixture to melt, run off, or soak into the surface rather than forming a delicate coating.
10. Measure the glaze gradually
Start with two tablespoons of milk or lemon juice and add more a few drops at a time if needed. A thicker glaze creates defined drizzles, while a thinner glaze spreads into a lighter coating.
7. Instructions
Step 1: Prepare the cake pan
Preheat the oven to 350°F (175°C).
Grease a 9-inch round cake pan with butter or a neutral cooking spray. Lightly dust it with flour, tapping out any excess. For easier removal, line the bottom with parchment paper.
Measure all ingredients before mixing so that the batter can be prepared smoothly.
Step 2: Cream the butter and sugar
Place the softened butter and granulated sugar in a large mixing bowl.
Using an electric mixer, beat for 3–5 minutes until the mixture becomes pale, fluffy, and noticeably lighter in texture. Stop once or twice to scrape down the sides of the bowl.
Do not rush this step. Proper creaming helps produce a lighter crumb.
Step 3: Add the eggs and vanilla
Add the eggs one at a time, beating after each addition until incorporated.
Scrape the sides and bottom of the bowl to ensure that the mixture is evenly combined.
Add the vanilla extract and optional lemon zest, then mix briefly until fragrant.
Step 4: Combine the dry ingredients
In a separate bowl, whisk together the all-purpose flour, baking powder, and salt.
Whisking distributes the baking powder throughout the flour and helps prevent concentrated pockets of leavening in the finished cake.
Step 5: Mix the batter
Add approximately one-third of the flour mixture to the butter mixture and mix on low speed until nearly incorporated.
Pour in about half of the milk and mix briefly. Add another portion of the flour mixture, followed by the remaining milk, then finish with the final portion of flour.
Mix only until no obvious dry flour remains. Use a spatula to gently scrape the bowl and finish combining the batter if necessary.
The batter should be thick but spreadable. Avoid prolonged mixing.
Step 6: Transfer the batter to the pan
Pour the batter into the prepared cake pan.
Use a spatula to spread it evenly and gently smooth the top. Tap the pan lightly against the counter once to help release any large air pockets.
Place the pan on the center rack of the preheated oven.
Step 7: Bake the cake
Bake for approximately 40–50 minutes, checking near the 40-minute mark.
The cake is ready when the top is golden, the center springs back lightly when touched, and a toothpick inserted into the middle comes out clean or with a few moist crumbs.
If the cake needs additional time, continue baking in short intervals and check again. Oven temperatures and pan materials can affect the final baking time.
Step 8: Cool the cake
Remove the cake from the oven and let it rest in the pan for 10–15 minutes.
Carefully loosen the edges with a thin knife if necessary. Turn the cake out onto a wire rack and allow it to cool completely before glazing.
Cooling helps the cake’s structure settle and prevents the glaze from melting excessively.
Step 9: Prepare the simple glaze
Place the powdered sugar in a small bowl.
Add two tablespoons of milk or fresh lemon juice, along with the vanilla extract. Whisk until smooth.
If the glaze is too thick, add a few drops of liquid at a time. If it becomes too thin, whisk in a little more powdered sugar.
For a classic vanilla finish, use milk. For a brighter citrus flavor, use lemon juice.
Step 10: Glaze the cake
Place the completely cooled cake on a serving plate or leave it on the wire rack with a tray underneath.
Drizzle the glaze over the top using a spoon, allowing some of it to flow naturally down the sides.
Let the glaze set for approximately 15–20 minutes before slicing, depending on its thickness and the room temperature.
Step 11: Slice and serve
Cut the cake into 10–12 slices using a sharp knife.
Serve with tea, coffee, milk, or a cold lemon-lime drink. For an extra-special presentation, add fresh berries or a small spoonful of whipped cream beside each slice.
8. Description
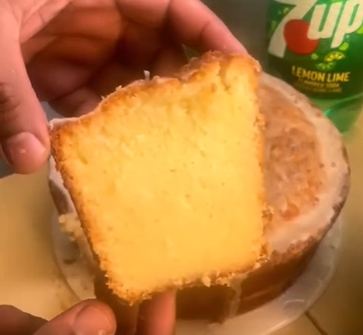
This Classic Moist Vanilla Butter Cake features a golden exterior and a soft, tender interior with a fine, buttery crumb.
Its flavor is rich without being overpowering. Butter provides depth and a delicate creaminess, while vanilla creates the familiar aroma associated with classic homemade cakes. The small amount of salt balances the sweetness, and optional lemon zest adds a subtle freshness.
The cake’s texture is one of its defining characteristics. When the butter and sugar are creamed properly and the batter is mixed gently, the finished cake should be tender, moist, and easy to slice without crumbling excessively.
The glaze adds another layer of sweetness without covering up the cake’s buttery flavor. A milk-based glaze creates a smooth vanilla finish, while lemon juice introduces a light tang that balances the richness.
Each slice pairs well with a warm drink or a simple fruit accompaniment. The cake is equally suitable for casual afternoon treats and more formal dessert presentations.
Because it does not require an elaborate filling or frosting, this recipe also works well when you want a homemade cake that looks appealing with minimal decoration.
9. Nutritional Information
The nutritional values below are estimates and can vary depending on the ingredients, the amount of glaze used, and the final number of slices.
Estimated nutrition per serving
Assuming the cake is divided into 12 servings and includes the glaze:
- Calories: approximately 390–430
- Protein: approximately 5–6 grams
- Carbohydrates: approximately 50–60 grams
- Fat: approximately 18–22 grams
- Sugar: approximately 30–40 grams
These estimates are intended as general guidance rather than precise dietary calculations.
Carbohydrates
Flour and sugar supply most of the carbohydrates in this cake. These ingredients contribute to its structure, sweetness, and soft texture.
Fats
Butter provides much of the cake’s fat content, contributing to its rich flavor and tender crumb. Egg yolks also contribute fat and richness.
Protein
Eggs, milk, and flour provide modest amounts of protein. This is a dessert intended primarily for enjoyment rather than as a major protein source.
Vitamins and minerals
Eggs and milk contribute small amounts of nutrients such as vitamin B12, riboflavin, and phosphorus. The quantities per serving depend on the recipe proportions and serving size.
Ways to adjust the recipe
If you prefer a less sweet finish, use a thinner glaze or omit it entirely and serve the cake plain.
For smaller portions, cut the cake into more slices. If you want to experiment with whole-wheat flour or sugar alternatives, make gradual adjustments because these substitutions can change moisture, texture, and browning.
The best choice depends on your preferences and dietary needs. Enjoying a slice of cake can fit into a varied eating pattern without requiring every dessert to be modified.
10. Storage and Food Safety
Proper storage helps preserve the cake’s moisture, flavor, and texture.
At room temperature
Once the glaze has set, store the cake in an airtight container in a cool, dry place.
A plain butter cake or one topped with a simple sugar glaze can generally be kept at room temperature for about two to three days, provided it is stored properly and the environment is not excessively hot or humid.
Keep the cake covered to prevent it from drying out.
In the refrigerator
If your kitchen is very warm, or if you add whipped cream, cream cheese frosting, custard, or another perishable topping, refrigerate the cake as appropriate for that topping.
A refrigerated cake may become firmer because the butter cools. Let individual slices sit briefly at room temperature before serving for a softer texture, while following food safety guidance for perishable ingredients.
Freezing the cake
For longer storage, freeze the cake without the glaze when possible.
Allow it to cool completely, wrap it tightly in plastic wrap, and place it in a freezer-safe container or bag. For best quality, use it within approximately two to three months.
Thaw the cake while wrapped at room temperature, then prepare fresh glaze and decorate before serving.
Individual slices can also be wrapped and frozen separately for convenient portions.
Food safety reminders
Wash your hands and use clean utensils during preparation. Do not eat raw cake batter because raw flour and uncooked eggs can contain harmful microorganisms.
If the cake includes perishable fillings or toppings, refrigerate it promptly. Discard cake that develops mold, an unusual smell, or other signs of spoilage.
11. Conclusion
Classic Moist Vanilla Butter Cake is a dependable homemade dessert that proves simple ingredients can produce wonderful results.
Its buttery flavor, delicate vanilla aroma, golden crust, and soft crumb make it suitable for nearly any occasion. The simple glaze adds a polished finish, while the optional lemon zest offers a fresh variation without complicating the recipe.
The preparation method is straightforward, but a few details make a significant difference: properly softened butter, room-temperature eggs, thorough creaming, gentle mixing, and adequate cooling.
Once you master the basic recipe, you can adapt it with fruit, chocolate chips, whipped cream, or different glaze flavors. It can remain a simple afternoon cake or become the foundation for a more elaborate celebration dessert.
Whether you bake it for guests or enjoy a slice at home with your favorite drink, this vanilla butter cake offers a comforting combination of familiar flavor and homemade goodness.
12. Recommendation
For the best results, follow the ingredient quantities carefully and avoid overmixing the batter after adding the flour. Use an oven thermometer if your oven tends to run hot or cold, and begin checking the cake near the lower end of the suggested baking time.
If you want the classic bakery-style experience, use vanilla extract, whole milk, and a milk-based glaze. For a fresher variation, add lemon zest to the batter and prepare the glaze with fresh lemon juice.
For an attractive serving platter, arrange the slices with fresh strawberries, raspberries, or blueberries. A light dusting of powdered sugar can also work if you prefer to skip the glaze.
This recipe is particularly useful for beginner bakers because it teaches essential techniques while leaving plenty of room for creativity. Once you are comfortable with the method, you can experiment with different pans, toppings, and flavor combinations.
My recommendation is to begin with the recipe as written, pay attention to the creaming and mixing stages, and allow the cake to cool fully before glazing. These simple steps help you achieve a tender, flavorful cake with an attractive finish.
13. Embracing Healthful Indulgence
Enjoying homemade desserts can be part of a balanced and flexible approach to eating. The goal does not need to be eliminating favorite foods, but rather appreciating them in a way that suits your preferences and needs.
This vanilla butter cake is made with familiar ingredients and offers a simple opportunity to enjoy the pleasure of baking from scratch. Its flavor comes from butter and vanilla rather than complicated fillings or multiple layers of frosting.
You can serve a slice alongside fresh fruit, share the cake with family or friends, or enjoy a smaller portion with tea or coffee. If you prefer a lighter finish, use less glaze or leave the cake plain.
Baking at home also gives you control over ingredient quality, sweetness, and portion size. You can choose good-quality vanilla, measure the sugar carefully, and make small adjustments while preserving the character of the recipe.
There is no need to treat a dessert as something that must be completely avoided or made perfect from a nutritional perspective. Variety, moderation, and an enjoyable relationship with food are more useful long-term principles.
With its soft crumb, rich buttery flavor, and delicate vanilla glaze, this Classic Moist Vanilla Butter Cake is a reminder that simple homemade treats can be both meaningful and delicious. Bake it for a special occasion or an ordinary afternoon, and enjoy each slice as part of the pleasure of sharing good food.