
1. Introduction
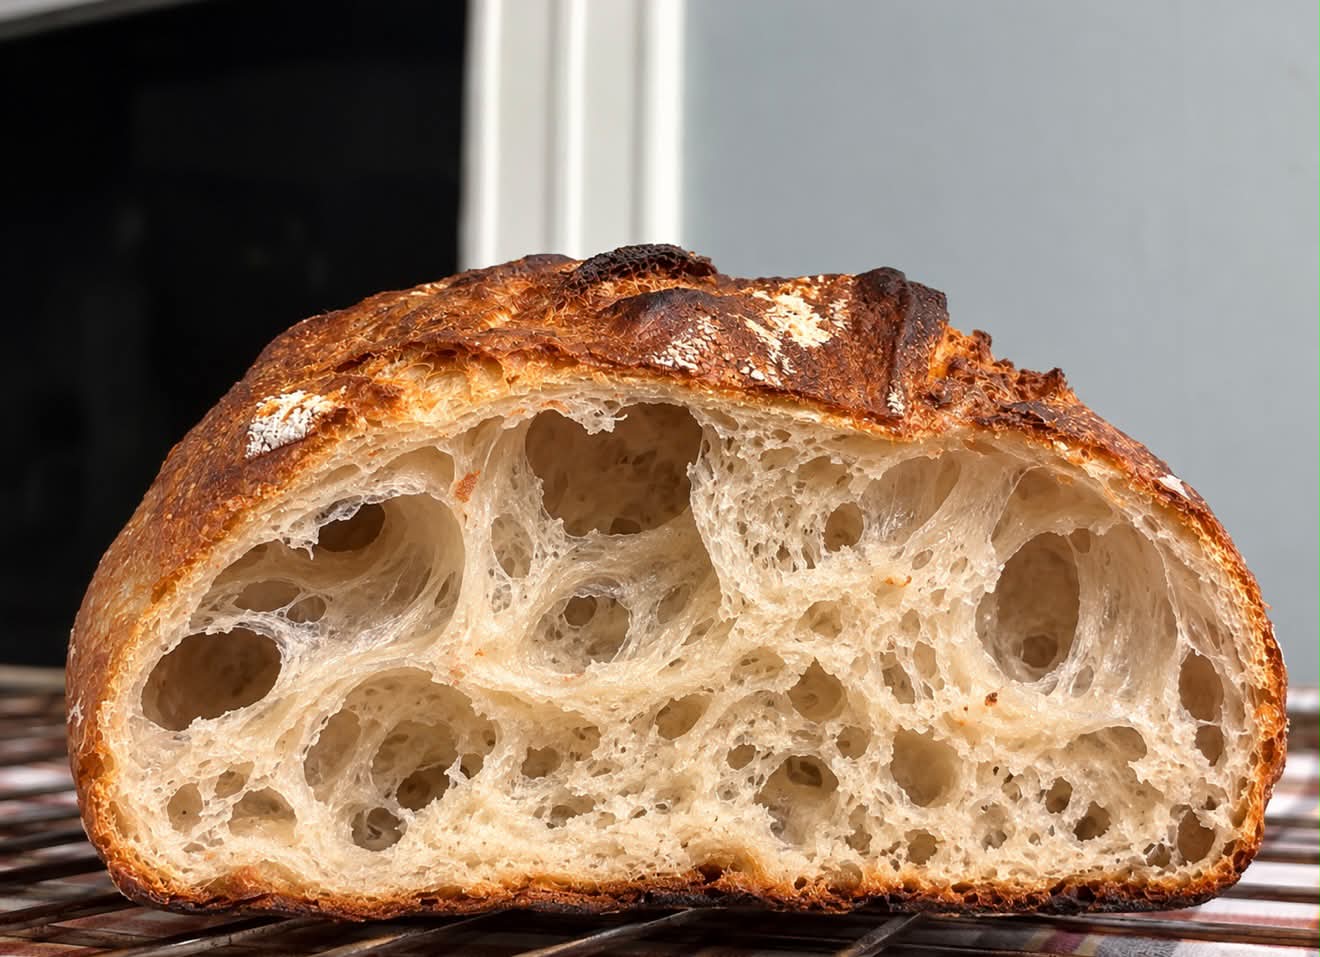
High-Hydration Artisan Sourdough Bread is a beautiful, naturally fermented loaf featuring a deeply caramelized, blistered crust and a soft, airy interior filled with irregular holes.
Made with strong bread flour, whole wheat flour, water, salt, and an active sourdough starter, this bread develops its distinctive flavor through slow fermentation rather than commercial yeast.
The secret to its glossy, open crumb lies in careful gluten development, proper fermentation, gentle shaping, and baking with steam.
Although this recipe requires patience, the result is a bakery-style sourdough loaf with exceptional texture, rich flavor, and a satisfying crunch.
2. Origin and Cultural Significance
Sourdough is one of the oldest methods of bread fermentation, dating back thousands of years.
Before commercial baker’s yeast became widely available, bread was commonly leavened using naturally occurring yeasts and lactic acid bacteria maintained in a fermented starter.
Sourdough traditions developed across many cultures, including European artisan baking and the famous sourdough breads of San Francisco.
Modern high-hydration sourdough emphasizes an open crumb, strong crust development, and long fermentation, combining traditional techniques with contemporary artisan bread-making methods.
3. Ingredients
Makes 1 large loaf, approximately 900–950 g after baking
For the Sourdough Bread
| Ingredient | Amount |
|---|---|
| High-protein bread flour (12–14% protein) | 450 g |
| Whole wheat flour | 50 g |
| Lukewarm water, approximately 80°F (27°C) | 400 g |
| Active sourdough starter (100% hydration) | 100 g |
| Fine sea salt | 10 g |
Baker’s Percentages
The percentages below use the 500 g of flour added directly to the dough as the reference.
| Ingredient | Percentage |
|---|---|
| Bread flour | 90% |
| Whole wheat flour | 10% |
| Water | 80% |
| Sourdough starter | 20% |
| Salt | 2% |
Important hydration note: Because the 100 g starter contains approximately 50 g flour and 50 g water, the actual total dough hydration is approximately 81.8% (450 g total water ÷ 550 g total flour). The formula is therefore slightly above 80% hydration when the starter is included.
Additional Supplies
- Rice flour, for dusting the proofing basket
- Parchment paper rated for the baking temperature, optional
- Extra flour, for shaping
4. Optional Additions
- Whole wheat flour: Increase slightly for a nuttier flavor, adjusting water as needed.
- Rye flour: Replace 25 g of bread flour for a deeper, earthy flavor.
- Toasted sesame seeds: Sprinkle over the shaped loaf before baking.
- Fresh rosemary: Fold a small amount into the dough for an aromatic variation.
- Roasted garlic: Add cooled roasted garlic during the folding stage.
- Flaky sea salt: Sprinkle lightly over the crust before baking, if desired.
For the most open crumb, begin with the plain formula before experimenting with additions.
5. Tips for Success
- Use strong bread flour with approximately 12–14% protein to support the high water content.
- Make sure your starter is active, bubbly, and capable of reliably raising dough before mixing.
- Use a digital kitchen scale for accurate measurements.
- Adjust the water temperature according to your kitchen temperature.
- Develop gluten gradually through stretch-and-folds or coil folds.
- Avoid adding excessive flour during shaping.
- Judge bulk fermentation by dough expansion, bubbles, and texture rather than time alone.
- Handle the dough gently during shaping to preserve fermentation gases.
- Preheat the Dutch oven thoroughly for strong oven spring.
- Allow the loaf to cool completely before slicing.
6. Instructions
Step 1: Prepare the Sourdough Starter
Feed your sourdough starter several hours before mixing the dough.
Allow it to rise until bubbly, expanded, and near its peak activity.
The starter should have a pleasantly fermented aroma and show signs of strong fermentation.
Use 100 g of active starter for the recipe.
Step 2: Autolyse the Flour and Water
In a large mixing bowl, combine:
- 450 g bread flour
- 50 g whole wheat flour
- 370 g lukewarm water
Mix until no dry flour remains.
Cover the bowl and allow the dough to rest for approximately 1 hour.
This resting period helps hydrate the flour and begins gluten development.
Step 3: Incorporate the Sourdough Starter
Add 100 g of active sourdough starter to the dough.
Use your fingers to gently dimple the starter into the mixture.
Fold and squeeze the dough until the starter is evenly incorporated.
Cover and rest for approximately 20 minutes.
Step 4: Add the Salt and Remaining Water
Sprinkle 10 g fine sea salt over the dough.
Gradually add the remaining 30 g water.
Pinch, squeeze, and fold the dough until the salt dissolves and the water is absorbed.
The dough should feel soft, stretchy, and slightly sticky.
Step 5: Begin Bulk Fermentation
Transfer the dough to a clean, lightly oiled container.
Cover and leave at a warm room temperature, ideally around 75–78°F (24–26°C).
Bulk fermentation generally takes approximately 4–6 hours from the addition of the starter, but may take longer depending on starter strength and dough temperature.
Step 6: Perform Stretch-and-Folds
During the first 2 hours of bulk fermentation, perform 4 sets of stretch-and-folds, approximately 30 minutes apart.
For each set:
- Wet your hands lightly.
- Lift one side of the dough until it stretches without tearing.
- Fold it over the center.
- Rotate the container and repeat on the remaining sides.
Cover the dough between each set.
As gluten develops, the dough should become smoother, stronger, and more elastic.
Step 7: Finish Bulk Fermentation
After the final fold, leave the dough undisturbed.
Allow it to ferment until it has increased in volume by approximately 30–50% at the suggested warm dough temperature.
Look for these signs:
- Small bubbles along the sides of the container
- A slightly domed surface
- A soft, airy texture
- Gentle movement or wobbling when the container is shaken
Avoid waiting for the dough to double if fermentation is already advanced, as this can lead to overproofing.
Step 8: Preshape the Dough
Lightly flour your work surface.
Gently turn the fermented dough onto the counter.
Using a bench scraper, shape it into a loose round without pressing out too much air.
Allow it to rest uncovered for approximately 20–30 minutes.
Step 9: Final Shape
Lightly flour the surface of the dough.
Flip it over and gently stretch it into a rectangle.
Fold the sides inward and roll or tuck the dough into a tight round boule or oval batard.
Create enough surface tension to help the loaf hold its shape, but avoid tearing the dough.
Step 10: Transfer to the Proofing Basket
Dust a banneton or cloth-lined bowl generously with rice flour.
Place the shaped dough seam-side up into the basket.
Cover with a reusable cover or food-safe bag to prevent drying.
Step 11: Cold Proof Overnight
Transfer the dough to the refrigerator at approximately 38°F (3°C).
Allow it to proof for 12–16 hours.
Cold fermentation helps develop flavor and makes the dough firmer and easier to score.
Step 12: Preheat the Dutch Oven
Place a heavy Dutch oven and its lid inside the oven.
Preheat to 500°F (260°C) for approximately 45–60 minutes, provided your Dutch oven and its components are rated for this temperature.
Otherwise, follow the manufacturer’s maximum temperature guidance.
Step 13: Score the Dough
Remove the dough from the refrigerator.
Turn it onto a piece of heat-rated parchment paper or a suitable bread sling.
Using a sharp bread lame or razor blade, make one long slash approximately ¼–½ inch (6–12 mm) deep.
Hold the blade at a slight angle to encourage a pronounced crust opening.
Step 14: Bake with Steam
Carefully transfer the dough into the preheated Dutch oven.
Cover with the lid.
Reduce the oven temperature to 450°F (230°C).
Bake covered for approximately 20 minutes.
The trapped moisture creates steam, helping the loaf expand before the crust hardens.
Step 15: Develop the Crust
Remove the Dutch oven lid carefully.
Reduce the oven temperature to 425°F (220°C).
Continue baking uncovered for approximately 20–25 minutes.
The loaf should develop a deep golden-brown to chestnut-colored crust.
For a darker, more caramelized finish, bake a few minutes longer while monitoring closely.
Step 16: Cool Completely
Remove the bread from the Dutch oven and transfer it to a wire rack.
Allow it to cool for at least 2 hours before slicing.
Cooling helps the crumb structure set and prevents the interior from becoming gummy when cut.
7. Description
This artisan sourdough loaf features a dramatic, deeply browned crust with delicate blisters and a rustic appearance.
The interior is soft, moist, and slightly glossy, with an irregular network of large and small air pockets.
Its flavor is mildly tangy, wheaty, and complex, with subtle fermented notes and a rich, toasted crust.
When sliced, the bread offers a satisfying contrast between its crisp exterior and tender, chewy crumb.
8. Nutritional Information
Approximate values per slice, assuming 16 slices per loaf.
| Nutrient | Estimated Amount |
|---|---|
| Calories | 120–130 kcal |
| Protein | 4–5 g |
| Carbohydrates | 24–26 g |
| Fat | 0.5–1 g |
| Fiber | 1–2 g |
| Sugars | Less than 1 g |
Values depend on the flour used, slice size, and moisture lost during baking.
9. Recipe Details
- Preparation and Mixing: 25–35 minutes of active work
- Autolyse: 1 hour
- Bulk Fermentation: Approximately 4–6 hours from starter addition, temperature-dependent
- Bench Rest: 20–30 minutes
- Cold Proof: 12–16 hours
- Baking Time: 40–45 minutes
- Cooling Time: At least 2 hours
- Total Elapsed Time: Approximately 20–27 hours
- Yield: 1 large artisan loaf
- Cuisine: Traditional artisan bread
- Course: Bread
- Difficulty: Advanced beginner to intermediate
- Equipment: Digital kitchen scale, mixing bowl, dough container, bench scraper, banneton, bread lame, Dutch oven, and wire rack
10. Conclusion
High-Hydration Artisan Sourdough Bread is a rewarding baking project that transforms a handful of simple ingredients into a beautiful, flavorful loaf.
Through proper fermentation, careful gluten development, and gentle handling, the dough develops the strength needed to support a light, airy crumb.
The finished bread offers a crisp, blistered crust, tender interior, and naturally fermented flavor that makes homemade sourdough so special.
Remember that a very open crumb is not the only sign of excellent sourdough. A well-fermented loaf with a balanced crumb, good texture, and delicious flavor is equally successful.
11. Recommendation
Serving: Enjoy freshly sliced with salted butter, olive oil, cheese, avocado, or homemade soup.
Storage: Keep the loaf at room temperature in a bread bag or wrapped in a clean kitchen towel for approximately 2–3 days. Avoid refrigeration, which accelerates staling.
Freezing: Slice the cooled loaf and freeze in an airtight freezer bag for up to 3 months for best quality.
Reheating: Toast individual slices directly from frozen or warm the loaf in a 350°F (175°C) oven until the crust becomes crisp again.
For Beginners: If the dough is difficult to handle, reduce the added water from 400 g to 370–380 g. This produces a slightly lower-hydration dough that is easier to shape.
For Better Open Crumb: Focus on starter strength, fermentation control, and gentle shaping rather than simply increasing hydration.
12. Embracing Healthful Indulgence
Naturally fermented sourdough bread provides carbohydrates for energy, along with protein and small amounts of fiber from wheat flour.
The long fermentation process develops organic acids that contribute to sourdough’s distinctive flavor and may influence starch digestion and mineral availability.
Using some whole wheat flour increases fiber and adds a richer grain flavor.
For a more nutrient-dense variation, gradually increase the proportion of whole grain flour while adjusting the hydration and fermentation process as needed.
Enjoyed with protein-rich toppings, vegetables, or a hearty soup, homemade sourdough can be a delicious part of a varied, balanced eating pattern.