
Prep Time: 30–35 minutes Bake Time: 1 hour 20 minutes (including crust) Cooling Time: Approximately 2 hours Chilling Time: At least 6 hours, preferably overnight Total Time: Approximately 10–12 hours, including cooling and chilling Servings: 12 slices Difficulty: Intermediate Category: Dessert, Baked Cheesecake, American Classics
1. Introduction
Classic Cherry Cheesecake is a timeless, elegant dessert that combines a buttery graham cracker crust, a luxurious cream cheese filling, and a vibrant, glossy cherry topping. Its irresistible combination of sweet, tangy, and creamy flavors makes it a favorite for celebrations, family gatherings, holiday dinners, and special occasions.
The foundation of this dessert is a golden graham cracker crust, prepared with finely crushed crackers, melted butter, and sugar. Above it sits a thick, velvety cheesecake filling made with full-fat cream cheese, sour cream, vanilla extract, eggs, and a delicate touch of fresh lemon juice.
The finishing layer of sweet cherry filling adds a beautiful ruby-red color, glossy appearance, and fruity contrast to the rich cheesecake.
Inspired by the classic Small Town Woman Cherry Cheesecake recipe, this version uses a gentle baking method and gradual cooling to help achieve a smooth texture with minimal cracking.
Although cheesecake requires patience during cooling and chilling, the preparation process is straightforward and produces a beautifully presented, bakery-style dessert.
2. Origin and Cultural Significance
Cheesecake has a fascinating history that stretches back thousands of years.
Early forms of cheese-based desserts were enjoyed in ancient Greece, where simple mixtures of cheese, flour, and honey were prepared and served during important occasions.
As culinary traditions spread across Europe, cheesecake evolved into numerous regional varieties, each reflecting local ingredients and baking techniques.
European-style cheesecakes often used fresh cheeses such as quark, ricotta, or farmer’s cheese.
The development and widespread use of commercial cream cheese in the United States during the nineteenth century helped establish the rich, creamy cheesecake styles associated with American baking.
New York-style cheesecake became particularly famous for its dense, smooth texture and generous use of cream cheese.
The addition of fruit toppings, including cherries, strawberries, and blueberries, introduced sweetness, acidity, and vibrant color to the classic dessert.
Cherry-topped cheesecake became especially popular in American home cooking because canned cherry pie filling offered a convenient way to decorate and flavor a homemade cheesecake.
Today, Classic Cherry Cheesecake is closely associated with celebrations, traditional family recipes, bakeries, and American-style diners.
Its popularity reflects the enduring appeal of combining rich dairy-based desserts with sweet and tangy fruit.
3. Ingredients and Quantities
A. For the Graham Cracker Crust
| Ingredient | Quantity |
|---|---|
| Graham cracker crumbs | 1¾ cups (approximately 175–190 g) |
| Granulated sugar | ⅓ cup (67 g) |
| Unsalted butter, melted | 7 tablespoons (99 g) |
Why Use Graham Crackers?
Graham crackers provide a pleasantly sweet, lightly toasted flavor and a crumbly texture that complements the rich cheesecake filling.
Why Add Melted Butter?
Melted butter helps bind the cracker crumbs together, creating a firm crust that holds its shape when sliced.
Why Prebake the Crust?
Briefly baking the crust improves its structure, enhances its toasted flavor, and helps prevent it from becoming excessively soft beneath the creamy filling.
B. For the Creamy Cheesecake Filling
| Ingredient | Quantity |
|---|---|
| Full-fat cream cheese, softened | 32 oz (907 g), four 8-oz blocks |
| Granulated sugar | 1 cup (200 g) |
| Sour cream, room temperature | ½ cup (120 g) |
| Pure vanilla extract | 1 teaspoon |
| Fresh lemon juice | 2 teaspoons |
| Large eggs, room temperature | 4 |
Why Use Full-Fat Cream Cheese?
Full-fat cream cheese creates the rich, dense, and velvety texture characteristic of classic baked cheesecake.
Why Add Sour Cream?
Sour cream introduces a gentle tanginess and contributes to a smoother, softer filling.
Why Use Lemon Juice?
Fresh lemon juice balances the richness of the cream cheese and enhances the overall flavor without making the cheesecake strongly lemon-flavored.
Why Add Eggs?
Eggs help the cheesecake filling set during baking while maintaining a smooth, custard-like consistency.
C. For the Glossy Cherry Topping
| Ingredient | Quantity |
|---|---|
| Cherry pie filling, chilled | 1 can (21 oz / approximately 595 g) |
Why Use Cherry Pie Filling?
Prepared cherry pie filling offers a convenient combination of tender cherries and glossy fruit sauce.
Its sweet-tart flavor complements the rich cream cheese filling, while its vibrant ruby-red color creates an attractive finishing layer.
D. Recommended Equipment
- 9-inch (23 cm) springform cake pan
- Electric hand mixer or stand mixer
- Large mixing bowls
- Silicone spatula
- Measuring cups and spoons
- Baking sheet or large baking dish
- Wire cooling rack
- Offset spatula
- Sharp knife for slicing
4. Optional Additions
Fresh Lemon Zest: Add 1 tablespoon of finely grated lemon zest to the filling for a brighter citrus aroma.
Almond Extract: Add ¼ teaspoon of almond extract to complement the cherry topping.
Chocolate Graham Cracker Crust: Replace regular graham crackers with chocolate-flavored crumbs for a chocolate-cherry variation.
Fresh Cherries: Garnish the finished cheesecake with a few pitted fresh cherries for additional texture and freshness.
White Chocolate: Add a small amount of melted, cooled white chocolate to the filling for a sweeter, creamier variation.
Whipped Cream: Decorate the edges with lightly sweetened whipped cream for a classic bakery-style presentation.
Mixed Berry Topping: Replace the cherry filling with a mixture of blueberries, raspberries, and strawberries.
Vanilla Bean: Substitute vanilla bean paste for vanilla extract for a more pronounced vanilla flavor.
Toasted Almonds: Sprinkle sliced toasted almonds around the edge of the cheesecake for a delicate nutty crunch.
5. Tips for Success
Use room-temperature cream cheese. Properly softened cream cheese blends smoothly and helps prevent lumps in the filling.
Choose full-fat ingredients. Full-fat cream cheese and sour cream provide the intended richness and structure.
Avoid overmixing the eggs. Once the eggs are added, mix only until incorporated. Excessive mixing introduces air, which can cause the cheesecake to rise and crack.
Scrape the bowl frequently. This ensures that the cream cheese and sugar are thoroughly combined without leaving unmixed pockets.
Do not overbake. The cheesecake is ready when the outer edges are set but the center still has a slight wobble.
Use gentle oven moisture. A pan of hot water on the lower oven rack introduces steam without requiring the cheesecake pan to sit directly in water.
Cool gradually. Sudden temperature changes can contribute to surface cracking.
Chill thoroughly. Refrigerating for at least 6 hours allows the filling to firm up and makes slicing easier.
Add cherries after chilling. Applying the topping to a completely chilled cheesecake helps preserve its smooth surface and appearance.
Use a clean knife. Wiping the knife between cuts creates neat, attractive slices.
6. Step-by-Step Instructions
Step 1: Prepare the Baking Pan
Preheat the oven to 350°F (175°C).
Lightly grease the bottom and lower sides of a 9-inch springform pan with butter.
Check that the springform ring is securely attached to the base.
Set the pan aside while preparing the graham cracker crust.
Step 2: Prepare the Graham Cracker Crumbs
Place the graham crackers into a food processor and pulse until they become fine, uniform crumbs.
If a food processor is unavailable, place the crackers inside a resealable plastic bag and crush them with a rolling pin.
Measure 1¾ cups of crumbs.
Transfer them to a medium mixing bowl.
Step 3: Combine the Crust Ingredients
Add the granulated sugar to the graham cracker crumbs.
Stir thoroughly to distribute the sugar.
Pour in the melted unsalted butter.
Mix using a fork or spatula until the crumbs are evenly moistened.
The mixture should resemble damp sand and hold together when gently pressed.
Step 4: Form the Graham Cracker Crust
Transfer the prepared crumb mixture into the springform pan.
Using the bottom of a measuring cup or flat-bottomed glass, press the crumbs firmly and evenly across the bottom.
Continue pressing some of the crumbs approximately 1 inch (2.5 cm) up the sides of the pan.
Ensure that the base is compact and relatively uniform in thickness.
This helps prevent the crust from crumbling when the cheesecake is sliced.
Step 5: Prebake the Crust
Place the springform pan in the preheated oven.
Bake for approximately 10 minutes, until the crust becomes lightly toasted and fragrant.
Remove the pan from the oven.
Transfer it to a wire rack and allow the crust to cool completely.
Reduce the oven temperature to 300°F (150°C) before baking the cheesecake filling.
Step 6: Prepare the Cream Cheese
Place the softened cream cheese into a large mixing bowl.
Using an electric mixer fitted with a paddle attachment or standard beaters, mix on medium-low speed until the cream cheese becomes smooth.
Scrape the sides and bottom of the bowl with a silicone spatula.
Continue mixing briefly until no visible lumps remain.
Avoid excessive whipping.
Step 7: Add the Sugar
Gradually add the granulated sugar to the softened cream cheese.
Mix on medium-low speed until the sugar is incorporated and the mixture becomes creamy.
Stop occasionally to scrape the bowl.
The finished mixture should be smooth, thick, and uniform.
Step 8: Add the Sour Cream and Flavorings
Add the room-temperature sour cream to the cream cheese mixture.
Pour in the vanilla extract and fresh lemon juice.
Mix gently until completely combined.
The sour cream contributes tenderness and a subtle tang, while the vanilla and lemon enhance the cheesecake’s delicate flavor.
Step 9: Incorporate the Eggs
Reduce the mixer speed to low.
Add the first egg and mix only until incorporated.
Repeat with the remaining eggs, adding them one at a time.
Avoid beating vigorously.
Once all four eggs are incorporated, stop mixing.
Use a silicone spatula to scrape the sides and bottom of the bowl and gently fold the batter a few times.
The filling should be smooth and pourable, without excessive air bubbles.
Step 10: Prepare the Oven for Gentle Baking
Fill a large, oven-safe baking dish with hot water.
Carefully place the dish on the lower oven rack, leaving the middle rack available for the cheesecake.
The hot water helps create a humid baking environment, which can reduce surface drying.
This approach differs from a traditional water bath because the cheesecake pan does not sit directly in the water.
Confirm that the oven temperature has decreased to 300°F (150°C).
Step 11: Fill the Cheesecake Pan
Pour the prepared cheesecake filling over the completely cooled graham cracker crust.
Use a silicone spatula to spread the batter evenly.
Gently tap the pan on the countertop once or twice to release large trapped air bubbles.
Smooth the surface with an offset spatula if necessary.
Avoid disturbing the crust beneath the filling.
Step 12: Bake the Cheesecake
Place the filled springform pan on the middle oven rack, above the hot-water dish.
Bake for approximately 70 minutes.
Avoid opening the oven door repeatedly during baking.
The cheesecake is ready when the outer edges are set and the center still moves slightly when the pan is gently nudged.
The center should wobble as one soft area rather than appear liquid.
The cheesecake will continue setting during the cooling process.
Step 13: Cool Slowly Inside the Oven
Once the baking time is complete, turn off the oven.
Open the oven door approximately 1 inch (2.5 cm), using a heat-safe method to keep it slightly ajar.
Leave the cheesecake inside the switched-off oven for approximately 1 hour.
This gradual cooling helps reduce sudden temperature changes that can cause surface cracking.
Do not remove the cheesecake immediately after baking unless necessary for safety.
Step 14: Cool at Room Temperature
Remove the cheesecake from the oven.
Place the springform pan on a wire cooling rack.
Allow it to cool further until it is no longer hot.
Do not leave the cheesecake unrefrigerated for more than 2 hours after removing it from the oven.
The surface should remain relatively smooth and slightly firm as the filling settles.
Step 15: Refrigerate the Cheesecake
Once sufficiently cooled, cover the springform pan loosely with plastic wrap or another suitable covering.
Place the cheesecake in the refrigerator for at least 6 hours.
For the best texture, refrigerate overnight.
During chilling, the cream cheese filling becomes firmer, denser, and easier to slice.
The flavors also become more harmonious as the cheesecake rests.
Step 16: Remove the Springform Ring
Once the cheesecake is thoroughly chilled, remove it from the refrigerator.
Carefully run a thin knife around the inside edge of the springform pan to loosen the cheesecake.
Release the springform clasp.
Slowly lift away the outer ring.
For a safer presentation, leave the cheesecake on the springform base rather than attempting to transfer it unnecessarily.
Place it on a serving platter.
Step 17: Prepare the Cherry Topping
Remove the chilled cherry pie filling from the refrigerator.
Open the can and transfer the filling to a bowl if necessary.
Stir gently to distribute the cherries evenly throughout the glossy sauce.
Avoid crushing the fruit.
The topping should be thick enough to sit on the cheesecake without running excessively down the sides.
Step 18: Add the Glossy Cherry Layer
Spoon the chilled cherry pie filling over the center of the cheesecake.
Using the back of a spoon, spread it gently toward the edges.
Distribute the cherries evenly to create a generous, attractive layer.
Allow a small border of the cream cheese filling to remain visible if desired.
The finished topping should create a vibrant red contrast against the pale cheesecake.
Step 19: Chill Briefly Before Serving
Return the decorated cheesecake to the refrigerator for approximately 15–20 minutes if the topping needs to settle.
This is optional if both the cake and topping are already thoroughly chilled.
The cheesecake should feel firm enough to slice cleanly while retaining its creamy interior.
Step 20: Slice and Serve
Fill a tall container with hot water.
Dip a long, sharp knife into the water and wipe it completely dry.
Carefully cut the cheesecake into 12 even slices.
Clean and warm the knife between cuts for neat edges.
Transfer each slice to a dessert plate.
Serve chilled, allowing the creamy filling, buttery crust, and sweet cherry topping to provide a balanced combination of flavors and textures.
7. Description
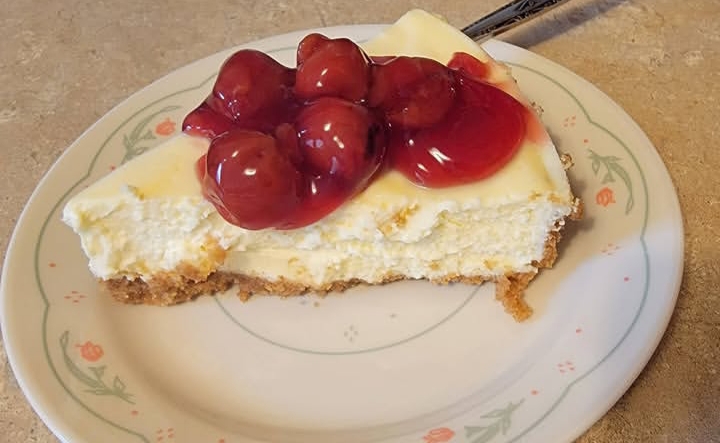
Classic Cherry Cheesecake is an elegant baked dessert featuring three distinctive layers.
The bottom consists of a golden, buttery graham cracker crust with a slightly crumbly texture and a pleasant toasted flavor.
The center is a thick, rich cream cheese filling with an exceptionally smooth, velvety consistency.
Full-fat cream cheese gives the filling its signature richness, while sour cream contributes a delicate tanginess. Vanilla and fresh lemon juice enhance the overall flavor without overpowering the creamy foundation.
The upper layer is covered with glossy, ruby-red cherry pie filling containing tender cherries suspended in a sweet fruit sauce.
The vibrant cherry topping creates a beautiful contrast against the pale cream cheese filling and golden crust.
When sliced, the cheesecake reveals neatly defined layers that are visually appealing and satisfying.
Each bite combines creamy richness, buttery crunch, fruity sweetness, and subtle acidity.
Its attractive presentation and classic flavor make Cherry Cheesecake ideal for birthdays, holiday gatherings, formal dinners, and family celebrations.
8. Nutritional Information
Approximate Nutritional Values per Slice (Based on 12 Servings):
| Nutrient | Approximate Amount |
|---|---|
| Calories | 500–520 kcal |
| Protein | 8 g |
| Carbohydrates | 36 g |
| Total Fat | 37 g |
| Saturated Fat | 21 g |
| Sugar | 28 g |
| Fiber | 0.5 g |
| Sodium | 395 mg |
| Cholesterol | 154 mg |
| Calcium | Approximately 100 mg |
These estimates are consistent with the published nutrition information for the closely matching Small Town Woman recipe. Actual values depend on ingredient brands, portion sizes, and the quantity of cherry topping. Small Town Woman
Healthier Preparation Alternatives
Reduce the Portion Size: Serve smaller cheesecake slices alongside fresh fruit.
Use a Lighter Topping: Replace some of the canned cherry filling with fresh or unsweetened cooked cherries.
Adjust the Sugar: A modest reduction in the filling’s granulated sugar can decrease sweetness, although substantial changes may affect texture.
Use Reduced-Fat Cream Cheese: A reduced-fat alternative can lower total fat, but may produce a less dense and creamy cheesecake.
Choose Plain Greek Yogurt: Replace some of the sour cream with thick plain Greek yogurt for a slightly different nutritional profile and tangy flavor.
Reduce the Crust Thickness: A thinner graham cracker crust can lower the amount of butter and sugar used per slice.
9. Conclusion
Classic Cherry Cheesecake is a beloved dessert that combines rich cream cheese filling, a buttery graham cracker crust, and sweet, tangy cherry topping.
Its appeal comes from the contrast between the smooth, dense filling, lightly crisp crust, and vibrant fruit topping.
Although the recipe requires several hours of chilling, the active preparation is relatively simple.
The most important techniques include properly softening the cream cheese, avoiding excessive mixing, baking at a gentle temperature, and allowing the cheesecake to cool gradually.
Thorough refrigeration helps establish the characteristic firm yet creamy texture.
Whether prepared for special celebrations or as a homemade weekend dessert, Classic Cherry Cheesecake offers a beautiful combination of traditional flavors and elegant presentation.
10. Recommendation
For the best results, use high-quality full-fat cream cheese and allow it to soften thoroughly before mixing.
Choose fresh sour cream, pure vanilla extract, and freshly squeezed lemon juice to create a balanced filling.
Press the graham cracker crust firmly into the pan and prebake it to improve its structure.
When preparing the cheesecake batter, mix the cream cheese and sugar until smooth before incorporating the remaining ingredients.
Add the eggs one at a time on low speed to minimize excess air.
Bake gently at 300°F (150°C), using a separate dish of hot water to maintain moisture in the oven.
Allow the cheesecake to cool slowly before transferring it to the refrigerator.
Serving Recommendation: Top the fully chilled cheesecake with glossy cherry pie filling shortly before serving. For a more elegant presentation, garnish with a few fresh cherries or small whipped cream rosettes.
Refrigerator Storage: Keep the cheesecake covered in the refrigerator at 40°F (4°C) or below. Consume within approximately 3–4 days for best quality and food safety.
Freezer Storage: Freeze the cheesecake without the cherry topping, tightly wrapped in a freezer-safe covering. For best quality, use within approximately 1–2 months. Thaw overnight in the refrigerator before adding the cherries.
Allergen Information: This recipe contains dairy, eggs, and wheat in conventional graham crackers. Check packaged ingredients for additional allergens.
11. Embracing Healthful Indulgence
Classic Cherry Cheesecake demonstrates how a rich and indulgent dessert can be enjoyed as part of a varied and balanced eating pattern.
Cream cheese and sour cream provide the dessert’s characteristic creamy texture and contribute small amounts of calcium and protein.
Eggs supply high-quality protein and nutrients such as choline, vitamin B12, and selenium.
Cherries contain naturally occurring plant compounds, including anthocyanins, which contribute to the deep red color of many cherry varieties.
However, the nutritional composition of canned cherry pie filling depends on the product and may include substantial amounts of added sugar.
The cheesecake itself is relatively high in calories, saturated fat, and added sugar because of its cream cheese, butter, and sugar content.
A balanced approach involves enjoying moderate portions and appreciating the dessert’s richness rather than consuming unnecessarily large servings.
Serving a smaller slice with fresh cherries or berries can introduce additional fruit flavor and texture.
Making cheesecake at home also provides greater control over ingredient quality, sweetness, toppings, and serving sizes.
For those seeking lighter alternatives, adjustments such as reducing the thickness of the crust, using a smaller amount of fruit topping, or substituting some reduced-fat dairy products can be explored.
However, maintaining the traditional ingredients is often the best choice when the goal is to recreate the authentic richness and velvety texture of classic baked cheesecake.
The preparation process also encourages patience and careful technique, particularly when mixing, baking, cooling, and decorating.
Sharing a homemade cheesecake with family and friends can make celebrations more memorable and enjoyable.
Ultimately, healthful indulgence is about finding a balance between nutritional awareness, portion control, and the pleasure of enjoying well-prepared desserts.
Final Thought: 🍒🍰 With its buttery graham cracker crust, luxuriously smooth vanilla cream cheese filling, and vibrant glossy cherry topping, the Ultimate Classic Cherry Cheesecake delivers an irresistible combination of richness, sweetness, and fruity freshness. Elegant, comforting, and beautifully layered, this timeless dessert is perfect for celebrations, family gatherings, and memorable homemade treats.