
Introduction
Classic Victoria Sponge Cake with Whipped Cream and Strawberry Jam is a timeless British dessert that combines two layers of light, buttery sponge cake with a delicious filling of sweet fruit jam and freshly whipped cream.
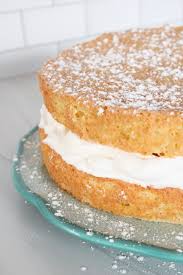
Finished with a delicate dusting of powdered sugar, this elegant cake is celebrated for its simplicity, soft texture, and beautifully balanced flavors.
The sponge layers are made with butter, caster sugar, eggs, and self-raising flour, creating a tender golden cake with a rich, delicate crumb. A generous layer of strawberry or raspberry jam adds fruity sweetness, while the whipped cream provides a smooth, airy contrast.
Unlike heavily frosted celebration cakes, Victoria Sponge Cake relies on a few carefully prepared ingredients to create an impressive dessert.
Perfect for afternoon tea, birthdays, family gatherings, or special occasions, this classic cake offers a beautiful presentation without requiring complicated decorating techniques.
Origin and Cultural Significance
Victoria Sponge Cake, also known as Victoria Sandwich Cake, is one of the most recognizable desserts in British baking.
The cake is named after Queen Victoria, who is traditionally associated with enjoying sponge cake during afternoon tea.
During the nineteenth century, afternoon tea became an important social custom in Britain, with delicate sandwiches, pastries, and cakes served alongside tea.
The development of chemical raising agents helped bakers produce lighter cakes, contributing to the popularity of the Victoria sponge.
Traditional versions commonly feature two buttery sponge layers sandwiched together with raspberry jam, sometimes accompanied by buttercream or whipped cream.
The top is usually left unfrosted and finished with a simple dusting of caster sugar or icing sugar.
Today, Victoria Sponge Cake remains a favorite in British homes, tearooms, baking competitions, and celebrations.
Its enduring appeal comes from its soft texture, balanced sweetness, and elegant simplicity.
Ingredients
For the Sponge Cake Layers
- 225 g (1 cup / 2 sticks) unsalted butter, softened
- 225 g (approximately 1 cup plus 2 tablespoons) caster sugar
- 225 g (approximately 1¾ cups) self-raising flour, measured by weight for accuracy
- 4 large eggs, at room temperature
- 1 teaspoon baking powder
- 1 teaspoon vanilla extract, optional
- 1–2 tablespoons (15–30 ml) milk, if needed
For the Whipped Cream Filling
– 150 ml (approximately ⅔ cup) cold double cream or heavy whipping cream
For the Fruit Jam Filling
– 4–5 tablespoons (80–100 g) strawberry or raspberry jam
For the Topping
- 1–2 tablespoons powdered sugar (icing sugar), for dusting
- Optional edible flowers for decoration
Note: If using flowers, choose only verified edible, food-grade flowers grown without harmful pesticides. Avoid inserting florist stems directly into the cake.
Optional Additions
- Fresh strawberries: Add a thin layer of sliced strawberries between the sponge layers.
- Fresh raspberries: Scatter a few over the jam for extra fruity flavor.
- Vanilla bean paste: Substitute for vanilla extract for a more pronounced vanilla aroma.
- Lemon zest: Add 1 teaspoon to the batter for a subtle citrus note.
- Buttercream filling: Replace whipped cream with vanilla buttercream for a richer, more stable cake.
- Raspberry preserves: Use a high-quality raspberry preserve for a traditional flavor.
- Lightly sweetened cream: Add 1 tablespoon powdered sugar to the cream if a sweeter filling is preferred.
Tips for Success
- Use room-temperature butter and eggs: They combine more evenly and help create a light sponge.
- Weigh the ingredients: Measuring by weight produces more consistent baking results.
- Cream the butter and sugar thoroughly: This incorporates air and helps the cake rise.
- Add eggs gradually: Mixing in one egg at a time reduces the chance of curdling.
- Avoid overmixing after adding flour: Gentle folding helps maintain a tender crumb.
- Use matching cake pans: Two 8-inch (20 cm) pans help the layers bake evenly.
- Check the oven temperature: Excessive heat can cause the cakes to rise unevenly or dry out.
- Cool completely before filling: Warm cake can melt the whipped cream.
- Use cold cream: Chilled cream whips more easily and holds its shape better.
- Assemble shortly before serving: Fresh whipped cream is delicate and needs refrigeration.
Instructions
Step 1: Preheat the Oven
Preheat the oven to 350°F (180°C), or 320°F (160°C) for a fan-assisted oven.
Position the oven rack in the center.
Prepare two 8-inch (20 cm) round cake pans.
Step 2: Prepare the Cake Pans
Lightly grease the bottom and sides of both cake pans with softened butter.
Line the bases with circles of baking parchment.
For additional protection against sticking, lightly dust the sides with flour.
Set the prepared pans aside.
Step 3: Prepare the Ingredients
Measure the butter, caster sugar, flour, and baking powder.
Allow the butter and eggs to reach room temperature before mixing.
Sift the self-raising flour and baking powder together into a separate bowl.
This helps remove lumps and distribute the raising agent evenly.
Step 4: Cream the Butter and Sugar
Place the softened butter and caster sugar in a large mixing bowl.
Using an electric hand mixer or stand mixer, beat on medium speed for approximately 3–5 minutes.
Continue until the mixture becomes pale, light, and fluffy.
Scrape down the sides of the bowl occasionally.
This step incorporates air into the mixture, contributing to the cake’s soft texture.
Step 5: Add the Eggs
Crack one egg into the butter mixture.
Beat until fully incorporated.
Repeat with the remaining eggs, adding them one at a time.
If the mixture begins to look slightly curdled, add a tablespoon of the measured flour and continue mixing.
Stir in the vanilla extract, if using.
Step 6: Fold in the Dry Ingredients
Add the sifted self-raising flour and baking powder to the bowl.
Using a large metal spoon or silicone spatula, gently fold the dry ingredients into the mixture.
Use slow, sweeping motions to preserve the air incorporated during creaming.
Continue until no visible streaks of flour remain.
Avoid overmixing.
Step 7: Adjust the Batter Consistency
Check the consistency of the cake batter.
It should be soft and thick enough to hold its shape briefly before slowly dropping from a spoon.
If the batter appears unusually stiff, add one tablespoon of milk.
Fold gently.
Add the second tablespoon only if needed.
Step 8: Divide the Batter
Divide the cake batter evenly between the two prepared pans.
Use a kitchen scale if available to ensure both pans contain approximately the same amount.
Smooth the surfaces gently with a spatula.
Avoid pressing the batter down excessively.
Step 9: Bake the Sponge Layers
Place both pans in the preheated oven.
Bake for approximately 20–25 minutes.
The cakes are ready when the tops are golden brown, the centers spring back when lightly pressed, and a toothpick inserted into the center comes out clean.
Avoid opening the oven during the early stages of baking, as sudden temperature changes can cause the cakes to sink.
Step 10: Cool the Cakes
Remove the cake pans from the oven.
Place them on a wire cooling rack.
Allow the cakes to cool in their pans for approximately five minutes.
Carefully run a thin knife around the edges if necessary.
Turn the cakes out onto the wire rack and remove the parchment paper.
Allow both layers to cool completely before assembling.
Step 11: Prepare the Whipped Cream
Pour the cold double cream or heavy whipping cream into a chilled mixing bowl.
Using an electric mixer or hand whisk, beat until soft to medium peaks form.
The cream should be thick enough to spread and hold its shape without becoming grainy.
Avoid overwhipping, which can cause the cream to separate.
If desired, add a small amount of powdered sugar or vanilla extract.
Step 12: Prepare the Bottom Sponge Layer
Choose the more evenly shaped sponge layer for the bottom of the cake.
Place it on a serving plate or cake stand with its flat side facing upward.
Make sure the cake is completely cool.
Step 13: Spread the Fruit Jam
Spoon the strawberry or raspberry jam onto the bottom sponge.
Using an offset spatula or the back of a spoon, spread it evenly across the surface.
Leave a narrow border around the edge to prevent excessive filling from spilling out.
Step 14: Add the Whipped Cream
Spoon the freshly whipped cream over the jam.
Spread gently into an even layer.
The cream should be thick enough to create a visible filling between the sponge layers.
Avoid pressing too firmly, as this may push the jam out toward the edges.
Step 15: Add the Top Sponge Layer
Carefully lift the second sponge layer.
Position it over the whipped cream with the smoothest side facing upward.
Lower it gently onto the filling.
Press very lightly to secure the layers without compressing the cake.
Step 16: Dust with Powdered Sugar
Place the powdered sugar in a fine-mesh sieve.
Hold the sieve above the cake.
Gently tap to create a light, even dusting across the top.
The powdered sugar should highlight the cake’s simple, traditional appearance.
Step 17: Decorate the Cake
For a classic presentation, leave the cake decorated only with powdered sugar.
For a floral variation, arrange a few verified edible flowers on top.
If using decorative non-edible flowers, keep them completely separate from the cake and remove them before serving.
Avoid inserting untreated flower stems into the sponge.
Step 18: Slice and Serve
Use a sharp serrated knife to cut the cake into even slices.
Wipe the blade between cuts for a cleaner presentation.
Serve with freshly brewed English breakfast tea, Earl Grey, or coffee.
For the best texture, enjoy the cake soon after assembly.
Description
Classic Victoria Sponge Cake features two soft, golden sponge layers with a tender, buttery crumb.
The cake has a delicate vanilla aroma and a light texture created by thoroughly creaming butter and sugar.
A layer of strawberry or raspberry jam provides a bright, fruity sweetness that contrasts beautifully with the rich sponge.
Freshly whipped cream adds a smooth, airy filling, making each bite creamy without overwhelming the cake.
The powdered sugar topping creates a simple, elegant finish that highlights the traditional character of this British dessert.
The finished cake is soft, buttery, fruity, and lightly creamy, making it ideal for afternoon tea and special occasions.
Nutritional Information
Approximate values per slice, based on 10 servings using whipped cream and strawberry jam.
| Nutrient | Estimated Amount |
|---|---|
| Calories | 430–480 kcal |
| Protein | 5–7 g |
| Carbohydrates | 48–55 g |
| Fat | 24–29 g |
| Fiber | 0–1 g |
| Sugars | 30–37 g |
Actual nutritional values depend on the type of jam, cream, and portion sizes.
Recipe Details
- Prep Time: 20 minutes
- Bake Time: 20–25 minutes
- Cooling Time: 45–60 minutes
- Assembly Time: 10 minutes
- Total Time: Approximately 1 hour 35 minutes to 1 hour 55 minutes
- Servings: 10 slices
- Cuisine: British
- Course: Dessert, afternoon tea, or celebration cake
- Cooking Method: Baking
- Difficulty: Easy to moderate
- Equipment: Two 8-inch (20 cm) round cake pans, electric mixer, mixing bowls, spatula, and wire rack
Conclusion
Classic Victoria Sponge Cake with Whipped Cream and Strawberry Jam is a timeless dessert that celebrates the beauty of simple, carefully prepared ingredients.
Its light, buttery sponge layers, sweet fruit jam, and delicate whipped cream filling create a satisfying combination of flavors and textures.
The traditional powdered sugar topping gives the cake an elegant appearance without requiring elaborate decorations.
Whether served for afternoon tea, birthdays, family celebrations, or weekend baking, this classic British cake offers a delicious homemade treat that never goes out of style.
Recommendation
Serving: Serve slightly chilled or after a brief rest at room temperature, accompanied by tea or coffee.
Make-ahead preparation: Bake the sponge layers one day in advance. Once completely cool, wrap them tightly and store in a cool, dry place. Add the jam and whipped cream shortly before serving.
Storage: Because the filling contains fresh whipped cream, refrigerate the assembled cake in an airtight container. Enjoy within 1–2 days for the best texture and freshness.
Freezing: The unfilled sponge layers can be wrapped individually and frozen for up to 2–3 months. Thaw completely before filling. Freezing the assembled cake is not recommended because whipped cream can lose its texture.
Food safety: Keep the whipped cream filling refrigerated at 40°F (4°C) or below. Do not leave the assembled cake at room temperature for more than two hours, or one hour in very hot conditions.
Buttercream alternative: For a more stable filling, replace the whipped cream with vanilla buttercream. This variation is especially useful when preparing a cake that needs to hold its shape for longer.
Embracing Healthful Indulgence
Classic Victoria Sponge Cake is a rich, comforting dessert that can be enjoyed as part of a balanced and varied diet.
Eggs contribute protein and help create the cake’s structure, while butter provides the rich flavor and tender crumb characteristic of traditional sponge cakes.
Strawberry or raspberry jam adds fruity flavor and sweetness, while whipped cream creates a light, smooth filling.
Because the recipe contains butter, sugar, cream, and refined flour, it is relatively high in calories, added sugar, and saturated fat.
For a lighter variation, serve smaller slices, use a thinner layer of jam, or replace part of the whipped cream with a lighter alternative suitable for cake fillings.
Fresh berries can also be served alongside the cake to add flavor, color, and additional nutrients.
With its delicate sponge, fruity filling, and elegant presentation, Victoria Sponge Cake is a wonderful example of how simple ingredients can create a memorable dessert.