
Introduction
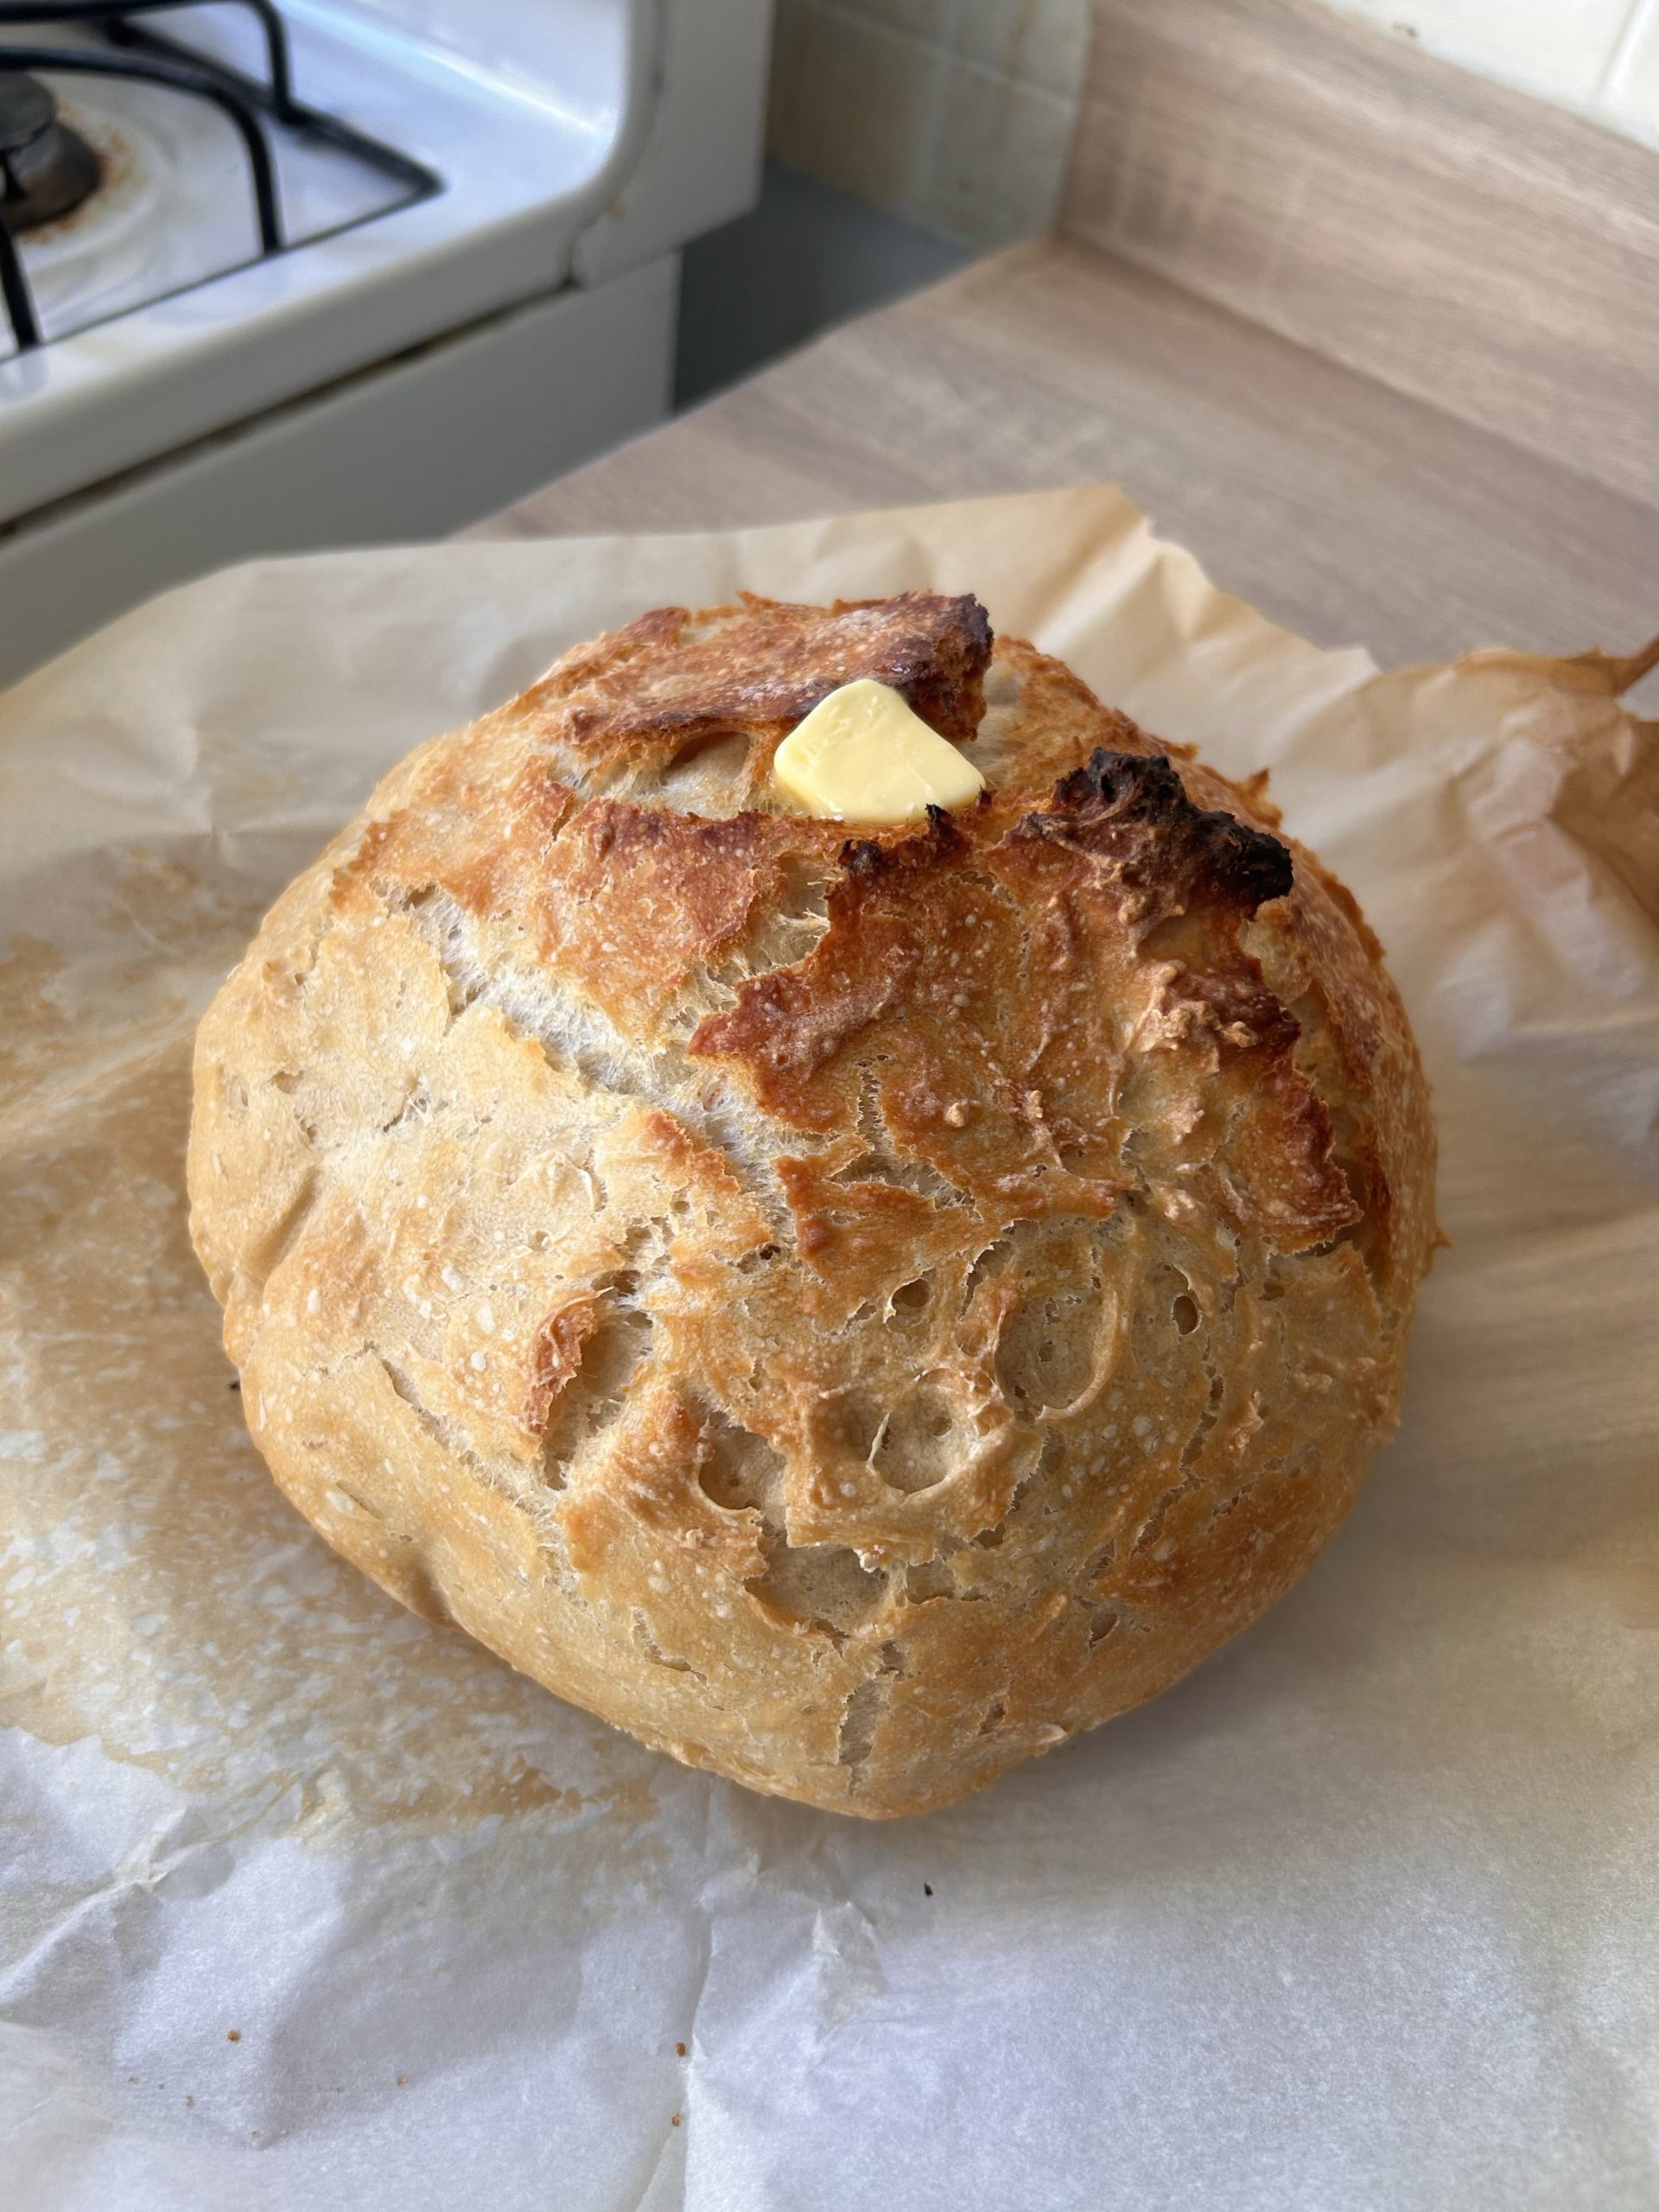
Crusty No-Knead Artisan Bread is a rustic homemade loaf with a beautifully golden, crunchy crust and a soft, airy interior. Made with just a few basic ingredients, this bread delivers the satisfying flavor and texture of traditional artisan bread without requiring intensive kneading or specialized baking skills.
The secret to this recipe is time. A long fermentation allows the flour, water, salt, and a small amount of yeast to develop flavor gradually. Instead of kneading the dough for an extended period, you simply mix the ingredients, cover the bowl, and allow the dough to rest until it becomes bubbly and expanded.
Baking the loaf in a preheated Dutch oven creates a steamy environment that helps the bread rise and develop its signature crust. Removing the lid toward the end of baking allows the exterior to turn deep golden brown and become crisp.
This bread is ideal for serving with butter, olive oil, cheese, soups, stews, or roasted vegetables. It also makes excellent toast and sandwiches. Whether you are new to bread baking or already enjoy making homemade loaves, this no-knead method offers an approachable way to create bakery-style bread in your own kitchen.
Origin
Artisan bread has roots in traditional bread-making practices that developed across many cultures. For centuries, bakers have combined flour, water, salt, and yeast or naturally occurring fermentation cultures to produce loaves with different shapes, textures, and flavors.
Rustic European breads, including many traditional French and Italian loaves, are known for their crisp crusts and varied interior textures. However, artisan bread is a broad category rather than a single recipe originating in one place.
No-knead bread became especially popular among home bakers because it simplified the traditional process. Instead of developing the dough through extended kneading, the method relies on a wetter dough and a long resting period. Time allows gluten to develop and fermentation to produce flavor.
Covered-pot baking is another important part of this approach. A heavy, covered pot traps moisture released by the dough, helping the loaf expand before its crust hardens. Once the lid is removed, the dry oven heat encourages browning and crispness.
This recipe combines these techniques into a practical homemade loaf with a rustic appearance and satisfying texture.
Cultural Significance
Bread is a staple food in many cultures and often plays an important role in everyday meals, family gatherings, and hospitality. From European country loaves to flatbreads and other traditional varieties, bread-making reflects local ingredients, cooking equipment, and culinary traditions.
Rustic artisan bread is particularly appreciated for its simplicity. A handful of ingredients can become a flavorful loaf through fermentation, careful shaping, and proper baking. The contrast between the crisp crust and soft interior is one of the qualities that makes this style of bread so appealing.
Homemade bread also has a practical advantage: it can be adapted to suit different meals. A freshly baked loaf can accompany soup, serve as the foundation for sandwiches, or be sliced and toasted for breakfast.
The no-knead method makes this traditional experience more accessible to home cooks. Because the dough develops over many hours with minimal handling, the process fits well into a relaxed baking routine.
Ingredients and Quantities
This recipe makes one medium-to-large artisan loaf.
- 500 grams bread flour
- 375 grams lukewarm water
- 10 grams salt
- 2 grams instant yeast, approximately 1/2 teaspoon
- 1 teaspoon honey or sugar, optional
- Extra flour, for shaping
- Butter, for serving
Understanding the Ingredients
Bread flour: Bread flour contains enough protein to help develop the gluten structure that gives the loaf its shape and chewy interior. All-purpose flour can be substituted, although the texture may be slightly different.
Water: The recipe uses 375 grams of water for 500 grams of flour, producing a relatively wet dough. This hydration helps create an open crumb and a moist interior. Measuring the water by weight provides more consistent results.
Salt: Salt enhances flavor and helps regulate yeast activity. Measure it carefully so the bread does not become overly salty or bland.
Instant yeast: A small quantity of instant yeast is sufficient for a long fermentation. The extended resting time allows the dough to develop flavor without requiring a large amount of yeast.
Honey or sugar: This ingredient is optional. It adds a small amount of sweetness and can support browning, although the bread can be made successfully without it.
Extra flour: A little flour helps prevent the sticky dough from adhering to the work surface and your hands. Avoid adding excessive flour, as it can make the loaf denser.
Butter: Butter is optional for serving. Its creamy flavor contrasts nicely with the crisp crust and warm interior.
Optional Additions
This basic artisan bread is delicious on its own, but a few additions can create different flavor profiles.
- Fresh rosemary: Add finely chopped rosemary for an aromatic loaf that pairs well with soups and roasted vegetables.
- Roasted garlic: Fold in cooled roasted garlic for a mellow, savory flavor.
- Olives: Add well-drained, chopped olives for a Mediterranean-inspired variation.
- Dried herbs: Italian seasoning, oregano, or thyme can add a fragrant touch.
- Sunflower seeds: Sprinkle seeds over the loaf or incorporate a modest quantity into the dough for additional texture.
- Sesame seeds: Add sesame seeds to the surface before baking for a nutty finish.
- Whole-wheat flour: Replace a portion of the bread flour with whole-wheat flour for a heartier flavor. You may need to adjust the water slightly.
- Sourdough starter: A sourdough version can be made with a suitable starter, but the yeast quantity, water balance, and fermentation schedule will need to be adjusted. It is not a direct one-for-one substitution.
- Olive oil: Serve slices with olive oil and a pinch of salt for a simple accompaniment.
For your first loaf, consider following the original recipe without additions. Once you are comfortable with the dough’s consistency and fermentation, experiment with herbs, seeds, or other ingredients.
Tips for Success
Measure Ingredients Accurately
Bread baking depends on the balance between flour, water, salt, and yeast. A digital kitchen scale is particularly helpful because flour measurements by volume can vary depending on how tightly the flour is packed.
For this recipe, measuring the flour and water in grams helps maintain the intended dough hydration.
Expect Sticky Dough
The dough will be sticky and rough after mixing. This is normal for a no-knead loaf and helps produce an airy crumb.
Resist the temptation to add large amounts of extra flour. Instead, use lightly floured hands and a scraper when handling the dough.
Give the Dough Enough Time
Fermentation is central to this recipe. Allow the dough to rest for approximately 12 to 18 hours at room temperature, depending on how warm your kitchen is and how active the yeast becomes.
Look for visible bubbles, an expanded appearance, and a slightly domed surface. The dough does not need to double precisely in every environment.
A warmer room generally speeds fermentation, while a cooler room slows it down. If the dough becomes excessively slack, collapses, or develops a very strong alcoholic smell, it may have fermented for too long.
Shape Gently
After fermentation, turn the dough onto a lightly floured surface. Fold the edges toward the center and shape it into a round loaf.
Use gentle movements to preserve some of the gas created during fermentation. Avoid pressing the dough flat or adding too much flour.
Preheat the Dutch Oven Thoroughly
A fully heated Dutch oven helps the loaf rise quickly when it enters the oven. Preheat the pot and lid at 450°F (230°C) for at least 30 minutes.
Handle the pot with dry, heat-resistant oven mitts. Cast iron and other heavy cookware retain heat for a long time and can cause serious burns.
Score the Loaf Before Baking
A shallow slash across the surface gives the expanding loaf a controlled place to open during baking. Use a sharp bread lame or knife and work carefully.
If the dough is very soft, score it just before lowering it into the pot.
Bake Until Deeply Golden
The covered stage traps steam and encourages expansion. The uncovered stage allows the crust to dry and brown.
Look for a deep golden-brown exterior. If you use a food thermometer, the center of a fully baked loaf will generally be around 200–210°F (93–99°C), although appearance and texture also matter.
Cool Before Slicing
Allow the bread to cool on a wire rack for at least one hour before slicing. Cutting too early can compress the interior and make it seem gummy because the crumb is still setting.
Cooling also helps preserve the crisp crust.
Instructions
Step 1: Mix the Dough
In a large mixing bowl, combine the bread flour, instant yeast, and salt. Add the optional honey or sugar if using.
Gradually pour in the lukewarm water and stir with a wooden spoon or sturdy spatula until all the flour is moistened and a sticky, rough dough forms.
The dough will not look smooth at this stage, and there is no need to knead it. Scrape down the sides of the bowl and make sure there are no large pockets of dry flour.
Step 2: Allow the Dough to Ferment
Cover the bowl with plastic wrap, a fitted lid, or a clean kitchen towel that prevents the dough from drying out.
Leave it at room temperature for approximately 12 to 18 hours. During this period, the yeast will produce gas and fermentation will gradually develop the dough’s flavor.
When ready, the dough should look expanded and bubbly, with a soft, elastic appearance. The exact timing depends on the temperature of your kitchen.
Step 3: Shape the Loaf
Lightly flour a clean work surface and turn the dough out of the bowl using a dough scraper or spatula.
Dust your hands lightly with flour. Fold the edges of the dough toward the center several times, then turn it over and gently shape it into a round loaf.
Avoid working too much extra flour into the dough. The aim is to create a reasonably smooth outer surface while keeping the interior airy.
Step 4: Let the Dough Proof
Place the shaped dough seam-side down on a sheet of parchment paper lightly dusted with flour.
Cover it loosely with a clean kitchen towel and allow it to rest for approximately 45 to 60 minutes.
During this time, the dough should become slightly puffier. Avoid letting it dry out while it proofs.
Step 5: Preheat the Dutch Oven
Place the Dutch oven and its lid inside the oven. Preheat to 450°F (230°C) for at least 30 minutes.
Make sure the cookware is suitable for this temperature and that any handles or knobs are oven-safe. Keep the parchment paper away from exposed heating elements and follow the manufacturer’s instructions for high-temperature use.
Step 6: Score the Dough
Once the oven and Dutch oven are fully heated, carefully remove the pot using dry oven mitts and place it on a heatproof surface.
Lift the dough by holding the parchment paper and lower it into the hot pot. Keep your hands away from the sides of the cookware.
Using a sharp knife or bread lame, make one shallow slash across the top of the dough. This allows the loaf to expand more predictably during baking.
Step 7: Bake with the Lid On
Cover the Dutch oven with its lid and carefully return it to the oven.
Bake for approximately 30 minutes. The trapped moisture creates a steamy environment that helps the loaf expand and delays the formation of a hard crust.
Keep the lid on throughout this stage for the best results.
Step 8: Bake Uncovered
Remove the lid carefully, watching for hot steam escaping from the pot.
Continue baking for another 15 to 20 minutes, until the loaf develops a deep golden-brown crust.
If the loaf is still pale, give it a few additional minutes while monitoring the color. Baking time may vary depending on the oven and the type of Dutch oven used.
Step 9: Cool the Bread
Remove the loaf from the Dutch oven and transfer it to a wire rack.
Allow it to cool for at least one hour before slicing. This gives the crumb time to set and helps prevent a gummy texture.
Step 10: Slice and Serve
Use a serrated bread knife to cut the cooled loaf into slices.
Serve with butter, olive oil, cheese, soup, stew, or your favorite sandwich fillings. The bread is also excellent toasted and can be used to make croutons once it begins to stale.
Description
Crusty No-Knead Artisan Bread is a rustic loaf characterized by a crisp, deeply golden crust and a soft, airy interior. Its flavor is gently wheaty with a subtle complexity developed through a long fermentation period.
The dough requires minimal hands-on work. Instead of repeated kneading, the recipe relies on hydration, time, and fermentation to develop its structure. Baking in a covered Dutch oven helps the loaf expand and creates the moisture needed for a crust that becomes crisp once the lid is removed.
The finished loaf is versatile enough to accompany nearly any meal. Its chewy crumb works well for dipping into soup, while the firm crust makes it satisfying when served with butter or cheese.
Because the recipe uses simple ingredients and a straightforward process, it is a useful starting point for anyone who wants to learn the basics of homemade artisan bread.
Nutritional Information
The following values are approximate estimates for plain bread made with the listed flour, water, salt, and yeast, assuming the optional honey or sugar is omitted and the loaf is divided into approximately 10 slices.
- Calories: approximately 190 per slice
- Protein: approximately 6 grams
- Carbohydrates: approximately 38–40 grams
- Fat: approximately 1 gram
- Saturated fat: less than 1 gram
- Fiber: approximately 1–2 grams
- Sodium: approximately 380–450 milligrams
Actual nutritional values depend on the flour brand, slice size, and whether optional ingredients are included. Adding honey or sugar will increase carbohydrates slightly, while butter served alongside the bread will add calories and fat.
Bread provides carbohydrates that supply energy, and bread flour contributes some protein. The recipe is naturally low in fat when served without butter or oil.
For a variation with more fiber, replace part of the bread flour with whole-wheat flour. The resulting dough may absorb water differently, so small adjustments to the hydration may be necessary.
Conclusion
Crusty No-Knead Artisan Bread shows how a few everyday ingredients and a little patience can produce a delicious homemade loaf. The long fermentation develops flavor, while the covered-pot baking method helps create a crisp, golden crust and an airy interior.
Although the overall process takes many hours, most of that time is spent allowing the dough to rise. The hands-on work is minimal, making this recipe approachable for beginners and convenient for experienced home bakers.
For a successful loaf, measure the ingredients accurately, avoid adding too much extra flour, preheat the Dutch oven thoroughly, and let the bread cool before slicing.
Once you have mastered the basic method, you can experiment with herbs, olives, seeds, and whole-wheat flour. Whether served with butter, soup, cheese, or a homemade sandwich, this rustic bread is a rewarding addition to your baking routine.
Recommendation
For the best balance of flavor and texture, use bread flour, weigh the ingredients, and allow the dough to ferment for the full recommended period when your kitchen temperature permits. The dough should be bubbly and expanded before shaping.
A Dutch oven is especially useful for creating the crisp crust associated with artisan bread. If you do not have one, you can use another oven-safe covered pot rated for the baking temperature, but avoid using cookware that is not designed for high heat.
Plan the timing so that the loaf finishes baking well before you need to serve it. Cooling for at least one hour improves the texture and makes slicing easier.
Enjoy the bread fresh with butter or olive oil, or serve it with soup, roasted vegetables, cheese, and other favorite foods. Store the cooled loaf in a paper bag or bread box for a crispier crust, or in a suitable sealed container if you prefer a softer crust. Freeze extra slices for longer storage.
Embracing Healthful Indulgence
Homemade bread can be part of a varied eating pattern, and preparing it yourself gives you control over the ingredients. This no-knead loaf uses a short ingredient list without requiring large amounts of added fat or sugar.
For a heartier variation, substitute a portion of the bread flour with whole-wheat flour. You can also serve the bread with vegetable-rich soups, salads, beans, or other foods to create a more varied meal.
Pay attention to portion sizes according to your appetite, and remember that toppings such as butter, cheese, and olive oil change the overall nutritional content.
The most important part of enjoying homemade bread is appreciating its flavor and texture while handling and storing it properly. Allow the loaf to cool fully before storing it, and freeze any portions you do not expect to eat within a few days.
With its crisp crust, airy crumb, and straightforward method, Crusty No-Knead Artisan Bread is an excellent recipe for building confidence in home baking and enjoying fresh bread made from simple ingredients.