
Introduction
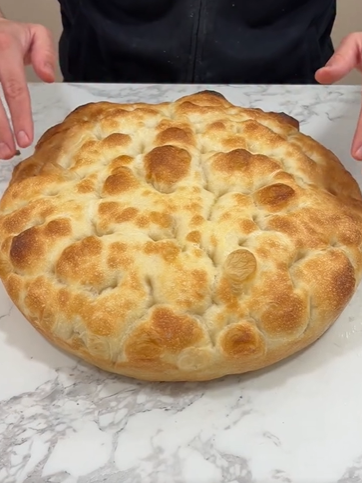
Homemade Golden Turkish Balloon Bread with Crispy Bubbled Crust is a beautiful, rustic flatbread featuring a golden exterior, delicate blistered bubbles, and a soft, fluffy interior. Made with flour, yeast, warm water, Greek yogurt, and olive oil, this homemade bread transforms simple pantry ingredients into a delicious centerpiece for the table.
Baked at high heat, the dough expands and develops an attractive surface with golden-brown patches and airy pockets. A light brushing of melted butter adds richness, while optional fresh parsley and flaky sea salt provide a flavorful finishing touch.
This Turkish-inspired bread is perfect for serving alongside grilled meats, roasted vegetables, soups, and Mediterranean-style meals. It is equally delicious torn into pieces and dipped into hummus, creamy garlic yogurt, or seasoned olive oil.
Although the dough requires time to rise, the preparation itself is straightforward. With a little kneading, proper resting, and a thoroughly preheated oven, you can make fresh homemade flatbread that looks impressive and tastes wonderfully comforting.
Origin
Turkey has a rich bread-making tradition, with countless regional varieties of flatbread, leavened bread, and oven-baked dough. Turkish breads are often enjoyed throughout the day, accompanying meals, wrapping savory fillings, or serving as a vehicle for dips and spreads.
One well-known Turkish flatbread is pide, which comes in several forms and may feature a soft or crisp crust depending on the recipe and baking method. Other regional breads are shaped and cooked using traditional ovens, griddles, or other high-heat surfaces.
This golden balloon bread takes inspiration from the broader Turkish and Mediterranean flatbread tradition. Its yeast-raised dough, high-temperature baking, and bubbled surface create a rustic result, although this particular recipe should not be considered a definitive traditional Turkish bread variety.
The recipe combines familiar bread-making techniques with Greek yogurt and olive oil to produce a tender crumb and a flavorful, golden crust.
Cultural Significance
Bread holds an important place in Turkish food culture. It commonly accompanies everyday meals, from soups and vegetable dishes to grilled meats, cheeses, and shared plates of dips. Fresh bread is also valued for its ability to bring people together around the table.
Flatbreads are especially versatile because they can be torn apart and shared, used to scoop up sauces, or served alongside a wide range of savory dishes. Their simple ingredients make them adaptable to different regions, family traditions, and cooking methods.
This homemade balloon bread celebrates that spirit of sharing. Its large, rustic shape makes it suitable for placing in the center of the table, where everyone can tear off a warm piece.
The crisp, golden surface and fluffy interior also make it an appealing alternative to packaged bread. Served fresh from the oven with butter, yogurt dip, or olive oil, it turns an ordinary meal into a more inviting experience.
Ingredients and Quantities
For the Bread Dough
- 4 cups all-purpose flour
- 1 1/2 cups warm water
- 2 teaspoons instant dry yeast
- 1 teaspoon granulated sugar
- 1 1/2 teaspoons salt
- 2 tablespoons olive oil
- 1/4 cup plain Greek yogurt, at room temperature
For Shaping and Finishing
- 1 tablespoon extra-virgin olive oil, for brushing
- 2 tablespoons all-purpose flour, for dusting
- 2 tablespoons unsalted butter, melted, for serving
- 1 teaspoon fresh parsley, finely chopped, optional
- 1/2 teaspoon flaky sea salt, optional
Optional Additions
One of the advantages of homemade flatbread is how easily you can adapt it to your preferred flavors.
Garlic butter: Mix finely minced garlic into the melted butter before brushing it over the warm bread. This adds a savory aroma and makes the crust especially flavorful.
Za’atar: Sprinkle a little za’atar over the bread after brushing it with olive oil for a herbaceous, tangy finish inspired by Middle Eastern cooking.
Sesame seeds: Add sesame seeds to the surface before baking for a delicate crunch and nutty flavor.
Nigella seeds: Sprinkle a small amount over the dough before baking to introduce a distinctive onion-like, slightly peppery flavor.
Fresh herbs: Replace the parsley garnish with chopped thyme, oregano, or rosemary for a more aromatic finish.
Whole-wheat flour: Replace a small portion of the all-purpose flour with whole-wheat flour. Because whole-wheat flour absorbs more liquid, you may need to adjust the water slightly.
Yogurt and garlic dip: Serve the bread with plain Greek yogurt mixed with garlic, lemon juice, salt, and chopped herbs for a cool, creamy accompaniment.
Olive oil and spices: Combine extra-virgin olive oil with paprika, dried oregano, and a pinch of salt for a simple dipping oil.
Tips for Success
1. Use Warm, Not Hot, Water
The water should feel comfortably warm rather than hot. Excessively hot water can damage the yeast and interfere with rising. If you use a thermometer, a temperature around 100–110°F (38–43°C) is generally suitable for this dough.
2. Measure the Flour Carefully
Too much flour can produce a dense, dry loaf instead of a soft, airy flatbread. For the most consistent results, weigh the flour if possible. Four cups of all-purpose flour may weigh approximately 480–500 grams, depending on how it is measured.
Add flour gradually and judge the dough by its texture rather than relying exclusively on the cup measurement.
3. Knead Until the Dough Becomes Elastic
Kneading helps develop the gluten structure that allows the dough to stretch and hold the gases produced by the yeast. Aim for a smooth, elastic dough that feels slightly tacky but is not excessively sticky.
If the dough sticks to your hands, lightly oil your hands or dust the work surface sparingly rather than adding large amounts of flour.
4. Allow Enough Time for Rising
The first rise usually takes 60–90 minutes, but the exact timing depends on room temperature and yeast activity. Look for dough that has approximately doubled in size rather than relying on the clock alone.
If your kitchen is cool, the dough may need additional time.
5. Rest the Shaped Dough
After shaping, let the dough rest for 20–25 minutes. This helps relax the gluten, making the dough easier to handle and allowing the yeast to continue working.
Avoid pressing out all the air during shaping. Preserving some of the gas in the dough helps create a lighter texture.
6. Preheat the Oven Thoroughly
A hot oven encourages rapid expansion and helps develop a golden crust. Preheat to 475°F (245°C) for at least 25 minutes, or longer if you are heating a pizza stone or baking steel.
Always follow the equipment manufacturer’s safety instructions when using a hot stone or steel.
7. Do Not Expect Every Bubble to Be Identical
The surface pattern depends on dough thickness, shaping, moisture, and oven heat. Some areas may puff dramatically while others remain flatter. These variations are natural and contribute to the rustic appearance of homemade bread.
8. Watch the Bread Closely Near the End
At high temperatures, the surface can brown quickly. Begin checking the bread around the 12-minute mark and remove it when the crust is golden and the center is fully baked.
9. Brush with Butter While Warm
Brushing the bread with melted butter after baking adds flavor and a soft sheen. For a crisper crust, use only a light coating and let the bread rest uncovered on a wire rack.
Instructions
Step 1: Prepare the Dough
In a large mixing bowl, combine the warm water, instant yeast, and granulated sugar. Stir gently and let the mixture stand for approximately 5 minutes.
Instant yeast can usually be mixed directly with the dry ingredients, but this short rest helps distribute it evenly in the liquid.
Add the Greek yogurt, olive oil, and salt. Mix until combined.
Gradually add the flour, stirring with a wooden spoon until a soft, slightly sticky dough forms. Depending on your flour and measuring method, you may not need every last spoonful of flour, or you may need a small adjustment to achieve the correct consistency.
Step 2: Knead Until Smooth and Elastic
Transfer the dough to a lightly floured work surface. Knead for approximately 8–10 minutes until it becomes smooth, elastic, and easier to handle.
The dough should remain soft and slightly tacky. If it feels excessively sticky, add a small amount of flour at a time, taking care not to make it too firm.
Shape the dough into a ball.
Step 3: Allow the Dough to Rise
Lightly grease a large bowl with olive oil and place the dough inside. Turn it gently so the surface receives a thin coating of oil.
Cover the bowl with a clean kitchen towel or plastic wrap. Leave it in a warm place for approximately 60–90 minutes, or until the dough has doubled in size.
During this period, the yeast produces gas that expands the dough and contributes to the bread’s light texture.
Step 4: Shape the Flatbread
Once the dough has risen, transfer it carefully to a lightly floured work surface.
Gently shape it into a round ball without pressing out all the air. Stretch and flatten the dough into a large circular flatbread, approximately 12 inches in diameter and around 3/4 inch thick.
If the dough resists stretching and springs back, let it rest for 5–10 minutes before continuing.
Transfer the shaped dough to a parchment-lined baking sheet suitable for high-temperature baking, or place it on a lightly floured pizza peel if you plan to use a preheated baking stone or steel.
Check that your parchment paper is rated for the oven temperature you intend to use.
Step 5: Create the Bubbled Surface
Cover the shaped dough loosely with a kitchen towel and let it rest for another 20–25 minutes.
Using lightly oiled fingertips, gently press scattered shallow indentations into the surface while leaving some areas raised. Avoid pressing so deeply that the dough becomes completely flattened.
Brush the top lightly with extra-virgin olive oil. This helps the surface brown and adds flavor during baking.
Step 6: Preheat the Oven
Preheat the oven to 475°F (245°C) for at least 25 minutes.
If using a pizza stone or baking steel, allow it to heat inside the oven according to the manufacturer’s instructions. A thoroughly heated surface can encourage the bread to expand quickly and develop a more pronounced crust.
If you are using a regular baking sheet, preheat the oven fully before placing the bread inside.
Step 7: Bake Until Golden and Bubbled
Carefully transfer the dough to the hot baking surface, or place the baking sheet on the middle rack.
Bake for approximately 12–16 minutes, checking after the first 12 minutes. The bread should puff in places and develop a golden-brown surface with scattered darker blisters.
If you want additional browning, move the bread to the upper rack for the final minute or two, watching it carefully to prevent burning.
The exact baking time depends on the dough’s thickness, your oven, and whether you use a baking stone, steel, or sheet pan.
Step 8: Brush with Butter and Serve
Remove the bread from the oven and transfer it to a wire rack.
Brush the warm surface lightly with melted butter. Sprinkle with chopped fresh parsley or flaky sea salt if desired.
Allow the bread to rest for about 5 minutes before cutting or tearing it into pieces.
Serve warm with creamy garlic yogurt, hummus, olive oil, grilled vegetables, roasted meats, or your favorite Mediterranean-inspired dishes.
Description
Homemade Golden Turkish Balloon Bread with Crispy Bubbled Crust is a rustic flatbread that combines a golden exterior with a soft, tender interior. Its yeast-raised dough develops an airy texture, while high-temperature baking creates attractive bubbles and lightly crisp edges.
Greek yogurt contributes tenderness, olive oil adds flavor, and melted butter provides a rich finishing touch. The bread has a mild, versatile taste that works beautifully with both creamy dips and strongly seasoned savory dishes.
Unlike dense loaves, this flatbread is best enjoyed while fresh and warm, when the contrast between the crisp surface and soft center is most noticeable. Its irregular golden patches give each loaf a unique, homemade appearance.
The recipe is suitable for everyday meals as well as special occasions. Place it on a serving board with hummus, olives, fresh vegetables, and cheese for a simple sharing platter, or use it to accompany soups, stews, and grilled chicken.
For a particularly flavorful serving option, combine melted butter with a little garlic and parsley, then brush it over the bread just before bringing it to the table.
Nutritional Information
The following values are approximate estimates per serving, assuming the recipe makes eight servings and includes the butter used for finishing. Actual nutrition will vary depending on flour weight, yogurt brand, butter quantity, and portion size.
- Calories: approximately 290
- Protein: approximately 7 grams
- Carbohydrates: approximately 45–50 grams
- Fat: approximately 7–10 grams
- Saturated fat: approximately 2–3 grams
- Fiber: approximately 1–2 grams
- Sodium: approximately 400–550 milligrams
These figures are estimates rather than laboratory measurements. The amount of salt retained in each serving and the quantity of butter used can noticeably affect the final values.
For a different nutritional profile, you can replace a small portion of the all-purpose flour with whole-wheat flour or reduce the finishing butter. Keep in mind that whole-wheat flour may change the dough’s texture and require a slight adjustment to the liquid.
Serve the bread alongside protein-rich foods, vegetables, or legumes to create a more varied meal. Since this bread is rich in carbohydrates, its role in the overall meal depends on the portion size and the foods served with it.
Conclusion
Homemade Golden Turkish Balloon Bread with Crispy Bubbled Crust is a delicious way to bring fresh, oven-baked bread to your table. With its soft interior, golden surface, and rustic appearance, it pairs beautifully with a wide variety of savory foods.
The recipe relies on straightforward ingredients and familiar bread-making techniques. Proper kneading, adequate rising time, and a thoroughly preheated oven are the main factors that help produce a light texture and attractive crust.
Although the bread takes time to rise, much of that time requires little attention. The result is a warm, homemade flatbread that can elevate a simple soup, complement a grilled meal, or become the star of a shared platter.
Recommendation
For the best flavor, serve this bread shortly after baking with garlic yogurt, hummus, or extra-virgin olive oil mixed with herbs. It also pairs well with grilled chicken, roasted vegetables, lentil soup, and Mediterranean-style salads.
If you are preparing it for guests, make the dough ahead and allow it to rise in the refrigerator overnight in a covered container. Bring it toward room temperature before shaping, allowing extra time if it still feels cold or resistant.
Leftover bread can be stored in an airtight container at room temperature for about 1–2 days, depending on the environment. For longer storage, freeze it once completely cooled, wrapped securely to prevent freezer burn.
To reheat, place the bread in a preheated oven at approximately 350°F (175°C) for a few minutes until warmed through. A light sprinkle of water before reheating can help refresh the crust without making the bread soggy.
For serving, tear the bread into generous pieces rather than cutting it into perfectly uniform slices. Its rustic texture and irregular bubbles are part of its appeal.
Embracing Healthful Indulgence
Homemade bread can be part of a balanced eating pattern, particularly when paired with a variety of nourishing foods. This flatbread provides carbohydrates for energy, a modest amount of protein, and fat from the olive oil, yogurt, and butter.
You can adapt the recipe to your preferences by using less finishing butter, incorporating a portion of whole-wheat flour, or adding herbs and spices for extra flavor without relying on additional salt.
Consider serving it with hummus, bean dips, yogurt-based sauces, grilled vegetables, or lean protein to create a meal with a broader range of nutrients and textures.
There is also value in preparing food at home: you can control the ingredients, adjust the seasoning, and enjoy the process of making something fresh from scratch.
Ultimately, a good flatbread is about more than its appearance. It is about the aroma of freshly baked dough, the pleasure of sharing food, and the simple satisfaction of serving a homemade dish that brings people together.