
1. Introduction
Laminated Brioche Loaf, also known as Brioche Feuilletée or Croissant Loaf, is an elegant French-inspired pastry bread that combines the rich, tender texture of traditional brioche with the delicate, buttery layers of a croissant.
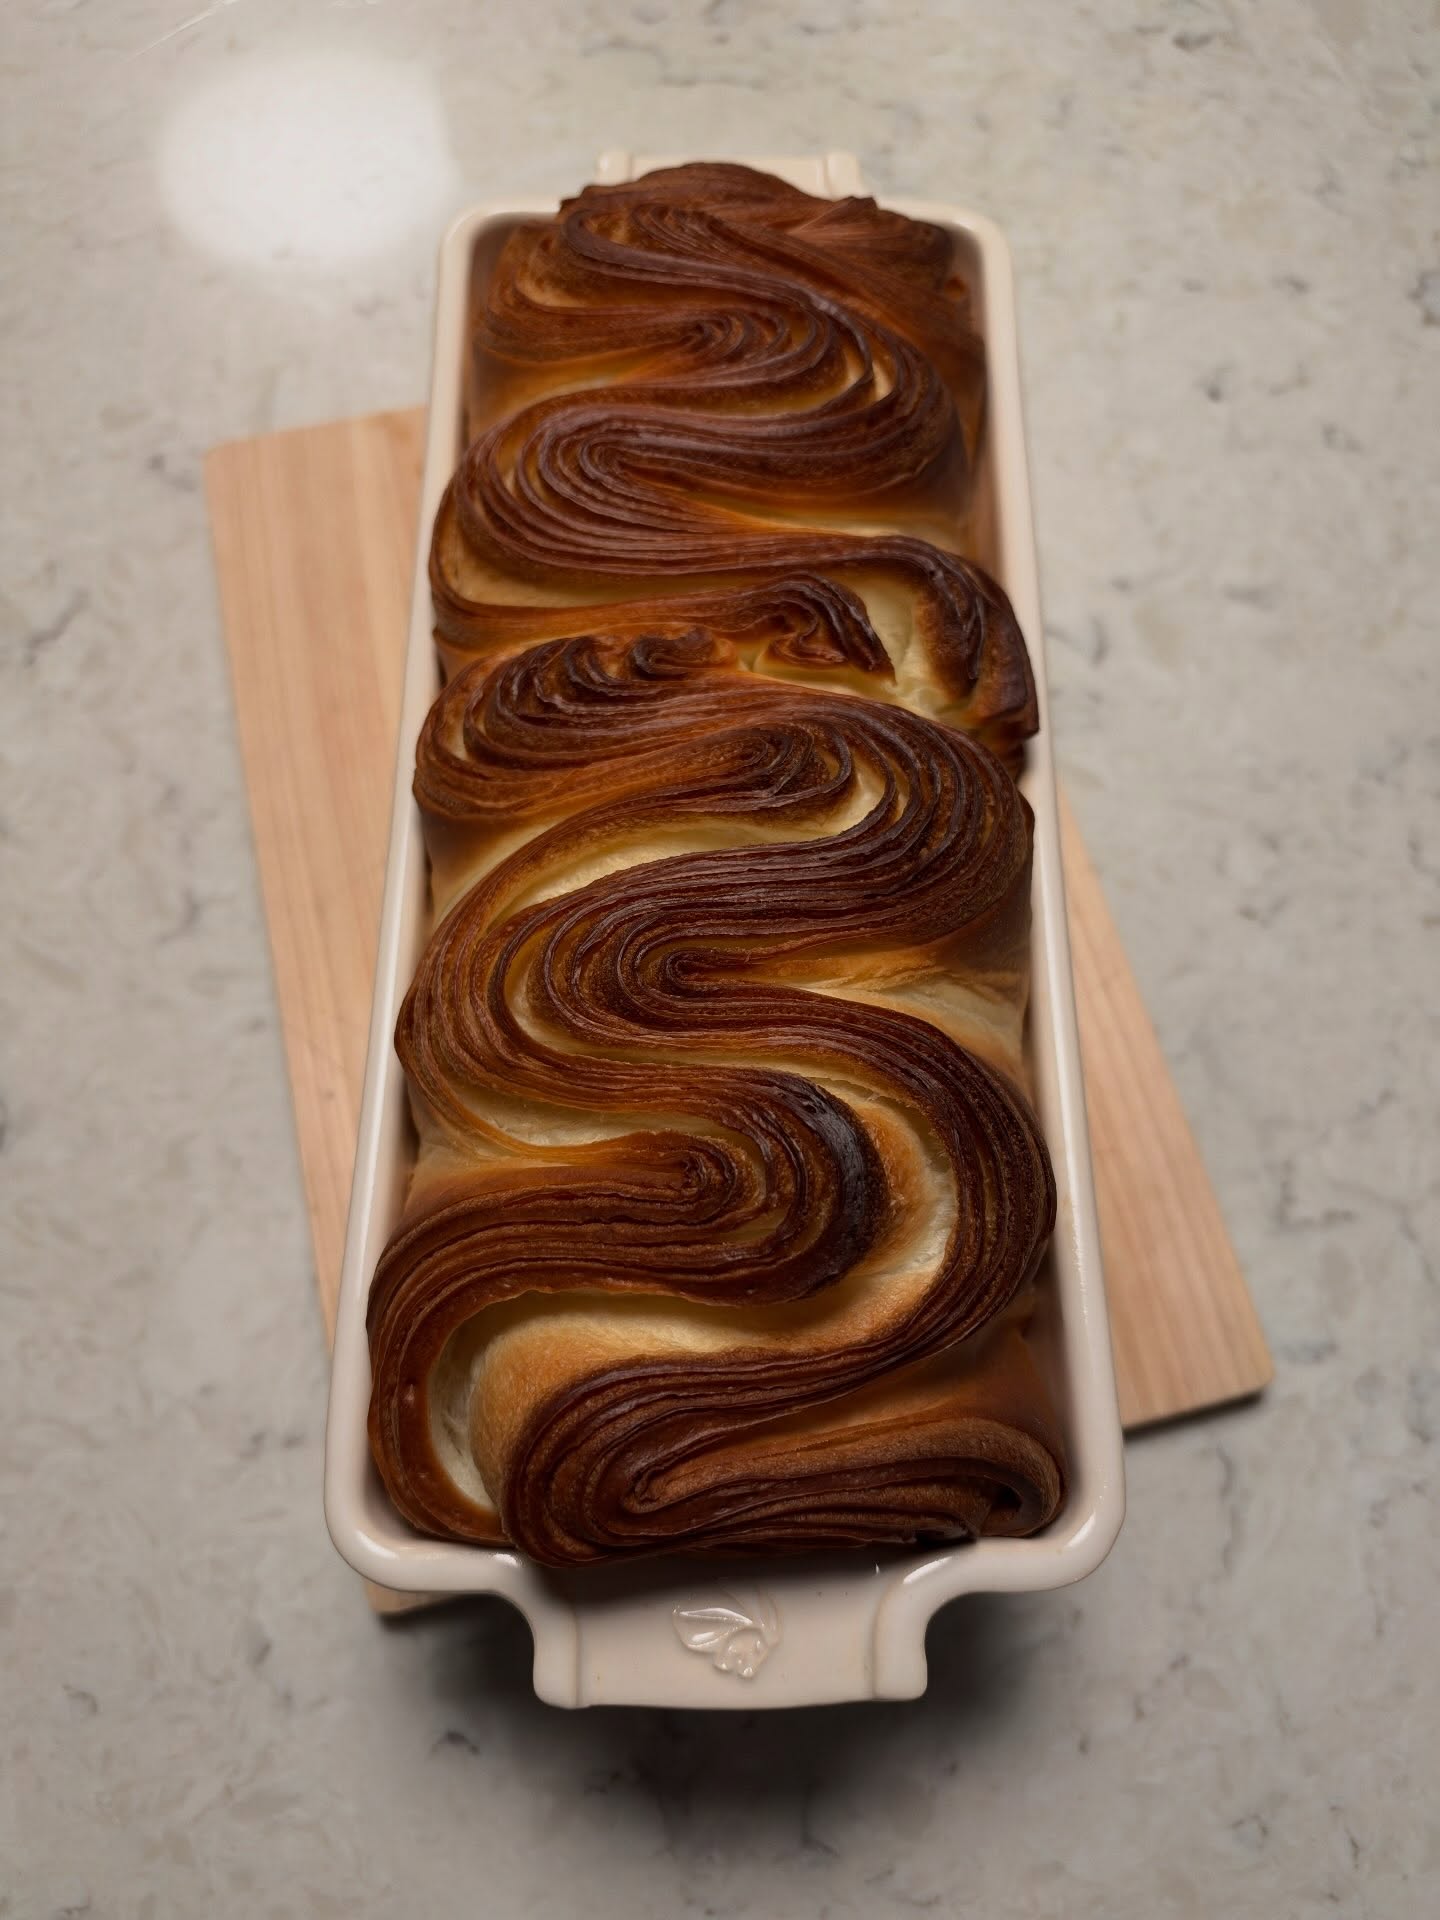
Its most distinctive feature is its beautifully folded, accordion-style appearance. The dough is arranged in soft waves inside a loaf pan, exposing the thin laminated layers across the top.
When baked, these layers expand into a golden-brown, flaky crust while the interior remains soft, buttery, and tender.
Unlike ordinary brioche, which relies primarily on butter incorporated directly into the dough, laminated brioche uses two separate additions of butter.
The first portion is kneaded into the dough, enriching its flavor and creating a soft crumb. The second portion is shaped into a flat butter block and enclosed inside the dough.
Through a careful sequence of rolling, folding, and chilling, the butter becomes distributed between multiple thin layers of dough.
During baking, moisture from the butter and dough turns into steam, helping separate the layers and create the characteristic flaky texture.
The process requires patience, particularly during lamination, but the result is a striking homemade pastry loaf with an exceptional combination of textures.
This recipe uses bread flour, whole milk, eggs, sugar, yeast, salt, and butter to create a rich yeast dough.
After kneading, the dough is chilled, laminated with European-style butter, shaped into waves, proofed, and baked until deeply golden.
The finished loaf is excellent for breakfast, brunch, afternoon coffee, or special occasions.
It can be enjoyed plain, lightly toasted, or served with jam, honey, or other favorite accompaniments.
2. Origin and Cultural Significance
Laminated brioche combines two important traditions of French baking: enriched yeast breads and laminated pastries.
The History of Brioche
Brioche has been associated with French baking for centuries.
Traditional brioche is an enriched yeast bread made with eggs, butter, flour, and other ingredients.
Its rich composition produces a soft, tender crumb and a distinctive buttery flavor.
The Development of Laminated Pastries
Lamination is a pastry-making technique in which butter is enclosed within dough and distributed through repeated rolling and folding.
The technique is especially associated with croissants and puff pastry.
When baked, the layers separate, creating a light, flaky structure.
Brioche Feuilletée
The French term brioche feuilletée describes brioche prepared using a layered or laminated technique.
It combines the richness of brioche dough with the crispness of laminated pastry.
The Croissant Loaf
Croissant-style loaves have become popular in modern artisan bakeries.
They offer the flaky characteristics of croissants in a sliceable loaf format.
The Accordion-Shaped Design
The wave-shaped presentation is a contemporary way to display laminated dough.
Folding the strips into an accordion pattern exposes the layers and creates a dramatic surface.
A Celebration of French Pastry Techniques
Laminated brioche demonstrates the importance of temperature control, dough development, and careful shaping in pastry-making.
It is especially appealing to home bakers who enjoy learning more advanced bread and pastry techniques.
3. Ingredients
This recipe makes one 9 × 5-inch laminated brioche loaf, approximately 10–12 slices.
A. Brioche Dough
| Ingredient | Quantity |
|---|---|
| Bread flour | 350 g (approximately 2¾ cups) |
| Whole milk, cold | 110 ml (approximately ½ cup) |
| Large eggs, cold | 2 (approximately 100 g without shells) |
| Granulated sugar | 40 g (approximately 3 tablespoons) |
| Instant yeast | 7 g (2¼ teaspoons) |
| Fine salt | 7 g (approximately 1¼ teaspoons) |
| Unsalted butter, softened | 40 g (approximately 3 tablespoons) |
B. Butter Block for Lamination
| Ingredient | Quantity |
|---|---|
| European-style unsalted butter | 175 g |
European-style butter is recommended because its relatively high butterfat content and suitable plasticity can make lamination easier.
C. Egg Wash
| Ingredient | Quantity |
|---|---|
| Large egg | 1 |
| Milk | A small splash |
D. Equipment
- Stand mixer with dough hook
- Digital kitchen scale
- Large mixing bowl
- Rolling pin
- Parchment paper
- Plastic wrap or reusable dough covering
- Sharp knife or pizza cutter
- 9 × 5-inch loaf pan
- Pastry brush
- Dough scraper
- Ruler
- Wire cooling rack
- Instant-read thermometer
- Refrigerator
- Oven
4. Optional Additions
The original laminated brioche is delicious without additional fillings or toppings.
However, several optional ingredients can create different variations.
Vanilla Extract: Add a small amount to the dough for a delicate vanilla aroma.
Orange Zest: Incorporate finely grated orange zest for a citrus flavor.
Lemon Zest: Add lemon zest for a fresh aromatic note.
Cinnamon Sugar: Sprinkle a thin layer over the dough before shaping for a sweeter loaf.
Chocolate Chips: Add a small quantity during shaping.
Dark Chocolate: Use finely chopped dark chocolate for a chocolate variation.
Almond Filling: Spread a thin layer of almond cream before shaping, adjusting the method to prevent leakage.
Pearl Sugar: Sprinkle a small amount over the top before baking.
Honey: Brush lightly over the finished loaf for sweetness and shine.
Maple Syrup: Serve alongside warm slices.
Fruit Jam: Enjoy with apricot, raspberry, or strawberry jam.
Powdered Sugar: Dust lightly over the cooled loaf.
Toasted Almonds: Add a small quantity for crunch.
Pistachios: Sprinkle finely chopped pistachios over a glazed variation.
For the most distinct laminated appearance, avoid heavy fillings that may interfere with the layers.
5. Tips for Success
Use a Kitchen Scale
Accurate measurements are especially important for laminated dough.
Develop the Gluten Properly
The dough needs enough elasticity to stretch during rolling without tearing.
Add Butter Gradually
Incorporating the softened butter a little at a time helps it blend evenly into the dough.
Perform the Windowpane Test
A properly kneaded dough should stretch into a thin membrane without tearing immediately.
Chill the Dough Thoroughly
Cold dough is easier to roll and helps keep the butter from melting.
Use Pliable Butter
The butter block should be cold but flexible enough to bend without cracking.
Match Butter and Dough Firmness
The butter and dough should have similar consistency during lamination.
Avoid Excess Flour
Use only enough flour to prevent sticking.
Roll Evenly
Uneven thickness can cause irregular layers.
Do Not Force the Dough
If the dough resists rolling, refrigerate it and allow the gluten to relax.
Keep the Butter Enclosed
Seal the dough carefully around the butter block.
Chill Between Folds
Resting in the refrigerator helps maintain distinct layers.
Use a Sharp Knife
A sharp blade helps expose the layers without crushing them.
Protect the Exposed Edges
Avoid pressing or squeezing the cut layers during shaping.
Proof at a Moderate Temperature
Around 24°C (75°F) is suitable for the suggested final proof.
Excessive warmth can cause butter to soften and leak.
Avoid Overproofing
The dough should become puffy and noticeably expanded without collapsing.
Apply Egg Wash Carefully
Brush lightly over the surface without sealing the exposed layers.
Check the Internal Temperature
An internal temperature of approximately 88°C (190°F) is a useful doneness indicator for this recipe.
Cool Before Slicing
Cooling allows the crumb to stabilize and reduces compression of the delicate layers.
6. Step-by-Step Instructions
Part A: Preparing the Ingredients
Step 1: Gather all ingredients and equipment.
Step 2: Measure 350 g bread flour.
Step 3: Measure 110 ml cold whole milk.
Step 4: Prepare two large eggs.
Step 5: Measure 40 g granulated sugar.
Step 6: Measure 7 g instant yeast.
Step 7: Measure 7 g fine salt.
Step 8: Prepare 40 g softened butter for the dough.
Step 9: Measure 175 g European-style butter for lamination.
Step 10: Keep the lamination butter refrigerated until needed.
Part B: Preparing the Mixer
Step 11: Place the stand mixer on a stable surface.
Step 12: Attach the dough hook.
Step 13: Prepare the mixing bowl.
Step 14: Check that the equipment is clean.
Part C: Combining the Dough Ingredients
Step 15: Add the bread flour to the mixing bowl.
Step 16: Add the granulated sugar.
Step 17: Add the instant yeast.
Step 18: Add the fine salt.
Step 19: Pour in the cold milk.
Step 20: Crack the two eggs into the bowl.
Step 21: Begin mixing on low speed.
Step 22: Continue until the ingredients form a rough dough.
Part D: Kneading the Base Dough
Step 23: Increase the mixer to low-medium speed.
Step 24: Knead for approximately 6–8 minutes.
Step 25: Observe the dough becoming smoother.
Step 26: Scrape down the bowl if necessary.
Step 27: Continue until the dough begins forming a cohesive ball.
Part E: Incorporating the Butter
Step 28: Cut the softened butter into small pieces.
Step 29: Add the first portion to the dough.
Step 30: Continue kneading.
Step 31: Wait until the butter is mostly incorporated.
Step 32: Add another portion.
Step 33: Repeat until all 40 g butter has been added.
Step 34: Continue kneading for approximately 6–8 minutes.
Step 35: Observe the dough becoming smooth and glossy.
Step 36: Check that the butter is fully incorporated.
Part F: Checking Gluten Development
Step 37: Stop the mixer.
Step 38: Remove a small piece of dough.
Step 39: Stretch it gently between your fingers.
Step 40: Look for a thin, translucent membrane.
Step 41: If the dough tears immediately, knead a little longer.
Step 42: Repeat the test if necessary.
Step 43: Stop once the dough is elastic and well developed.
Part G: Shaping the Dough for Chilling
Step 44: Remove the dough from the mixing bowl.
Step 45: Place it on a lightly floured work surface.
Step 46: Shape it into a rough rectangle.
Step 47: Flatten it gently.
Step 48: Wrap tightly in plastic wrap.
Step 49: Place it on a flat tray.
Step 50: Refrigerate for at least 2 hours or overnight.
Part H: Preparing the Butter Block
Step 51: Remove the 175 g butter from the refrigerator.
Step 52: Place it between two sheets of parchment paper.
Step 53: Arrange the butter into a roughly square shape.
Step 54: Fold the parchment to create a 6 × 6-inch (15 × 15 cm) guide.
Step 55: Gently pound the butter with a rolling pin.
Step 56: Begin rolling it outward.
Step 57: Fill the parchment square evenly.
Step 58: Check the thickness.
Step 59: Smooth any uneven areas.
Step 60: Refrigerate until cold but pliable.
Part I: Preparing for Lamination
Step 61: Remove the chilled dough from the refrigerator.
Step 62: Lightly flour the work surface.
Step 63: Place the dough on the surface.
Step 64: Prepare the rolling pin.
Step 65: Check the firmness of the butter block.
Step 66: If the butter is extremely hard, allow it to soften slightly while keeping it cold.
Part J: Rolling the Dough
Step 67: Roll the dough into a rectangle approximately 12 × 6 inches (30 × 15 cm).
Step 68: Keep the thickness as even as possible.
Step 69: Straighten the edges.
Step 70: Brush away excess flour.
Part K: Locking in the Butter
Step 71: Remove the butter block from its parchment.
Step 72: Place the 6 × 6-inch butter square in the center of the dough rectangle.
Step 73: Fold one short end of the dough over the butter.
Step 74: Fold the opposite short end over the remaining exposed butter.
Step 75: Bring the dough edges together.
Step 76: Pinch the center seam closed.
Step 77: Seal any exposed edges.
Step 78: Check that the butter is completely enclosed.
Part L: Preparing the First Fold
Step 79: Rotate the dough approximately 90 degrees.
Step 80: Lightly flour the work surface.
Step 81: Begin rolling gently.
Step 82: Apply even pressure.
Step 83: Roll into an approximately 8 × 20-inch (20 × 50 cm) rectangle.
Step 84: Keep the corners reasonably square.
Step 85: Brush away excess flour.
Part M: Performing the Single Fold
Step 86: Position the dough lengthwise.
Step 87: Fold one short end inward by approximately one-third.
Step 88: Fold the opposite end over it.
Step 89: Create a three-layer business-letter fold.
Step 90: Align the edges.
Step 91: Avoid pressing the layers together excessively.
Step 92: Wrap the dough.
Step 93: Refrigerate for approximately 30–45 minutes.
Part N: Preparing the Second Fold
Step 94: Remove the dough from the refrigerator.
Step 95: Lightly flour the work surface.
Step 96: Position the dough with the appropriate orientation for rolling.
Step 97: Roll gently into another approximately 8 × 20-inch rectangle.
Step 98: Maintain even thickness.
Step 99: Avoid tearing the dough.
Step 100: Brush away excess flour.
Part O: Performing the Book Fold
Step 101: Position the long rectangle in front of you.
Step 102: Fold one short end inward toward the center.
Step 103: Fold the opposite short end inward to meet it.
Step 104: Adjust the folds so the edges meet neatly.
Step 105: Fold the dough in half like closing a book.
Step 106: Align the edges.
Step 107: Avoid compressing the dough.
Step 108: Wrap tightly.
Step 109: Refrigerate for approximately 45 minutes.
Part P: Preparing the Loaf Pan
Step 110: Select a 9 × 5-inch loaf pan.
Step 111: Lightly grease the bottom.
Step 112: Grease the sides.
Step 113: Line with parchment paper if desired.
Step 114: Leave enough parchment overhang for easier removal.
Step 115: Set the pan aside.
Part Q: Rolling the Final Dough Sheet
Step 116: Remove the laminated dough from the refrigerator.
Step 117: Place it on a lightly floured surface.
Step 118: Begin rolling gently.
Step 119: Roll into a rectangle approximately 10 × 14 inches.
Step 120: Aim for a thickness of approximately ¼ inch (6 mm).
Step 121: Keep the surface even.
Step 122: Avoid stretching the dough excessively.
Part R: Trimming the Edges
Step 123: Prepare a sharp knife or pizza cutter.
Step 124: Trim uneven edges.
Step 125: Make clean, straight cuts.
Step 126: Avoid dragging or crushing the laminated layers.
Step 127: Set the trimmed pieces aside.
Part S: Cutting the Strips
Step 128: Measure the dough rectangle.
Step 129: Divide it into two or three long strips.
Step 130: Aim for strips approximately 3–3½ inches wide, adjusting to the dimensions of the loaf pan.
Step 131: Cut cleanly.
Step 132: Keep the strips cold.
Step 133: Avoid pulling or stretching the cut edges.
Part T: Creating the Accordion Waves
Step 134: Select the first strip.
Step 135: Gently fold it back and forth into an accordion pattern.
Step 136: Create soft S-shaped waves.
Step 137: Avoid sharp creases.
Step 138: Repeat with the remaining strips.
Step 139: Arrange the folds so the laminated cut edges face upward.
Step 140: Handle the dough carefully to preserve the layers.
Part U: Arranging the Dough in the Pan
Step 141: Transfer the folded dough into the prepared loaf pan.
Step 142: Position the waves upright.
Step 143: Arrange the strips beside one another.
Step 144: Leave some space for expansion.
Step 145: Adjust the folds gently.
Step 146: Check that the exposed layers face upward.
Step 147: Avoid packing the dough too tightly.
Part V: Preparing for Final Proof
Step 148: Cover the loaf pan loosely.
Step 149: Place it in a moderately warm area.
Step 150: Aim for approximately 75°F (24°C).
Step 151: Keep the pan away from excessive heat.
Step 152: Allow the dough to rise undisturbed.
Part W: Final Proofing
Step 153: Proof for approximately 1½–2½ hours.
Step 154: Observe the dough gradually expanding.
Step 155: Check that the waves become fuller.
Step 156: Look for a noticeably puffy appearance.
Step 157: The dough should approach double its original volume.
Step 158: Gently move the pan.
Step 159: Look for a slight jiggle in the risen dough.
Step 160: Avoid overproofing.
Part X: Preparing the Oven
Step 161: Preheat the oven to 375°F (190°C).
Step 162: Position an oven rack near the center.
Step 163: Allow the oven to reach the correct temperature.
Part Y: Preparing the Egg Wash
Step 164: Crack the remaining egg into a small bowl.
Step 165: Add a small splash of milk.
Step 166: Whisk until smooth.
Step 167: Prepare a pastry brush.
Part Z: Applying the Egg Wash
Step 168: Remove the covering from the proofed loaf.
Step 169: Dip the pastry brush lightly into the egg wash.
Step 170: Gently brush the exposed surface.
Step 171: Avoid allowing egg wash to pool between the layers.
Step 172: Do not press down on the dough.
Part AA: Baking the Loaf
Step 173: Place the loaf pan in the preheated oven.
Step 174: Bake at 375°F (190°C).
Step 175: Allow the dough to rise and expand.
Step 176: Observe the surface becoming golden.
Step 177: Check the loaf after approximately 20 minutes.
Step 178: If the top is browning too quickly, cover loosely with aluminum foil.
Step 179: Continue baking.
Step 180: The suggested baking time is approximately 30–35 minutes.
Step 181: Check the internal temperature.
Step 182: Look for approximately 190°F (88°C) in the center.
Step 183: Continue baking if necessary until fully cooked.
Part AB: Cooling the Loaf
Step 184: Remove the loaf from the oven.
Step 185: Place the pan on a wire rack.
Step 186: Allow it to cool in the pan for approximately 10 minutes.
Step 187: Carefully lift the loaf from the pan.
Step 188: Transfer to the wire rack.
Step 189: Allow it to cool completely before slicing.
Part AC: Serving
Step 190: Place the cooled loaf on a cutting board.
Step 191: Prepare a serrated bread knife.
Step 192: Slice gently without compressing the layers.
Step 193: Arrange the slices on a serving plate.
Step 194: Serve plain or with a preferred accompaniment.
Step 195: Enjoy the buttery, flaky texture.
7. Description
Laminated Brioche Loaf is a visually striking pastry bread featuring a deeply golden-brown crust and beautifully defined layers.
The top is arranged in an accordion-style wave pattern, creating a sculptural appearance.
The exposed laminated layers become crisp and flaky during baking.
Inside, the loaf has a tender, buttery crumb.
The texture combines characteristics of traditional brioche and croissant pastry.
The exterior is delicate and slightly crisp.
The interior is soft, rich, and lightly airy.
The flavor is buttery with a gentle sweetness.
Eggs and milk contribute richness, while the yeast creates a subtle bread-like aroma.
The laminated butter layers produce a delicate, flaky sensation when the loaf is torn or sliced.
When freshly baked, the loaf has a warm buttery fragrance and a golden surface.
Its distinctive layered appearance makes it suitable for special breakfasts and bakery-style presentations.
8. Nutritional Information
Approximate nutritional values per slice, assuming the loaf is divided into 12 servings:
| Nutrient | Estimated Amount |
|---|---|
| Calories | 280–330 kcal |
| Protein | 5–7 g |
| Carbohydrates | 25–30 g |
| Total Fat | 17–21 g |
| Saturated Fat | 10–13 g |
| Fiber | 1–2 g |
| Sugar | 3–5 g |
| Sodium | 220–300 mg |
| Calcium | Present |
| Iron | Present |
| Vitamin A | Present |
| Vitamin B12 | Present |
Values are approximate and depend on the butter brand, egg size, flour, and serving size. Optional fillings or toppings are not included.
9. Recipe Details
| Category | Details |
|---|---|
| Recipe Name | Laminated Brioche Loaf |
| French Name | Brioche Feuilletée |
| Alternative Name | Croissant Loaf |
| Cuisine | French-Inspired |
| Course | Breakfast / Brunch / Pastry |
| Preparation Time | Approximately 45–60 Minutes Active |
| Dough Chilling Time | At Least 2 Hours |
| Lamination Resting Time | Approximately 1¼–1½ Hours |
| Final Proofing Time | 1½–2½ Hours |
| Baking Time | 30–35 Minutes |
| Cooling Time | Approximately 1 Hour |
| Total Time | Approximately 7–9 Hours, Depending on Chilling and Proofing |
| Yield | 1 Loaf |
| Servings | 10–12 Slices |
| Difficulty | Advanced |
| Main Flour | Bread Flour |
| Dough Butter | 40 g |
| Lamination Butter | 175 g |
| Total Butter | 215 g |
| Yeast | Instant Yeast |
| Lamination Method | Single Fold + Book Fold |
| Shaping Style | Accordion Waves |
| Loaf Pan | 9 × 5 Inches |
| Baking Temperature | 375°F (190°C) |
| Target Internal Temperature | Approximately 190°F (88°C) |
| Texture | Flaky Exterior, Tender Interior |
| Flavor Profile | Buttery, Rich, Lightly Sweet |
| Best For | Breakfast, Brunch, Special Occasions |
| Potential Allergens | Wheat, Eggs, Milk |
10. Conclusion
Laminated Brioche Loaf is an elegant pastry bread that combines the richness of French brioche with the delicate layers of croissant-style dough.
Its buttery flavor, soft interior, and crisp exterior create a distinctive eating experience.
The preparation begins with an enriched yeast dough made from bread flour, milk, eggs, sugar, yeast, salt, and butter.
After kneading, the dough is chilled to prepare it for lamination.
A separate butter block is enclosed inside the dough.
Through a single fold and a book fold, the butter becomes distributed into thin layers.
The laminated dough is then rolled, sliced, and folded into an accordion pattern.
After proofing, the loaf is brushed with egg wash and baked until golden.
The finished bread features beautifully exposed layers and a rich, buttery aroma.
Although the process requires patience and careful temperature control, the result is a bakery-style loaf suitable for special occasions.
Served plain, toasted, or accompanied by jam or honey, laminated brioche offers a delicious combination of tender bread and flaky pastry.
11. Serving and Storage Recommendations
Serve Fresh: Laminated brioche is especially enjoyable on the day it is baked.
Cool Before Slicing: Allow the loaf to cool completely to preserve its structure.
Use a Serrated Knife: Slice gently to avoid compressing the layers.
Breakfast: Serve with coffee, tea, or hot chocolate.
Jam: Pair with apricot, raspberry, or strawberry jam.
Honey: Drizzle a small amount over warm slices.
Butter: Serve plain or with a little additional butter if desired.
Toasting: Lightly toast slices to refresh the crisp texture.
Room-Temperature Storage: Keep the cooled loaf tightly wrapped or in an airtight container for approximately 1–2 days.
Refrigeration: Refrigeration can accelerate staling, so it is generally not ideal for plain brioche.
Freezing: Freeze individual slices in airtight wrapping for up to approximately 2–3 months for best quality.
Thawing: Thaw at room temperature or reheat gently.
Oven Reheating: Warm slices in a moderate oven to help restore some crispness.
Avoid Excess Moisture: Protect the loaf from humidity, which can soften the flaky layers.
Food Safety: Store the loaf in a clean, dry container and discard it if mold or spoilage develops.
12. Embracing Healthful Indulgence
Laminated Brioche Loaf is a rich pastry bread made with flour, eggs, milk, sugar, yeast, and butter.
Its distinctive texture comes from the combination of enriched dough and laminated butter layers.
Bread Flour
Bread flour provides carbohydrates and protein.
Its relatively strong gluten-forming properties help the dough withstand rolling and folding.
Eggs
Eggs contribute protein and nutrients such as choline and vitamin B12.
They also enrich the dough and support its tender texture.
Whole Milk
Whole milk contributes protein, calcium, and flavor.
It also adds moisture to the dough.
Butter
Butter is essential to the flavor and structure of laminated brioche.
It creates richness in the dough and separates the laminated layers.
Because the recipe contains a substantial amount of butter, it is relatively high in saturated fat.
Yeast
Yeast helps the dough rise and contributes to its characteristic bread aroma.
Sugar
Sugar provides mild sweetness and supports browning during baking.
The recipe contains a moderate amount of added sugar relative to some sweet pastries, although the overall loaf remains rich because of its butter content.
Portion Awareness
Laminated brioche is best enjoyed in satisfying portions.
One or two slices can be served as part of breakfast or brunch, depending on individual needs.
Pairing with Fresh Fruit
Serving the loaf with berries, citrus fruit, or other fresh fruit adds variety and freshness.
Balancing Richness
Because laminated brioche is buttery, it pairs well with lighter accompaniments such as fresh fruit or unsweetened tea.
Homemade Baking
Preparing laminated brioche at home provides control over ingredient selection and portion size.
It also offers an opportunity to practice traditional pastry techniques.
A Special Occasion Treat
Laminated brioche is a luxurious bread that requires time and care.
Its flaky layers, tender crumb, and rich flavor make it particularly suitable for special breakfasts, weekend baking, and celebrations.
Enjoyed as an occasional treat within a varied eating pattern, this beautiful French-inspired loaf offers a memorable combination of craftsmanship, flavor, and texture.