
1. Introduction
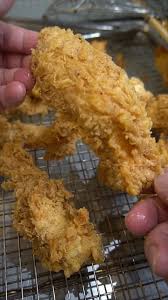
Extra-Crispy Fried Chicken Tenders are a delicious comfort-food favorite featuring juicy, tender chicken wrapped in a thick, golden-orange coating with an irresistibly crunchy texture.
These homemade chicken tenders are inspired by the crispy, craggy fried chicken commonly served in restaurants.
The secret to their texture is a combination of buttermilk marination, seasoned flour, cornstarch, baking powder, and a double-dredging technique.
The chicken is first soaked in a flavorful buttermilk marinade containing hot sauce, salt, and black pepper.
The buttermilk helps create a tender, flavorful result, while the hot sauce adds a subtle tang and gentle warmth.
After marinating, each piece is coated in a carefully seasoned mixture of all-purpose flour, cornstarch, baking powder, paprika, garlic powder, onion powder, and black pepper.
Cornstarch helps create a lighter, crispier coating, while baking powder contributes to the airy texture of the crust.
A particularly effective technique involves adding a few tablespoons of the buttermilk marinade directly to the dry flour mixture.
This creates small, irregular clumps that cling to the chicken during breading.
When fried, these clumps become crunchy flakes, giving the tenders their distinctive restaurant-style appearance.
For an even thicker coating, the chicken is dipped into the marinade and flour mixture twice.
The coated strips are then rested briefly before frying.
Cooking the chicken in hot oil at approximately 350°F (175°C) produces a deeply golden crust while keeping the meat juicy.
The finished chicken tenders are crispy on the outside, tender on the inside, and packed with savory flavor.
They are perfect for family dinners, weekend meals, game-day gatherings, lunch, or serving with homemade dipping sauces.
2. Origin and Cultural Significance
Fried chicken is an important part of several culinary traditions, particularly in the Southern United States.
Chicken tenders are a more modern variation designed around boneless strips of chicken that are convenient to cook, serve, and eat.
The History of Fried Chicken
Frying chicken in seasoned fat has roots in multiple food traditions.
Southern American fried chicken developed through a combination of European and African American culinary influences.
Southern-Style Fried Chicken
Southern fried chicken is commonly associated with seasoned flour coatings, crisp exteriors, and juicy meat.
Different regions and families use their own seasoning blends and preparation techniques.
The Popularity of Chicken Tenders
Boneless chicken tenders became especially popular in American restaurants and fast-food establishments during the late twentieth century.
Their convenient shape makes them suitable for dipping sauces and casual meals.
Buttermilk-Marinated Chicken
Buttermilk is frequently used in Southern-inspired fried chicken recipes.
Its acidity and dairy proteins influence the surface of the chicken and help create a flavorful coating.
The Development of Extra-Crispy Coatings
Restaurant-style fried chicken often features irregular, crunchy breading.
Techniques such as double-dredging and adding moisture to seasoned flour help produce this texture.
Chicken Tenders in Modern Food Culture
Chicken tenders are commonly served in restaurants, cafés, food trucks, and home kitchens.
They are popular with both children and adults.
Homemade Fried Chicken
Preparing chicken tenders at home allows cooks to control the seasonings, oil temperature, coating thickness, and serving portions.
This recipe uses halal chicken and halal-compatible ingredients.
3. Ingredients
Yield: Approximately 4–6 servings
A. Chicken
| Ingredient | Quantity |
|---|---|
| Chicken breast tenderloins | 1½ lbs (680 g) |
Alternatively, use boneless, skinless chicken breasts cut into approximately 1-inch-wide strips.
B. Buttermilk Marinade
| Ingredient | Quantity |
|---|---|
| Buttermilk | 1 cup (240 ml) |
| Hot sauce | 1–2 tablespoons |
| Kosher salt | 1 teaspoon |
| Black pepper | ½ teaspoon |
Buttermilk substitute: If buttermilk is unavailable, mix 1 cup milk with 1 tablespoon lemon juice or vinegar. Let it stand for approximately 5–10 minutes before using.
C. Extra-Crispy Flour Coating
| Ingredient | Quantity |
|---|---|
| All-purpose flour | 1½ cups |
| Cornstarch | ½ cup |
| Baking powder | 1 teaspoon |
| Paprika | 2 teaspoons |
| Garlic powder | 1 teaspoon |
| Onion powder | 1 teaspoon |
| Cayenne pepper | ½ teaspoon, optional |
| Salt | 1 teaspoon |
| Black pepper | ½ teaspoon |
D. Flaky Coating Technique
| Ingredient | Quantity |
|---|---|
| Prepared buttermilk marinade | 2–3 tablespoons |
This is taken from the marinade already prepared, not added as a separate ingredient.
E. Frying Oil
| Ingredient | Quantity |
|---|---|
| Vegetable, canola, or peanut oil | Enough for approximately 2 inches of oil in the pot |
The exact quantity depends on the size of the cooking vessel.
F. Equipment
- Large mixing bowl
- Shallow breading dish
- Heavy-bottomed pot or deep skillet
- Whisk
- Kitchen tongs
- Wire cooling rack
- Rimmed baking sheet
- Cooking thermometer
- Instant-read meat thermometer
- Measuring cups and spoons
- Paper towels
- Sharp knife
- Cutting board
- Refrigerator-safe cover
4. Optional Additions
The original recipe is delicious without additional ingredients, but several optional additions can create different flavor variations.
Smoked Paprika
Replace some of the regular paprika with smoked paprika for a smoky flavor.
Extra Cayenne Pepper
Increase the cayenne for a spicier coating.
Chili Powder
Add a small amount of chili powder for warmth.
White Pepper
Include a pinch of white pepper for additional seasoning.
Dried Oregano
Add a small amount of oregano to the flour mixture.
Dried Thyme
Use a pinch of thyme for an herbal note.
Mustard Powder
Add a little mustard powder for a tangy flavor.
Extra Garlic Powder
Increase the garlic powder for a stronger savory taste.
Lemon Zest
Add finely grated lemon zest to the seasoning mixture.
Hot Honey
Drizzle with halal-friendly hot honey after frying.
Buffalo-Style Sauce
Toss the cooked tenders in a spicy butter-and-hot-sauce mixture.
Garlic Mayonnaise
Serve with homemade garlic mayonnaise.
Honey Mustard Sauce
Combine mayonnaise, mustard, and honey for dipping.
Spicy Mayonnaise
Mix mayonnaise with hot sauce.
Barbecue Sauce
Serve with a halal-compatible barbecue sauce.
Fresh Parsley
Garnish with finely chopped parsley.
These additions are optional and are not required for the original recipe.
5. Tips for Success
Choose Evenly Sized Chicken Pieces
Similar-sized strips cook more evenly.
Use Fresh Chicken
Choose fresh, properly refrigerated chicken.
Marinate in the Refrigerator
Never leave raw chicken marinating at room temperature.
Allow Enough Marinating Time
At least 30 minutes gives the marinade time to coat and flavor the chicken.
Avoid Excessively Long Marination
The recommended maximum is approximately four hours.
Use Cornstarch
Cornstarch contributes to a lighter, crunchier coating.
Include Baking Powder
Baking powder helps create an airy, irregular crust.
Season the Flour Thoroughly
The coating provides much of the finished chicken’s flavor.
Create Small Flour Clumps
Drizzling marinade into the flour mixture creates the distinctive flaky texture.
Press the Flour Firmly
Pressing the coating onto the chicken helps it adhere.
Double-Dredge for Extra Crunch
A second coating creates a thicker crust.
Rest Before Frying
Allowing the coated chicken to rest for 10 minutes helps the breading hydrate and adhere.
Maintain the Oil Temperature
Aim for approximately 350°F (175°C).
Avoid Overcrowding
Frying too many pieces at once can lower the oil temperature.
Use a Thermometer
Oil temperature is important for consistent results.
Cook Chicken Thoroughly
The thickest part must reach 165°F (74°C).
Drain on a Wire Rack
A rack allows excess oil to drip away without trapping steam underneath the crust.
Serve Fresh
Fried chicken tenders are crispiest shortly after cooking.
6. Step-by-Step Instructions
Part A: Preparing the Ingredients
Step 1: Gather all ingredients and equipment.
Step 2: Measure 1½ lbs chicken tenderloins.
Step 3: Prepare 1 cup buttermilk.
Step 4: Measure 1–2 tablespoons hot sauce.
Step 5: Prepare 1 teaspoon kosher salt for the marinade.
Step 6: Measure ½ teaspoon black pepper for the marinade.
Step 7: Measure 1½ cups all-purpose flour.
Step 8: Measure ½ cup cornstarch.
Step 9: Measure 1 teaspoon baking powder.
Step 10: Measure 2 teaspoons paprika.
Step 11: Measure 1 teaspoon garlic powder.
Step 12: Measure 1 teaspoon onion powder.
Step 13: Prepare ½ teaspoon optional cayenne pepper.
Step 14: Measure 1 teaspoon salt for the coating.
Step 15: Measure ½ teaspoon black pepper for the coating.
Step 16: Set out the frying oil.
Part B: Preparing the Chicken
Step 17: Place the chicken on a clean cutting board.
Step 18: Check the pieces for any remaining cartilage or tough connective tissue.
Step 19: Trim away any unwanted pieces.
Step 20: If using chicken breasts, cut them into approximately 1-inch-wide strips.
Step 21: Keep the strips similar in thickness.
Step 22: Pat the chicken lightly with paper towels if necessary.
Step 23: Place the prepared chicken in a clean bowl.
Step 24: Wash your hands and sanitize surfaces that contacted raw chicken.
Part C: Preparing the Buttermilk
Step 25: Select a large mixing bowl.
Step 26: Pour in 1 cup buttermilk.
Step 27: If using the substitute, combine milk and lemon juice or vinegar beforehand.
Step 28: Stir the buttermilk gently.
Part D: Adding the Hot Sauce
Step 29: Measure 1–2 tablespoons hot sauce.
Step 30: Add it to the buttermilk.
Step 31: Whisk until combined.
Step 32: Check that the color is evenly distributed.
Part E: Seasoning the Marinade
Step 33: Add 1 teaspoon kosher salt.
Step 34: Add ½ teaspoon black pepper.
Step 35: Whisk thoroughly.
Step 36: Make sure the seasonings are distributed throughout the marinade.
Part F: Adding the Chicken
Step 37: Place the chicken strips into the marinade.
Step 38: Gently turn each piece.
Step 39: Make sure all surfaces are coated.
Step 40: Press the strips beneath the liquid where possible.
Step 41: Cover the bowl.
Part G: Marinating the Chicken
Step 42: Place the covered bowl in the refrigerator.
Step 43: Marinate for at least 30 minutes.
Step 44: For a longer marination, leave it for up to four hours.
Step 45: Keep the chicken refrigerated throughout.
Step 46: Do not leave the bowl at room temperature.
Part H: Preparing the Flour Mixture
Step 47: Select a wide, shallow dish.
Step 48: Add 1½ cups all-purpose flour.
Step 49: Add ½ cup cornstarch.
Step 50: Add 1 teaspoon baking powder.
Step 51: Stir gently.
Part I: Adding the Coating Seasonings
Step 52: Add 2 teaspoons paprika.
Step 53: Add 1 teaspoon garlic powder.
Step 54: Add 1 teaspoon onion powder.
Step 55: Add ½ teaspoon cayenne pepper if using.
Step 56: Add 1 teaspoon salt.
Step 57: Add ½ teaspoon black pepper.
Step 58: Whisk until evenly combined.
Step 59: Break apart any large dry lumps.
Part J: Creating the Flaky Texture
Step 60: Take the marinated chicken from the refrigerator.
Step 61: Uncover the bowl.
Step 62: Measure 2–3 tablespoons of the buttermilk marinade.
Step 63: Drizzle the marinade over the flour mixture.
Step 64: Use clean fingers or a fork to rub the liquid into the flour.
Step 65: Create small irregular clumps.
Step 66: Avoid turning the mixture into a smooth paste.
Step 67: Leave plenty of dry flour between the clumps.
Step 68: Continue until the mixture has a crumbly texture.
Part K: Preparing the Breading Station
Step 69: Place the chicken marinade bowl beside the flour mixture.
Step 70: Position a clean wire rack nearby.
Step 71: Place the rack over a baking sheet.
Step 72: Keep the station organized.
Step 73: Use separate utensils or wash hands appropriately to prevent cross-contamination.
Part L: Coating the First Chicken Strip
Step 74: Lift one chicken strip from the marinade.
Step 75: Hold it above the bowl.
Step 76: Allow excess marinade to drip off.
Step 77: Transfer the chicken to the seasoned flour.
Step 78: Cover the top with flour.
Step 79: Turn the strip over.
Step 80: Press the flour mixture firmly onto the chicken.
Step 81: Coat the sides and edges.
Step 82: Make sure the surface is completely covered.
Step 83: Shake off loose excess flour.
Part M: Double-Dredging the Chicken
Step 84: Return the coated chicken briefly to the buttermilk marinade.
Step 85: Coat it with a thin layer of liquid.
Step 86: Lift it from the marinade.
Step 87: Allow excess liquid to drip away.
Step 88: Place it back into the flour mixture.
Step 89: Press the flour firmly onto the chicken.
Step 90: Encourage the small flour clumps to stick.
Step 91: Turn the strip over.
Step 92: Coat every side.
Step 93: Shake off any loose flour.
Part N: Coating the Remaining Chicken
Step 94: Place the coated strip on the wire rack.
Step 95: Take the next chicken strip.
Step 96: Allow excess marinade to drip off.
Step 97: Coat it in the flour mixture.
Step 98: Dip it back into the marinade.
Step 99: Coat it a second time.
Step 100: Press the flour mixture firmly.
Step 101: Transfer it to the rack.
Step 102: Repeat with the remaining chicken.
Step 103: Arrange the strips in a single layer.
Step 104: Avoid stacking them.
Part O: Resting the Coated Chicken
Step 105: Leave the coated chicken on the rack for approximately 10 minutes.
Step 106: Allow the flour coating to hydrate slightly.
Step 107: Check that the breading remains attached.
Step 108: Keep the chicken refrigerated if the room is warm or the frying setup will take longer.
Step 109: Prepare the frying equipment during this time.
Part P: Preparing the Frying Pot
Step 110: Select a heavy-bottomed pot or deep skillet.
Step 111: Place it on the stovetop.
Step 112: Make sure the pot is completely dry.
Step 113: Choose a pot deep enough to contain the oil safely.
Step 114: Keep the cooking area clear of water and clutter.
Part Q: Adding the Frying Oil
Step 115: Pour vegetable, canola, or peanut oil into the pot.
Step 116: Add enough for approximately 2 inches of depth.
Step 117: Make sure the pot is not filled more than halfway.
Step 118: Leave sufficient space for bubbling when the chicken is added.
Part R: Heating the Oil
Step 119: Turn the heat to medium or medium-high.
Step 120: Place a suitable frying thermometer in the oil.
Step 121: Allow the oil to heat gradually.
Step 122: Watch the temperature rise.
Step 123: Adjust the heat as necessary.
Step 124: Continue heating until the oil reaches approximately 350°F (175°C).
Step 125: Avoid allowing the oil to smoke.
Part S: Preparing the Draining Rack
Step 126: Place a clean wire rack over a rimmed baking sheet.
Step 127: Position it away from the hot oil.
Step 128: Keep kitchen tongs nearby.
Step 129: Prepare a clean plate for serving.
Part T: Adding the First Batch
Step 130: Take one coated chicken strip with tongs.
Step 131: Lower it carefully into the hot oil.
Step 132: Release it gently to avoid splashing.
Step 133: Add a few more strips without overcrowding.
Step 134: Leave enough space between the pieces.
Step 135: Monitor the oil temperature.
Part U: Frying the Chicken
Step 136: Allow the chicken to fry.
Step 137: Watch for bubbling around the coating.
Step 138: Keep the oil near 350°F (175°C).
Step 139: Adjust the burner as needed.
Step 140: Allow the breading to become golden.
Step 141: Turn the strips carefully if necessary.
Step 142: Continue frying for approximately 4–5 minutes for typical tenderloin-sized pieces.
Step 143: Allow additional time if the strips are thicker.
Step 144: Check that the coating is deep golden-orange.
Part V: Checking Doneness
Step 145: Carefully lift one chicken tender from the oil.
Step 146: Insert an instant-read thermometer into its thickest section.
Step 147: Check the internal temperature.
Step 148: Confirm that it reaches at least 165°F (74°C).
Step 149: Return the chicken to the oil if additional cooking is needed.
Step 150: Repeat the temperature check as necessary.
Part W: Removing the First Batch
Step 151: Use tongs to lift the cooked tenders from the oil.
Step 152: Hold them briefly above the pot.
Step 153: Allow excess oil to drip away.
Step 154: Transfer them to the clean wire rack.
Step 155: Arrange them in a single layer.
Step 156: Avoid stacking the hot tenders.
Part X: Frying the Remaining Chicken
Step 157: Allow the oil to return to approximately 350°F (175°C).
Step 158: Add the next batch.
Step 159: Fry until deeply golden.
Step 160: Check that the chicken reaches 165°F (74°C).
Step 161: Remove the cooked strips.
Step 162: Transfer them to the wire rack.
Step 163: Repeat until all chicken is cooked.
Part Y: Draining the Chicken
Step 164: Leave the fried chicken on the wire rack.
Step 165: Allow excess oil to drip onto the baking sheet.
Step 166: Keep space between the strips.
Step 167: Avoid covering them tightly while hot.
Step 168: Allow steam to escape so the coating stays crisp.
Part Z: Checking the Crust
Step 169: Examine the fried chicken.
Step 170: Look for a deep golden-orange color.
Step 171: Check that the coating has an irregular, flaky surface.
Step 172: Confirm that the crust is crisp.
Step 173: Allow the chicken to cool slightly before serving.
Part AA: Preparing the Serving Plate
Step 174: Select a large serving plate or platter.
Step 175: Arrange the cooked chicken tenders neatly.
Step 176: Avoid stacking too many pieces.
Step 177: Leave room for dipping sauces.
Part AB: Adding Optional Garnishes
Step 178: Prepare chopped parsley if desired.
Step 179: Sprinkle lightly over the chicken.
Step 180: Add lemon wedges if preferred.
Step 181: Arrange dipping sauces beside the tenders.
Part AC: Serving the Chicken
Step 182: Serve the chicken while warm.
Step 183: Pair with fries, coleslaw, or a fresh salad.
Step 184: Offer dipping sauces on the side.
Step 185: Enjoy the crispy exterior and juicy chicken.
7. Description
Extra-Crispy Fried Chicken Tenders are golden-orange strips of chicken covered in a thick, irregular, crunchy coating.
Appearance
The chicken has a deep golden-orange color from the paprika and frying process.
The coating is uneven and craggy, with small crispy flakes covering the surface.
The interior is white and juicy when fully cooked.
Texture
The exterior is exceptionally crunchy.
The small flour clumps create delicate, crispy ridges.
The chicken inside is tender and moist.
Flavor
The buttermilk marinade adds subtle tanginess.
Hot sauce contributes a mild spicy note.
Paprika provides warmth and color.
Garlic and onion powder add savory depth.
Black pepper and optional cayenne enhance the seasoning.
Aroma
The finished tenders have a warm aroma of fried chicken, paprika, garlic, and toasted flour.
Overall Experience
Each bite begins with a loud, satisfying crunch followed by juicy, tender chicken.
The combination of seasoned coating and flavorful meat creates a restaurant-style fried chicken experience.
8. Nutritional Information
Approximate nutritional values per serving, assuming the recipe makes five servings:
| Nutrient | Estimated Amount |
|---|---|
| Calories | 350–550 kcal |
| Protein | 30–40 g |
| Carbohydrates | 25–40 g |
| Total Fat | 12–28 g |
| Saturated Fat | 2–6 g |
| Dietary Fiber | 1–2 g |
| Sugar | 1–3 g |
| Sodium | Variable |
| Iron | Present |
| Vitamin B6 | Present |
| Vitamin B12 | Present |
| Selenium | Present |
These values are estimates. Actual nutrition depends heavily on how much coating adheres to the chicken, the amount of oil absorbed during frying, the chicken portion size, and the dipping sauces served.
9. Recipe Details
| Category | Details |
|---|---|
| Recipe Name | Extra-Crispy Fried Chicken Tenders |
| Cuisine | Southern American-Inspired |
| Course | Main Course, Appetizer |
| Preparation Time | Approximately 20–25 Minutes |
| Marinating Time | 30 Minutes to 4 Hours |
| Coating Rest Time | 10 Minutes |
| Frying Time | Approximately 4–5 Minutes Per Batch |
| Total Time | Approximately 1–1½ Hours with Minimum Marination, Depending on Batch Count |
| Yield | Approximately 1½ lbs Chicken Before Coating |
| Servings | 4–6 |
| Difficulty | Moderate |
| Main Ingredient | Chicken Tenderloins |
| Marinade | Buttermilk and Hot Sauce |
| Coating | Flour, Cornstarch, Baking Powder |
| Main Seasonings | Paprika, Garlic Powder, Onion Powder |
| Cooking Method | Deep Frying |
| Oil Temperature | 350°F (175°C) |
| Safe Internal Temperature | 165°F (74°C) |
| Texture | Extra-Crispy Exterior, Juicy Interior |
| Flavor Profile | Savory, Tangy, Mildly Spicy |
| Best Served | Hot |
| Best For | Family Dinners, Parties, Casual Meals |
| Storage | Refrigerated |
| Potential Allergens | Wheat, Milk; Peanuts if Peanut Oil Is Used |
10. Conclusion
Extra-Crispy Fried Chicken Tenders are a flavorful homemade alternative to restaurant-style fried chicken.
The recipe begins by marinating chicken strips in buttermilk, hot sauce, salt, and black pepper.
The chicken is then coated in a seasoned mixture of flour, cornstarch, baking powder, paprika, garlic powder, onion powder, and additional spices.
Adding a few tablespoons of marinade to the flour mixture creates small clumps that produce a distinctive flaky crust.
Double-dredging creates an even thicker coating.
After resting briefly, the chicken is fried in hot oil until golden-orange and cooked through.
Draining the finished tenders on a wire rack helps preserve their crispy texture.
The result is juicy chicken surrounded by a crunchy, flavorful coating.
These chicken tenders can be served with fries, salads, vegetables, or homemade dipping sauces.
Whether prepared for a family dinner, weekend gathering, or casual meal, this recipe delivers the satisfying texture and flavor of classic restaurant-style fried chicken.
11. Serving and Storage Recommendations
Serve Hot: Fried chicken tenders are crispiest shortly after cooking.
French Fries: Pair with crispy French fries.
Potato Wedges: Serve with seasoned roasted potato wedges.
Coleslaw: Add creamy coleslaw for contrast.
Fresh Salad: Serve with a green salad.
Corn on the Cob: Pair with buttered corn.
Mashed Potatoes: Serve alongside mashed potatoes.
Macaroni and Cheese: Pair with creamy macaroni and cheese.
Honey Mustard: Serve with homemade honey mustard sauce.
Garlic Mayonnaise: Offer garlic mayonnaise for dipping.
Barbecue Sauce: Serve with halal-compatible barbecue sauce.
Hot Sauce: Add hot sauce for extra heat.
Lemon Wedges: Serve with lemon wedges.
Refrigeration: Allow the chicken to cool briefly and refrigerate promptly in airtight containers.
Storage Duration: Consume refrigerated leftovers within approximately 3–4 days.
Freezing: Freeze cooked chicken tenders in freezer-safe containers or bags for approximately 2–3 months for best quality.
Thawing: Thaw frozen chicken in the refrigerator.
Oven Reheating: Reheat on a wire rack in the oven until the center reaches 165°F (74°C).
Air-Fryer Reheating: Reheat in an air fryer to help restore crispness.
Microwave: Microwaving is possible but usually softens the coating.
Food Safety: Refrigerate cooked chicken within two hours, or within one hour if the surrounding temperature exceeds 90°F (32°C).
12. Embracing Healthful Indulgence
Extra-Crispy Fried Chicken Tenders combine protein-rich chicken with a flavorful, crunchy coating.
They can be enjoyed as part of a varied eating pattern.
Chicken Breast
Chicken breast provides high-quality protein.
Protein supports normal muscle maintenance and tissue repair.
Buttermilk
Buttermilk adds moisture and flavor to the marinade.
It also contributes small amounts of protein and calcium.
Flour
All-purpose flour forms the main structure of the crispy coating.
Cornstarch
Cornstarch helps produce a light, crunchy texture.
Baking Powder
Baking powder contributes to the airy texture of the crust.
Paprika
Paprika adds color and mild flavor.
Garlic Powder
Garlic powder provides savory seasoning.
Onion Powder
Onion powder enhances the flavor of the coating.
Cayenne Pepper
Cayenne pepper adds heat when included.
Frying Oil
Frying oil transfers heat efficiently and creates the crisp exterior.
The amount absorbed varies depending on cooking temperature, coating thickness, and frying time.
Protein Content
Chicken contributes substantial protein to the meal.
Portion Awareness
Serving sizes can be adjusted according to appetite and the accompanying side dishes.
Balanced Meal Pairing
Serving chicken tenders with vegetables, salad, or fruit can add variety to the meal.
Homemade Preparation
Preparing fried chicken at home allows control over the chicken quality, seasonings, oil, and portion size.
Enjoying Comfort Food
Fried chicken can be enjoyed occasionally as part of a balanced diet.
Extra-Crispy Fried Chicken Tenders demonstrate how careful marination, seasoned breading, and controlled frying can transform simple chicken strips into a delicious homemade meal.
With their flaky golden-orange crust, juicy interior, and savory seasoning, these chicken tenders are an excellent choice for a satisfying family dinner or special homemade treat.