
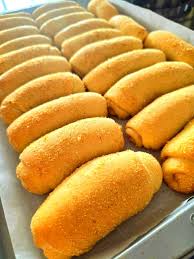
Soft, fluffy Filipino bakery-style bread rolls filled with a rich brown sugar and butter paste, coated in delicate breadcrumbs, and baked until lightly golden.
Filipino Bakery Classic
Soft & Fluffy
Makes 16 Rolls
If you’ve ever visited a traditional Filipino bakery, you may be familiar with the irresistible aroma of freshly baked Filipino Spanish Bread.
Also known as Señorita Bread or Pan de Kastila, these sweet rolls feature a soft, pillowy dough wrapped around a rich, buttery brown sugar filling.
Each roll is coated in fine breadcrumbs before baking, creating a lightly textured exterior that contrasts beautifully with the tender bread inside.
The filling becomes warm, soft, and slightly caramelized as the rolls bake. Occasionally, a little of the buttery sugar mixture escapes onto the baking sheet, creating delicious golden caramelized edges.
Whether served for breakfast, as an afternoon snack, or alongside a warm cup of coffee, Filipino Spanish Bread is a comforting homemade treat worth making.
1. Introduction
Filipino Spanish Bread is one of the most recognizable sweet breads found in traditional Filipino bakeries, commonly called panaderias.
Despite its name, this bread is a distinctly Filipino bakery favorite.
It is made from a lightly sweetened yeast dough enriched with milk, butter, and egg.
The dough is rolled into individual portions, filled with a buttery brown sugar paste, and coated in breadcrumbs.
After rising and baking, the rolls become soft and fluffy with a sweet, slightly caramelized filling.
What makes this recipe particularly special is the contrast between three elements:
- Soft bread: Tender, lightly sweetened dough.
- Buttery filling: A rich mixture of brown sugar, butter, and breadcrumbs.
- Delicate coating: Fine breadcrumbs that create a lightly textured exterior.
The recipe produces approximately 16 rolls, making it ideal for families, gatherings, or preparing several days of homemade snacks.
2. Origin and Cultural Significance
Filipino Spanish Bread has become an important part of everyday bakery culture in the Philippines.
Although the name suggests a connection to Spain, the familiar sweet, breadcrumb-coated roll is a Filipino specialty.
It is commonly sold in neighborhood bakeries alongside other popular breads such as pandesal.
Spanish Bread is especially associated with merienda, the Filipino tradition of enjoying a light meal or snack between main meals.
These rolls are often eaten in the afternoon with coffee, tea, or another warm beverage.
The combination of soft bread and sweet butter filling makes them particularly comforting.
According to King Arthur Baking’s Señorita Bread recipe, the bread is a cherished Filipino snack, with individual bakeries developing their own versions of the filling and preparation. King Arthur Baking
Today, Filipino Spanish Bread is enjoyed both in the Philippines and in Filipino communities around the world.
3. Ingredients
For the Soft Bread Dough
| Ingredient | Quantity |
|---|---|
| All-purpose flour or bread flour | 3 cups (approximately 360–390 g) |
| Warm milk | ¾–1 cup (180–240 ml) |
| Instant dry yeast | 2 teaspoons |
| Granulated white sugar | ¼ cup (50 g) |
| Unsalted butter, melted | 3 tablespoons (42 g) |
| Large egg | 1 |
| Salt | 1 teaspoon |
For the Brown Sugar Butter Filling
| Ingredient | Quantity |
|---|---|
| Unsalted butter | ¼ cup (57 g) |
| Packed brown sugar | ½ cup (100 g) |
| Fine breadcrumbs | ½ cup |
| All-purpose flour | 2 teaspoons |
| Milk or water | 2–3 tablespoons |
| Salt | ⅛ teaspoon |
| Extra melted butter | For brushing |
For the Breadcrumb Coating
| Ingredient | Quantity |
|---|---|
| Fine breadcrumbs | ½–1 cup |
| Milk or water | 2 tablespoons |
Why These Ingredients Matter
Flour
All-purpose flour creates a soft and tender roll, while bread flour provides additional structure and elasticity.
Milk
Milk helps enrich the dough and contributes to its soft texture.
Yeast
Instant dry yeast allows the dough to rise and become light and fluffy.
Butter
Butter adds richness to both the dough and the filling.
Brown Sugar
Brown sugar gives the filling its warm caramel-like flavor.
Breadcrumbs
Breadcrumbs are essential to the recipe. They provide texture in the filling and create the signature coating on the outside.
4. Optional Additions
Filipino Spanish Bread can be customized with several delicious variations.
Extra Buttery Spanish Bread
Brush the inside of each flattened dough portion with slightly more melted butter before adding the filling.
This produces an especially rich result.
Ube Spanish Bread
Add a small spoonful of thick ube halaya to the filling.
The purple yam flavor creates a sweet Filipino-inspired variation.
Cheese-Filled Spanish Bread
Place a small piece of mild cheese inside each roll before sealing.
The combination of sweet brown sugar and creamy cheese creates a delicious sweet-and-savory filling.
Milk Powder Filling
Add 1–2 tablespoons of milk powder to the brown sugar mixture.
This gives the filling a richer, milkier taste.
Cinnamon Brown Sugar Filling
Mix ¼ teaspoon of ground cinnamon into the filling.
The cinnamon adds warmth and complements the caramel-like sweetness.
Chocolate Spanish Bread
Replace a portion of the brown sugar filling with a small amount of thick chocolate hazelnut spread.
Be careful not to overfill the rolls.
5. Tips for Success
Use lukewarm milk.
The milk should feel comfortably warm, around 105–110°F (40–43°C). Very hot milk can damage the yeast.
Add the milk gradually.
Different brands of flour absorb moisture differently.
Start with ¾ cup and add more only if the dough feels too dry.
Knead until smooth and elastic.
Proper kneading develops the dough’s structure, helping the rolls rise evenly.
Allow enough time for rising.
The dough should noticeably increase in volume during the first rise.
Cool the filling before spreading.
Hot filling can soften the dough too much and make shaping difficult.
Avoid overfilling.
Too much brown sugar filling can cause the rolls to split or leak excessively during baking.
Seal the seams carefully.
Pinching the edges helps hold the filling inside.
Use fine breadcrumbs.
Fine breadcrumbs create a more traditional, evenly coated appearance.
Avoid overbaking.
The rolls should remain soft with lightly golden tops.
6. Step-by-Step Instructions
Step 1: Prepare the Dry Ingredients
In a large mixing bowl, combine:
- 3 cups flour
- ¼ cup granulated sugar
- 2 teaspoons instant yeast
- 1 teaspoon salt
Whisk until evenly distributed.
Step 2: Add the Wet Ingredients
Pour in:
- ¾ cup lukewarm milk
- 3 tablespoons melted butter
- 1 beaten egg
Mix until a soft, shaggy dough forms.
If the mixture feels too dry, gradually add more milk, a tablespoon at a time.
The dough should feel soft and slightly tacky but manageable.
Step 3: Knead the Dough
Transfer the dough to a lightly oiled work surface.
Knead by hand for approximately 8–12 minutes.
Alternatively, use a stand mixer fitted with a dough hook for approximately 5–8 minutes.
The dough should become:
- Smooth
- Elastic
- Soft
- Slightly springy
When gently pressed, it should gradually spring back.
Step 4: Allow the First Rise
Shape the kneaded dough into a smooth ball.
Place it in a lightly greased bowl.
Cover with plastic wrap or a clean kitchen towel.
Let it rise in a warm, draft-free location for approximately 60–90 minutes, or until doubled in size.
The exact rising time depends on the room temperature.
Step 5: Prepare the Brown Sugar Filling
While the dough rises, melt ¼ cup butter in a small saucepan over medium-low heat.
Add:
- ½ cup brown sugar
- ½ cup fine breadcrumbs
- 2 teaspoons flour
- 2–3 tablespoons milk or water
- ⅛ teaspoon salt
Stir continuously.
Cook for approximately 1–3 minutes until the mixture becomes thick and spreadable.
The filling should resemble a soft brown sugar paste rather than a runny syrup.
If it becomes too thick, add another teaspoon of milk.
Remove from the heat and allow it to cool.
Cooking the filling before assembly helps create a moist paste and can reduce excessive leakage during baking, a method also used by Foxy Folksy. Foxy Folksy
Step 6: Divide the Dough
Once the dough has doubled in size, gently press it down to release excess air.
Transfer it to a lightly floured work surface.
Divide into 16 approximately equal portions.
Shape each piece into a smooth ball.
Cover the dough balls and allow them to rest for 5–10 minutes.
This helps relax the dough and makes rolling easier.
Step 7: Flatten Each Portion
Using a rolling pin, flatten one dough ball into a long oval or triangular shape.
The wider end should be suitable for starting the roll.
Keep the dough relatively thin but avoid tearing it.
Step 8: Add the Filling
Lightly brush the flattened dough with melted butter.
Spread approximately 1 tablespoon of the cooled brown sugar filling over the center.
Leave a small border around the edges.
Avoid spreading the filling all the way to the ends because it may escape during baking.
Step 9: Roll and Seal
Starting from the wider end, roll the dough toward the narrower tip.
Roll gently but firmly to create a compact shape.
Pinch the seam and ends to help seal the filling inside.
Repeat with the remaining dough portions.
Step 10: Coat with Breadcrumbs
Place ½–1 cup fine breadcrumbs in a shallow bowl or plate.
Brush each shaped roll lightly with milk or water.
Roll it through the breadcrumbs until evenly coated.
Shake off any excess.
Step 11: Arrange on the Baking Sheet
Line a large baking sheet with parchment paper.
Arrange the rolls seam-side down.
Leave approximately 1–2 inches between them so they have enough room to rise.
Step 12: Allow the Second Rise
Cover the shaped rolls loosely with a clean kitchen towel.
Let them rise for approximately 30–45 minutes until visibly puffy.
Avoid overproofing, which can cause the rolls to collapse or lose their shape.
Step 13: Preheat and Bake
Preheat the oven to 325°F (165°C).
Bake the rolls on the middle rack for approximately 18–25 minutes, or until lightly golden and cooked through.
For a more lightly colored, traditional-style roll, 300°F (150°C) can also be used, but baking may take longer.
Some established recipes bake at 300°F, while others use 350°F (175°C), so the correct time depends on roll size and oven temperature. Foxy FolksyKing Arthur Baking
The dough should be fully baked while remaining soft.
If checking with a food thermometer, aim for approximately 190°F (88°C) in the bread portion, avoiding the hot filling.
Step 14: Cool Slightly
Remove the baking sheet from the oven.
Allow the rolls to rest for 5–10 minutes.
The filling will be extremely hot immediately after baking.
A small amount of caramelized filling around the edges is normal.
Step 15: Serve Warm
Transfer the rolls to a serving basket or plate.
Serve warm to enjoy the soft bread and buttery brown sugar filling.
7. Description
Freshly baked Filipino Spanish Bread has a soft golden appearance with a fine breadcrumb coating.
The rolls are slightly elongated, with rounded ends and a gently textured exterior.
When broken open, the bread reveals a soft, fluffy interior surrounding a rich brown sugar filling.
The filling is thick, buttery, and slightly caramelized.
Flavor Profile
- Sweet: From the brown sugar filling.
- Buttery: From the enriched dough and filling.
- Caramel-like: From the cooked brown sugar.
- Mildly rich: From milk and egg.
- Lightly toasted: From the breadcrumb coating.
Texture
The exterior has a delicate breadcrumb coating.
The bread itself is tender and airy.
Inside, the filling creates a rich, slightly sticky contrast.
For the best eating experience, enjoy the rolls while warm.
8. Nutritional Information
The following values are approximate and based on one roll from a batch of 16.
| Nutrient | Approximate Amount |
|---|---|
| Calories | 190–230 kcal |
| Protein | 4–5 g |
| Carbohydrates | 30–36 g |
| Total fat | 6–8 g |
| Dietary fiber | 1–2 g |
| Total sugars | 10–14 g |
| Sodium | 150–240 mg |
Actual values depend on the flour, milk, butter, breadcrumb quantity, and amount of filling used.
Smaller rolls will contain fewer calories, while larger portions with additional filling will contain more.
9. Recipe Details
| Detail | Information |
|---|---|
| Recipe Name | Filipino Spanish Bread |
| Alternative Names | Señorita Bread, Pan de Kastila |
| Cuisine | Filipino |
| Course | Breakfast / Snack / Dessert |
| Preparation Time | 35–45 minutes |
| First Rise | 60–90 minutes |
| Second Rise | 30–45 minutes |
| Baking Time | 18–25 minutes |
| Total Time | Approximately 2½–3½ hours |
| Yield | 15–16 rolls |
| Difficulty | Intermediate |
| Cooking Method | Oven-Baked |
| Main Ingredients | Flour, Milk, Butter, Brown Sugar |
| Best Served | Warm |
10. Conclusion
Filipino Spanish Bread is a delicious example of how simple bakery ingredients can create something truly comforting.
The soft, enriched dough provides the perfect foundation for the sweet, buttery brown sugar filling.
The fine breadcrumb coating adds a distinctive texture that makes these rolls instantly recognizable.
Although the recipe requires time for kneading and proofing, the individual steps are straightforward.
With proper dough preparation, a thick filling, and gentle baking, you can recreate the familiar taste and texture of traditional Filipino bakery Spanish Bread at home.
Whether enjoyed for breakfast, merienda, or dessert, these warm sweet rolls are a wonderful homemade treat.
11. Serving and Storage Recommendations
Best Ways to Serve
1. With Hot Coffee
Filipino Spanish Bread pairs beautifully with freshly brewed coffee.
The slightly bitter flavor of coffee balances the sweet filling.
2. With Tea
Serve alongside black tea, milk tea, or another warm beverage.
3. With Hot Chocolate
A cup of hot chocolate creates an especially comforting sweet snack.
4. For Breakfast
Serve warm rolls with fresh fruit and your favorite morning drink.
5. As an Afternoon Snack
Enjoy one or two rolls as a traditional merienda-style treat.
Storage Instructions
Room Temperature: Allow the rolls to cool completely before placing them in an airtight container.
Store in a cool, dry location for up to 2–3 days.
Refrigerator: Refrigeration is possible, but it can make the bread firmer and less fluffy.
Freezer: Wrap individual rolls tightly and freeze for up to 2 months for best quality.
Reheating Instructions
Oven: Warm at 300°F (150°C) for approximately 5–8 minutes.
Microwave: Heat an individual roll for approximately 10–15 seconds, checking carefully because the filling can become very hot.
Air Fryer: Warm at a low temperature for a few minutes until heated through.
Avoid overheating, which can dry out the bread.
Make-Ahead Tips
The filling can be prepared in advance and refrigerated in an airtight container.
Allow it to soften slightly before spreading.
The dough can also be refrigerated after the first rise, then shaped and proofed before baking.
12. Embracing Healthful Indulgence
Filipino Spanish Bread is a sweet bakery treat made with flour, milk, butter, sugar, and breadcrumbs.
Its soft texture and caramel-like filling make it particularly satisfying.
Although the recipe contains added sugar and butter, homemade preparation gives you control over ingredient quality and portion sizes.
For a lighter variation:
- Reduce the amount of filling slightly.
- Make smaller rolls.
- Use lower-fat milk.
- Serve with fresh fruit.
- Enjoy one roll as part of a balanced snack.
You can also experiment with a portion of whole-wheat flour, although this may create a denser texture.
The key to enjoying homemade sweet bread is finding a balance between delicious flavor and satisfying portions.
With its soft, golden dough, rich buttery filling, and delicate breadcrumb coating, Filipino Spanish Bread remains a beloved bakery classic that brings warmth and sweetness to every bite.
#FilipinoSpanishBread #SenoritaBread #FilipinoBaking #SweetBreadRecipe #HomemadeBread