
Introduction
Celebrate the cozy flavors and beautiful colors of autumn with this stunning Pumpkin-Shaped Sourdough Bread with Cinnamon Swirl. Combining the naturally tangy character of homemade sourdough, the earthy sweetness of real pumpkin puree, and a fragrant cinnamon-sugar ribbon, this artisan loaf is as delicious as it is beautiful.
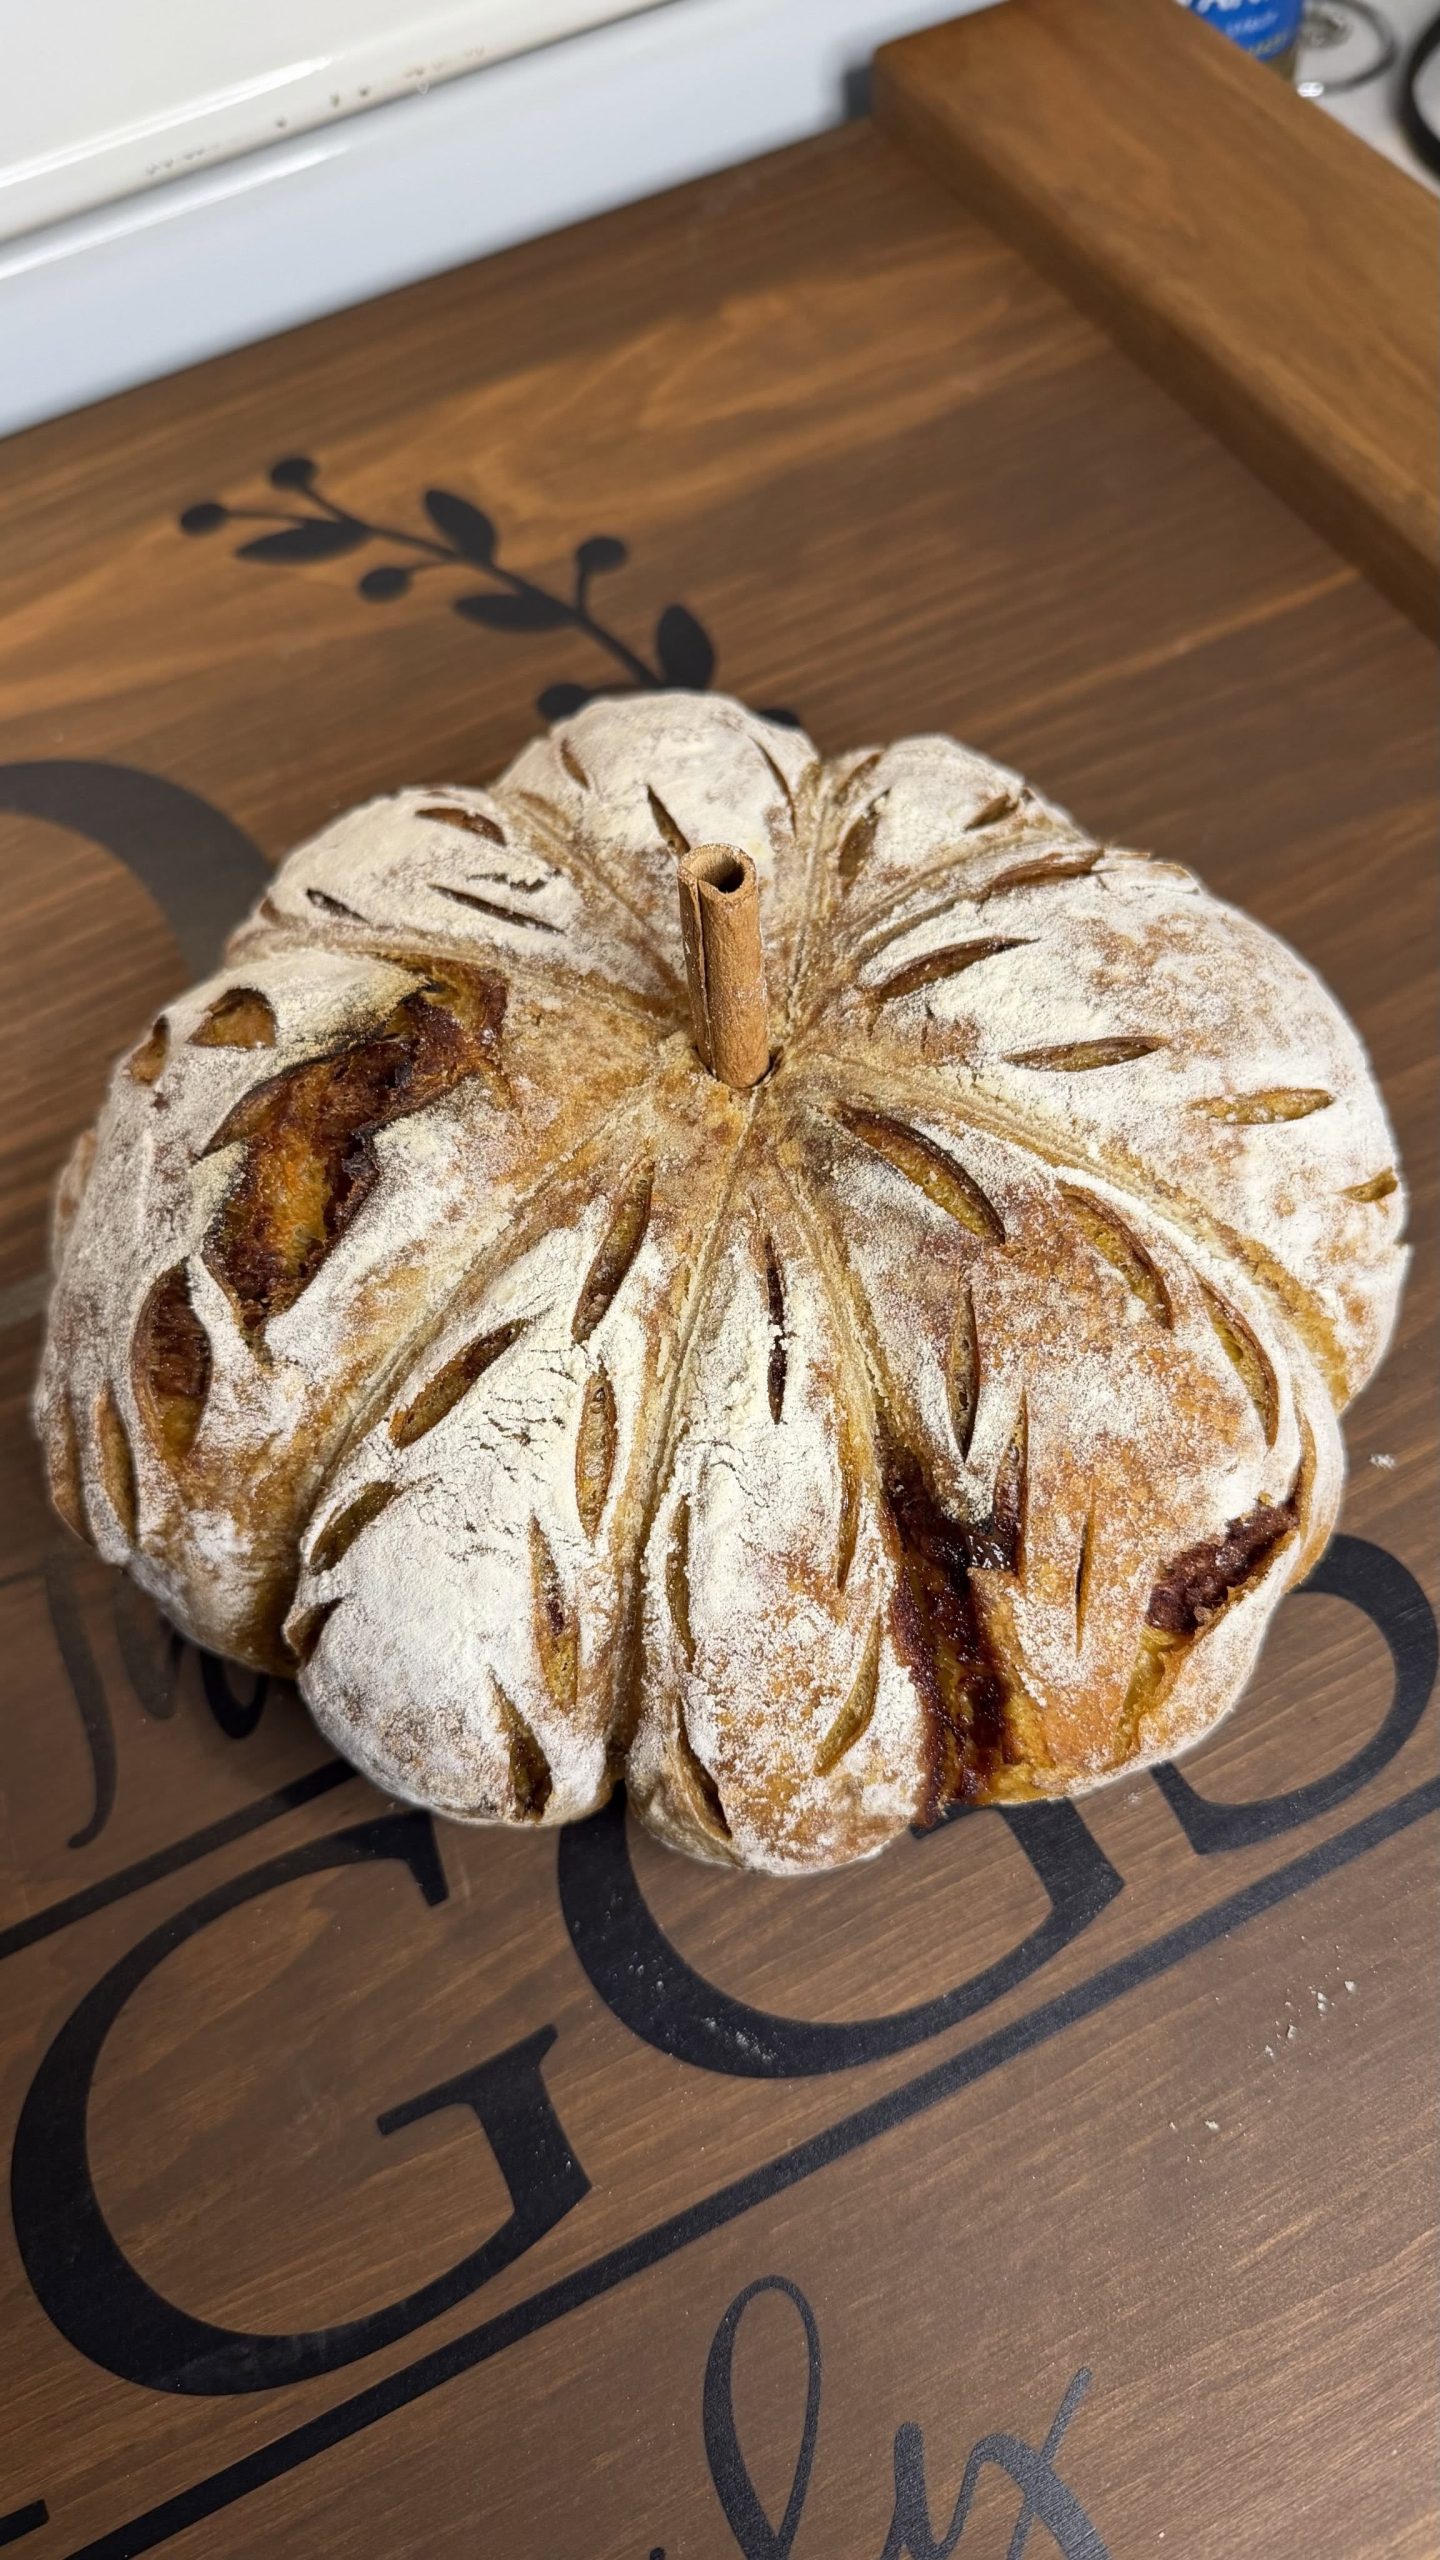
The exterior features a golden, rustic crust divided into rounded pumpkin-like sections, decorated with delicate leaf-inspired scoring and finished with a cinnamon stick stem. Inside, the bread reveals a soft, warmly colored crumb with sweet cinnamon swirls running through every slice.
Unlike ordinary pumpkin bread, which is typically a sweet quick bread made with baking powder or baking soda, this recipe uses an active sourdough starter to develop flavor, structure, and natural fermentation. The result is a rustic yeast-fermented loaf with a distinctive tang, gentle pumpkin sweetness, and an inviting homemade aroma.
Pumpkin puree adds moisture and color to the dough, while honey or maple syrup introduces subtle sweetness. Pumpkin pie spice contributes comforting notes of cinnamon, ginger, nutmeg, and cloves, making the loaf particularly appealing during the cooler months.
Although the decorative pumpkin shape may look complicated, it can be created using a simple arrangement of food-safe cotton baker’s twine. As the bread expands during baking, the loosely tied strings encourage the dough to rise into rounded sections resembling a real pumpkin.
Whether prepared for a fall breakfast, Thanksgiving gathering, seasonal brunch, or homemade edible gift, this beautiful sourdough bread brings warmth, creativity, and artisan baking charm to the table.
Origin and Cultural Significance
Sourdough bread is one of the oldest forms of naturally fermented bread, with a history extending back thousands of years. Before commercial baker’s yeast became widely available, bread makers relied on naturally occurring yeasts and bacteria to ferment dough and produce flavorful loaves.
Sourdough traditions developed in many regions of the world, with variations influenced by local grains, climates, and baking techniques. Today, sourdough remains popular among artisan bakers because of its complex flavor, characteristic crust, and traditional fermentation process.
Pumpkin, meanwhile, has a long agricultural and culinary history in the Americas. Indigenous peoples cultivated pumpkins and other squash varieties long before European colonization, using them in a variety of preparations.
Over time, pumpkin became closely associated with autumn cooking in North America, especially in dishes served during harvest celebrations and Thanksgiving.
Pumpkin breads are particularly popular during the fall season, often flavored with warming spices such as cinnamon, ginger, nutmeg, and cloves.
The pumpkin-shaped sourdough loaf represents a modern combination of traditional bread-making techniques and decorative seasonal baking.
By incorporating pumpkin puree into naturally fermented dough, bakers create a loaf with a distinctive golden-orange color and gentle sweetness.
The cinnamon-sugar swirl adds another familiar autumn flavor, while the decorative scoring and twine shaping transform the bread into an edible centerpiece.
The finished loaf celebrates both the heritage of sourdough baking and the creativity of contemporary home bakers.
Ingredients
For the Pumpkin Sourdough Dough
- 100 g active sourdough starter, recently fed, bubbly, and ready to use
- 230 g lukewarm water, approximately 75–85°F (24–29°C)
- 200 g pure pumpkin puree, canned or homemade
- 40 g honey or pure maple syrup
- 510 g bread flour
- 10–12 g fine sea salt
- 2 teaspoons pumpkin pie spice
Note: Use plain, unsweetened pumpkin puree rather than pumpkin pie filling. The recipe assumes a sourdough starter maintained at 100% hydration, meaning equal weights of flour and water. Pumpkin puree varies in moisture content, so the dough may require small adjustments.
For the Cinnamon-Sugar Swirl
- 85 g packed light or dark brown sugar
- 2 teaspoons ground cinnamon
- 10 g all-purpose flour
For the Pumpkin Shaping and Decoration
- 4 pieces of food-grade, oven-safe, 100% cotton baker’s twine, approximately 24–30 inches long each
- 1–2 tablespoons neutral cooking oil or melted coconut oil, for coating the twine
- 1–2 tablespoons rice flour or all-purpose flour, for dusting
- 1 whole cinnamon stick, for the decorative pumpkin stem
- Parchment paper rated for the intended baking temperature
Note: Use only plain, uncoated, oven-safe cotton twine without synthetic fibers, dyes, or decorative coatings. Check the manufacturer’s temperature guidance. The cinnamon stick is a decorative stem and should be removed before slicing or eating.
Optional Additions
- Extra cinnamon: Add another ½ teaspoon to the cinnamon-sugar filling for a more pronounced cinnamon flavor.
- Ground nutmeg: Incorporate a small pinch into the dough for additional warmth.
- Ground ginger: Add ¼ teaspoon to emphasize the autumn spice blend.
- Vanilla extract: Mix 1 teaspoon into the dough liquids for a softer, bakery-style aroma.
- Orange zest: Add 1 teaspoon of finely grated orange zest for a fresh citrus note.
- Chopped pecans: Sprinkle 2–3 tablespoons of finely chopped pecans over the cinnamon filling for extra crunch.
- Chopped walnuts: Use a small amount in the filling for an earthy, nutty flavor.
- Maple glaze: Drizzle cooled slices with a simple maple-powdered sugar glaze for a sweeter breakfast presentation.
- Pumpkin seeds: Sprinkle a few seeds over selected sections before baking for additional texture.
- Brown butter: Brush a small amount over the finished loaf for a richer, nutty aroma.
- Cream cheese spread: Serve slices with lightly sweetened cream cheese.
- Honey butter: Pair warm slices with softened butter mixed with honey and cinnamon.
These optional additions allow you to customize the loaf while preserving its distinctive pumpkin shape and cinnamon-swirled interior.
Tips for Success
- Use an active sourdough starter: The starter should be bubbly, expanded, and capable of reliably raising dough. A weak starter can result in a dense loaf.
- Measure ingredients by weight: Using a digital kitchen scale improves accuracy, especially when working with sourdough hydration and pumpkin puree.
- Choose pure pumpkin puree: Avoid pumpkin pie filling because it contains added sugar and spices that can alter the dough’s balance.
- Adjust for pumpkin moisture: Homemade pumpkin puree can contain more water than canned puree. Drain watery puree before using it.
- Keep the dough moderately warm during fermentation: A dough temperature around 75–78°F (24–26°C) generally encourages steady fermentation, although actual timing depends on starter activity.
- Do not rely only on the clock: Bulk fermentation may take longer or shorter than the suggested range. Watch for dough expansion, bubbles, and a slightly domed surface.
- Handle the dough gently: Pumpkin sourdough may feel softer and stickier than ordinary white sourdough. Avoid adding excessive flour.
- Use stretch-and-fold techniques: Gentle folding develops dough strength without requiring intensive kneading.
- Avoid excessive cinnamon filling: Too much sugar can create sticky gaps and encourage the loaf to separate along the swirl.
- Keep the cinnamon mixture away from the outer edges: Leaving a clean border helps the dough seal and reduces leaking during baking.
- Shape with sufficient surface tension: A well-shaped boule holds its form more effectively during proofing and baking.
- Use a well-floured proofing basket: Rice flour is particularly useful for reducing sticking.
- Chill the dough before scoring: Cold dough is firmer and easier to score into decorative patterns.
- Tie the twine loosely: The strings should guide the loaf into pumpkin-like sections without cutting deeply into the dough as it expands.
- Use a sharp scoring blade: A bread lame or clean razor blade creates more precise decorative cuts than a dull knife.
- Avoid cutting too deeply into the cinnamon filling: Shallow decorative scoring reduces the chance of sugar leaking onto the crust.
- Handle the Dutch oven carefully: Preheated cast iron becomes extremely hot. Use suitable oven mitts and a stable, heat-resistant surface.
- Check parchment temperature limits: Some parchment products are not rated for 450°F (232°C). Use a suitable product and keep excess parchment away from oven heating elements.
- Monitor crust color: The honey, pumpkin, and brown sugar can encourage browning. Reduce the heat as directed if the crust darkens too quickly.
- Cool completely before slicing: Allowing the bread to cool for at least 2 hours helps the crumb set and reduces gumminess around the cinnamon swirl.
Instructions
Step 1: Prepare the Active Sourdough Starter
Begin with a healthy sourdough starter that has been fed recently and is visibly active.
The starter should appear bubbly and expanded, with a pleasantly tangy aroma.
For a starter maintained at 100% hydration, feed it with equal weights of flour and water according to your usual feeding routine.
Allow it to ferment until it reaches or approaches its peak activity.
Measure 100 g of active starter for the recipe.
A strong starter is especially important because pumpkin puree, honey, and spices create a dough that may ferment differently from a simple flour-and-water sourdough.
Step 2: Combine the Wet Ingredients
In a large mixing bowl, add the active sourdough starter and lukewarm water.
Whisk gently until the starter is mostly dispersed.
Add the pumpkin puree and honey or maple syrup.
Continue whisking until the ingredients form a smooth, evenly colored mixture.
The liquid should have a warm orange appearance from the pumpkin.
Make sure the water is not excessively hot, as high temperatures can damage the microorganisms responsible for fermentation.
Step 3: Add the Flour and Spices
Add the bread flour, fine sea salt, and pumpkin pie spice to the wet ingredients.
Using a dough whisk, sturdy spoon, or clean hands, mix until all the flour is hydrated.
Continue until a shaggy, cohesive dough forms with no visible dry flour pockets.
The dough may feel slightly sticky because of the pumpkin puree and honey.
Avoid adding large amounts of extra flour at this stage.
Cover the bowl with a lid, reusable cover, or plastic wrap.
Allow the dough to rest for approximately 30 minutes.
This resting period allows the flour to absorb moisture and begins gluten development. Because the starter and salt are already incorporated, this is more accurately described as a dough rest or fermentolyse rather than a traditional flour-and-water autolyse.
Step 4: Perform the First Stretch and Fold
After the resting period, uncover the dough.
Lightly wet your hands to reduce sticking.
Grasp one edge of the dough, stretch it upward gently until you feel resistance, and fold it over the center.
Rotate the bowl approximately 90 degrees and repeat.
Continue until all four sides have been stretched and folded.
The dough should begin feeling smoother and slightly stronger.
Cover the bowl and allow it to rest for approximately 30 minutes.
Step 5: Continue the Stretch-and-Fold Process
Repeat the stretch-and-fold technique approximately 3–4 times over the next 2 hours.
Space the folding sessions about 30 minutes apart.
During each session, handle the dough gently and avoid tearing the developing gluten structure.
As the folds progress, the dough should become more elastic and better able to hold its shape.
If the dough already feels strong and resistant to stretching, avoid forcing additional folds.
After the final session, cover the bowl and leave the dough undisturbed to continue fermenting.
Step 6: Complete the Bulk Fermentation
Allow the dough to ferment at a moderately warm room temperature until it becomes visibly puffy and aerated.
A typical total bulk fermentation time may be approximately 5–7 hours from the initial mixing, although cooler temperatures or a less active starter may require considerably longer.
Look for a noticeable increase in volume, often around 40–60% at a warm dough temperature, rather than insisting that the dough double.
The surface should appear slightly domed, and small bubbles may be visible along the sides of a transparent container.
When the bowl is gently shaken, the dough should have a soft, slightly jiggly appearance.
Avoid allowing the dough to become excessively fermented, as overproofed dough can be difficult to shape and may spread during baking.
Step 7: Prepare the Cinnamon-Sugar Filling
In a small mixing bowl, combine the brown sugar, ground cinnamon, and all-purpose flour.
Stir thoroughly until the mixture is evenly blended.
Break apart any large lumps of brown sugar with the back of a spoon.
The small amount of flour helps absorb some of the moisture released by the cinnamon-sugar mixture during baking.
Set the filling aside until the dough is ready to shape.
Step 8: Gently Stretch the Fermented Dough
Lightly flour a clean work surface.
Carefully turn the fermented dough out of its bowl.
Using lightly floured hands, gently stretch and pat the dough into a large rectangle.
Work slowly to preserve some of the air developed during fermentation.
Avoid pulling the dough so thin that it tears.
A moderately thin, even rectangle is sufficient for distributing the cinnamon filling.
Try to maintain a consistent thickness so the finished loaf develops an attractive swirl.
Step 9: Add the Cinnamon-Sugar Swirl
Sprinkle the prepared cinnamon-sugar mixture evenly over the surface of the stretched dough.
Leave approximately a 1-inch border around the outer edges.
Use your fingertips or the back of a spoon to distribute the filling into a relatively even layer.
Avoid piling large amounts of sugar in one area.
The cinnamon mixture should form a thin ribbon inside the loaf rather than a thick pocket that could separate during baking.
Step 10: Fold and Shape the Dough into a Boule
Fold one-third of the dough toward the center.
Fold the opposite third over the first section, similar to folding a letter.
Gently roll or fold the dough into a compact shape, keeping the cinnamon filling enclosed.
Pinch any exposed seams to reduce leakage.
Turn the dough seam-side down and gently draw it across the work surface to create surface tension.
Rotate and repeat until the dough forms a rounded boule.
Avoid pulling so firmly that the outer surface tears.
The finished dough should be round, smooth, and able to hold its shape.
Step 11: Prepare the Proofing Basket
Dust a round banneton or a bowl lined with a clean kitchen towel generously with rice flour.
Rice flour is especially helpful because it absorbs moisture differently from wheat flour and reduces sticking.
Carefully transfer the shaped boule into the basket with the seam facing upward.
If necessary, pinch the seam gently to keep the filling enclosed.
Cover the basket with a reusable cover, plastic wrap, or a clean food-safe bag.
Make sure the covering does not press tightly against the dough.
Step 12: Refrigerate for the Overnight Proof
Place the covered dough in the refrigerator at approximately 38–40°F (3–4°C).
Allow it to cold-proof for approximately 12–16 hours.
During this time, fermentation continues slowly while the dough becomes firmer and easier to handle.
The extended refrigeration also contributes to the development of sourdough flavor.
Keep in mind that the dough may require a shorter or longer cold proof depending on its fermentation level before refrigeration.
The dough should remain sufficiently structured to hold its shape when removed from the proofing basket.
Step 13: Preheat the Dutch Oven
When ready to bake, place a heavy Dutch oven with its oven-safe lid inside the oven.
Preheat to 450°F (232°C), provided the cookware and lid are rated for that temperature.
Allow the Dutch oven to heat thoroughly for approximately 45–60 minutes.
A well-preheated Dutch oven helps create a hot baking environment and traps moisture released from the dough during the initial baking stage.
This trapped steam encourages oven spring and supports the development of a rustic crust.
Prepare a large sheet of heat-rated parchment paper while the oven preheats.
Step 14: Prepare the Baker’s Twine
Cut four pieces of food-grade, oven-safe cotton baker’s twine, approximately 24–30 inches long each.
Place the twine in a small bowl with neutral cooking oil or melted coconut oil.
Coat each piece lightly, then remove any excess oil.
The oil helps reduce the likelihood of the twine sticking firmly to the baked crust.
Arrange the four pieces across the parchment paper so they intersect at the center.
Space them evenly to create eight sections, similar to the spokes of a wheel.
Ensure the strings are long enough to pass around the dough and tie loosely at the top.
Step 15: Position the Dough on the Twine
Remove the chilled dough from the refrigerator.
Carefully invert the proofing basket over the center of the prepared parchment paper.
The dough should release with its smooth side facing upward.
Position it so the center of the boule rests directly over the point where the four strings intersect.
Work carefully to avoid flattening or stretching the cold dough.
Step 16: Tie the Dough into a Pumpkin Shape
Take the two opposite ends of one string and bring them gently upward around the sides of the dough.
Tie them loosely over the center of the top.
Repeat with the remaining three strings.
The strings should divide the dough into eight approximately equal sections.
Leave a little slack beneath each string so the bread has room to expand during baking.
Do not pull the twine tightly against the dough.
The goal is to guide the expanding loaf into rounded pumpkin-like ridges, not to cut deeply into the dough.
Trim any long string ends, leaving enough length to locate and remove the knots after baking.
Step 17: Dust the Loaf and Create the Leaf Scoring
Lightly dust the surface of the cold dough with rice flour or all-purpose flour.
Use your hand or a small brush to distribute the flour into a thin, even coating.
The flour creates contrast between the pale surface and the darker baked scoring lines.
Using a sharp bread lame or clean razor blade, make shallow diagonal cuts along the individual sections between the strings.
Arrange the cuts in a repeating leaf-like or wheat-stalk pattern.
Keep the decorative cuts relatively shallow, approximately ⅛–¼ inch deep.
Avoid cutting deeply into the cinnamon filling, as exposed sugar may melt and leak during baking.
For a more natural pumpkin appearance, vary the length of the cuts slightly while maintaining a balanced overall design.
Step 18: Transfer the Loaf to the Dutch Oven
Carefully remove the hot Dutch oven from the oven using protective oven mitts.
Place it on a stable, heat-resistant surface.
Using the parchment paper as a sling, gently lower the shaped and scored loaf into the Dutch oven.
Keep your hands away from the hot sides and base.
Make sure the parchment lies flat enough that it does not press heavily against the bread.
Check that no loose twine ends extend near exposed heating elements.
Cover the Dutch oven with its lid.
Step 19: Bake the Bread Covered
Return the covered Dutch oven to the preheated oven.
Bake at 450°F (232°C) for approximately 25–30 minutes.
During this stage, the dough should expand, and the strings will encourage the formation of rounded pumpkin sections.
The covered environment traps moisture and helps the bread rise before the crust becomes firm.
Avoid opening the lid repeatedly, as doing so releases the trapped steam.
Step 20: Finish Baking Uncovered
After the initial covered baking period, carefully remove the Dutch oven lid.
Reduce the oven temperature to 400°F (204°C).
Continue baking uncovered for approximately 15–20 minutes.
The loaf should develop a deep golden-brown crust with clearly defined pumpkin-like ridges.
The decorative scoring should become more visible as the crust darkens.
Check the internal temperature with an instant-read thermometer inserted into a section of plain bread rather than a concentrated cinnamon-sugar pocket.
A temperature around 200–205°F (93–96°C) is a useful indication of doneness, although temperature alone does not guarantee that a heavily filled loaf has finished baking.
The crust should feel firm, and the bread should appear fully baked.
If the surface begins browning excessively before the center is ready, loosely cover the loaf with foil and continue baking as needed.
Step 21: Remove the Twine Carefully
Remove the Dutch oven from the oven.
Using the parchment paper and suitable heat protection, transfer the loaf to a wire cooling rack.
Allow it to cool briefly until the twine can be handled safely.
Using small kitchen scissors, carefully cut the knots or exposed strings.
Gently pull away each piece of twine.
If any string has become embedded in the crust, loosen it carefully rather than pulling forcefully and damaging the loaf.
Inspect the bread to ensure all four pieces have been removed completely.
The finished loaf should now have eight rounded sections resembling the shape of a pumpkin.
Step 22: Add the Cinnamon Stick Stem
Once the bread has cooled enough to handle, locate the center of the top surface.
Using the tip of a small knife or another suitable utensil, make a shallow opening in the center.
Insert the whole cinnamon stick gently to create a decorative pumpkin stem.
Avoid pushing it deeply into the loaf.
The cinnamon stick is intended for decoration and should be removed before slicing or serving.
For a rustic presentation, position the stick at a slight angle.
Step 23: Cool the Bread Completely
Place the finished loaf on a wire rack and allow it to cool for at least 2 hours before slicing.
This cooling period is especially important because the bread contains pumpkin puree and a moist cinnamon-sugar filling.
Cutting too early may compress the crumb and cause the interior to appear gummy.
As the bread cools, moisture redistributes and the internal structure becomes more stable.
Once completely cooled, use a sharp serrated bread knife to slice through the loaf.
The interior should reveal a soft, lightly orange crumb with a beautiful cinnamon-sugar ribbon running through the bread.
Step 24: Slice and Serve
Remove the decorative cinnamon stick before cutting.
Slice the bread into even pieces.
Serve plain to appreciate the sourdough flavor and cinnamon swirl, or accompany it with softened butter, honey butter, cream cheese, or a small drizzle of maple syrup.
The bread is delicious at room temperature and can also be warmed gently before serving.
For a cozy autumn breakfast, pair it with coffee, tea, or warm milk.
Optional Method: Make a Less-Sweet Pumpkin Sourdough Loaf
For a more savory variation, omit the cinnamon-sugar swirl and reduce the honey or maple syrup to approximately 15–20 g.
Keep the pumpkin puree, sourdough starter, flour, salt, and pumpkin pie spice as the foundation of the dough.
Shape, cold-proof, tie, score, and bake using the same general method.
Because removing sugar changes the dough composition, fermentation and baking characteristics may vary slightly.
The finished loaf will have a more pronounced sourdough character and can be served with soups, roasted vegetables, cheese, or savory spreads.
Description
Pumpkin-Shaped Sourdough Bread with Cinnamon Swirl and Rustic Autumn Leaf Scoring is an artisan-style loaf that combines traditional sourdough baking with warm seasonal flavors and an eye-catching decorative presentation.
The exterior features a golden, rustic crust shaped into eight rounded sections resembling a real pumpkin. Delicate leaf-inspired scoring adds texture and visual interest, while a whole cinnamon stick creates a charming stem.
Inside, the bread has a soft, gently chewy crumb with a warm orange color from the pumpkin puree.
A sweet cinnamon-brown sugar ribbon winds through the loaf, creating pockets of aromatic sweetness that contrast beautifully with the mild tanginess of the naturally fermented dough.
Pumpkin pie spice introduces comforting notes of cinnamon, ginger, nutmeg, and cloves, while honey or maple syrup adds a gentle sweetness without turning the loaf into a cake.
The finished bread offers a satisfying combination of rustic crust, tender interior, subtle pumpkin flavor, and fragrant cinnamon filling.
Its decorative appearance makes it particularly suitable for autumn gatherings, Thanksgiving tables, seasonal brunches, and homemade gifts.
Nutritional Information
Approximate values per serving, assuming the loaf is divided into 12 slices:
- Calories: 250–290 kcal
- Protein: 6–8 g
- Carbohydrates: 48–55 g
- Fat: 1–3 g
- Saturated Fat: 0–1 g
- Fiber: 2–3 g
- Sugar: 9–12 g
- Sodium: 330–400 mg
These values are estimates and vary depending on the flour, starter hydration, pumpkin puree, sweetener, and final slice size.
Optional toppings such as butter, cream cheese, maple glaze, or honey butter are not included.
The cinnamon-sugar filling contributes much of the loaf’s added sugar, while the bread flour provides the majority of its carbohydrates.
Pumpkin puree contributes beta-carotene and small amounts of dietary fiber.
Recipe Details
- Prep Time: Approximately 35–45 minutes of active preparation
- Bulk Fermentation: Approximately 5–7 hours, depending on dough temperature and starter activity
- Cold Proof: Approximately 12–16 hours
- Cook Time: Approximately 40–50 minutes
- Cooling Time: At least 2 hours
- Total Time: Approximately 20–27 hours, including fermentation, refrigeration, baking, and cooling
- Servings: 1 large loaf, approximately 12 slices
- Cuisine: American-inspired seasonal artisan baking
- Course: Bread, breakfast, brunch, or snack
- Cooking Methods: Natural fermentation, folding, shaping, cold proofing, scoring, and Dutch oven baking
- Difficulty: Intermediate to advanced
Conclusion
Pumpkin-Shaped Sourdough Bread with Cinnamon Swirl and Rustic Autumn Leaf Scoring brings together the traditional character of naturally fermented bread and the comforting flavors of autumn.
The combination of active sourdough starter, real pumpkin puree, warm spices, and a sweet cinnamon-sugar filling creates a loaf that is both flavorful and visually impressive.
Its distinctive pumpkin shape, formed with simple baker’s twine, transforms an ordinary round loaf into a beautiful seasonal centerpiece.
The delicate leaf scoring and cinnamon stick stem provide charming decorative details, making the bread particularly appealing for fall celebrations and holiday gatherings.
Although sourdough baking requires patience and careful attention to fermentation, the individual steps are approachable with practice.
From mixing and folding the dough to shaping, scoring, and baking, each stage contributes to the final texture and appearance.
The result is a rustic, golden loaf with a fragrant cinnamon swirl and a soft pumpkin-colored crumb that makes every slice feel special.
Whether served for breakfast, shared at a gathering, or presented as a homemade gift, this bread offers a memorable combination of artisan baking and seasonal creativity.
Recommendation
For the best results, prepare the dough one day before you plan to bake.
Begin with an active sourdough starter and allow enough time for the dough to complete bulk fermentation before shaping.
Refrigerating the shaped loaf overnight makes it easier to handle and allows the decorative scoring to remain more defined.
When creating the pumpkin shape, use only food-grade, oven-safe cotton twine and avoid tying it tightly around the dough.
For a beautifully contrasted design, dust the chilled loaf lightly with rice flour before scoring.
Bake in a thoroughly preheated Dutch oven to encourage good oven spring and a well-developed crust.
Allow the bread to cool completely before slicing, especially because the cinnamon-sugar filling can remain soft and sticky while warm.
For serving, pair slices with softened butter, lightly sweetened cream cheese, honey butter, or a warm beverage.
To store, keep the completely cooled bread in a bread bag or suitable airtight container at room temperature for approximately 2–3 days, depending on temperature and humidity.
Because the loaf contains a moist pumpkin puree and cinnamon-sugar filling, inspect it for signs of spoilage and avoid storing it in a warm, humid environment.
For longer storage, slice the fully cooled bread and freeze the portions in a freezer-safe bag or container for up to 2–3 months for best quality.
Thaw slices at room temperature or warm them gently in an oven or toaster oven.
Avoid placing the decorative cinnamon stick in the toaster, and always remove the stem and any remaining twine before serving.
For an attractive autumn presentation, place the whole loaf on a wooden board surrounded by small decorative pumpkins, cinnamon sticks, and autumn leaves that do not come into direct contact with the edible portions.
The finished bread makes a beautiful centerpiece for Thanksgiving, seasonal brunches, and cozy family gatherings.
Embracing Healthful Indulgence
Pumpkin-shaped sourdough bread offers a satisfying way to enjoy homemade baking while incorporating the seasonal flavor and natural color of pumpkin.
Pumpkin puree provides beta-carotene, which the body can convert into vitamin A, along with small amounts of fiber and other nutrients.
The bread flour supplies carbohydrates that provide energy, while the sourdough fermentation process contributes the distinctive flavor and texture associated with naturally leavened bread.
Sourdough fermentation can change certain components of the dough, although the nutritional effects depend on the ingredients, fermentation conditions, and preparation method.
The cinnamon filling introduces warmth and sweetness, making the bread enjoyable without requiring a heavy frosting or glaze.
For a less-sweet variation, reduce the amount of brown sugar in the filling or serve the bread without additional sweet toppings.
You can also experiment with replacing a modest portion of the white bread flour with whole wheat flour for additional fiber, keeping in mind that the dough may require more water and may produce a denser crumb.
Serving a slice alongside protein-rich foods such as eggs, yogurt, or cottage cheese can create a more substantial breakfast.
Portion sizes can be adjusted according to individual needs and preferences.
Homemade sourdough baking also offers an opportunity to appreciate traditional food preparation, patience, and the satisfaction of creating something from simple ingredients.
Ultimately, this pumpkin-shaped cinnamon swirl sourdough celebrates the pleasure of seasonal baking while allowing room for thoughtful ingredient choices and balanced enjoyment.