
Introduction
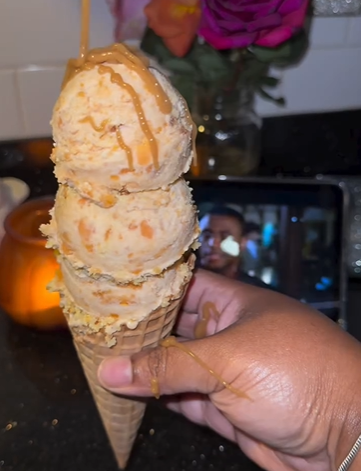
Creamy Caramel Crunch Ice Cream with Cookie Crumbles is a delicious homemade frozen dessert that combines smooth vanilla ice cream, buttery caramel ribbons, crunchy cookie pieces, and sweet toffee bits. Served in crispy waffle cones and finished with an extra drizzle of caramel sauce, this irresistible treat brings the experience of an ice cream shop right into your kitchen.
One of the best things about this recipe is that it does not require an ice cream machine. Instead, whipped heavy cream and sweetened condensed milk create a rich, airy base that freezes into a creamy, scoopable dessert. Homemade caramel adds a deep buttery sweetness, while crushed vanilla cookies provide a satisfying contrast to the silky texture.
Whether you are planning a summer gathering, preparing a special dessert for family and friends, or simply craving something sweet after dinner, this caramel cookie crunch ice cream is a wonderful choice. You can prepare it ahead of time, keep it in the freezer, and serve generous scoops whenever you want a refreshing homemade treat.
Origin
Ice cream has a long culinary history, developing over centuries as frozen desserts evolved from early iced delicacies into the creamy treats enjoyed around the world today. Modern ice cream became increasingly popular as refrigeration technology improved and home freezing became more accessible.
Caramel-flavored ice cream is part of this broader tradition of combining dairy-based frozen desserts with cooked sugar, sauces, and other sweet additions. Caramel itself is made by heating sugar until it develops a golden amber color and a complex flavor ranging from sweet and buttery to pleasantly toasted.
Cookie-studded ice cream also reflects the modern love of combining different textures in a single dessert. Rather than following one specific traditional recipe, this homemade version brings together familiar dessert elements: vanilla cream, caramel sauce, crunchy cookies, and toffee.
The no-churn method makes the recipe especially convenient for home cooks. By whipping cream and folding it into sweetened condensed milk, you can create a rich frozen dessert without purchasing specialized equipment.
Cultural Significance
Ice cream is a popular dessert across many cultures, often associated with celebrations, warm-weather gatherings, family outings, and simple moments of enjoyment. From neighborhood ice cream shops to homemade frozen desserts served at birthday parties, it has become a familiar way to bring people together.
Caramel and cookies are particularly appealing additions because they offer contrasting flavors and textures. The caramel contributes buttery sweetness, while the cookie pieces add a gentle crunch that makes every spoonful more interesting.
Serving the ice cream in waffle cones adds a classic ice cream parlor touch. The crisp cone provides a pleasant contrast to the cold, creamy filling, and the caramel drizzle creates an attractive finish.
This recipe is also easy to personalize. Families can choose different cookies, adjust the amount of caramel, or add extra toffee bits to suit their preferences. Because the ice cream is prepared ahead of time, it is convenient for summer parties, weekend desserts, and casual gatherings.
Ingredients and Quantities
For the Ice Cream
- 2 cups cold heavy whipping cream
- 1 can (14 ounces) sweetened condensed milk
- 1 teaspoon vanilla extract
- 1/2 cup caramel sauce, divided for swirling
- 1 cup crushed vanilla cookies or butter biscuits
- 1/4 cup toffee bits
- 1/4 teaspoon salt
For the Homemade Caramel Sauce
- 1 cup granulated sugar
- 1/4 cup water
- 1/2 cup heavy cream, warmed
- 3 tablespoons unsalted butter
- 1/2 teaspoon vanilla extract
- 1/4 teaspoon sea salt
For Serving
- 4 to 6 waffle cones
- 1/2 cup crushed cookies
- Extra caramel sauce for drizzling
- Extra toffee bits, optional
Ingredient Notes
Heavy whipping cream: Use cold cream with sufficient fat content for whipping. The fat helps create a rich texture and supports the structure of the ice cream.
Sweetened condensed milk: This thick, sweet milk provides sweetness and helps keep the no-churn ice cream creamy. Evaporated milk is not an equivalent substitute because it does not contain the same amount of added sugar.
Vanilla extract: Vanilla complements the caramel and gives the ice cream a familiar, rounded flavor.
Caramel sauce: Homemade caramel gives this dessert a buttery, toasted flavor. You can also use a prepared caramel sauce if you prefer a quicker method, choosing one that remains soft enough to drizzle after cooling.
Vanilla cookies or butter biscuits: Choose crisp cookies that can be crushed into small pieces. A mixture of fine crumbs and slightly larger pieces gives the ice cream a more interesting texture.
Toffee bits: These add a buttery crunch and a deeper caramel-like flavor. They are optional, but they work especially well with the caramel ribbons.
Salt: A small amount of salt balances the sweetness and enhances the flavor of the caramel.
Optional Additions
One of the advantages of homemade ice cream is how easily it can be customized. Consider these variations while keeping the original caramel cookie combination as the foundation.
Chocolate Chips
Fold in 1/3 cup of mini chocolate chips for a chocolate-and-caramel combination. Mini chips distribute more evenly throughout the ice cream than large chocolate chunks.
Chocolate Cookie Pieces
Replace some or all of the vanilla cookies with crushed chocolate sandwich cookies or chocolate wafer cookies. This creates a richer flavor and a striking contrast against the pale ice cream.
Toasted Pecans
Add 1/4 cup of finely chopped toasted pecans for a nutty flavor that pairs naturally with caramel. Allow the nuts to cool completely before adding them to the mixture.
Extra Vanilla
Increase the vanilla extract in the ice cream base slightly if you enjoy a stronger vanilla flavor. Add small amounts at a time so the vanilla does not overpower the caramel.
Salted Caramel Variation
Use a little extra flaky sea salt on the finished scoops for a sweet-and-salty dessert. Start with a small amount because the caramel sauce and toffee bits may already contain salt.
Different Cookie Choices
Shortbread, digestive biscuits, vanilla wafers, and other crisp butter cookies can all work well. Choose cookies that you enjoy eating on their own, since their flavor will remain noticeable in the finished dessert.
Tips for Success
1. Start with Very Cold Cream
Cold heavy cream whips more effectively and develops a stable structure. Chill the mixing bowl and beaters beforehand if your kitchen is warm.
2. Whip to Stiff Peaks
Beat the cream until it forms stiff peaks that hold their shape when the beaters are lifted. Avoid continuing to beat after the cream becomes firm, as excessive whipping can make it grainy and eventually turn it into butter.
3. Fold Gently
When combining the whipped cream with the condensed milk mixture, use a spatula and gentle folding motions. This helps preserve the air incorporated into the cream, contributing to a lighter texture.
4. Let the Caramel Cool Completely
Hot caramel can melt the whipped cream and compromise the texture of the ice cream. Allow the sauce to cool to room temperature before adding it to the ice cream mixture.
The caramel should remain pourable. If it becomes too thick, let it stand briefly at room temperature or warm it gently and allow it to cool again before use.
5. Watch the Sugar Carefully
Caramel can change from golden to burnt quickly. Once the sugar reaches a deep amber color, remove the pan from the heat. Use visual cues rather than relying only on the cooking time, because stovetops and pans vary.
6. Add the Caramel in Layers
Layering the ice cream and caramel creates distinct ribbons throughout the container. Use a knife or skewer to make a few gentle swirls. Overmixing will distribute the caramel too evenly and eliminate the attractive ribbons.
7. Choose the Right Cookie Texture
Crush most of the cookies into small pieces, but leave a few slightly larger chunks for extra crunch. Very fine crumbs can disappear into the creamy base, while excessively large pieces may be difficult to scoop through when frozen.
8. Use a Freezer-Safe Container
A shallow, airtight container helps the ice cream freeze evenly. Press a piece of freezer-safe parchment or wrap against the surface before closing the lid if you want to reduce exposure to air.
9. Allow Enough Freezing Time
Six hours is the minimum recommended freezing time, but overnight freezing usually produces a firmer, more scoopable result. Avoid repeatedly opening the freezer while the mixture sets.
10. Prepare the Cones Just Before Serving
Add the caramel and cookie crumbs to the waffle cones shortly before serving. Preparing them too far ahead can soften the cones, especially if the caramel is warm or runny.
Instructions
Step 1: Prepare the Caramel Sauce
Combine the granulated sugar and water in a medium, heavy-bottomed saucepan. Place the pan over medium heat and allow the sugar to dissolve.
Once the mixture begins to boil, avoid stirring it with a spoon, since stirring can encourage crystallization. If needed, gently swirl the pan to help the sugar color evenly.
Continue cooking until the syrup turns a deep amber color, usually around 8 to 10 minutes, although the timing will vary. Watch the pan closely because caramel can burn quickly.
Step 2: Finish the Caramel
Remove the saucepan from the heat. Slowly whisk in the warmed heavy cream, keeping your hands and face away from the pan because the mixture will bubble vigorously and release hot steam.
Add the butter, vanilla extract, and sea salt. Stir until the butter melts and the sauce becomes smooth.
If the caramel develops small lumps, return the pan to very low heat briefly and stir until they dissolve. Do not rush this step.
Transfer the sauce to a heat-safe container and let it cool completely. Reserve 1/2 cup for the ice cream, keeping the remaining sauce for serving.
Step 3: Whip the Cream
Pour the cold heavy whipping cream into a large, clean mixing bowl.
Using an electric mixer, beat the cream for approximately 3 to 4 minutes, adjusting the time according to the mixer and cream. Continue until stiff peaks form.
The whipped cream should look thick and hold its shape. Set it aside while preparing the condensed milk mixture.
Step 4: Prepare the Ice Cream Base
In a separate bowl, combine the sweetened condensed milk, vanilla extract, and salt. Stir until evenly blended.
Add approximately one-third of the whipped cream to the condensed milk mixture and fold gently to loosen the base.
Add the remaining whipped cream in two portions, folding carefully after each addition. Stop when the mixture is smooth and uniform, with no large streaks of condensed milk remaining.
Step 5: Add the Cookie Crunch
Fold the crushed vanilla cookies and toffee bits into the ice cream base.
Distribute the pieces evenly, using gentle movements to keep as much air in the mixture as possible.
Reserve a small amount of cookie crumbs and toffee bits for the final topping if desired.
Step 6: Create the Caramel Swirls
Spread half of the ice cream mixture into a freezer-safe container.
Drizzle approximately 1/4 cup of the completely cooled caramel sauce over the surface. Add the remaining ice cream mixture, then drizzle another 1/4 cup of caramel over the top.
Use a butter knife or skewer to create a few gentle swirls through the mixture. Avoid stirring too deeply or mixing the caramel completely into the cream.
Step 7: Freeze Until Firm
Smooth the surface of the ice cream and cover the container tightly with a lid.
Place it in the freezer for at least 6 hours, preferably overnight. The ice cream should become firm enough to scoop while retaining a creamy texture.
Keep the container level during freezing so the caramel ribbons remain distributed throughout the dessert.
Step 8: Prepare the Waffle Cones
Place the reserved crushed cookies in a shallow bowl.
Drizzle a small amount of cooled caramel sauce inside each waffle cone, then sprinkle in some cookie crumbs. Rotate the cones gently so the crumbs stick to the caramel.
Prepare the cones shortly before serving to preserve their crispness.
Step 9: Scoop the Ice Cream
Remove the container from the freezer and let it stand briefly at room temperature, approximately 3 to 5 minutes, depending on the firmness of the ice cream and the temperature of your kitchen.
Use a sturdy ice cream scoop to form generous portions. Place two or three scoops into each prepared waffle cone, taking care not to overload the cone.
If the ice cream is too firm to scoop comfortably, allow it to soften for another minute or two rather than forcing the scoop through it.
Step 10: Add the Caramel Drizzle
Drizzle additional caramel sauce over the scoops.
Finish with crushed cookies and a sprinkling of toffee bits, if desired. Serve immediately while the ice cream is creamy and the waffle cones remain crisp.
Description
Creamy Caramel Crunch Ice Cream with Cookie Crumbles is rich, sweet, and full of contrasting textures. The whipped cream and condensed milk create a smooth vanilla base, while homemade caramel adds buttery sweetness and a subtle toasted flavor.
Crushed cookies provide a pleasant crunch throughout the ice cream, and the toffee bits contribute an additional layer of caramel-like flavor. The ribbons of caramel make every scoop slightly different, delivering creamy vanilla, sweet sauce, and cookie pieces in every bite.
The waffle cone adds a crisp finish, while the final caramel drizzle gives the dessert a classic ice cream shop presentation.
This recipe is particularly useful when you want a make-ahead dessert. Since the ice cream needs several hours to freeze, you can prepare it the day before a gathering and finish the cones just before serving.
Nutritional Information
The following nutritional estimates are approximate and depend on the brands used, the amount of caramel consumed, the cookie variety, and the size of each serving.
For a rough estimate, this recipe can be divided into six generous servings, including a portion of the homemade caramel sauce and some toppings.
| Nutrient | Approximate amount per serving |
|---|---|
| Calories | 590 |
| Protein | 7 g |
| Carbohydrates | 65–75 g |
| Total fat | 32–38 g |
| Saturated fat | 19–24 g |
| Sugars | 50–60 g |
| Sodium | 180–300 mg |
These values are estimates rather than laboratory-tested nutrition data. The actual calorie count can vary substantially depending on the size of the scoops, whether all the caramel sauce is used, and how much cookie topping is added.
Because this dessert contains heavy cream, sweetened condensed milk, caramel, and cookies, it is relatively rich in added sugar and saturated fat. Smaller portions can still provide a satisfying dessert experience.
Storage and Food Safety
Store the finished ice cream in a clean, airtight, freezer-safe container. Keep it continuously frozen at 0°F (-18°C) or below for best quality.
For the best texture and flavor, enjoy homemade no-churn ice cream within about 2 to 3 weeks. It may remain frozen longer if stored properly, but the texture can gradually become less creamy and develop ice crystals.
Keep the container covered between servings to limit exposure to air and reduce freezer burn. Use a clean scoop each time and return the container to the freezer promptly after serving.
Do not leave the ice cream sitting at room temperature for extended periods. If it becomes noticeably melted, avoid repeatedly refreezing it, as this can damage the texture and create food-safety concerns. Discard ice cream that has been held above 40°F (4°C) for more than 2 hours, or more than 1 hour when the surrounding temperature is above 90°F (32°C).
Store leftover caramel sauce separately in a clean, covered container in the refrigerator. Because this sauce contains cream and butter, refrigerate it promptly rather than leaving it at room temperature. Rewarm small portions gently when needed, then let the sauce cool to a suitable serving temperature before drizzling over the ice cream.
Conclusion
Creamy Caramel Crunch Ice Cream with Cookie Crumbles is an easy, satisfying way to enjoy a homemade frozen dessert without an ice cream machine. Its smooth vanilla base, buttery caramel swirls, crunchy cookie pieces, and sweet toffee bits create a combination that feels special enough for celebrations but simple enough for an ordinary summer afternoon.
Although the recipe involves preparing caramel from scratch, the remaining steps are straightforward. Whip the cream, fold together the base, add the crunchy ingredients, create the caramel ribbons, and let the freezer do the rest.
Prepare it ahead of time, serve it in crisp waffle cones, and finish with extra caramel for a dessert that is as inviting to look at as it is enjoyable to eat.
Recommendation
For the best results, make the caramel sauce and ice cream a day before you plan to serve them. Overnight freezing gives the dessert enough time to firm up, while preparing the waffle cones at the last minute helps them stay crisp.
If you enjoy experimenting with homemade frozen desserts, try these variations next:
- Salted Caramel Ice Cream: Emphasize the buttery caramel flavor with a little extra sea salt and fewer cookie pieces.
- Cookies and Cream Ice Cream: Replace the vanilla cookies with crushed chocolate sandwich cookies for a classic chocolate-and-cream combination.
- Chocolate Caramel Crunch Ice Cream: Add mini chocolate chips and use chocolate wafer pieces alongside the caramel ribbons.
- Pecan Caramel Ice Cream: Fold in cooled, toasted pecans for a nutty variation that complements the caramel.
For the original recipe, the most important details are using cold cream, folding gently, allowing the caramel to cool completely, and giving the ice cream sufficient time to freeze.
Embracing Healthful Indulgence
Enjoying dessert can be part of a balanced eating pattern, and homemade ice cream gives you control over the ingredients and serving sizes. This caramel crunch version is designed as a rich treat, so a smaller scoop can be a satisfying choice when you want something sweet.
You can adjust the toppings, use fewer cookie crumbs, or serve the ice cream in a bowl instead of a waffle cone. These changes can reduce the overall portion size without removing the flavors that make the dessert appealing.
You can also make the dessert more personal by choosing your favorite crisp cookies and adjusting the caramel drizzle to your taste. Keep in mind that replacing ingredients may change the texture, sweetness, and nutritional profile.
Most importantly, focus on enjoying the dessert for its flavor and texture rather than treating it as an everyday necessity. A thoughtfully prepared scoop of homemade caramel cookie crunch ice cream can be a delicious way to finish a meal, share a summer moment, or celebrate a special occasion.