
Prep Time: 30 minutes Cook Time: 30–40 minutes Cooling and Decorating Time: 2–3 hours Total Time: Approximately 4 hours Servings: 12 slices Difficulty: Intermediate Category: Dessert, Cake, Baking
1. Introduction
The Ultimate Chocolate Fudge Cake with Silky Ganache is a luxurious dessert that combines rich, moist chocolate sponge layers with an exceptionally smooth and glossy dark chocolate ganache. Its deep chocolate flavor, tender texture, and elegant presentation make it a perfect centerpiece for birthdays, celebrations, dinner parties, and special occasions.
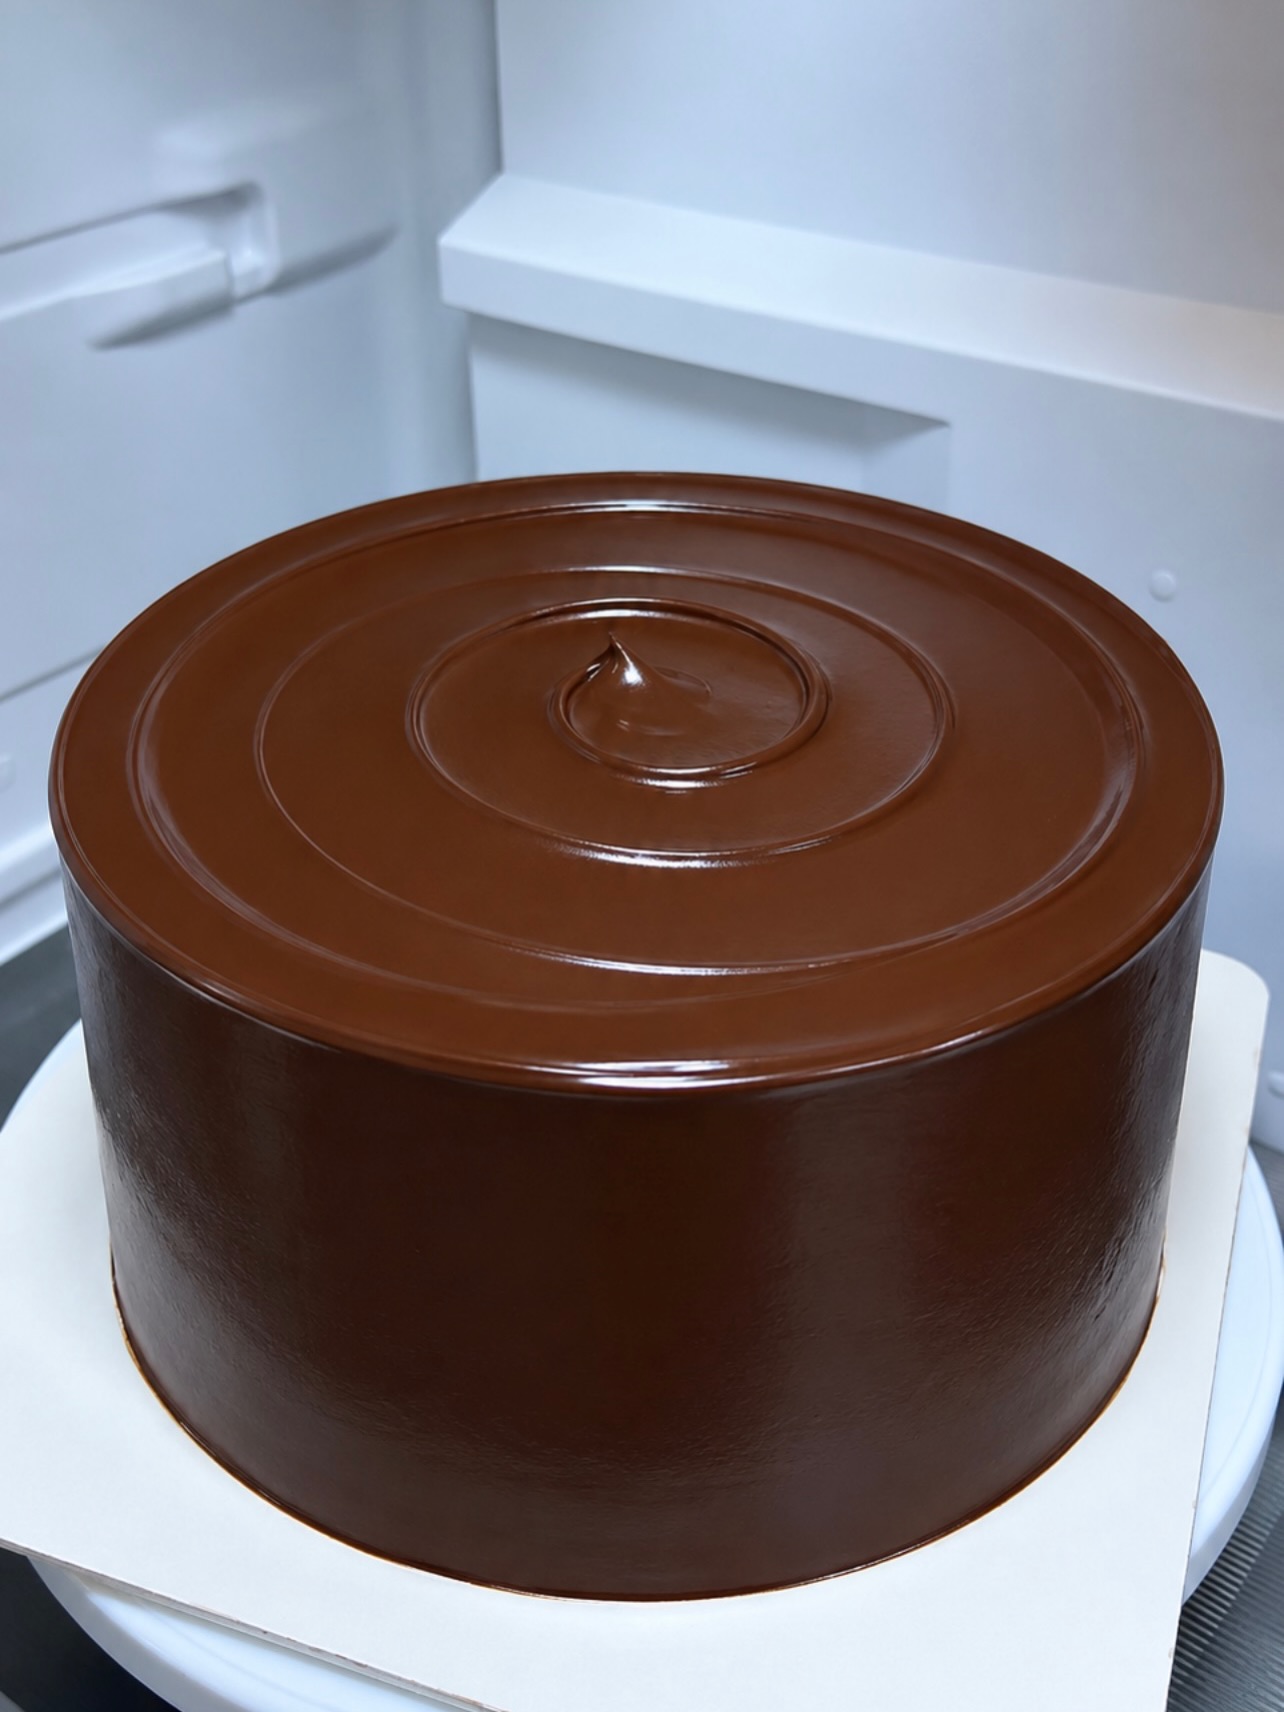
What distinguishes this cake is its professional-quality finish. The sides are carefully smoothed to create crisp, sharp edges, while the top features a beautiful spiral pattern formed using a rotating cake turntable and a small offset spatula.
The chocolate sponge is prepared with Dutch-process cocoa powder, which contributes an intense chocolate flavor and deep, dark color. Hot coffee or water enhances the cocoa, creating a moist, tender crumb.
The finishing touch is a silky ganache made from high-quality dark chocolate, heavy cream, and butter. This creates a rich, creamy coating with an elegant glossy appearance.
Despite its sophisticated presentation, this cake can be successfully prepared at home by following the correct mixing, cooling, and decorating techniques.
2. Origin and Cultural Significance
Chocolate cake has a long history connected to the evolution of chocolate from a traditional beverage into a widely used baking ingredient.
During the nineteenth century, improvements in cocoa processing and chocolate manufacturing made cocoa powder and baking chocolate increasingly accessible to home bakers.
Over time, chocolate cakes became popular throughout Europe and North America, eventually developing into numerous variations, including chocolate layer cakes, devil’s food cake, flourless chocolate cake, and chocolate fudge cake.
The modern chocolate fudge cake is especially associated with rich chocolate flavor, moist sponge layers, and dense or creamy chocolate fillings.
Chocolate ganache, meanwhile, is traditionally associated with French pastry-making. It is generally prepared by combining chocolate and warm cream to produce a smooth mixture that can be used as a glaze, filling, frosting, or confectionery base.
Today, chocolate fudge cake with ganache represents a fusion of classic chocolate baking and modern cake-decorating techniques.
Its elegant appearance and indulgent flavor have made it a popular choice for weddings, birthdays, anniversaries, and other celebrations.
The glossy coating and precisely finished edges also reflect the growing influence of professional patisserie techniques on contemporary home baking.
3. Ingredients and Quantities
A. For the Chocolate Fudge Sponge Layers
- 2 cups (250 g) all-purpose flour
- 2 cups (400 g) granulated sugar
- ¾ cup (60 g) Dutch-process cocoa powder
- 1½ teaspoons baking powder
- 1½ teaspoons baking soda
- 1 teaspoon fine salt
- 2 large eggs, at room temperature
- 1 cup (240 ml) whole milk or buttermilk
- ½ cup (120 ml) vegetable oil
- 2 teaspoons pure vanilla extract
- 1 cup (240 ml) hot water or freshly brewed hot coffee
Why Use Hot Coffee?
Hot coffee enhances the natural depth of cocoa, creating a stronger chocolate flavor without necessarily making the cake taste like coffee. Hot water is an excellent alternative for those who prefer a caffeine-free version.
B. For the Smooth Fudge Ganache
- 14 oz (400 g) high-quality dark chocolate, containing 50–60% cocoa solids
- 1½ cups (360 ml) heavy cream, preferably containing at least 35% fat
- 2 tablespoons (30 g) unsalted butter
- 1 tablespoon light corn syrup or glucose syrup (optional)
Why Use Dark Chocolate?
Dark chocolate provides the rich cocoa flavor and smooth texture necessary for an elegant ganache. Chocolate containing approximately 50–60% cocoa solids offers a pleasant balance between sweetness and intensity.
Why Add Butter?
Butter enriches the ganache and gives it a smooth, luxurious consistency with an attractive sheen.
Why Add Corn Syrup?
A small quantity of light corn syrup or glucose syrup can enhance the glossy appearance and help create a smoother finish.
C. Equipment Needed
- Two 8-inch (20 cm) round cake pans
- Large mixing bowls
- Electric hand mixer or stand mixer
- Fine-mesh sieve
- Whisk and silicone spatula
- Digital kitchen scale
- Wire cooling rack
- Cake turntable
- Offset spatula
- Cake scraper or bench scraper
- Serrated knife or cake leveler
- Parchment paper
4. Optional Additions
The Ultimate Chocolate Fudge Cake can be customized with additional ingredients to create different flavors and textures.
Espresso Powder: Add 1 teaspoon of instant espresso powder to the cake batter to intensify the chocolate flavor.
Chocolate Chips: Fold ½ cup of mini chocolate chips into the batter for additional pockets of melted chocolate.
Salted Caramel: Spread a thin layer of salted caramel between the sponge layers before adding the ganache.
Raspberry Filling: Add a thin layer of raspberry preserves between the cake layers for a pleasant fruity contrast.
Hazelnut Spread: Incorporate a small amount of chocolate-hazelnut spread into the filling for a nutty variation.
Orange Zest: Add 1 teaspoon of finely grated orange zest to introduce a refreshing citrus aroma.
Chocolate Shavings: Decorate the finished cake with delicate chocolate curls for an elegant presentation.
Flaky Sea Salt: Sprinkle a small amount over the finished ganache to balance the sweetness and enhance the chocolate flavor.
5. Tips for Success
Measure ingredients accurately: A digital kitchen scale is recommended for consistent results, particularly when measuring flour, cocoa powder, and chocolate.
Use room-temperature ingredients: Eggs and milk at room temperature combine more easily, helping create a uniform batter.
Do not overmix: Once the dry and wet ingredients are combined, mix only until the batter becomes smooth. Excessive mixing can develop too much gluten and create a tougher cake.
Use quality cocoa powder: Dutch-process cocoa provides a deep chocolate flavor and rich color. For this particular recipe, use the specified cocoa type to maintain the intended flavor and appearance.
Do not worry about thin batter: The addition of hot water or coffee creates a relatively fluid batter. This is normal and contributes to the cake’s moist texture.
Avoid overbaking: Remove the cakes when a toothpick inserted into the center comes out with a few moist crumbs rather than wet batter.
Cool completely before decorating: Warm sponge layers can melt the ganache, making it difficult to achieve smooth sides and defined edges.
Use the correct ganache consistency: The ganache should be thick and spreadable, similar to soft frosting, before it is applied to the cake.
Chill between decorating stages: Brief refrigeration helps stabilize the ganache and makes it easier to produce sharp, professional-looking edges.
Use a turntable for the spiral: A rotating cake turntable makes it much easier to create the signature spiral design on the top surface.
6. Step-by-Step Instructions
Step 1: Preheat the Oven and Prepare the Pans
Preheat the oven to 350°F (175°C).
Grease two 8-inch (20 cm) round cake pans with butter or nonstick baking spray.
Line the bottom of each pan with parchment paper to prevent sticking.
Lightly dust the sides with cocoa powder if desired.
Set the prepared pans aside.
Step 2: Combine the Dry Ingredients
In a large mixing bowl, sift together the all-purpose flour, Dutch-process cocoa powder, baking powder, baking soda, and salt.
Add the granulated sugar and whisk thoroughly until all ingredients are evenly distributed.
Sifting the cocoa powder helps eliminate lumps and produces a smoother cake batter.
Step 3: Add the Wet Ingredients
Add the eggs, whole milk or buttermilk, vegetable oil, and vanilla extract to the bowl containing the dry ingredients.
Using an electric mixer on medium speed, mix for approximately 1–2 minutes until the ingredients are fully incorporated.
Scrape down the sides and bottom of the bowl to ensure that no dry ingredients remain.
The batter should become smooth and chocolate-colored.
Step 4: Incorporate the Hot Coffee or Water
Reduce the mixer speed to low.
Carefully pour the hot water or freshly brewed coffee into the batter in a slow, steady stream.
Mix gently until the liquid is completely incorporated.
The resulting batter will be noticeably thinner than traditional butter-based cake batter.
This consistency is expected and helps produce a moist chocolate sponge.
Step 5: Bake the Chocolate Sponge Layers
Divide the batter evenly between the prepared cake pans.
Gently tap each pan on the counter to release large trapped air bubbles.
Place the pans in the preheated oven.
Bake for approximately 30–40 minutes, depending on the oven and the depth of the cake pans.
Check for doneness by inserting a toothpick into the center of each cake.
The cakes are ready when the toothpick comes out clean or with a few moist crumbs attached.
Remove the pans from the oven and allow the cakes to cool inside the pans for approximately 10–15 minutes.
Carefully transfer the cakes to a wire rack and allow them to cool completely.
Step 6: Prepare the Chocolate Ganache
Finely chop the dark chocolate and place it in a heat-resistant bowl.
Pour the heavy cream into a small saucepan and heat over medium-low heat until it begins to steam and small bubbles appear around the edges.
Do not allow the cream to boil vigorously.
Pour the hot cream over the chopped chocolate.
Allow the mixture to rest undisturbed for approximately 3–5 minutes.
Starting from the center, stir gently with a spatula or whisk until the chocolate and cream form a smooth, glossy mixture.
Add the unsalted butter and optional corn syrup.
Continue stirring until everything is completely incorporated.
Avoid vigorous whisking, which can introduce unwanted air bubbles.
Step 7: Allow the Ganache to Thicken
Leave the prepared ganache at room temperature, stirring occasionally, until it thickens to a spreadable consistency.
Depending on the room temperature, this may take approximately 30–90 minutes.
If necessary, refrigerate the ganache in short intervals, stirring between each interval to maintain an even texture.
The ganache should be firm enough to hold its shape but soft enough to spread smoothly.
Avoid using the ganache while it is hot or excessively runny.
Step 8: Level and Prepare the Cake Layers
Once the chocolate sponge layers have cooled completely, wrap them individually in plastic wrap.
Refrigerate for approximately 30–60 minutes to make them firmer and easier to handle.
Place each chilled cake on a flat surface.
Using a serrated knife or cake leveler, carefully trim any domed tops to create flat, even layers.
Level sponge layers help produce a stable cake with straight sides and sharp edges.
Step 9: Assemble the Chocolate Fudge Cake
Place the first chocolate sponge layer onto a cake board or serving plate positioned on a rotating cake turntable.
Spread an even layer of thickened chocolate ganache over the top using an offset spatula.
Keep the filling relatively level, extending it close to the edges.
Carefully position the second sponge layer on top.
Gently press to secure it without squeezing out too much ganache.
Check that the layers are correctly aligned.
Step 10: Apply the Crumb Coat
Spread a thin layer of ganache over the entire cake, including the top and sides.
Use an offset spatula to fill any gaps between the sponge layers.
This first coating traps loose cake crumbs and creates a smooth base for the final finish.
Refrigerate the cake for approximately 20–30 minutes, or until the crumb coat becomes firm.
Step 11: Create the Smooth Ganache Finish
Remove the chilled cake from the refrigerator.
Apply a generous, even layer of spreadable ganache over the top and sides.
Using a cake scraper held vertically against the sides, rotate the turntable slowly to smooth the ganache.
Repeat the process, removing excess ganache and filling any visible imperfections.
For sharper top edges, chill the cake briefly until the coating is firm enough to refine.
Using a clean offset spatula, gently pull any excess ganache from the outer edge toward the center of the cake.
Repeat around the circumference until the top edge becomes crisp and uniform.
Step 12: Create the Signature Spiral Pattern
Spread a smooth, fresh layer of soft ganache across the top of the cake.
Position the cake on the rotating turntable.
Place the tip of a small offset spatula or the back of a spoon near the outer edge of the cake.
Slowly rotate the turntable while gradually moving the spatula toward the center.
Maintain gentle, consistent pressure throughout the movement.
This technique creates a continuous spiral pattern across the chocolate surface.
Carefully lift the spatula when you reach the center to preserve the design.
For the most attractive result, create the spiral while the ganache is still soft enough to hold a defined groove.
Step 13: Chill and Set the Cake
Place the decorated cake in the refrigerator for approximately 30–60 minutes, or until the ganache is sufficiently firm.
Keep the cake protected from strong refrigerator odors and excessive moisture.
For an attractive glossy finish, avoid unnecessary handling of the decorated surface.
Before serving, allow the cake to stand at cool room temperature for approximately 20–30 minutes so the ganache softens slightly and the chocolate flavor becomes more pronounced.
Step 14: Slice and Serve
Use a long, sharp knife to cut the cake into even slices.
For clean, professional-looking portions, dip the knife into hot water, wipe it completely dry, and slice carefully.
Clean the knife between cuts to prevent smearing the ganache.
Serve on individual dessert plates, optionally accompanied by fresh berries, lightly whipped cream, or a warm beverage.
7. Description
The Ultimate Chocolate Fudge Cake with Silky Ganache is an elegant, deeply chocolatey dessert featuring moist sponge layers enclosed in a smooth coating of dark chocolate ganache.
The cake has a rich, dark appearance, complemented by a glossy surface that reflects light beautifully.
Its exterior features precisely smoothed sides and crisp upper edges, giving it a refined, professional patisserie-style presentation.
The top is decorated with a delicate spiral pattern, creating a sophisticated visual effect without requiring elaborate decorations.
Inside, the sponge remains soft, tender, and moist, while the ganache provides a creamy, luxurious contrast.
The combination of Dutch-process cocoa powder, dark chocolate, and heavy cream produces a balanced chocolate flavor that is rich without relying entirely on sweetness.
Each slice showcases the contrast between the delicate cake layers and the smooth, indulgent ganache.
This dessert is ideal for chocolate lovers who appreciate both exceptional flavor and elegant presentation.
8. Nutritional Information
Estimated Nutritional Values per Serving (Based on 12 Slices):
| Nutrient | Approximate Amount |
|---|---|
| Calories | 600–700 kcal |
| Protein | 7–10 g |
| Carbohydrates | 65–85 g |
| Total Fat | 33–42 g |
| Saturated Fat | 17–23 g |
| Sugar | 48–65 g |
| Fiber | 4–6 g |
| Sodium | 350–500 mg |
Note: Nutritional values are estimates and depend on the specific chocolate, cream, milk, ingredient brands, and final portion sizes.
Healthier Preparation Alternatives
Reduce the sugar: A modest reduction in granulated sugar may be possible, although substantial changes can affect the cake’s moisture, texture, and structure.
Choose dark chocolate: Select chocolate with a higher cocoa percentage and moderate sugar content for a more intense cocoa flavor.
Use smaller portions: Because the cake is rich and satisfying, smaller slices can still provide an enjoyable dessert experience.
Add fresh fruit: Serve with raspberries, strawberries, or blueberries to provide freshness, additional fiber, and contrasting flavors.
Reduce the ganache quantity: Applying a thinner ganache layer can lower the amount of added fat and sugar per serving, although it may change the finished appearance.
9. Conclusion
The Ultimate Chocolate Fudge Cake with Silky Ganache is a sophisticated dessert that combines rich chocolate flavor, a moist sponge texture, and an elegant glossy finish.
Its professional appearance is achieved through careful preparation rather than complicated ingredients.
The key techniques include accurate measurement, controlled baking, complete cooling, properly thickened ganache, and precise cake smoothing.
By following these techniques, home bakers can create a beautiful chocolate cake featuring sharp edges, smooth sides, and a delicate spiral design.
Whether prepared for birthdays, anniversaries, holiday celebrations, or an indulgent weekend dessert, this cake offers a memorable combination of presentation, texture, and flavor.
10. Recommendation
For the best possible results, use high-quality Dutch-process cocoa powder and dark chocolate containing approximately 50–60% cocoa solids.
Freshly brewed coffee is recommended for the sponge batter because it enhances chocolate flavor without substantially changing the cake’s overall character.
Bake the sponge layers carefully, checking for doneness toward the end of the baking period to avoid drying them out.
Allow the cakes to cool completely before assembling, and chill the layers briefly to improve stability during decorating.
For the ganache, use heavy cream with at least 35% fat and ensure that the chocolate is finely chopped so it melts evenly.
A small amount of butter and optional glucose syrup helps produce a smooth ganache with an attractive sheen.
To achieve a professional finish, work with ganache that is soft enough to spread but sufficiently thick to hold its shape.
Use a rotating turntable and a straight cake scraper to create smooth sides, then refine the top edges after a short chilling period.
For the final spiral design, maintain a steady rotation and gradually move the spatula inward without lifting it prematurely.
Storage Recommendation: Keep the finished cake covered in the refrigerator for approximately 3–4 days. Allow individual slices to stand briefly at room temperature before serving for the best texture and flavor.
11. Embracing Healthful Indulgence
Chocolate cake is often associated with celebrations, comfort, and moments of enjoyment. Although it is a rich dessert, it can be enjoyed as part of a varied and balanced eating pattern when consumed in appropriate portions.
Cocoa naturally contains compounds known as flavanols, which are the subject of nutritional research. However, their concentration varies considerably depending on cocoa processing, and the presence of cocoa does not automatically make a chocolate cake a health-promoting food.
The dark chocolate used in this recipe contributes cocoa flavor and small amounts of minerals, including iron and magnesium. Nevertheless, the cake also contains substantial quantities of sugar, saturated fat, and calories.
A balanced approach focuses on enjoying the dessert mindfully rather than assigning foods strict labels of good or bad.
Serving moderate portions, pairing the cake with fresh fruit, and reserving especially rich desserts for occasional enjoyment are practical ways to incorporate indulgent foods into everyday life.
For those who wish to adapt the recipe, reducing the thickness of the ganache coating or making modest changes to the sugar content may help adjust the nutritional profile while retaining the dessert’s characteristic flavor.
The pleasure of homemade baking also extends beyond nutrition. Preparing a cake from scratch encourages creativity, patience, and the development of valuable culinary skills.
Sharing a beautifully prepared chocolate cake with family and friends can make ordinary gatherings more memorable.
Ultimately, healthful indulgence means appreciating delicious food while maintaining variety, balance, and moderation.
Final Thought: 🍫🍰 With its moist chocolate sponge, luxurious dark chocolate ganache, flawless glossy exterior, and elegant spiral finish, the Ultimate Chocolate Fudge Cake is a celebration of rich flavor and refined baking technique. It transforms simple ingredients into a beautiful, bakery-style dessert that is perfect for sharing and savoring.