
1. Introduction
Classic Danish Butter Cookies are delicate, buttery treats known for their crisp edges, tender centers, and irresistible melt-in-your-mouth texture.
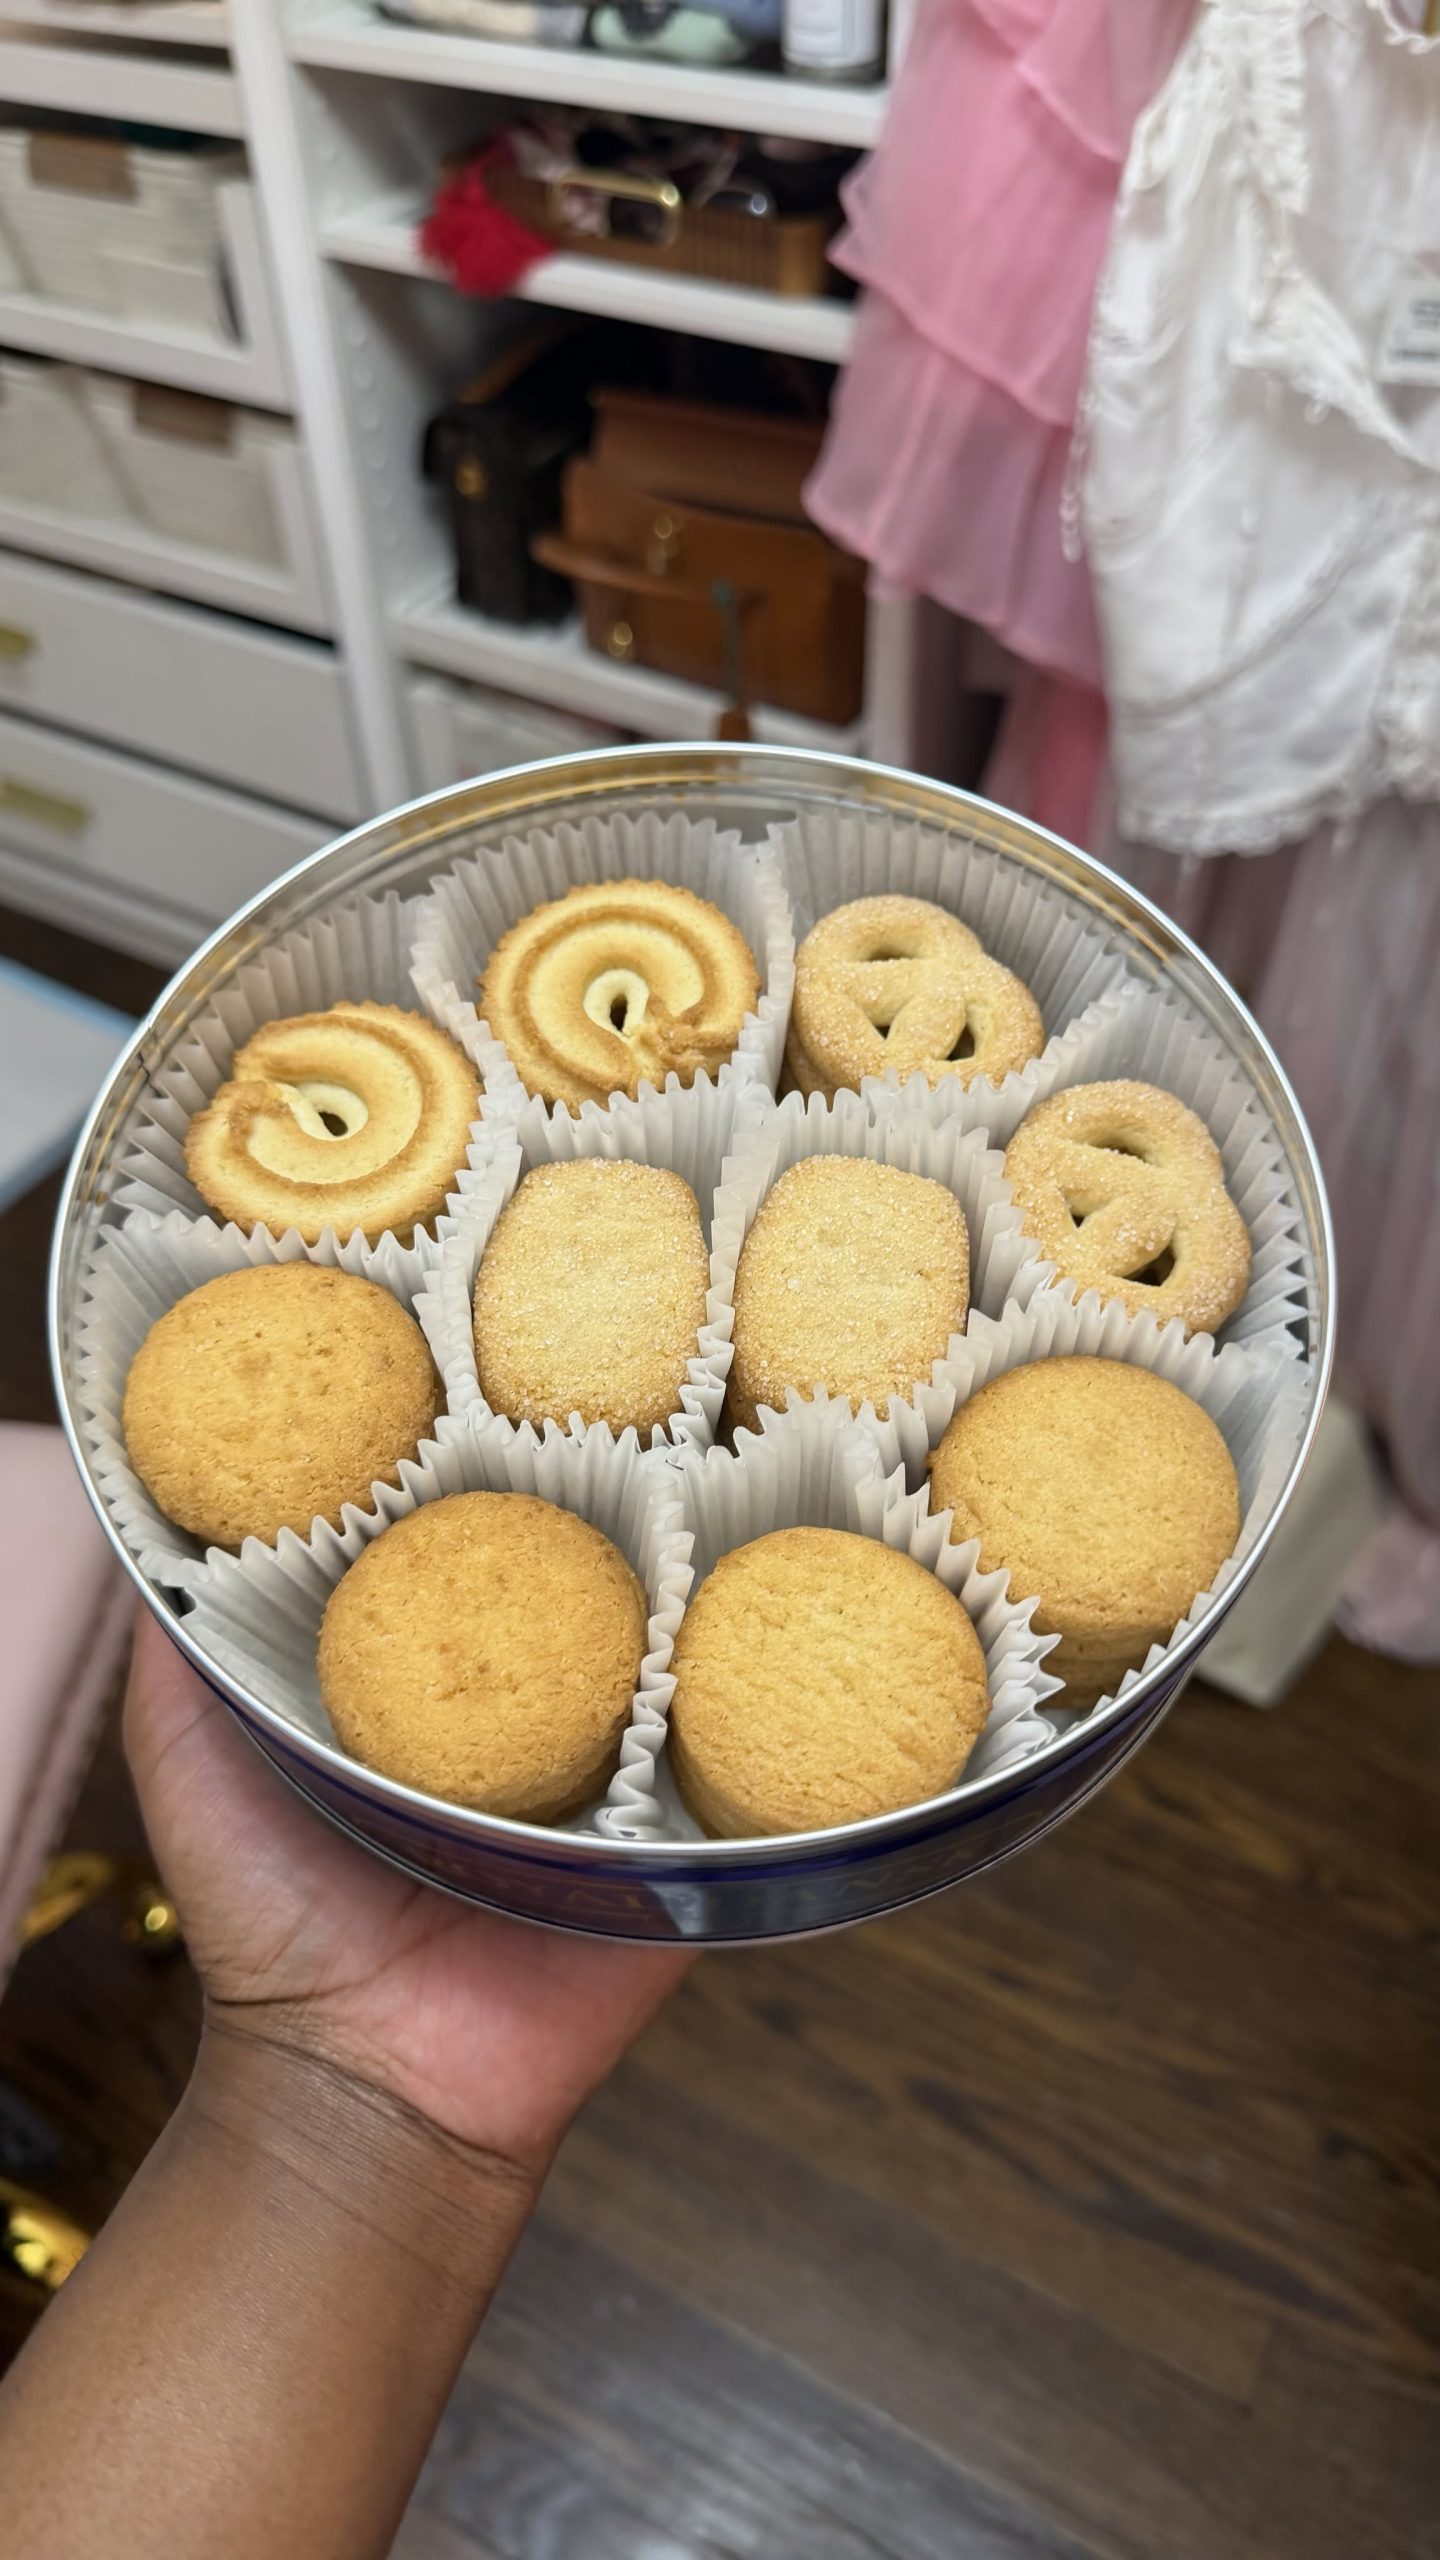
Traditionally arranged in decorative round tins, these golden cookies are recognized for their beautiful assortment of shapes, including elegant swirls, delicate rings, rectangular biscuits, and charming pretzel designs.
Made with simple pantry ingredients such as butter, sugar, eggs, flour, and vanilla, Danish butter cookies prove that delicious homemade baking doesn’t require complicated techniques or lengthy ingredient lists.
The secret to their distinctive flavor and texture lies in using high-quality butter, properly creaming the ingredients, and chilling the shaped dough before baking.
Unlike many traditional cookies, Danish butter cookies do not require baking powder or baking soda. This helps preserve their intricate piped patterns and produces their characteristic delicate, slightly sandy crunch.
Whether prepared for holiday celebrations, afternoon tea, homemade gifts, or everyday snacking, these classic butter cookies offer a wonderful combination of simplicity, elegance, and comforting flavor.
With approximately 20 minutes of active preparation, these homemade cookies are a delightful baking project for beginners and experienced bakers alike.
2. Origin and Cultural Significance
Danish butter cookies have a long history in Denmark, where butter-rich biscuits are an important part of traditional baking.
One of the best-known Danish varieties is vaniljekranse, meaning vanilla wreaths. These delicate ring-shaped cookies are traditionally flavored with vanilla and are especially popular during the Christmas season.
Danish butter cookies gained international recognition through their distinctive round metal tins, which often contain several different cookie shapes.
These decorative tins became popular gifts and helped introduce Danish-style butter cookies to households around the world.
Traditional Danish baking emphasizes the use of good-quality butter, simple ingredients, and careful preparation.
The characteristic piped rings, swirls, and other shapes reflect the importance of presentation in classic European baking.
Today, Danish butter cookies remain popular during holidays, family gatherings, and special occasions.
Their elegant appearance, delicate texture, and long-standing association with gift-giving make them a timeless homemade treat.
3. Ingredients
For the Danish Butter Cookies
- 1 cup (225 g) unsalted butter, softened at room temperature
- ½ cup (115 g) granulated sugar or superfine sugar
- 1 large egg, at room temperature
- 1 tablespoon vanilla extract or vanilla bean paste
- 2 cups (284 g) all-purpose flour, sifted
- ¼ teaspoon fine salt
For Decorating
– 2 tablespoons coarse sanding sugar, optional
Equipment Needed
- Large mixing bowl
- Electric hand mixer or stand mixer
- Rubber spatula
- Fine-mesh sieve
- Sturdy piping bag
- Large open-star piping tip, such as Wilton 1M or Ateco #827
- Baking sheets
- Parchment paper
- Wire cooling rack
- Airtight cookie tin or container
Ingredient Note: Flour measurements can vary significantly depending on how flour is packed into a measuring cup. For consistent results, use a kitchen scale and follow the specified 284 g measurement.
4. Optional Additions
Customize your homemade Danish butter cookies with:
- Vanilla bean paste: Replace vanilla extract for a richer aroma and attractive vanilla speckles.
- Almond extract: Add ¼ teaspoon for a subtle nutty flavor.
- Lemon zest: Mix in 1 teaspoon of finely grated lemon zest for a refreshing citrus variation.
- Orange zest: Add a small amount for a fragrant holiday-inspired flavor.
- Chocolate drizzle: Decorate cooled cookies with melted dark or milk chocolate.
- Chocolate-dipped edges: Dip half of each cooled cookie in melted chocolate and allow it to set.
- Coarse sugar: Sprinkle over selected shapes for extra crunch.
- Cinnamon: Add a small pinch for a gently spiced variation.
For the most traditional butter cookie flavor, keep the ingredients simple and allow the butter and vanilla to remain the dominant flavors.
5. Tips for Success
- Use high-quality unsalted butter for the richest flavor.
- Soften the butter until pliable but not melted or greasy.
- Cream the butter and sugar thoroughly for a light texture.
- Use room-temperature eggs to help the ingredients combine evenly.
- Sift the flour before incorporating it into the dough.
- Avoid overmixing once the flour has been added.
- Use a sturdy piping bag because butter cookie dough is thicker than cake frosting.
- Pipe cookies in similar sizes to promote even baking.
- Chill shaped cookies for 20–30 minutes before baking.
- Bake one sheet at a time for consistent results.
- Remove the cookies when the edges are lightly golden.
- Allow the cookies to cool completely before storing them.
Important: If the dough is too stiff to pipe, allow it to soften slightly at room temperature before trying again. Avoid adding large amounts of liquid, as this can change the cookie texture and cause spreading.
6. Step-by-Step Instructions
Step 1: Prepare the Ingredients
Measure all ingredients before beginning.
Allow the butter and egg to reach room temperature.
The butter should be soft enough to press gently with a finger but should still hold its shape.
Line two baking sheets with parchment paper.
Set them aside while preparing the dough.
Step 2: Combine the Butter, Sugar, and Salt
Place the softened butter into a large mixing bowl.
Add:
- ½ cup granulated sugar
- ¼ teaspoon fine salt
Using an electric hand mixer or stand mixer fitted with a paddle attachment, begin mixing on medium speed.
Step 3: Cream Until Light and Fluffy
Increase the mixer speed to medium-high.
Beat the butter and sugar mixture for approximately 3–4 minutes.
The mixture should become pale, creamy, and noticeably lighter in texture.
Scrape down the sides of the bowl as necessary.
Proper creaming helps produce tender cookies with a delicate bite.
Step 4: Add the Egg
Reduce the mixer speed to low.
Add the room-temperature egg.
Mix until the egg is fully incorporated into the butter mixture.
Scrape down the sides and bottom of the bowl to ensure even mixing.
Step 5: Add the Vanilla
Pour in 1 tablespoon of vanilla extract or vanilla bean paste.
Mix gently until combined.
The vanilla enhances the buttery flavor and provides the familiar aroma associated with classic Danish butter cookies.
Step 6: Sift the Flour
Place the all-purpose flour in a fine-mesh sieve.
Sift it into a separate bowl or directly over the butter mixture in batches.
Sifting helps remove lumps and makes the flour easier to incorporate evenly.
Step 7: Incorporate the Flour
Turn the mixer to low speed.
Gradually add the sifted flour.
Mix only until the flour disappears and a thick, soft dough forms.
Stop mixing as soon as the ingredients are combined.
Overmixing can develop too much gluten, making the cookies less tender.
Step 8: Check the Dough Consistency
The finished dough should be soft enough to pipe but firm enough to hold its shape.
It should not be sticky, runny, or excessively stiff.
If the dough feels too soft, refrigerate it briefly.
If it is difficult to pipe, allow it to sit at room temperature for a few minutes.
Step 9: Prepare the Piping Bag
Fit a sturdy piping bag with a large open-star tip.
Transfer a portion of the cookie dough into the bag.
Avoid overfilling it, as a smaller amount of dough is easier to control.
Twist the top of the bag securely.
Step 10: Pipe the Classic Swirl Cookies
Hold the piping bag vertically above the parchment-lined baking sheet.
Apply steady pressure and pipe small circular swirls approximately 2 inches wide.
Release the pressure gently to create a neat finish.
Leave approximately 1½–2 inches between cookies.
Step 11: Create the Traditional Rings
Using the same piping tip, pipe circular rings.
Begin at one point and guide the dough into a small circle.
Bring the end of the dough back to meet the starting point.
These classic wreath-shaped cookies are inspired by traditional Danish vaniljekranse.
Step 12: Shape the Rectangular Cookies
Set aside a small portion of dough.
Roll it gently into short logs or flatten it into small rectangular pieces.
Place them on the prepared baking sheet.
If desired, use a fork to create delicate decorative lines across the surface.
Step 13: Create the Pretzel Shapes
Roll small portions of dough into thin, even ropes.
Shape each rope into a miniature pretzel.
Gently press the ends into place.
Keep the thickness consistent so the cookies bake evenly.
Step 14: Add Decorative Sugar
Sprinkle the rectangular and pretzel-shaped cookies with coarse sanding sugar.
Press the sugar very lightly onto the surface so it adheres.
The sugar adds a pleasant crunch and a delicate sparkling finish.
Step 15: Chill the Shaped Cookies
Place the baking sheets in the refrigerator for 20–30 minutes.
This step is especially important for piped cookies.
Chilling firms the butter and helps the cookies retain their decorative ridges during baking.
Step 16: Preheat the Oven
While the cookies chill, preheat the oven to 325°F (165°C).
Position an oven rack in the center.
Allow the oven to reach the correct temperature before baking.
Step 17: Bake the First Batch
Remove one chilled baking sheet from the refrigerator.
Place it in the preheated oven.
Bake for approximately 14–16 minutes.
The cookies are ready when the bottoms and outer edges become lightly golden.
The centers should remain relatively pale.
Step 18: Monitor the Baking
Check the cookies near the end of the baking time.
Smaller cookies may bake faster than larger ones.
Avoid allowing the entire cookie surface to become dark golden brown, as this can result in a dry texture.
Step 19: Cool on the Baking Sheet
Remove the baking sheet from the oven.
Allow the cookies to rest on the hot pan for approximately 3–5 minutes.
They will be delicate immediately after baking.
This brief resting period helps them firm up before transferring.
Step 20: Transfer to a Cooling Rack
Using a thin spatula, carefully transfer the cookies to a wire cooling rack.
Allow them to cool completely.
As they cool, the cookies develop their characteristic crisp texture.
Step 21: Bake the Remaining Cookies
Repeat the baking process with the remaining chilled cookie sheets.
If the baking sheets are still hot, allow them to cool before placing additional unbaked dough on them.
Step 22: Arrange the Cookies
Once completely cooled, arrange the cookies by shape.
For a traditional presentation, place the swirls, rings, rectangles, and pretzels in separate sections of a round cookie tin.
Use parchment paper between layers if stacking.
Step 23: Serve and Enjoy
Serve the Danish butter cookies with coffee, tea, hot chocolate, or milk.
Enjoy their delicate crunch, rich buttery flavor, and melt-in-your-mouth texture.
7. Description
Classic Danish Butter Cookies are delicate, golden biscuits with a rich buttery aroma and a beautifully crisp texture.
Their distinctive appearance comes from the variety of shapes, including piped swirls, decorative rings, rectangular biscuits, and small pretzels.
The piped cookies feature clearly defined ridges that become lightly golden during baking.
The centers remain pale and tender, while the edges develop a delicate crunch.
High-quality butter provides the dominant flavor, complemented by the gentle sweetness of sugar and the warm aroma of vanilla.
Unlike chewy cookies, Danish butter cookies have a fine, slightly sandy texture that crumbles delicately with each bite.
The optional coarse sugar adds a subtle crunch to selected shapes.
Arranged inside a traditional round tin, these cookies create a beautiful assortment that is perfect for serving guests or giving as a homemade gift.
8. Nutritional Information
Approximate values per cookie, assuming the recipe produces 32 cookies:
| Nutrient | Estimated Amount |
|---|---|
| Calories | 100–115 kcal |
| Protein | 1–2 g |
| Carbohydrates | 10–12 g |
| Total Fat | 6–7 g |
| Saturated Fat | 3–4 g |
| Fiber | Less than 1 g |
| Sugar | 3–5 g |
| Sodium | 20–35 mg |
Values vary depending on cookie size, butter brand, and the amount of decorative sugar used.
9. Recipe Details
| Category | Details |
|---|---|
| Recipe Name | Classic Danish Butter Cookies |
| Cuisine | Danish-Inspired |
| Preparation Time | 20 Minutes |
| Chilling Time | 20–30 Minutes |
| Baking Time | 14–16 Minutes per Batch |
| Total Time | Approximately 55–75 Minutes, Plus Cooling |
| Yield | Approximately 30–35 Cookies |
| Difficulty | Easy to Intermediate |
| Main Ingredients | Butter, Flour, Sugar, Egg, Vanilla |
| Cooking Method | Baking |
| Course | Dessert, Snack |
| Texture | Crisp, Tender, Melt-in-Your-Mouth |
| Flavor Profile | Rich, Buttery, Lightly Sweet, Vanilla |
| Best For | Holidays, Gift Boxes, Afternoon Tea |
10. Conclusion
Classic Danish Butter Cookies are a timeless homemade treat that combines rich butter flavor, delicate sweetness, and a beautifully crisp texture.
Their traditional assortment of swirls, rings, rectangles, and pretzel shapes makes them especially attractive when arranged inside a decorative cookie tin.
Despite their elegant appearance, these cookies require only a handful of simple ingredients and straightforward baking techniques.
The key to success is properly creaming the butter and sugar, avoiding overmixing, and chilling the shaped dough before baking.
Whether prepared for holiday gatherings, homemade gifts, afternoon tea, or everyday enjoyment, these Danish-style butter cookies are a wonderful recipe to keep in your baking collection.
11. Serving and Storage Recommendations
Serve with:
- Hot coffee
- Black tea
- Earl Grey tea
- Hot chocolate
- Warm milk
- Vanilla latte
- Fresh berries
- A small bowl of melted chocolate for dipping
Serving: Serve the cookies at room temperature for the best buttery flavor and crisp texture.
Room Temperature Storage: Store completely cooled cookies in an airtight container or cookie tin at room temperature for approximately 1–2 weeks.
Moisture Protection: Keep the cookies away from humidity, which can soften their crisp texture.
Freezing Baked Cookies: Freeze fully cooled cookies in an airtight freezer-safe container for up to 2–3 months for best quality.
Freezing Cookie Dough: Pipe the dough onto a parchment-lined tray, freeze until firm, then transfer the shaped cookies to a freezer-safe container. Bake from frozen, allowing a few extra minutes if needed.
Make-Ahead: Prepare the cookie dough up to 2 days in advance and refrigerate it tightly covered. Allow it to soften slightly before piping if necessary.
Gift Packaging: Arrange the cooled cookies in a decorative round tin lined with parchment paper. Separate layers with additional parchment to prevent breakage.
12. Embracing Healthful Indulgence
Classic Danish Butter Cookies are a rich, satisfying treat made with familiar baking ingredients.
Butter provides their signature flavor and delicate texture, while flour, sugar, eggs, and vanilla create a simple, traditional cookie dough.
Because these cookies contain butter and added sugar, they are best enjoyed in moderate portions as part of a varied, balanced diet.
Their small size makes them convenient for portioning, especially when served alongside tea or coffee.
For a slightly less sweet variation, omit the optional coarse sanding sugar.
You can also experiment with subtle natural flavorings such as lemon zest, orange zest, or vanilla bean paste without substantially changing the recipe.
The recipe’s simplicity also makes it easy to prepare at home, giving you control over the ingredients and serving sizes.
With their golden edges, delicate crunch, rich buttery flavor, and beautiful traditional shapes, homemade Danish butter cookies are a wonderful way to enjoy a classic bakery-style treat.