
Introduction
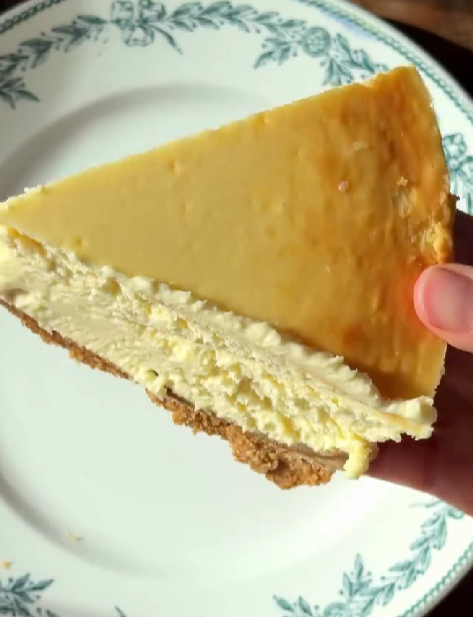
Classic New York Style Baked Cheesecake is a timeless dessert loved for its rich flavor, dense yet velvety texture, and buttery graham cracker crust. Made with full-fat cream cheese, sour cream, eggs, and vanilla, this cheesecake delivers a luxurious, creamy filling with just the right amount of sweetness.
Although cheesecake may look like an elaborate dessert, making it at home is surprisingly simple when you follow a few essential baking techniques. Using room-temperature ingredients, mixing gently, and allowing the cheesecake to cool gradually will help create a smooth filling and reduce the risk of cracks.
Whether you’re preparing it for a birthday, holiday gathering, or special weekend treat, this homemade New York cheesecake is sure to impress.
Origin
Cheesecake has a long history that dates back to ancient Greece, where early versions were made with cheese, flour, and honey. Over time, the dessert evolved as it spread throughout Europe, with different regions developing their own styles and ingredients.
The New York-style cheesecake became especially popular in the United States during the twentieth century. Its signature characteristics include a generous amount of cream cheese, a rich and dense filling, and a simple crumb crust. Modern versions often include sour cream or heavy cream to create a smoother texture and balanced flavor.
Cultural Significance
New York cheesecake has become one of America’s most recognizable desserts. It is commonly served in restaurants, bakeries, cafés, and homes across the country.
Its elegant appearance and creamy texture make it a popular choice for celebrations and special occasions. While countless variations exist, the classic version remains a favorite because of its simple ingredients and unmistakably rich flavor.
Ingredients Quantity
For the Graham Cracker Crust
- 1½ cups graham cracker crumbs, approximately 12 full sheets
- 5 tablespoons unsalted butter, melted
- 2 tablespoons granulated sugar
- ⅛ teaspoon salt
For the Cream Cheese Filling
- 32 oz (four 8-oz blocks) full-fat cream cheese, softened to room temperature
- 1 cup sour cream, or heavy cream, at room temperature
- 1 cup granulated sugar
- 3 tablespoons all-purpose flour
- 1 tablespoon vanilla extract
- 4 large eggs, at room temperature
Equipment: A 9-inch springform pan, mixing bowls, an electric mixer, a spatula, and a roasting pan if using a water bath.
Optional Additions
Although the traditional recipe is delicious on its own, you can customize it with a few simple additions:
- Lemon zest: Add 1 teaspoon for a subtle citrus flavor.
- Fresh berries: Serve with strawberries, raspberries, or blueberries.
- Fruit sauce: Add a homemade strawberry or raspberry topping.
- Chocolate drizzle: Finish with melted dark or milk chocolate.
- Caramel sauce: Add a drizzle of caramel for extra sweetness.
- Whipped cream: Serve each slice with a small spoonful of freshly whipped cream.
Tips for Success
Use room-temperature ingredients: Cold cream cheese can create lumps in the filling. Allow the cream cheese, eggs, and sour cream to reach room temperature before mixing.
Avoid overmixing: Once the eggs are added, mix on low speed just until combined. Too much air in the batter can cause the cheesecake to rise excessively and crack as it cools.
Prepare the crust properly: Press the graham cracker mixture firmly and evenly into the bottom of the pan. Pre-baking it helps create a sturdy base.
Use a water bath: A water bath provides gentle, even heat and helps prevent the cheesecake from drying out. Wrap the outside of the springform pan securely with heavy-duty foil to keep water from entering.
Cool gradually: Sudden temperature changes can cause cracks. Allow the cheesecake to cool slowly in the turned-off oven before transferring it to room temperature.
Chill overnight: Refrigeration is essential for developing the proper dense texture and making clean slices.
Instructions
Step 1: Prepare the Oven and Pan
Preheat your oven to 325°F (163°C). Lightly grease a 9-inch springform pan.
If using a water bath, wrap the outside of the pan with two or three layers of heavy-duty aluminum foil to prevent water from leaking inside.
Step 2: Make the Graham Cracker Crust
Combine the graham cracker crumbs, melted butter, granulated sugar, and salt in a mixing bowl. Stir until the crumbs are evenly coated and resemble damp sand.
Transfer the mixture into the prepared springform pan. Press firmly across the bottom to create an even crust.
Bake for approximately 8–10 minutes. Remove from the oven and allow the crust to cool while preparing the filling.
Step 3: Prepare the Cream Cheese Filling
Place the softened cream cheese in a large mixing bowl. Beat on medium-low speed until smooth and creamy, scraping down the sides of the bowl as needed.
Add the granulated sugar and flour. Mix until incorporated, then add the sour cream and vanilla extract.
Continue mixing on low speed until the filling is smooth. Avoid beating too much air into the mixture.
Step 4: Add the Eggs
Add the eggs one at a time, mixing on low speed after each addition until just combined.
Scrape the sides and bottom of the bowl with a spatula to ensure everything is evenly incorporated. The finished batter should be thick, smooth, and free of lumps.
Step 5: Assemble the Cheesecake
Pour the cream cheese filling over the cooled graham cracker crust.
Gently smooth the surface with a spatula. Tap the pan lightly against the counter a few times to release any large air bubbles.
Step 6: Bake the Cheesecake
Place the springform pan inside a larger roasting pan. Carefully pour hot water into the roasting pan until it reaches approximately halfway up the sides of the springform pan.
Bake at 325°F (163°C) for approximately 60–75 minutes. The edges should look set, while the center should still have a slight wobble when gently shaken.
Avoid waiting until the center becomes completely firm, as the cheesecake will continue setting as it cools.
Step 7: Cool Gradually
Turn off the oven and leave the cheesecake inside with the door slightly open for approximately 1 hour.
Remove it from the oven and water bath. Carefully remove the foil and allow the cheesecake to cool completely at room temperature.
Step 8: Refrigerate and Serve
Cover the cooled cheesecake and refrigerate for at least 6 hours, preferably overnight.
Before serving, carefully run a thin knife around the edge of the pan and release the springform sides.
For clean slices, dip a sharp knife in warm water and wipe it dry between cuts.
Description
This Classic New York Style Baked Cheesecake features a thick, buttery graham cracker crust topped with a rich and velvety cream cheese filling. Each slice is smooth, dense, and creamy, with a delicate vanilla flavor and a perfectly balanced sweetness.
The contrast between the crunchy crust and silky filling makes every bite satisfying. Serve it plain for a traditional presentation or add fresh berries, fruit sauce, or whipped cream for an elegant finishing touch.
Nutritional Information
The following values are approximate and may vary depending on the brands of ingredients used and the choice between sour cream and heavy cream.
Estimated nutrition per serving, assuming 12 servings:
- Calories: 430–490
- Protein: 7–9 g
- Carbohydrates: 30–35 g
- Fat: 32–38 g
- Sugar: 23–27 g
- Fiber: Less than 1 g
Conclusion
Classic New York Style Baked Cheesecake is a dessert worth making from scratch. Its rich cream cheese filling, buttery graham cracker crust, and smooth texture create a combination that never goes out of style.
With simple ingredients and a little patience during baking and cooling, you can prepare a beautiful homemade cheesecake that tastes just as satisfying as one from your favorite bakery.
Recommendation
For the best results, prepare this cheesecake one day before serving. Overnight refrigeration allows the filling to become firm, creamy, and easier to slice.
Store leftovers covered in the refrigerator for up to 5 days. Individual slices can also be frozen in airtight wrapping for up to 2 months. Thaw frozen slices overnight in the refrigerator before serving.
Embracing Healthful Indulgence
Enjoying dessert can be part of a balanced lifestyle. This cheesecake is a rich treat, so serving moderate portions alongside fresh berries can add color, freshness, and dietary fiber.
You can also experiment with slightly smaller slices or lighter toppings while keeping the traditional cheesecake recipe intact. The goal is to enjoy every bite mindfully without giving up the desserts you love.