
1. Introduction
Homemade No-Churn Vanilla Ice Cream is a rich, smooth, and creamy frozen dessert that can be prepared with just four simple ingredients and no ice cream machine.
Made with cold heavy whipping cream, sweetened condensed milk, pure vanilla extract, and a pinch of salt, this recipe creates a delicious homemade ice cream with a soft, velvety texture and classic vanilla flavor.
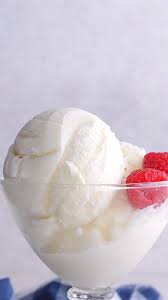
The finished dessert is served in bowls or glass dishes and topped with a bright red maraschino cherry for a traditional ice cream parlor presentation.
One of the greatest advantages of this recipe is its simplicity.
Traditional ice cream recipes often require cooking a custard base, chilling it thoroughly, and processing it in an ice cream maker.
This no-churn version eliminates those steps.
Instead, heavy whipping cream is beaten until it forms stiff peaks, creating a light and airy base.
Sweetened condensed milk adds sweetness and helps produce a smooth, scoopable texture.
Vanilla extract provides the familiar aromatic flavor, while a small pinch of salt balances the sweetness.
The ingredients are gently folded together and frozen until firm.
After approximately 4–6 hours in the freezer, the mixture transforms into a creamy homemade dessert.
Although the recipe itself is vanilla ice cream, it can easily be adapted into cherry vanilla ice cream by folding chopped cherries into the base.
For the classic version presented here, a maraschino cherry is added as a garnish just before serving.
This easy frozen dessert is ideal for summer afternoons, family gatherings, birthday celebrations, weekend treats, or whenever you want homemade ice cream without specialized equipment.
2. Origin and Cultural Significance
Ice cream has a long and fascinating history, with frozen desserts appearing in different forms across many cultures.
Early frozen sweets often combined ice or snow with fruit, honey, or flavored syrups.
Over time, techniques for preparing frozen desserts evolved, eventually leading to milk- and cream-based ice creams.
Vanilla became one of the most recognizable ice cream flavors because of its delicate aroma and ability to complement many other ingredients.
Vanilla ice cream remains especially popular in American and European dessert traditions.
It is commonly served on its own or alongside cakes, pies, brownies, fruit desserts, and warm pastries.
Traditional ice cream is often prepared using a custard base made from milk, cream, sugar, and sometimes egg yolks.
The mixture is chilled and churned as it freezes.
Churning helps incorporate air and limits the formation of large ice crystals.
No-churn ice cream uses a different method.
Whipped cream provides the incorporated air, while sweetened condensed milk contributes sugar and milk solids that help create a softer frozen texture.
This approach has become popular in home kitchens because it requires minimal equipment and preparation.
The use of maraschino cherries as a topping reflects the familiar presentation of classic ice cream sundaes.
Bright red cherries are often associated with ice cream parlors, soda fountains, milkshakes, and celebratory desserts.
This recipe combines the traditional flavor of vanilla ice cream with the convenience of a modern no-churn preparation method.
3. Ingredients
This recipe uses four ingredients for the ice cream base and one optional topping.
A. For the Vanilla Ice Cream Base
| Ingredient | Amount |
|---|---|
| Heavy whipping cream, cold | 2 cups (480 ml) |
| Sweetened condensed milk | 1 can (14 oz / approximately 396 g) |
| Pure vanilla extract | 1 tablespoon |
| Fine salt | 1 pinch |
Instead of vanilla extract, you may use the scraped seeds from 1 vanilla bean.
B. For Serving
| Ingredient | Amount |
|---|---|
| Maraschino cherries | 4–6, or as desired |
Equipment
- Large mixing bowl
- Medium mixing bowl
- Hand mixer or stand mixer
- Rubber spatula
- Measuring cups and spoons
- 9 × 5-inch loaf pan or freezer-safe container
- Plastic wrap or airtight lid
- Ice cream scoop
- Serving bowls or dessert glasses
Yield: Approximately 4–6 generous servings. The mixture also makes roughly 1 quart of ice cream, depending on how much air is incorporated.
4. Optional Additions
The classic vanilla ice cream base is delicious on its own, but it can also be customized with a variety of flavors and toppings.
Fresh Cherries: Fold in chopped, pitted fresh cherries for a fruity variation.
Maraschino Cherry Pieces: Add a small amount of chopped, well-drained maraschino cherries to the base.
Chocolate Chips: Fold in mini chocolate chips for extra texture.
Chocolate Sauce: Drizzle over the finished ice cream.
Caramel Sauce: Add a swirl of caramel before freezing.
Strawberry Sauce: Spoon over individual servings.
Crushed Cookies: Fold in crushed chocolate sandwich cookies or vanilla cookies.
Toasted Almonds: Add chopped toasted almonds for crunch.
Vanilla Bean Seeds: Use fresh vanilla bean seeds for a stronger vanilla aroma.
Cherry Syrup: Add a small drizzle over the finished dessert.
Fresh Berries: Serve with strawberries, raspberries, or blueberries.
Whipped Cream: Add a small swirl before placing the maraschino cherry on top.
Chopped Dark Chocolate: Combine with fresh cherries for a cherry-chocolate variation.
For the smoothest classic vanilla ice cream, prepare the original four-ingredient base and add toppings only when serving.
5. Tips for Success
The secret to smooth no-churn vanilla ice cream is incorporating enough air into the whipped cream while preserving that air during mixing.
Use Very Cold Heavy Cream
Heavy whipping cream should be thoroughly chilled before whipping.
Cold cream whips more efficiently and produces a more stable foam.
For best results, refrigerate the cream until ready to use.
Chill the Mixing Bowl
Place the large mixing bowl in the refrigerator for approximately 10–15 minutes before whipping.
This is especially helpful in a warm kitchen.
Whip to Stiff Peaks
Beat the cream until stiff peaks form.
When the beaters are lifted, the whipped cream should hold its shape.
Avoid overwhipping because the cream can become grainy and eventually separate into butter and liquid.
Use Sweetened Condensed Milk
Make sure the can contains sweetened condensed milk rather than evaporated milk.
These products are not interchangeable in this recipe.
Sweetened condensed milk provides both sweetness and texture.
Use Pure Vanilla Extract
Pure vanilla extract creates a fragrant, classic vanilla flavor.
Vanilla bean seeds can also be used for a more pronounced vanilla appearance and aroma.
Fold Gently
Do not vigorously stir the whipped cream into the condensed milk.
Instead, use a spatula and gentle folding motions.
This helps preserve the air incorporated during whipping.
Freeze in a Suitable Container
A metal loaf pan works well because it conducts cold efficiently.
A freezer-safe airtight container is also suitable.
Cover the Surface
Press plastic wrap gently against the surface of the ice cream before freezing.
This helps reduce exposure to air and the formation of ice crystals.
Allow Enough Freezing Time
Freeze for at least 4–6 hours.
For a firmer texture, leave the ice cream overnight.
Let It Soften Before Scooping
If the ice cream becomes very firm, allow it to stand at room temperature for approximately 5–10 minutes before serving.
Drain the Cherries
Drain maraschino cherries before using them as a topping.
This prevents excess syrup from running over the ice cream.
6. Step-by-Step Instructions
Part A: Preparing the Equipment
Step 1: Gather the Ingredients
Measure the heavy whipping cream, sweetened condensed milk, vanilla extract, and salt.
Step 2: Check the Cream
Make sure the heavy whipping cream is cold.
Step 3: Prepare the Mixing Bowl
Select a large, clean mixing bowl.
Step 4: Chill the Bowl
Place the bowl in the refrigerator for approximately 10–15 minutes.
Step 5: Prepare the Mixer
Attach the beaters to a hand mixer or prepare a stand mixer with a whisk attachment.
Step 6: Prepare the Freezing Container
Choose a 9 × 5-inch loaf pan or airtight freezer-safe container.
Step 7: Set Aside the Container
Keep the container ready for the ice cream mixture.
Part B: Whipping the Cream
Step 8: Remove the Chilled Bowl
Take the mixing bowl out of the refrigerator.
Step 9: Add the Cream
Pour 2 cups cold heavy whipping cream into the bowl.
Step 10: Begin Mixing
Start beating the cream at medium speed.
Step 11: Increase the Speed
Gradually increase the mixer speed as the cream thickens.
Step 12: Watch the Texture
The cream will begin to form soft peaks.
Step 13: Continue Whipping
Beat until the cream becomes thick and fluffy.
Step 14: Check for Stiff Peaks
Lift the beaters from the cream.
Step 15: Inspect the Peaks
The peaks should stand upright and hold their shape.
Step 16: Stop Mixing
Turn off the mixer once stiff peaks form.
Step 17: Avoid Overwhipping
Do not continue beating after the cream becomes stiff.
Step 18: Set the Whipped Cream Aside
Keep the whipped cream cool while preparing the condensed milk mixture.
Part C: Preparing the Vanilla Base
Step 19: Prepare a Second Bowl
Place a medium mixing bowl on the countertop.
Step 20: Open the Condensed Milk
Open the 14-ounce can of sweetened condensed milk.
Step 21: Add the Condensed Milk
Pour the entire can into the bowl.
Step 22: Measure the Vanilla
Measure 1 tablespoon pure vanilla extract.
Step 23: Add the Vanilla
Pour the vanilla extract into the condensed milk.
Step 24: Add the Salt
Sprinkle in a small pinch of fine salt.
Step 25: Begin Whisking
Use a whisk to combine the ingredients.
Step 26: Continue Mixing
Whisk until the vanilla and salt are evenly distributed.
Step 27: Check the Consistency
The mixture should be smooth and thick.
Step 28: Set Aside
Keep the vanilla mixture ready for folding.
Part D: Combining the Ice Cream Base
Step 29: Prepare the Spatula
Use a large rubber spatula.
Step 30: Add the First Portion of Cream
Spoon approximately one-third of the whipped cream into the condensed milk mixture.
Step 31: Begin Folding
Gently fold the whipped cream into the condensed milk.
Step 32: Lighten the Mixture
Continue folding until mostly combined.
Step 33: Add More Whipped Cream
Transfer another portion of whipped cream into the bowl.
Step 34: Fold Gently
Use slow, sweeping motions to incorporate the cream.
Step 35: Add the Remaining Cream
Add the rest of the whipped cream.
Step 36: Continue Folding
Gently lift the mixture from the bottom of the bowl and fold it over the top.
Step 37: Rotate the Bowl
Turn the bowl slightly as you fold.
Step 38: Check for Streaks
Look for any remaining streaks of condensed milk or whipped cream.
Step 39: Finish Combining
Fold until the mixture is smooth and uniform.
Step 40: Stop Mixing
Avoid unnecessary stirring once the ingredients are combined.
Step 41: Check the Texture
The finished base should look thick, airy, and creamy.
Part E: Transferring the Ice Cream
Step 42: Prepare the Loaf Pan
Place the 9 × 5-inch loaf pan on a stable surface.
Step 43: Transfer the Mixture
Spoon the ice cream base into the pan.
Step 44: Spread Evenly
Use a spatula to distribute the mixture.
Step 45: Smooth the Top
Gently smooth the surface.
Step 46: Avoid Compressing
Do not press the mixture down firmly.
Step 47: Prepare the Cover
Cut a piece of plastic wrap large enough to cover the surface.
Step 48: Cover the Ice Cream
Press the plastic wrap gently against the top.
Step 49: Add an Outer Cover
If desired, cover the pan with a lid or additional wrap.
Part F: Freezing the Ice Cream
Step 50: Place in the Freezer
Transfer the covered pan to the freezer.
Step 51: Position on a Flat Surface
Keep the container level to prevent uneven freezing.
Step 52: Freeze Undisturbed
Leave the mixture in the freezer for at least 4–6 hours.
Step 53: Check the Texture
After the freezing period, inspect the ice cream.
Step 54: Continue Freezing if Needed
If the center is still soft, return the container to the freezer.
Step 55: Freeze Overnight for Best Firmness
For a firmer texture, leave the ice cream overnight.
Step 56: Keep Covered
Maintain the cover until ready to serve.
Part G: Preparing the Cherry Topping
Step 57: Prepare the Cherries
Remove the maraschino cherries from their jar.
Step 58: Drain the Syrup
Allow excess syrup to drip away.
Step 59: Prepare the Serving Dishes
Arrange four to six glass dessert bowls or ice cream dishes.
Part H: Scooping and Serving
Step 60: Remove from the Freezer
Take the ice cream container out of the freezer.
Step 61: Remove the Cover
Carefully peel away the plastic wrap.
Step 62: Allow to Soften Briefly
If necessary, let the ice cream stand for approximately 5–10 minutes.
Step 63: Prepare the Scoop
Use a clean ice cream scoop.
Step 64: Scoop the Ice Cream
Scoop the frozen vanilla ice cream into rounded portions.
Step 65: Transfer to the Bowls
Place one or two scoops into each serving dish.
Step 66: Add the Cherry
Place one maraschino cherry on top of each serving.
Step 67: Add Optional Toppings
If desired, finish with chocolate sauce, caramel, or chopped nuts.
Step 68: Serve Immediately
Enjoy the homemade vanilla ice cream while cold and creamy.
7. Description
Homemade No-Churn Vanilla Ice Cream is a rich, creamy frozen dessert with a smooth texture and classic vanilla flavor.
The ice cream has a pale ivory color and a soft, velvety appearance.
Heavy whipping cream creates a light, airy texture.
Sweetened condensed milk adds sweetness and contributes to the smooth consistency.
Pure vanilla extract provides a fragrant aroma and familiar dessert flavor.
A small pinch of salt balances the sweetness without making the ice cream taste salty.
Unlike traditional churned ice cream, this recipe relies on whipped cream to incorporate air before freezing.
The finished ice cream is dense enough to hold a scoop but softens pleasantly as it warms.
A maraschino cherry adds a bright red finishing touch and a sweet, fruity contrast.
The dessert is delicious on its own or served alongside cakes, brownies, cookies, and fruit pies.
Its simple preparation makes it especially appealing for home cooks who want creamy homemade ice cream without an ice cream machine.
8. Nutritional Information
Approximate nutritional values per serving, assuming the recipe makes 6 portions and includes one maraschino cherry per serving:
| Nutrient | Estimated Amount |
|---|---|
| Calories | 440–490 kcal |
| Protein | 6–8 g |
| Carbohydrates | 43–49 g |
| Total Fat | 28–32 g |
| Saturated Fat | 17–20 g |
| Sugar | 42–47 g |
| Sodium | 100–150 mg |
| Calcium | 180–240 mg |
These are estimates. Actual values depend on the cream and condensed milk brands, serving size, and toppings. Four larger servings will contain more calories per portion.
9. Recipe Details
| Category | Details |
|---|---|
| Recipe Name | Homemade No-Churn Vanilla Ice Cream |
| Cuisine | American-Inspired |
| Preparation Time | 15 Minutes |
| Cooking Time | None |
| Freezing Time | 4–6 Hours |
| Total Time | Approximately 4 Hours 15 Minutes to 6 Hours 15 Minutes |
| Servings | 4–6 |
| Difficulty | Easy |
| Main Ingredients | Heavy Cream, Sweetened Condensed Milk, Vanilla |
| Preparation Method | Whipping, Folding, Freezing |
| Course | Dessert |
| Flavor Profile | Sweet, Creamy, Vanilla |
| Texture | Smooth, Rich, Velvety |
| Equipment Required | Electric Mixer, Freezer |
| Best For | Summer Desserts, Family Treats, Parties |
| Serving Style | Scooped with Maraschino Cherry |
10. Conclusion
Homemade No-Churn Vanilla Ice Cream is a simple and satisfying dessert that delivers a rich, creamy texture without requiring an ice cream machine.
The recipe uses just four ingredients: heavy whipping cream, sweetened condensed milk, vanilla extract, and salt.
Whipping the cream creates an airy base, while the condensed milk adds sweetness and helps produce a smooth frozen texture.
The mixture is gently folded together and frozen until firm.
After several hours, it becomes a delicious homemade vanilla ice cream that can be scooped and served.
A maraschino cherry provides a classic finishing touch.
The recipe is also versatile enough to serve as the foundation for other flavors, including cherry vanilla, chocolate chip, caramel, or cookies and cream.
Whether prepared for a special occasion or enjoyed as a simple homemade treat, this no-churn vanilla ice cream is an easy way to create a classic frozen dessert.
11. Serving and Storage Recommendations
Serving Suggestions: Serve in chilled glass bowls, dessert dishes, or waffle cones.
Classic Garnish: Place one maraschino cherry on top of each serving.
Chocolate Sauce: Drizzle with chocolate sauce for a sundae-style dessert.
Caramel Sauce: Add a small amount of caramel for extra richness.
Fresh Fruit: Serve with strawberries, blueberries, or fresh cherries.
With Baked Desserts: Pair with brownies, apple pie, fruit crumble, or chocolate cake.
Freezer Storage: Store in an airtight freezer-safe container.
Best Quality: Enjoy within approximately 2–4 weeks for the freshest flavor and texture, although properly frozen ice cream may remain safe longer.
Preventing Ice Crystals: Keep plastic wrap pressed against the surface before sealing the container.
Freezer Temperature: Store at approximately 0°F (-18°C) or colder.
Scooping: Let the ice cream soften for 5–10 minutes if it becomes too firm.
Avoid Repeated Thawing: Return the container to the freezer promptly after serving.
Cherry Storage: Keep maraschino cherries refrigerated after opening if required by the package instructions.
Make-Ahead: Prepare the ice cream the day before serving for a fully set texture.
Food Safety: Use pasteurized dairy products and keep the mixture refrigerated until freezing.
Allergen Information: This recipe contains milk and dairy products.
12. Embracing Healthful Indulgence
Homemade No-Churn Vanilla Ice Cream is a rich dessert made primarily from heavy cream and sweetened condensed milk.
These ingredients provide calcium and small amounts of protein, along with substantial fat and sugar.
Heavy cream contributes the smooth, creamy texture that makes this dessert enjoyable.
Sweetened condensed milk provides sweetness and helps prevent the mixture from freezing into a hard, icy block.
Vanilla adds flavor without requiring additional ingredients.
Although this dessert is indulgent, it can be enjoyed as part of a varied diet when served in moderate portions.
For smaller servings, use a small dessert bowl and add fresh fruit.
Fresh berries or sliced cherries can provide additional flavor and texture.
Because the balance of cream and condensed milk is important for the no-churn texture, significantly reducing either ingredient may change the final result.
Instead of modifying the recipe heavily, portion size can be adjusted according to preference.
This ice cream is best appreciated as an occasional sweet treat.
With its rich vanilla aroma, smooth texture, and classic maraschino cherry topping, Homemade No-Churn Vanilla Ice Cream offers a simple and delicious way to enjoy a traditional frozen dessert at home.