
1. Introduction
Homemade Toasted Sugar is a simple yet fascinating baking ingredient made by slowly heating ordinary white granulated sugar in the oven until it develops a beautiful golden-beige color and a rich, caramel-like flavor.
Unlike traditional caramel, which is prepared by melting sugar over direct heat, toasted sugar is made by gently heating dry granulated sugar at a relatively low oven temperature for several hours.
The result is a flavorful ingredient that retains much of its familiar granular texture while developing deeper, more complex aromas.
The process requires only one ingredient: plain white granulated sugar.
There is no need to add butter, water, cream, or other ingredients.
With a suitable baking dish, an oven, and occasional stirring, regular sugar can be transformed into a fragrant ingredient for cookies, cakes, pastries, frostings, and other homemade desserts.
One of the most appealing aspects of toasted sugar is its versatility.
Depending on how long the sugar remains in the oven, it can develop different levels of color and flavor.
Lightly toasted sugar has a pale beige appearance and a delicate, honey-like sweetness.
Medium-toasted sugar develops a richer golden color and a more pronounced caramel aroma.
Deeply toasted sugar becomes darker and more intense, with stronger caramel notes and a slightly bittersweet finish.
The process is straightforward, but patience is essential.
Because the sugar is heated slowly, it takes several hours to develop a noticeable change in flavor.
Stirring is also important because it helps distribute heat evenly, breaks apart developing clumps, and prevents the sugar around the edges of the baking dish from becoming excessively hot.
The type of cookware can influence the results.
Glass and ceramic baking dishes heat differently from stainless steel roasting pans, which can develop hot spots more quickly.
For this reason, careful temperature control and regular stirring are particularly important when using metal cookware.
Once the toasted sugar has cooled completely, it can be stored in an airtight container and used in many recipes that normally call for white granulated sugar.
Homemade Toasted Sugar is an excellent project for baking enthusiasts who enjoy experimenting with familiar ingredients and discovering new flavors through simple cooking techniques.
2. Origin and Cultural Significance
Toasted sugar is a modern baking technique based on the broader culinary practice of developing flavor through controlled heating.
Sugar has been used in cooking and baking for centuries, and cooks have long explored ways to transform its flavor, color, and texture through heat.
The History of Heated Sugar
Sugar has played an important role in confectionery, pastry making, and dessert preparation across many cultures.
Traditional caramel is created by heating sugar until it melts and undergoes chemical changes that produce characteristic caramel flavors and colors.
Caramel is used in candies, sauces, custards, desserts, and baked goods.
Toasted sugar uses a different approach.
Instead of intentionally melting the sugar into a liquid, the goal is to heat the crystals gradually while retaining a mostly granular consistency.
The Development of Toasted Sugar
Oven-toasted sugar has gained attention in contemporary baking, particularly through modern pastry experimentation and recipe development.
Pastry chef and cookbook author Stella Parks helped popularize the technique among home bakers.
The method demonstrates how prolonged heating can change the flavor of granulated sugar without requiring the preparation of a conventional caramel syrup.
The Science Behind the Flavor
When sugar is heated, its physical and chemical properties can gradually change.
Over time, the sugar may develop a darker color and more complex aromas.
These changes are influenced by temperature, heating duration, cookware, and the distribution of heat.
The goal is to develop toasted, caramel-like notes while avoiding excessive melting or burning.
Toasted Sugar in Modern Baking
Toasted sugar is particularly useful in recipes where bakers want a deeper flavor without introducing additional liquid ingredients.
It can be used in cookies, cakes, buttercream, meringues, and other desserts.
Its flavor can complement vanilla, chocolate, nuts, cinnamon, and warm baking spices.
Although toasted sugar is not a traditional ingredient associated with one particular national cuisine, it reflects the creativity of modern pastry making.
3. Ingredients
This recipe produces approximately 4 pounds of toasted sugar, with the final weight potentially changing slightly during heating.
A. Main Ingredient
| Ingredient | Quantity |
|---|---|
| Plain white granulated sugar | 4 pounds (approximately 9 cups) |
No additional ingredients are required.
B. Recommended Equipment
| Equipment | Purpose |
|---|---|
| Large 9 × 13-inch glass or ceramic baking dish | Holds the sugar during oven toasting |
| Oven | Provides controlled heat |
| Oven thermometer | Helps verify oven temperature |
| Heat-resistant spatula or spoon | Used for stirring |
| Oven mitts | Protect hands when handling hot cookware |
| Large heatproof tray or surface | Provides a safe place to set the hot dish |
| Airtight storage container | Keeps cooled toasted sugar dry |
| Food processor | Optional, for breaking up cooled clumps |
| Kitchen scale | Optional, for accurate measurement |
C. Cookware Considerations
Glass Baking Dish: Provides a convenient option for slow oven toasting, although glass can still develop hot areas and must be handled according to its manufacturer’s temperature limits.
Ceramic Baking Dish: Suitable when rated for the oven temperature and large enough to hold the sugar safely.
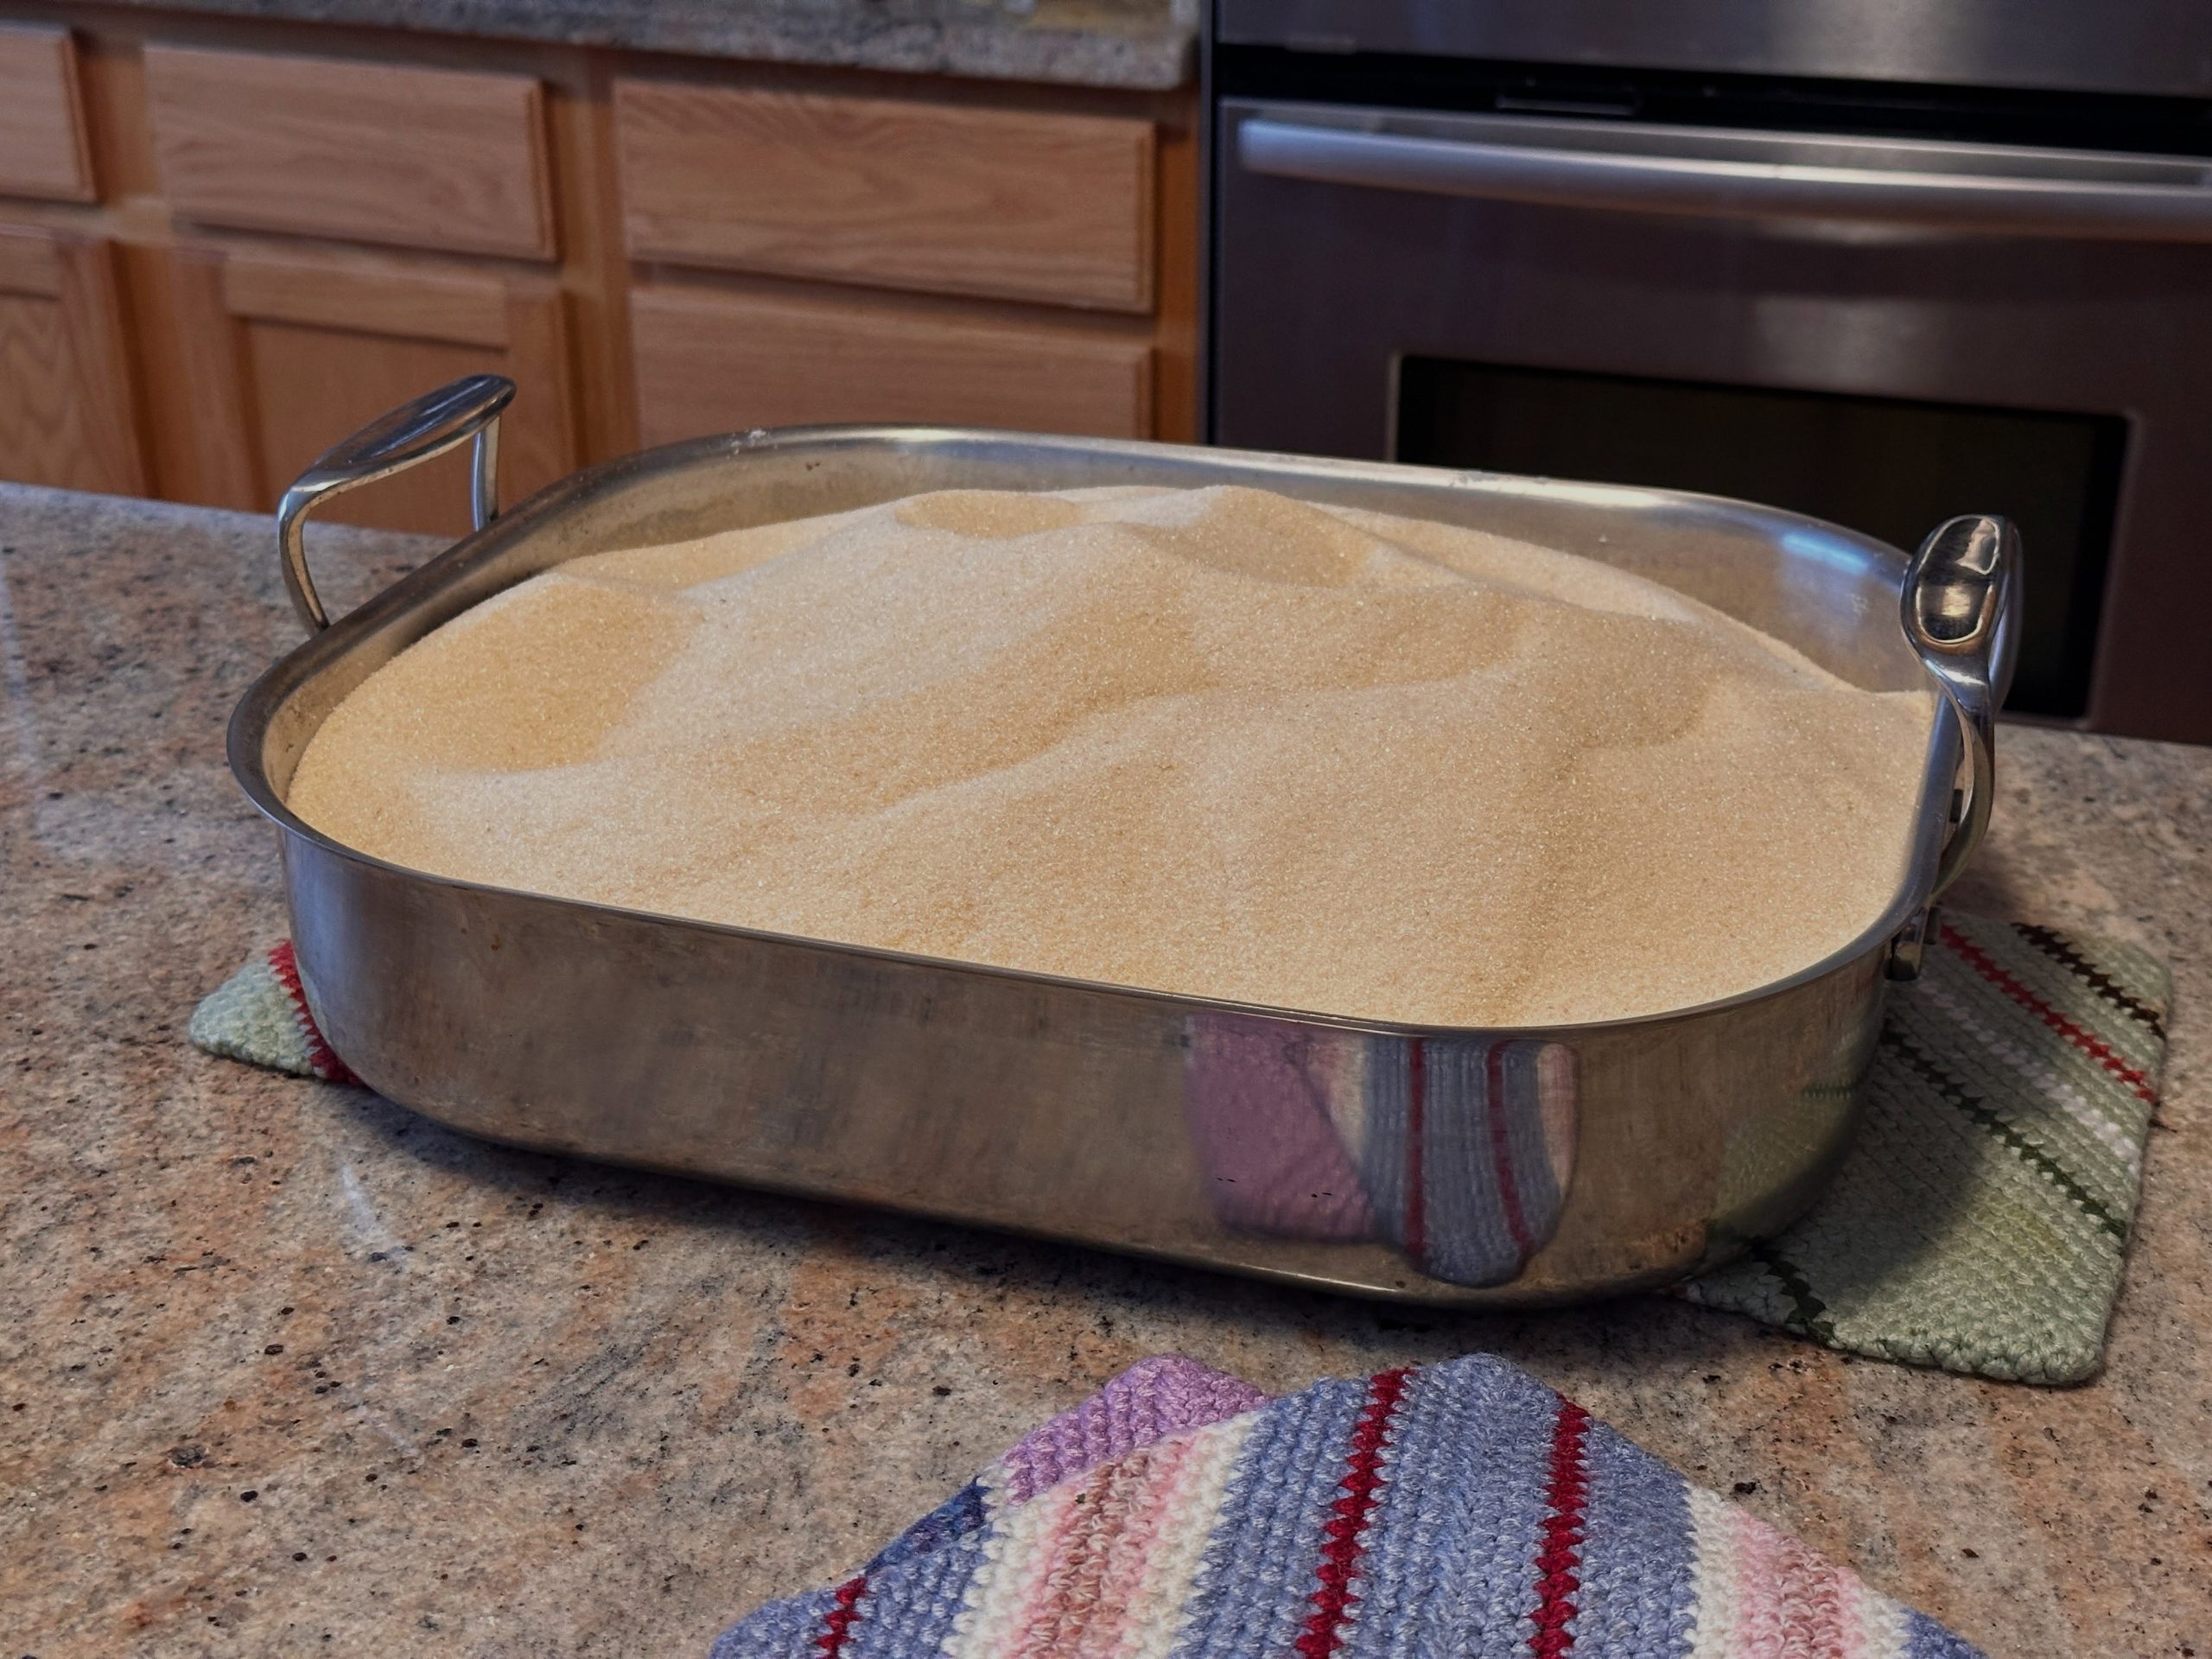
Stainless Steel Roasting Pan: Can also be used, but its thinner or more conductive areas may heat the sugar unevenly, especially near the edges and corners.
When using stainless steel, monitor the sugar carefully and stir thoroughly.
4. Optional Additions
The basic toasted sugar recipe requires only white granulated sugar.
However, once the sugar has cooled, it can be combined with other ingredients for specific baking applications.
Vanilla Bean: Store a completely dry vanilla bean with the cooled sugar to create a fragrant vanilla variation.
Ground Cinnamon: Mix a small amount into cooled toasted sugar for cinnamon-flavored baking.
Ground Cardamom: Add a pinch for a warm, aromatic flavor.
Ground Ginger: Use for ginger cookies or spiced desserts.
Nutmeg: Add a small amount to complement the caramel-like notes.
Cocoa Powder: Combine with toasted sugar for certain chocolate dessert preparations.
Citrus Zest: Use only thoroughly dried zest when preparing a dry sugar blend for storage.
Pumpkin Pie Spice: Mix into cooled sugar for seasonal baking.
Espresso Powder: Combine with toasted sugar when making coffee-flavored desserts.
Fine Sea Salt: Add a very small amount for a sweet-salty topping.
These are optional flavoring ideas for the finished sugar, not additions required during the oven-toasting process.
For the most consistent results, toast the plain sugar by itself.
5. Tips for Success
Maintain a Consistent Oven Temperature
Set the oven to 300°F (150°C).
An oven thermometer can help confirm the actual temperature.
Choose Oven-Safe Cookware
Use a dish that is rated for the required temperature.
Avoid Overfilling
The baking dish should provide enough space for safe, thorough stirring.
Spread the Sugar Evenly
An even layer helps distribute heat throughout the sugar.
Allow the First Hour to Pass
The original method begins with approximately one hour of heating before the first thorough stir.
Stir Regularly Afterward
Stir every 30 minutes to redistribute the sugar.
Move Sugar from the Edges
Sugar near the edges may become hotter than sugar in the center.
Move it toward the middle during stirring.
Break Apart Developing Clumps
Use a heat-resistant spatula to separate small clumps before they harden.
Watch for Melting
If the edges begin to liquefy, the pan or oven may be creating localized hot spots.
Monitor Stainless Steel Pans Carefully
Metal roasting pans can produce uneven heating depending on their thickness and construction.
Avoid Excessive Browning
Deeply toasted sugar can develop bitter flavors if overheated.
Use Color and Aroma as Guides
Cooking times are approximate.
The sugar’s appearance and aroma are more useful indicators than time alone.
Cool Completely
Do not transfer warm sugar directly into an airtight container.
Break Up Clumps Only After Cooling
Hot sugar can cause severe burns and should never be processed in a food processor.
Store in a Dry Container
Moisture can cause sugar to clump during storage.
6. Step-by-Step Instructions
Part A: Preparing the Equipment
Step 1: Gather the granulated sugar and required equipment.
Step 2: Select a large oven-safe baking dish.
Step 3: Check that the dish is clean.
Step 4: Make sure the dish is completely dry.
Step 5: Inspect the dish for cracks or damage.
Step 6: Confirm that it is suitable for heating to 300°F (150°C).
Step 7: Prepare a heat-resistant spatula.
Step 8: Place oven mitts nearby.
Step 9: Prepare a heatproof surface for the hot dish.
Part B: Preheating the Oven
Step 10: Position an oven rack in the middle of the oven.
Step 11: Set the oven temperature to 300°F (150°C).
Step 12: Allow the oven to preheat fully.
Step 13: Check the temperature with an oven thermometer if available.
Step 14: Avoid beginning the process before the oven reaches the target temperature.
Part C: Measuring the Sugar
Step 15: Place the baking dish on a stable work surface.
Step 16: Measure 4 pounds of white granulated sugar.
Step 17: Alternatively, measure approximately 9 cups.
Step 18: Check that the sugar is dry and free from foreign material.
Step 19: Pour the sugar into the baking dish.
Step 20: Use a spatula to distribute the sugar evenly.
Step 21: Level the surface gently.
Step 22: Check that the sugar does not spill over the sides.
Part D: Beginning the Toasting Process
Step 23: Carefully place the baking dish into the preheated oven.
Step 24: Position it on the center rack.
Step 25: Close the oven door.
Step 26: Set a timer for one hour.
Step 27: Allow the sugar to heat without stirring during this initial stage.
Step 28: Maintain the oven at 300°F (150°C).
Step 29: Monitor for unusual smoking or signs of excessive heating.
Part E: Completing the First Hour
Step 30: After one hour, carefully open the oven.
Step 31: Put on oven mitts.
Step 32: Remove the baking dish carefully.
Step 33: Place it on a heatproof surface.
Step 34: Observe the color of the sugar.
Step 35: Look for a very faint ivory or pale beige tint.
Step 36: Check the edges for signs of melting.
Part F: First Thorough Stirring
Step 37: Use a heat-resistant spatula to stir the sugar.
Step 38: Begin at one side of the baking dish.
Step 39: Gently scrape along the bottom.
Step 40: Move the sugar from the edges toward the center.
Step 41: Move sugar from the center toward the edges.
Step 42: Break apart small clumps.
Step 43: Continue stirring until the sugar is evenly redistributed.
Step 44: Level the sugar again.
Step 45: Return the dish to the oven.
Part G: Continuing the Toasting Process
Step 46: Set a timer for 30 minutes.
Step 47: Allow the sugar to continue heating.
Step 48: Remove the baking dish carefully when the timer finishes.
Step 49: Stir thoroughly.
Step 50: Redistribute the sugar from the edges to the center.
Step 51: Break apart developing clumps.
Step 52: Return the dish to the oven.
Step 53: Repeat the process every 30 minutes.
Part H: Lightly Toasted Sugar
Step 54: After approximately 2 hours of total heating, inspect the sugar.
Step 55: Look for a pale sand or beige color.
Step 56: Stir thoroughly.
Step 57: Smell the sugar carefully from a safe distance.
Step 58: Notice whether a mild toasted aroma has developed.
Step 59: Continue heating if a stronger flavor is desired.
Step 60: Stop between approximately 2 and 3 hours for a lightly toasted result, depending on the oven and desired flavor.
Part I: Medium-Toasted Sugar
Step 61: Continue heating the sugar if a deeper flavor is desired.
Step 62: Stir every 30 minutes.
Step 63: Monitor the edges and corners.
Step 64: Watch for gradual darkening.
Step 65: At approximately 4 hours, inspect the color.
Step 66: Look for a shade resembling light brown sugar.
Step 67: Check for a richer toasted aroma.
Step 68: Stir thoroughly.
Step 69: Stop when the desired medium-toast level is reached.
Part J: Deeply Toasted Sugar
Step 70: Continue heating beyond 4 hours only if a stronger toasted flavor is desired.
Step 71: Maintain regular stirring.
Step 72: Watch carefully for melting near the edges.
Step 73: Monitor the overall color.
Step 74: Look for a darker tan appearance.
Step 75: Check the aroma for stronger caramel-like notes.
Step 76: Avoid allowing the sugar to scorch.
Step 77: After approximately 5 hours or longer, evaluate whether the desired depth has been achieved.
Step 78: Stop the process before the sugar develops an unpleasant burnt aroma.
Part K: Removing the Toasted Sugar
Step 79: Turn off the oven.
Step 80: Put on oven mitts.
Step 81: Carefully remove the baking dish.
Step 82: Place it on a stable heatproof surface.
Step 83: Keep the dish away from children and pets.
Step 84: Avoid touching or tasting the hot sugar.
Part L: Cooling the Sugar
Step 85: Allow the sugar to cool naturally.
Step 86: Stir occasionally with a heat-resistant spatula.
Step 87: Break apart small clumps while they are still manageable.
Step 88: Continue cooling until the sugar reaches room temperature.
Step 89: Check that the bottom of the dish is no longer warm.
Step 90: Do not seal the sugar while it is warm.
Part M: Breaking Up Clumps
Step 91: Inspect the cooled sugar for hard clumps.
Step 92: Break apart small clumps using a clean, dry utensil.
Step 93: If large hard clumps remain, transfer a small portion of completely cooled sugar to a food processor.
Step 94: Secure the lid.
Step 95: Pulse briefly.
Step 96: Check the texture.
Step 97: Repeat only as needed to break up the clumps.
Step 98: Avoid excessive processing if a granulated texture is preferred.
Step 99: Return the processed sugar to the remaining batch.
Part N: Storing the Toasted Sugar
Step 100: Select a clean, dry, airtight storage container.
Step 101: Make sure the container is completely dry.
Step 102: Transfer the cooled sugar into the container.
Step 103: Use a funnel if necessary.
Step 104: Avoid introducing moisture.
Step 105: Seal the container tightly.
Step 106: Label it as toasted sugar.
Step 107: Record the preparation date if desired.
Step 108: Store in a cool, dry pantry.
Part O: Using the Toasted Sugar
Step 109: Choose a baking recipe that uses granulated sugar.
Step 110: Measure the required amount of toasted sugar.
Step 111: Substitute it for regular white sugar at a 1:1 ratio by weight as an initial trial.
Step 112: Use it in cookies, cakes, or other suitable baked goods.
Step 113: Observe any differences in flavor, color, or texture.
Step 114: Adjust future batches according to the desired level of toasted flavor.
7. Description
Homemade Toasted Sugar is a dry, granulated baking ingredient with a warm beige-to-tan color and a distinctive caramel-like aroma.
Its appearance changes depending on the duration of heating.
Lightly toasted sugar retains a pale ivory or sandy color.
It has a delicate sweetness with subtle toasted notes.
Medium-toasted sugar develops a warmer beige or light golden-brown color.
Its aroma becomes richer, with more pronounced caramel-like characteristics.
Deeply toasted sugar has a darker tan appearance and a stronger flavor that may include bittersweet notes.
The texture should remain mostly granular, although some clumping is common.
When properly prepared and cooled, toasted sugar can be measured and handled similarly to ordinary granulated sugar.
Its flavor is especially appealing in recipes containing vanilla, chocolate, nuts, cinnamon, and other warm baking ingredients.
The finished ingredient adds complexity to desserts without requiring additional flavor extracts or sauces.
8. Nutritional Information
Approximate nutritional values for 1 tablespoon of toasted sugar:
| Nutrient | Estimated Amount |
|---|---|
| Calories | Approximately 48 kcal |
| Carbohydrates | Approximately 12.5 g |
| Total Sugars | Approximately 12.5 g |
| Protein | 0 g |
| Total Fat | 0 g |
| Saturated Fat | 0 g |
| Fiber | 0 g |
| Sodium | Approximately 0 mg |
| Cholesterol | 0 mg |
These values are approximate and assume a tablespoon weighing about 12.5 grams. Heating changes the sugar’s flavor and appearance but does not make it a low-calorie or nutritionally superior sweetener.
9. Recipe Details
| Category | Details |
|---|---|
| Recipe Name | Homemade Toasted Sugar |
| Alternative Name | Oven-Toasted Granulated Sugar |
| Cuisine | Modern Baking / Pastry |
| Preparation Time | Approximately 5–10 Minutes |
| Cooking Time | 2–5+ Hours |
| Cooling Time | Until Completely Cool |
| Total Time | Approximately 3–6+ Hours, Including Cooling |
| Yield | Approximately 4 Pounds Before Heating |
| Difficulty | Easy, but Requires Monitoring |
| Main Ingredient | White Granulated Sugar |
| Cooking Method | Slow Oven Toasting |
| Oven Temperature | 300°F (150°C) |
| First Stir | After 1 Hour |
| Subsequent Stirring | Every 30 Minutes |
| Light Toast | Approximately 2–3 Hours |
| Medium Toast | Approximately 4 Hours |
| Deep Toast | Approximately 5+ Hours |
| Flavor Profile | Sweet, Toasted, Caramel-Like |
| Texture | Mostly Granular, Possibly Slightly Clumped |
| Storage | Airtight Container in a Cool, Dry Pantry |
| Best Uses | Cookies, Cakes, Frostings, Pastries, Desserts |
10. Conclusion
Homemade Toasted Sugar is an excellent example of how a familiar pantry ingredient can develop new flavors through careful heating.
Using only white granulated sugar, an oven, and a suitable baking dish, ordinary sugar can be transformed into a richly aromatic ingredient with caramel-like notes.
The process begins by spreading the sugar evenly in a baking dish and heating it at 300°F (150°C).
After the first hour, the sugar is stirred thoroughly.
The process continues with stirring every 30 minutes until the desired color and flavor are achieved.
Lightly toasted sugar offers a delicate flavor, while medium and deeply toasted versions provide increasingly pronounced caramel-like characteristics.
Careful monitoring is particularly important when using stainless steel cookware because the edges may become hotter than the center.
Once the sugar has cooled completely, any clumps can be broken apart and the finished sugar can be stored in an airtight container.
It can then be used in a variety of baking recipes.
Whether added to cookies, cakes, buttercream, or other desserts, toasted sugar provides a simple way to experiment with flavor and create a more distinctive homemade baking experience.
11. Serving and Storage Recommendations
Cooling: Allow the toasted sugar to cool completely before storing.
Airtight Containers: Store in a tightly sealed container to protect it from moisture.
Pantry Storage: Keep in a cool, dry pantry away from humidity.
Avoid Refrigeration: Refrigeration is generally unnecessary and can introduce condensation.
Storage Duration: Properly dried and stored sugar is shelf-stable for a long period, although its best flavor may gradually diminish.
Clumping: Break apart any clumps before measuring.
Food Processor: Use only on completely cooled sugar.
Cookies: Substitute for white sugar in suitable cookie recipes.
Cakes: Use in vanilla, chocolate, or spice cakes.
Buttercream: Experiment with toasted sugar in frostings that fully dissolve the sugar.
Meringues: Use in recipes where the sugar dissolves completely, while recognizing that toasted sugar may affect color and behavior.
Brownies: Add for a deeper sweetness.
Shortbread: Use in buttery cookies for a toasted flavor.
Custards: Incorporate into custard recipes where the sugar is fully dissolved.
Homemade Ice Cream: Use in suitable ice cream bases.
Hot Beverages: Stir into coffee or tea for a subtle caramel-like sweetness.
Food Safety: Never touch, taste, or process hot sugar. Heated sugar can cause severe burns and may remain dangerously hot after the baking dish is removed from the oven.
Cookware Safety: Avoid sudden temperature changes with glass or ceramic dishes, and follow the manufacturer’s instructions.
12. Embracing Healthful Indulgence
Homemade Toasted Sugar is a flavorful baking ingredient that allows home cooks to explore deeper sweetness and caramel-like aromas without adding extra ingredients.
The toasting process changes the sensory qualities of granulated sugar, but it does not substantially improve its nutritional value.
Toasted sugar remains an added sugar and should be enjoyed in moderation.
Its main advantage is culinary rather than nutritional.
The deeper flavor may allow bakers to create desserts with a more complex taste.
In some recipes, a stronger toasted flavor may make a smaller amount of sweetness satisfying, although reducing sugar can affect the structure, moisture, and texture of baked goods.
Toasted sugar can be incorporated into homemade desserts alongside ingredients such as nuts, whole grains, fruit, and dairy or suitable alternatives.
It can also be used in smaller portions as a topping or flavoring ingredient.
For individuals monitoring added sugar intake, the same general considerations that apply to ordinary granulated sugar also apply to toasted sugar.
Its carbohydrate and calorie content remains similar.
With its warm aroma, beautiful golden color, and distinctive caramel-like flavor, Homemade Toasted Sugar offers an enjoyable way to elevate everyday baking while maintaining a balanced approach to sweet treats.