
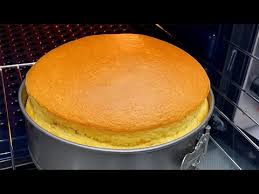
A light and airy Japanese-style cheesecake with a delicate golden top, soft cotton-like texture, and creamy vanilla flavor.
1. Introduction
If you love cheesecake but prefer something lighter than traditional dense desserts, this Japanese Cotton Cheesecake is a wonderful recipe to try.
Also known as Japanese soufflé cheesecake, this beautiful dessert combines the creamy flavor of cheesecake with the airy texture of sponge cake.
Its signature appearance features a tall, softly risen shape, a pale golden surface, and a delicate interior that gently jiggles when moved.
Unlike traditional baked cheesecake, which is usually dense and rich, Japanese cotton cheesecake gets its fluffy texture from whipped egg whites folded into a smooth cream cheese batter.
The cake is baked gently in a water bath to help it rise evenly and maintain its delicate texture.
With the right technique and a little patience, you can recreate this elegant bakery-style dessert at home.
2. Origin and Cultural Significance
Japanese cotton cheesecake is a modern dessert that combines Western-style cheesecake ingredients with Japanese sponge-cake techniques.
It is commonly called soufflé cheesecake in Japan.
The dessert is known for its distinctive texture, which falls somewhere between a traditional cheesecake and a light sponge cake.
Cream cheese provides the familiar tangy flavor, while whipped egg whites create an airy structure.
Japanese soufflé cheesecake has become internationally popular partly because of its visually distinctive rise and gentle wobble.
Its preparation reflects the precision often associated with Japanese baking, particularly careful temperature control, delicate mixing, and attention to texture.
Today, Japanese cotton cheesecake is enjoyed both freshly baked and chilled, with each serving temperature producing a slightly different eating experience. King Arthur Baking
3. Ingredients
7-inch cake
8 servings
Intermediate
For the Cream Cheese Base
- 200 g (7 oz) cream cheese, softened
- 40 g (3 tablespoons) unsalted butter
- 80 ml (⅓ cup) whole milk
- 4 large egg yolks
- 40 g (⅓ cup) cake flour, sifted
- 15 g (approximately 2 tablespoons) cornstarch, sifted
- 1 teaspoon alcohol-free vanilla flavoring or vanilla extract
For the Meringue
- 4 large egg whites
- 80 g granulated sugar
- ½ teaspoon lemon juice or a small pinch of cream of tartar
For Preparing the Pan
- Parchment paper
- A little butter or oil for securing the parchment
- Hot water for the water bath
Optional Garnish
- Powdered sugar
- Fresh strawberries
- Fresh raspberries
- A little whipped cream
4. Optional Additions
Japanese cotton cheesecake has a delicate flavor that works well with several variations.
Lemon Cotton Cheesecake
Add 1 teaspoon finely grated lemon zest to the cream cheese mixture.
This gives the cake a brighter, refreshing flavor.
Orange Cheesecake
Add a small amount of fresh orange zest for a subtle citrus aroma.
Matcha Cheesecake
Replace 5 g of the cake flour with 5 g of matcha powder.
Sift the matcha thoroughly to prevent lumps.
Chocolate Cotton Cheesecake
Replace approximately 10 g of the cake flour with unsweetened cocoa powder.
Vanilla Bean Cheesecake
Use vanilla bean paste or the seeds from half a vanilla pod for a more pronounced vanilla flavor.
Berry-Topped Cheesecake
Serve chilled slices with fresh strawberries, raspberries, or a lightly sweetened berry sauce.
5. Tips for Success
Use room-temperature cream cheese
Softened cream cheese blends more smoothly with butter and milk.
Cold cream cheese can leave lumps in the batter.
Keep the egg whites free from fat
Even small amounts of oil or egg yolk can interfere with whipping.
Use a clean, dry bowl and whisk.
Whip to soft or medium peaks
The meringue should look glossy and hold a gentle peak that bends at the tip.
Overwhipped, dry meringue can be difficult to fold evenly and may contribute to cracking.
Fold gently
The whipped egg whites provide much of the cake’s structure.
Fold carefully to preserve as much air as possible.
Use a water bath
The water bath helps maintain a gentle, humid baking environment.
This encourages more even baking and reduces the risk of excessive browning or cracking. Just One Cookbook
Prevent water from entering the pan
A solid-bottom cake pan is the most reliable choice.
If using a springform pan, wrap its exterior thoroughly in heavy-duty foil and ensure it is well sealed.
Avoid opening the oven frequently
Sudden temperature changes can cause the delicate cake to lose volume.
Cool the cheesecake gradually
Rapid cooling can contribute to shrinking and cracking.
Allow the cake to cool slowly before refrigerating.
6. Step-by-Step Instructions
Step 1: Prepare the Oven
Preheat your oven to 320°F (160°C).
Position an oven rack in the lower-middle section.
Prepare a larger roasting pan that can comfortably hold your cheesecake pan.
Step 2: Line the Cake Pan
Use a 7-inch (18 cm) round cake pan, preferably with solid sides and a solid base.
Lightly grease the interior.
Line the bottom with a parchment circle.
Line the sides with parchment paper extending approximately 2 inches above the rim.
The extra height provides space for the cheesecake to rise.
Step 3: Prepare the Double Boiler
Fill a saucepan with a small amount of water.
Bring it to a gentle simmer.
Place a heatproof bowl over the saucepan without allowing the bottom of the bowl to touch the water.
Step 4: Melt the Cream Cheese Mixture
Add the cream cheese, butter, and milk to the bowl.
Whisk gently until the ingredients melt together.
Continue mixing until smooth and free from lumps.
Remove the bowl from the heat.
Allow the mixture to cool until warm rather than hot.
Step 5: Add the Egg Yolks
Add the egg yolks one at a time.
Whisk gently after each addition.
Continue until the mixture is smooth and evenly combined.
Step 6: Add the Vanilla
Stir in the vanilla flavoring.
Mix gently to distribute it throughout the cream cheese base.
Step 7: Incorporate the Dry Ingredients
Sift the cake flour and cornstarch together.
Gradually add them to the cream cheese mixture.
Whisk gently until no visible flour lumps remain.
Avoid excessive mixing.
Step 8: Prepare the Egg Whites
Place the egg whites in a large, clean mixing bowl.
Add the lemon juice or cream of tartar.
Begin whipping with an electric mixer at medium speed.
Continue until the egg whites become foamy.
Step 9: Add the Sugar Gradually
Add the granulated sugar in three portions.
Continue whipping between additions.
The meringue should gradually become white, smooth, and glossy.
Step 10: Check the Meringue
Lift the whisk from the mixture.
The meringue should form a soft-to-medium peak that gently curves at the tip.
Avoid whipping until it becomes dry or clumpy.
Step 11: Lighten the Cream Cheese Batter
Add approximately one-third of the whipped egg whites to the cream cheese mixture.
Use a silicone spatula to fold gently.
This first addition makes the batter lighter and easier to combine with the remaining meringue.
Step 12: Fold in the Remaining Meringue
Add the remaining egg whites in two batches.
Use gentle folding motions, scraping from the bottom of the bowl and lifting the mixture over itself.
Continue until the batter appears evenly combined.
Avoid vigorous stirring.
Step 13: Fill the Cake Pan
Pour the batter into the prepared cake pan.
Smooth the surface gently.
Tap the pan lightly against the counter once or twice to release large air pockets.
Do not tap excessively.
Step 14: Prepare the Water Bath
Place the cheesecake pan inside the larger roasting pan.
Carefully pour hot water into the roasting pan until it reaches approximately 1 inch up the sides of the cake pan.
Make sure no water enters the cheesecake batter.
Step 15: Begin Baking
Place the roasting pan carefully into the preheated oven.
Bake at 320°F (160°C) for approximately 25 minutes.
The cheesecake should begin to rise and develop a pale golden surface.
Step 16: Lower the Temperature
Without removing the cake, reduce the oven temperature to 285°F (140°C).
Continue baking for approximately 40–45 minutes.
The cheesecake should become more stable while retaining a gentle wobble in the center.
Oven performance varies, so baking time may need adjustment.
Step 17: Check for Doneness
The top should appear lightly golden.
The edges should be set, while the center should move gently rather than slosh like liquid.
For egg-based dishes, FoodSafety.gov recommends a safe internal temperature of 160°F (71°C). FoodSafety.gov
If the center remains visibly liquid or underbaked, continue baking and check again.
Step 18: Cool Slowly in the Oven
Turn off the oven.
Leave the cheesecake inside with the door slightly open for approximately 20 minutes.
This allows the temperature to decrease gradually.
Step 19: Remove and Cool
Carefully remove the cheesecake from the water bath.
Place the cake pan on a wire rack.
Allow it to cool until close to room temperature.
A small amount of shrinking is normal.
Step 20: Remove from the Pan
Once the cake has cooled sufficiently, carefully remove it from the pan.
Peel away the parchment paper.
Transfer the cheesecake to a serving plate.
Step 21: Refrigerate
Cover the cheesecake and refrigerate for at least 4 hours.
Chilling helps the cake set and develop its creamy texture.
Step 22: Slice and Serve
Use a sharp knife to cut the cheesecake into slices.
Wipe the blade between cuts for neat portions.
Serve plain or with a light dusting of powdered sugar.
7. Description
Japanese Cotton Cheesecake has a delicate appearance and an exceptionally light texture.
The top is pale golden, smooth, and slightly domed.
The interior is soft, airy, and moist.
Unlike dense traditional cheesecake, this dessert has a gentle sponge-like structure.
The cream cheese creates a mild tanginess, while the milk, butter, and vanilla contribute richness without overwhelming the cake.
When freshly baked, the cheesecake feels particularly light and fluffy.
After refrigeration, the texture becomes slightly firmer and creamier.
Both versions are enjoyable, offering different expressions of the same delicate dessert.
8. Nutritional Information
The following values are approximate estimates for one of eight slices.
| Nutrient | Approximate Amount |
|---|---|
| Calories | 220–270 kcal |
| Protein | 5–7 g |
| Carbohydrates | 19–24 g |
| Total Fat | 15–19 g |
| Saturated Fat | 8–11 g |
| Sugar | 11–14 g |
| Sodium | Varies with cream cheese |
| Fiber | Less than 1 g |
Actual nutritional values depend on ingredient brands, serving size, and optional toppings.
Nutritional Highlights
Eggs: Provide protein and help create the airy structure.
Cream Cheese: Contributes richness and some calcium.
Milk: Adds moisture and dairy nutrients.
Moderate Flour Quantity: Helps produce the cheesecake’s characteristic delicate texture.
9. Recipe Details
| Detail | Information |
|---|---|
| Recipe Name | Japanese Cotton Cheesecake |
| Cuisine | Japanese-Inspired Dessert |
| Course | Dessert |
| Preparation Time | 25–30 minutes |
| Baking Time | 65–70 minutes |
| Oven Cooling | 20 minutes |
| Additional Cooling | Until near room temperature |
| Refrigeration | At least 4 hours |
| Total Time | Approximately 6–7 hours, including chilling |
| Servings | 8 slices |
| Pan Size | 7-inch (18 cm) round |
| Difficulty | Intermediate |
| Main Ingredients | Cream cheese, eggs, milk, butter |
| Cooking Method | Water-Bath Baking |
| Texture | Airy, soft, creamy |
| Best Served | Chilled or lightly cool |
10. Conclusion
Japanese Cotton Cheesecake is a beautiful dessert that combines the creamy flavor of cheesecake with the lightness of sponge cake.
Its tall shape, pale golden surface, and delicate texture make it especially appealing.
The recipe requires careful preparation, particularly when whipping the egg whites and folding them into the batter.
However, the ingredients themselves are simple and widely available.
By using a water bath, controlling the oven temperature, and allowing the cheesecake to cool gradually, you can create a light, elegant dessert at home.
Whether served plain or topped with fresh berries, this cheesecake is a wonderful choice for anyone who enjoys soft, creamy desserts.
11. Serving and Storage Recommendations
Best Ways to Serve
Japanese cotton cheesecake can be enjoyed slightly warm or chilled.
When served warm, it has a softer, more sponge-like texture.
When chilled, it becomes creamier and easier to slice.
Recommended Toppings
- Powdered sugar
- Fresh strawberries
- Fresh raspberries
- Blueberries
- Lightly sweetened whipped cream
- A small spoonful of berry sauce
Refrigerating Leftovers
Store the cheesecake in an airtight container.
Keep refrigerated at 40°F (4°C) or below.
For best quality, consume within 3–4 days.
Freezing
Allow the cheesecake to chill completely.
Cut into individual portions.
Wrap each portion carefully and store in a freezer-safe container.
Freeze for up to 1–2 months for best quality.
Thawing
Transfer frozen portions to the refrigerator.
Allow them to thaw slowly overnight.
The texture may become slightly denser after freezing.
Serving Tip
For clean slices, use a sharp knife dipped briefly in warm water and wiped dry.
Repeat between slices.
12. Embracing Healthful Indulgence
Japanese Cotton Cheesecake offers a lighter eating texture than many traditional cheesecakes, although it still contains cream cheese, butter, sugar, and eggs.
Its airy structure makes each slice feel delicate and satisfying.
For a slightly lighter variation, consider:
- Serving smaller portions.
- Pairing the cheesecake with fresh berries.
- Using a light dusting of powdered sugar rather than rich toppings.
- Reducing added sauces and whipped cream.
- Enjoying the cake as an occasional dessert within a varied diet.
The recipe’s appeal comes from its balance of richness and lightness.
The cream cheese provides flavor, while the whipped egg whites create the soft, airy texture.
With its beautiful appearance and delicate vanilla taste, Japanese Cotton Cheesecake is a memorable homemade dessert that feels elegant without requiring elaborate decorations.
#JapaneseCottonCheesecake #JapaneseCheesecake #SouffleCheesecake #FluffyCheesecake #HomemadeDesserts