
1. Introduction
There is something special about a loaf of homemade sourdough bread. With its crisp golden crust, chewy interior, and naturally tangy flavor, sourdough can turn a handful of simple ingredients into an incredibly satisfying loaf.
This simple homemade sourdough recipe uses bread flour, water, active sourdough starter, salt, and a little olive oil. The dough relies on natural fermentation rather than commercial yeast, giving the bread its characteristic flavor and texture.
Although sourdough requires patience, most of the work happens during resting and fermentation. Once you understand the basic process, baking a beautiful loaf at home becomes much more approachable.
2. Origin
Sourdough bread is one of the oldest forms of leavened bread. Before commercial baker’s yeast became widely available, bakers relied on naturally occurring wild yeasts and beneficial bacteria captured in fermented starters to make dough rise.
Different cultures have developed their own sourdough traditions over centuries. Modern home bakers continue this tradition while using techniques that make naturally fermented bread more accessible in everyday kitchens.
3. Cultural Significance
Bread has played an important role in food traditions around the world, and sourdough is especially connected with traditional fermentation and long-standing baking practices.
Today, sourdough has become popular among home bakers because of its distinctive flavor, rustic appearance, and hands-on preparation. Maintaining a starter and watching dough transform through fermentation can also make bread baking feel like a rewarding kitchen ritual.
4. Ingredients & Quantities
For the Dough
- 500 g bread flour
- 350 g warm water
- 100 g active sourdough starter
- 10 g salt
- 1 tbsp olive oil
The recipe has a relatively high hydration, which helps create a moist, airy crumb. The dough may feel sticky during the early stages, but gentle handling and proper fermentation will make it easier to work with.
5. Optional Additions
Once you are comfortable with the basic recipe, you can experiment with different flavors and textures.
- Sesame seeds
- Sunflower seeds
- Pumpkin seeds
- Rolled oats
- Chopped rosemary
- Roasted garlic
- Black or green olives
- Dried herbs
- A small amount of honey
Keep additions moderate so they do not interfere with the dough’s ability to rise.
6. Tips for Success
Use an active starter: Your sourdough starter should be recently fed, bubbly, and showing good fermentation activity before you begin.
Do not use very hot water: Warm water is helpful, but excessively hot water can negatively affect fermentation.
Expect sticky dough: High-hydration sourdough can feel wet at first. Resist the temptation to add large amounts of flour.
Use stretch-and-folds: Gentle folds help strengthen the gluten structure without requiring extensive kneading.
Watch the dough, not only the clock: Fermentation speed changes with room temperature and starter activity.
Allow enough fermentation time: Under-fermented dough may be dense, while properly fermented dough should look aerated and feel lighter.
Create steam during baking: Steam helps the loaf develop a crisp crust and allows it to expand properly during the early part of baking.
7. Instructions
Step 1: Mix the Dough
Add the warm water and active sourdough starter to a large mixing bowl. Stir until the starter is mostly dispersed.
Add the bread flour and mix until no large dry patches remain.
Cover the bowl and let the dough rest for about 30 minutes.
Step 2: Add the Salt and Olive Oil
Sprinkle the salt over the dough and add the olive oil.
Use wet hands to gently work the salt and oil into the dough until everything is evenly incorporated.
Step 3: Strengthen the Dough
Over the next 1½–2 hours, perform several rounds of stretch-and-folds.
To do this, grab one side of the dough, gently stretch it upward, and fold it over the center. Rotate the bowl and repeat on the remaining sides.
Perform a round approximately every 30 minutes.
Step 4: Bulk Fermentation
Cover the dough and leave it at room temperature until it becomes noticeably puffier and develops visible air bubbles.
Depending on the temperature of your kitchen and the activity of your starter, this can take approximately 4–6 hours or longer.
The dough does not necessarily need to double in size. Look for a lighter, aerated texture and a noticeable increase in volume.
Step 5: Shape the Loaf
Lightly flour your work surface and carefully transfer the dough onto it.
Shape the dough into a round by gently folding the edges toward the center and creating surface tension.
Place the shaped dough seam-side up into a floured proofing basket or a bowl lined with a well-floured kitchen towel.
Step 6: Final Proof
Cover the dough and allow it to proof.
For more convenient timing and deeper flavor, you can place it in the refrigerator for several hours or overnight.
Step 7: Preheat the Oven
Place a Dutch oven or suitable covered baking vessel in the oven and preheat to 450°F (230°C).
Allow the baking vessel to heat thoroughly before baking.
Step 8: Score the Dough
Carefully turn the dough onto a piece of parchment paper.
Use a sharp bread lame or suitable scoring tool to make one or two deliberate cuts across the surface. This gives the expanding loaf a controlled place to open during baking.
Step 9: Bake
Carefully transfer the dough into the hot Dutch oven.
Cover and bake for approximately 20 minutes.
Remove the lid and continue baking for another 20–25 minutes, or until the crust is deeply golden brown.
Step 10: Cool Completely
Transfer the bread to a wire rack and allow it to cool completely before slicing.
Cutting into sourdough while it is still very hot can compress the interior and make the crumb appear gummy.
8. Description
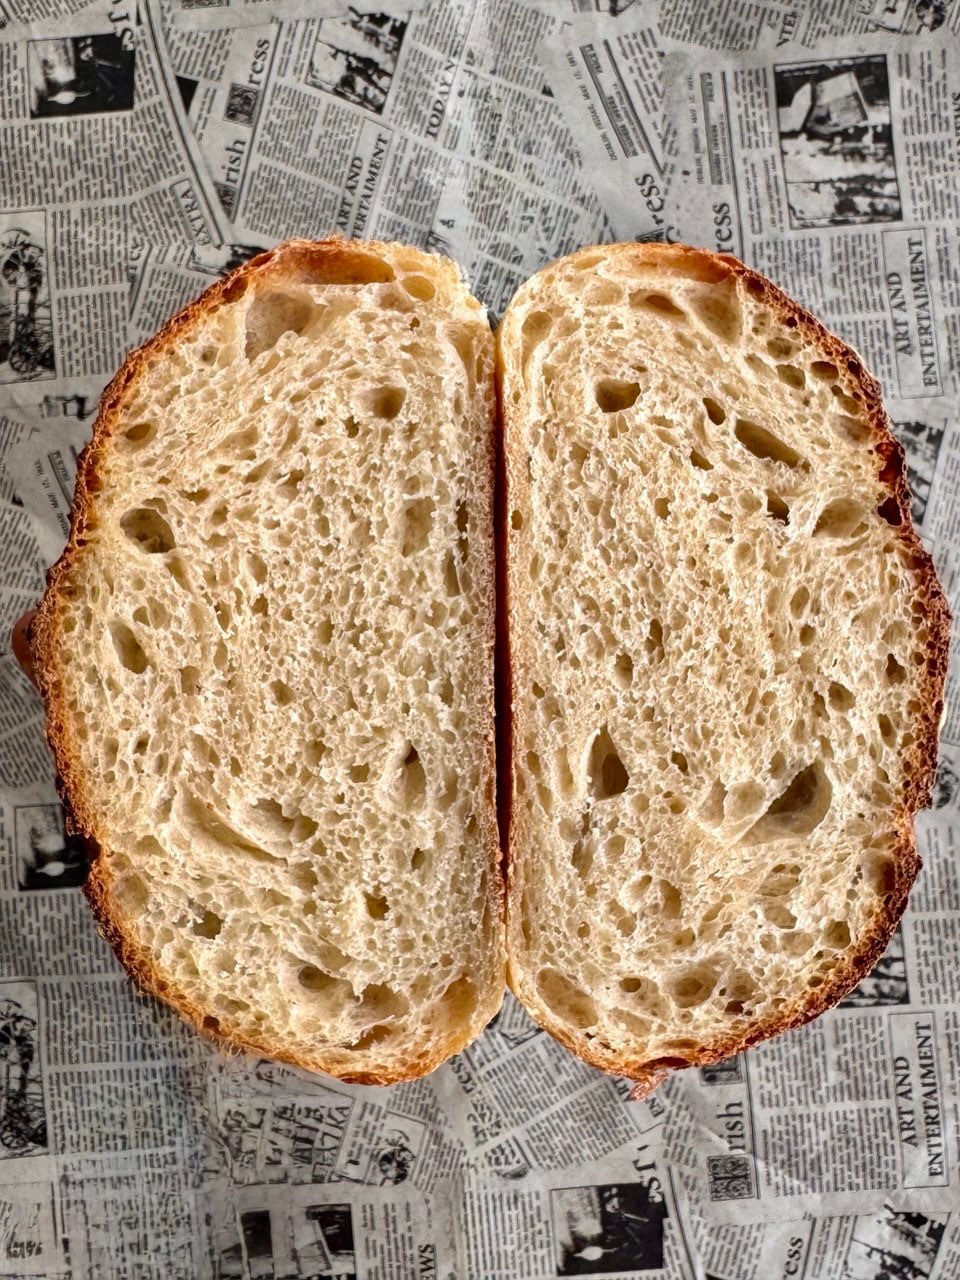
Simple Homemade Sourdough Bread has a crisp, beautifully browned crust surrounding a soft and chewy interior. Natural fermentation gives the loaf a pleasant depth of flavor, while the long fermentation process helps create its characteristic open texture.
With only a few basic ingredients, this recipe produces a rustic loaf that is excellent for sandwiches, toast, breakfast, or serving alongside soups and hearty meals.
9. Nutritional Information
Approximate nutrition per serving, assuming 10 servings per loaf:
- Calories: 190–220 kcal
- Protein: 6–7 g
- Carbohydrates: 35–40 g
- Fat: 3–5 g
- Fiber: 1–2 g
- Sugar: Less than 2 g
Actual nutritional values will vary depending on the flour, starter, slice size, and fermentation process.
10. Conclusion
Making sourdough bread at home is a process that rewards patience. The ingredients are simple, but fermentation, shaping, and baking work together to create a loaf with impressive flavor and texture.
Once you become familiar with how your starter and dough behave, you can begin adjusting fermentation times and experimenting with different flours and additions.
11. Recommendation
For the best results, bake the loaf in a preheated Dutch oven or another covered baking vessel that can safely withstand high temperatures. The covered environment helps trap steam around the dough during the first part of baking, supporting good oven spring and crust development.
For everyday use, slice the cooled loaf and serve it with butter, eggs, cheese, soup, or your favorite sandwich fillings.
12. Embracing Healthful Indulgence
Homemade sourdough can be a simple and enjoyable way to bring freshly baked bread to your table. The recipe uses straightforward ingredients without requiring complicated equipment or specialty additives.
Enjoy it as part of a varied meal, pair it with vegetables or a protein-rich topping, or simply serve a warm slice with your favorite spread. The best part of homemade bread is being able to adjust it to your own preferences while enjoying the process of baking from scratch.