
1. Introduction
Nothing compares to the comforting aroma of a Classic Homemade Double-Crust Apple Pie baking in the oven. With its golden-brown, buttery pastry and tender cinnamon-spiced apple filling, this timeless dessert brings warmth and sweetness to any occasion.
This homemade apple pie features two layers of flaky pastry surrounding a generous filling of fresh apples, brown sugar, cinnamon, and nutmeg. As the pie bakes, the apples soften and release their natural juices, creating a rich, flavorful filling.
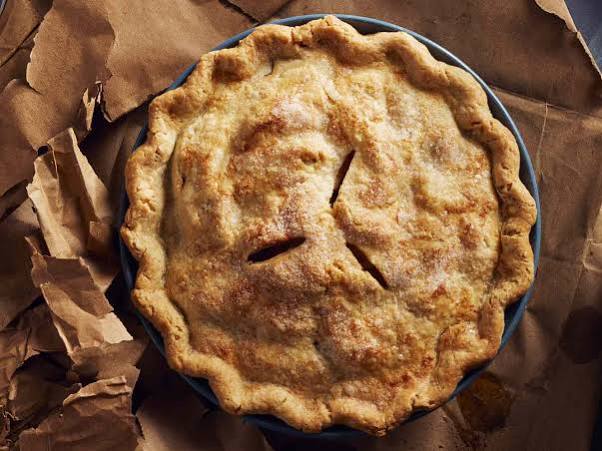
The top crust develops a beautiful golden finish, while the bottom pastry supports the tender fruit without becoming overly soggy.
Although making pie crust from scratch requires a little patience, the process is straightforward and rewarding.
Whether served on its own or with a scoop of vanilla ice cream, this traditional double-crust apple pie is a dessert worth sharing.
2. Origin and Cultural Significance
Apple pies have a long history, with early recipes appearing in European cooking centuries ago.
As apples became widely cultivated in North America, apple pie developed into one of the most recognizable desserts in American home baking.
The classic double-crust version features a bottom pastry shell filled with sweetened apples and covered by a second layer of pastry.
This method helps enclose the fruit while allowing the apples to soften and release their flavorful juices during baking.
Over generations, homemade apple pie became associated with family gatherings, celebrations, and comforting home-cooked meals.
Today, countless variations exist, but the combination of buttery pastry, tender apples, and warm spices remains a beloved classic.
3. Ingredients
This recipe makes one 9-inch double-crust apple pie, serving approximately 8 people.
For the Flaky Double Pie Crust
- 2½ cups (300g) all-purpose flour
- 1 cup (225g) unsalted butter, very cold and cut into small cubes
- 1 teaspoon salt
- 1 tablespoon granulated sugar
- 6–8 tablespoons ice-cold water, added gradually
For the Spiced Apple Filling
- 3 lb (1.35kg) firm baking apples, weighed before peeling and coring
- 1 tablespoon freshly squeezed lemon juice
- ½ cup (100g) granulated sugar
- ½ cup (100g) packed light brown sugar
- ¼ cup (30g) all-purpose flour, for thickening
- 2 teaspoons ground cinnamon
- ¼ teaspoon ground nutmeg
- 1 tablespoon (15g) unsalted butter, cut into small pieces
For the Egg Wash
- 1 large egg
- 1 tablespoon water
Optional Finishing Touches
- 1 tablespoon coarse sugar, for sprinkling over the crust
- Vanilla ice cream, for serving
- Whipped cream, for serving
4. Optional Additions
This apple pie is delicious as written, but a few simple additions can provide extra flavor.
Vanilla Extract: Add 1 teaspoon to the apple filling for a warm, sweet aroma.
Ground Allspice: A small pinch complements the cinnamon and nutmeg.
Chopped Pecans: Add ⅓ cup of finely chopped toasted pecans for a subtle crunch.
Orange Zest: Add ½ teaspoon finely grated orange zest for a delicate citrus note.
Caramel Sauce: Drizzle a little caramel over individual slices before serving.
Coarse Sugar: Sprinkle coarse sugar over the egg-washed pastry to create a lightly crunchy, sparkling finish.
5. Tips for Success
Keep the butter cold. Cold butter is essential for a flaky pie crust. As it melts during baking, it creates small pockets that separate the layers of pastry.
Do not overwork the dough. Mix only until the dough holds together. Excessive handling can make the pastry tough.
Add water gradually. Start with 6 tablespoons of ice water and add more only if needed. The dough should hold together when squeezed without feeling wet or sticky.
Use firm baking apples. Granny Smith, Honeycrisp, Braeburn, and Pink Lady are excellent choices. Combining tart and sweet apples creates a more balanced filling.
Slice the apples evenly. Aim for slices approximately ¼ inch thick so they cook at a similar rate.
Do not skip the thickener. Flour helps bind the apple juices and creates a filling that holds its shape when sliced.
Vent the top crust. Small slits allow steam to escape, helping prevent excessive moisture from building up beneath the pastry.
Protect the crust edges. If the edges become too brown before the filling is cooked, loosely cover them with aluminum foil or a pie shield.
Wait before slicing. Cooling the pie for at least 3 hours helps the filling thicken and prevents the juices from spilling out.
6. Instructions
Part 1: Prepare the Homemade Pie Dough
Step 1: Combine the Dry Ingredients
In a large mixing bowl, whisk together:
- All-purpose flour
- Salt
- Granulated sugar
Mix until evenly combined.
Step 2: Add the Cold Butter
Add the cold, cubed butter to the flour mixture.
Using a pastry cutter or your fingertips, gently work the butter into the flour until the mixture resembles coarse crumbs with visible pea-sized pieces of butter.
Do not blend the butter completely into the flour. Those small pieces help create the flaky texture.
Step 3: Add the Ice Water
Drizzle 6 tablespoons of ice-cold water over the mixture.
Use a fork to toss everything together gently.
If the mixture still feels too dry to hold together when squeezed, add more water, 1 tablespoon at a time, up to approximately 8 tablespoons total.
The dough should be slightly crumbly but able to hold its shape when pressed.
Step 4: Divide and Chill
Turn the dough onto a clean work surface.
Gently press it together without kneading.
Divide the dough into two equal portions and shape each into a flat disk.
Wrap the disks tightly and refrigerate for at least 1 hour.
Chilling helps firm the butter and makes the pastry easier to roll.
Part 2: Prepare the Apple Filling
Step 5: Peel and Slice the Apples
Peel, core, and slice the apples into pieces approximately ¼ inch thick.
Place the slices in a large mixing bowl.
Drizzle with the fresh lemon juice and toss gently.
The lemon juice adds brightness and helps slow browning.
Step 6: Combine the Sugar and Spices
In a separate small bowl, whisk together:
- Granulated sugar
- Light brown sugar
- All-purpose flour
- Ground cinnamon
- Ground nutmeg
Make sure the flour and spices are evenly mixed.
Step 7: Season the Apples
Sprinkle the sugar mixture over the sliced apples.
Toss thoroughly until all the apple slices are evenly coated.
Set the filling aside while preparing the pastry.
Part 3: Assemble the Double-Crust Apple Pie
Step 8: Preheat the Oven
Preheat your oven to 400°F (200°C).
Position an oven rack in the lower third of the oven to help the bottom crust bake thoroughly.
Place a rimmed baking sheet in the oven while it preheats. The sheet will support the pie and catch any bubbling juices.
Step 9: Roll Out the Bottom Crust
Lightly flour a clean work surface.
Remove one dough disk from the refrigerator.
Roll it into a circle approximately 12 inches wide and about ⅛ inch thick.
Carefully transfer the dough to a 9-inch pie plate.
Gently press the pastry into the bottom and sides without stretching it.
Leave a little pastry hanging over the edges.
Step 10: Add the Apple Filling
Spoon the seasoned apple slices into the prepared crust.
Arrange the slices closely together, gently pressing them down to reduce large gaps.
Mound the apples slightly higher in the center.
If any sugar and flour mixture remains in the bowl, sprinkle it evenly over the apples.
Dot the top of the filling with the 1 tablespoon of butter, cut into small pieces.
Step 11: Roll Out the Top Crust
Remove the second dough disk from the refrigerator.
Roll it into another circle approximately 12 inches wide.
Carefully place it over the apple filling.
Make sure it covers the entire pie.
Step 12: Seal the Edges
Trim any excessive overhanging pastry, leaving approximately ½–¾ inch beyond the rim.
Fold the top and bottom crust edges together.
Tuck them under and press firmly to seal.
Crimp the edges using your fingers or the tines of a fork to create a decorative border.
Step 13: Cut Steam Vents
Using a sharp knife, cut 4–5 small slits in the top crust.
Arrange the slits around the center of the pie.
These openings allow steam to escape as the apples release moisture during baking.
Step 14: Apply the Egg Wash
In a small bowl, whisk together the egg and 1 tablespoon water.
Using a pastry brush, lightly coat the top crust and crimped edges.
Avoid letting the egg wash pool around the edges.
If desired, sprinkle a little coarse sugar over the top.
Step 15: Chill the Assembled Pie
If the pastry has become soft during assembly, refrigerate the pie for approximately 15–20 minutes before baking.
This helps keep the butter firm and supports a flaky texture.
Part 4: Bake the Apple Pie
Step 16: Begin Baking at High Heat
Carefully place the pie on the preheated baking sheet in the oven.
Bake at 400°F (200°C) for 20 minutes.
The initial higher temperature helps the pastry begin to set and develop a golden finish.
Step 17: Reduce the Oven Temperature
After 20 minutes, reduce the oven temperature to 375°F (190°C).
Continue baking for approximately 40–50 minutes.
Check the pie occasionally.
If the crust edges are browning too quickly, cover them loosely with strips of aluminum foil or a pie shield.
Step 18: Check for Doneness
The apple pie is ready when:
- The top crust is deeply golden brown.
- The pastry looks crisp and fully baked.
- Thick apple juices are bubbling through the steam vents.
- The apples are tender when carefully tested through a vent with a thin knife.
If the crust is golden but the filling is not bubbling, continue baking and protect the crust with foil as needed.
Step 19: Cool Completely
Remove the pie from the oven and place it on a wire rack.
Allow it to cool for at least 3 hours before slicing.
During cooling, the filling thickens and becomes easier to serve.
Cutting the pie immediately after baking can cause the warm apple juices to run out.
Step 20: Slice and Serve
Once the filling has set, use a sharp knife to cut the pie into eight generous slices.
Serve at room temperature or gently rewarm individual slices.
For an extra-special dessert, add a scoop of vanilla ice cream or a spoonful of whipped cream.
7. Description
Classic Homemade Double-Crust Apple Pie features a beautifully golden pastry shell filled with tender, cinnamon-spiced apples.
The crust is buttery and flaky, with delicate layers that provide a satisfying contrast to the soft fruit filling.
Inside, the apples are sweet, slightly tart, and coated in a thickened sauce flavored with cinnamon, nutmeg, and brown sugar.
The top pastry has an inviting golden finish, while the crimped edges and small steam vents give the pie its traditional homemade appearance.
Every slice combines the richness of buttery pastry with the natural sweetness and gentle tang of baked apples.
Served on its own or with vanilla ice cream, it is a comforting dessert with a classic, familiar flavor.
8. Nutritional Information
The following values are approximate estimates for one of eight slices, without ice cream or additional toppings.
| Nutrient | Approximate Amount Per Serving |
|---|---|
| Calories | 520–600 kcal |
| Carbohydrates | 70–85 g |
| Protein | 5–7 g |
| Total Fat | 26–32 g |
| Saturated Fat | 16–20 g |
| Fiber | 3–5 g |
| Sugar | 35–45 g |
The exact nutritional values depend on the type of apples used, the pastry thickness, and the size of each serving.
9. Recipe Details
- Recipe Name: Classic Homemade Double-Crust Apple Pie
- Cuisine: American-Inspired Baking
- Course: Dessert
- Difficulty: Intermediate
- Servings: 8 slices
- Pie Size: 9 inches
- Preparation Time: Approximately 45 minutes
- Dough Chilling Time: At least 1 hour
- Baking Time: Approximately 60–70 minutes
- Cooling Time: At least 3 hours
- Total Time: Approximately 5½–6 hours, including chilling and cooling
- Initial Oven Temperature: 400°F (200°C)
- Final Oven Temperature: 375°F (190°C)
- Cooking Method: Oven Baking
- Main Ingredients: Apples, flour, butter, sugar, cinnamon, and nutmeg
10. Conclusion
Classic Homemade Double-Crust Apple Pie is a timeless dessert that combines simple ingredients with comforting flavors.
Its flaky, buttery pastry surrounds a generous filling of tender apples, cinnamon, nutmeg, and brown sugar.
The golden crust provides a wonderful contrast to the soft fruit, creating a dessert that feels both traditional and special.
While homemade pastry takes a little care, the results are well worth the effort.
Whether you’re baking for a gathering or simply want to enjoy a classic dessert at home, this double-crust apple pie is a wonderful choice.
11. Recommendation
For the best results, use a combination of firm, sweet, and tart apples.
A mixture of Granny Smith and Honeycrisp provides a particularly good balance of flavors.
Keep the pastry cold throughout preparation, and avoid adding more water than necessary.
Bake the pie until the filling bubbles visibly through the vents, rather than relying only on the appearance of the crust.
Most importantly, allow sufficient cooling time so the filling sets before slicing.
Serving Suggestions
This homemade apple pie pairs beautifully with:
- Vanilla bean ice cream
- Freshly whipped cream
- Warm caramel sauce
- Hot coffee
- Unsweetened black tea
Storage Tips
Room Temperature: A fully baked fruit pie without cream or custard can generally be kept covered at room temperature for up to 2 days.
Refrigeration: For longer storage, refrigerate the covered pie for approximately 3–4 additional days.
Freezing: Wrap the cooled pie or individual slices securely and freeze for up to 2–3 months for best quality.
Reheating: Warm individual slices in a 325°F (160°C) oven until heated through. This helps restore some crispness to the crust.
12. Embracing Healthful Indulgence
Homemade apple pie is a delicious example of how simple ingredients can create a memorable dessert.
The apples provide natural sweetness and some dietary fiber, while cinnamon and nutmeg contribute warm, aromatic flavors.
Although the pastry contains butter and the filling includes added sugar, apple pie can still be enjoyed as an occasional treat within a balanced eating pattern.
For a lighter serving, cut the pie into smaller portions or enjoy it without additional ice cream or caramel sauce.
You can also adjust the sugar slightly when using naturally sweet apples, keeping in mind that doing so may subtly change the filling’s texture.
Ultimately, the pleasure of homemade apple pie comes from more than its ingredients. From preparing the dough to enjoying the aroma of baked apples, the entire process celebrates the warmth and satisfaction of traditional home baking.