
Introduction
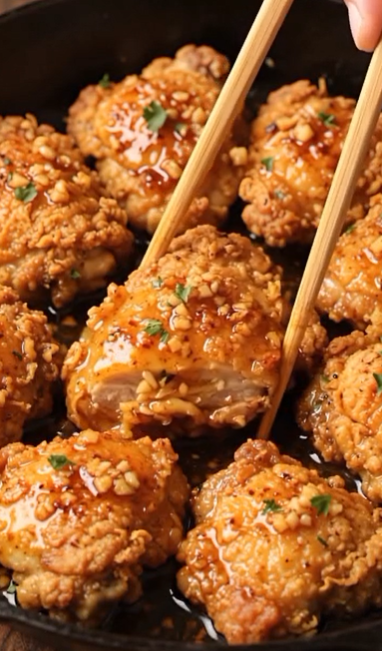
Double Crunch Honey Garlic Fried Chicken combines everything you want in a satisfying fried chicken dinner: juicy chicken thighs, an extra-crispy double coating, and a glossy honey-garlic glaze. The secret to the signature crunch is the combination of all-purpose flour and cornstarch, along with a second dredge that creates plenty of rough, craggy edges.
The honey-garlic glaze brings a delicious balance of sweet, savory, buttery, and garlicky flavors. Add a little hot sauce for a spicy kick, or leave it out for a milder version. To keep the coating as crisp as possible, the glaze is brushed or spooned over the chicken just before serving rather than simmering the fried chicken in the sauce.
Origin and Cultural Significance
Honey garlic chicken is a popular flavor combination found across many modern home-cooking and restaurant recipes, particularly in North American-style comfort food. This version combines the techniques of Southern-inspired fried chicken with the sweet-savory flavors commonly associated with honey garlic sauces.
The double-dredging method is especially useful for creating a thick, textured crust, while cornstarch helps produce a lighter and crispier exterior.
Ingredients
For the Chicken
- 1 kg (2.2 lb) chicken thighs, preferably bone-in and skin-on
- 1½ cups (190 g) all-purpose flour
- ½ cup (60 g) cornstarch
- 1 tsp baking powder
- 1 tsp garlic powder
- 1 tsp smoked or sweet paprika
- 1 tsp salt
- 1 tsp ground black pepper
- Neutral oil, for frying
For the Wet Dip
- 1 cup (240 ml) buttermilk
For the Honey Garlic Glaze
- ⅓ cup (115 g) honey
- 4–5 garlic cloves, finely minced
- 2 tbsp butter
- 2 tbsp soy sauce
- 1–2 tbsp hot sauce, optional
- 1 tsp fresh lemon juice or rice vinegar
- Fresh parsley, finely chopped, for garnish
Optional Additions
- ½ tsp red pepper flakes for extra heat
- 1 tsp sesame seeds for garnish
- 1–2 tsp grated fresh ginger for a deeper glaze
- Sliced green onions for a fresh finish
- A small pinch of cayenne pepper in the flour mixture
- Lemon wedges for serving
Tips for Success
- Dry the chicken thoroughly: Pat the thighs dry before coating to help the breading adhere.
- Use cornstarch: It helps create a lighter, crispier crust.
- Double-dredge carefully: Flour, buttermilk, then flour creates the thick, rugged coating.
- Press the second coating onto the chicken: This encourages crispy flakes and ridges.
- Let the coating rest: A 10-minute rest allows the flour mixture to hydrate and stick better during frying.
- Maintain the oil temperature: Aim for approximately 340–350°F (170–175°C) and adjust the heat as needed.
- Don’t overcrowd the pan: Too much chicken at once can cause the oil temperature to drop.
- Use an instant-read thermometer: Chicken thighs vary in size, so temperature is more reliable than cooking time. The thickest part should reach at least 165°F (74°C).
- Glaze immediately before serving: The longer the crispy coating sits in sauce, the softer it becomes.
- Use a wire rack: Resting fried chicken on a rack allows excess oil to drain without trapping steam underneath the crust.
Instructions
Prepare the Chicken
- Pat the chicken thighs thoroughly dry with paper towels. Lightly season them with a little salt and black pepper.
Prepare the Seasoned Dredge
- In a wide, shallow bowl, whisk together the flour, cornstarch, baking powder, garlic powder, paprika, salt, and black pepper.
- Pour the buttermilk into a separate shallow bowl.
Double-Dredge the Chicken
- Coat each chicken thigh thoroughly in the seasoned flour mixture, making sure every surface is covered.
- Dip the floured chicken briefly into the buttermilk. Allow the excess to drip back into the bowl.
- Return the chicken to the flour mixture. Press the coating firmly onto the surface, especially around the edges, to create rough, craggy pieces of breading.
- Shake off only the loose excess flour and place the coated chicken on a wire rack.
Rest the Coating
- Let the coated chicken rest for approximately 10 minutes. This short resting period allows the buttermilk to hydrate the flour and helps the crust adhere during frying.
Fry the Chicken
- Pour enough neutral oil into a heavy skillet or Dutch oven for a generous shallow fry. Heat the oil to approximately 340–350°F (170–175°C).
- Carefully add the chicken without overcrowding the pan. If using skin-on thighs, place them skin-side down first.
- Fry in batches, turning occasionally, until the coating is deeply golden and crisp and the chicken is fully cooked.
- Check the thickest part of each thigh with an instant-read thermometer, avoiding the bone. The chicken should reach at least 165°F (74°C).
- If the crust is becoming dark before the chicken is cooked through, reduce the heat and continue cooking more gently.
- Transfer the fried chicken to a wire rack to drain and remain crisp.
Make the Honey Garlic Glaze
- While the chicken rests, melt the butter in a clean skillet over medium-low heat.
- Add the minced garlic and cook for about 30–60 seconds, stirring frequently, until fragrant. Do not let the garlic brown or burn.
- Add the honey and soy sauce. Stir in the hot sauce if using.
- Add the lemon juice or rice vinegar and stir to combine.
- Bring the mixture to a gentle simmer and cook for 1–2 minutes, stirring frequently, until the glaze becomes glossy and slightly thickened. Avoid aggressively boiling the honey.
Glaze and Serve
- Remove the glaze from the heat. For the crispiest result, brush the warm glaze over the fried chicken or spoon a small amount over each piece immediately before serving.
- For a more heavily glazed finish, quickly toss the chicken with the glaze just before plating. Avoid letting the chicken sit in the sauce for an extended period.
- Garnish with freshly chopped parsley and serve immediately.
Description
This Double Crunch Honey Garlic Fried Chicken features juicy chicken thighs wrapped in a thick, golden, craggy crust and finished with a warm honey-garlic glaze. The combination of flour and cornstarch delivers a satisfying crunch, while butter, honey, garlic, soy sauce, and lemon create a balanced sweet-and-savory coating. A little hot sauce adds optional heat without overpowering the honey and garlic.
Nutritional Information
Approximate per serving, based on 4 servings and excluding the exact amount of oil absorbed during frying:
- Calories: 750–900
- Protein: 45–55 g
- Carbohydrates: 55–70 g
- Fat: 40–50 g
- Sugar: 18–25 g
- Sodium: 1,000–1,400 mg
Actual nutrition will vary depending on whether the thighs are bone-in or boneless, the amount of coating and glaze consumed, and how much oil is absorbed during frying.
Recipe Details
- Prep Time: 20 minutes
- Coating Rest: 10 minutes
- Cook Time: Approximately 20–30 minutes, depending on chicken size and frying method
- Total Time: About 50–60 minutes
- Servings: 4
- Frying Temperature: 340–350°F (170–175°C)
- Chicken Safe Internal Temperature: 165°F (74°C)
Conclusion
Double Crunch Honey Garlic Fried Chicken is a satisfying combination of crisp texture and bold flavor. The double coating creates plenty of crunchy ridges, while the honey-garlic glaze adds a glossy layer of sweetness, savory depth, and buttery garlic flavor.
For the best texture, fry the chicken until deeply golden, let it drain on a wire rack, and add the glaze immediately before serving.
Recommendation
Serve this fried chicken with creamy coleslaw, roasted vegetables, French fries, mashed potatoes, or steamed rice. For a complete sweet-and-savory meal, add lemon wedges and a simple green salad to balance the richness of the fried chicken.
If you’re serving a crowd, keep the fried chicken unglazed until the last moment, then brush each piece with the honey-garlic sauce just before bringing it to the table.
Embracing Healthful Indulgence
Fried chicken is naturally an indulgent dish, but a few preparation choices can make the experience more balanced. Using a wire rack helps excess oil drain away, while adding the glaze at the end allows you to control how much sauce goes onto each piece.
Pairing the chicken with fresh vegetables, salad, or another lighter side can also create a more balanced plate while preserving the crispy, flavorful character that makes this recipe so enjoyable.