
Introduction
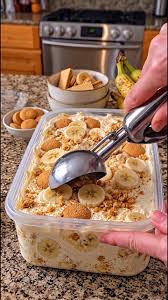
No-Churn Banana Pudding Ice Cream brings all the nostalgic flavors of classic Southern banana pudding into a creamy, frozen dessert. Made with ripe bananas, a rich vanilla cream base, instant pudding mix, and crunchy vanilla wafers, this homemade treat delivers the perfect balance of sweetness, creaminess, and cookie crunch.
The best part? You don’t need an ice cream maker or any complicated equipment. A few simple ingredients, a mixer, and some freezer time are all you need to create a delicious dessert that the whole family will love.
Whether you’re preparing a summer treat, hosting a gathering, or satisfying a banana pudding craving, this easy recipe is sure to become a favorite.
Origin and Cultural Significance
Banana pudding is a beloved dessert in the American South, traditionally made with layers of vanilla pudding, sliced bananas, and vanilla wafers, often topped with whipped cream or meringue. It has long been associated with family gatherings, potlucks, holidays, and comforting homemade desserts.
This no-churn version transforms those familiar flavors into ice cream while preserving the signature combination of bananas, creamy vanilla, and cookies. It offers a refreshing twist on a classic dessert without requiring traditional ice cream-making equipment.
Ingredients
For the Ice Cream Base
- 2 cups heavy whipping cream, cold
- 1 can (14 ounces) sweetened condensed milk
- 1 box (3.4 ounces) instant banana cream pudding mix, or vanilla pudding mix
- 1 teaspoon vanilla extract
- A pinch of salt
For the Banana and Cookie Mix-Ins
- 2–3 large ripe bananas, sliced or partially mashed
- 1–2 cups Nilla Wafers, broken into pieces
- Extra whole Nilla Wafers for topping
- Additional banana slices for decoration, optional
Optional Additions
- Caramel sauce: Drizzle between the layers for a sweet, buttery flavor.
- White chocolate chips: Add a little extra sweetness and texture.
- Toasted pecans: Sprinkle in chopped pecans for a nutty crunch.
- Cinnamon: Add a small pinch to complement the banana flavor.
- Crushed vanilla cookies: Use extra cookie crumbs throughout the ice cream for a stronger banana pudding experience.
- Whipped cream: Add a dollop when serving for an extra-creamy finish.
Tips for Success
- Start with cold cream. Well-chilled heavy whipping cream whips more easily and produces a better texture.
- Whip to stiff peaks. The whipped cream should hold its shape when the beaters are lifted, but avoid overwhipping until it becomes grainy.
- Fold gently. Use a spatula to incorporate the pudding mixture into the whipped cream without knocking out too much air.
- Choose ripe bananas. Bananas with yellow peels and a few brown spots provide excellent sweetness and flavor.
- Keep the cookies in pieces. Break the Nilla Wafers into bite-sized chunks rather than crushing them all into fine crumbs. This creates more interesting texture.
- Protect the surface. Cover the container tightly to prevent ice crystals from forming and to keep the ice cream from absorbing freezer odors.
- Allow enough freezing time. Freeze for at least 6 hours, although overnight usually produces a firmer, more scoopable result.
- Add fresh banana topping just before serving. Fresh banana slices can brown during freezing, so use them as a garnish shortly before serving for the best appearance.
Instructions
Step 1: Whip the Heavy Cream
Pour the cold heavy whipping cream into a large chilled mixing bowl. Using a hand mixer or stand mixer, beat on medium-high speed until stiff peaks form. The whipped cream should be thick and hold its shape. Set aside.
Step 2: Prepare the Pudding Mixture
In a separate bowl, whisk together the sweetened condensed milk, instant banana cream pudding mix, vanilla extract, and a pinch of salt. Continue mixing until the ingredients are smooth and evenly combined.
Step 3: Combine the Mixtures
Add the pudding mixture to the whipped cream in two or three additions. Gently fold with a spatula after each addition until the mixture is smooth and uniform. Avoid vigorous stirring, as preserving the air in the whipped cream helps create a lighter texture.
Step 4: Add the Bananas and Cookies
Fold in the sliced or partially mashed bananas and the broken Nilla Wafers. Distribute them throughout the mixture so every scoop contains a combination of creamy ice cream, banana, and cookie pieces.
Step 5: Transfer to a Container
Pour the mixture into a loaf pan or another freezer-safe container. Smooth the top with a spatula.
Arrange extra whole Nilla Wafers or cookie pieces over the surface if desired. For the best appearance, reserve fresh banana slices for serving rather than freezing them on top.
Step 6: Freeze Until Firm
Cover the container tightly with a lid or plastic wrap. Place it in the freezer for at least 6 hours, preferably overnight, until the ice cream is firm enough to scoop.
Step 7: Scoop and Serve
Remove the ice cream from the freezer and let it stand at room temperature for approximately 5–10 minutes to soften slightly. Scoop into bowls or cones and garnish with extra vanilla wafers, fresh banana slices, or a drizzle of caramel sauce if desired.
Serve immediately and enjoy!
Description
This no-churn banana pudding ice cream is rich, smooth, and packed with familiar dessert flavors. The sweetened condensed milk creates a luscious base, while whipped cream adds lightness. Banana pudding mix intensifies the banana-vanilla flavor, and ripe bananas provide natural sweetness.
Pieces of vanilla wafers add a delightful cookie texture that recalls traditional banana pudding. Each scoop is creamy, sweet, and comforting, making it an ideal dessert for warm weather or any occasion that calls for something special.
Nutritional Information
Approximate values per serving, assuming 10 servings:
- Calories: 350–430
- Protein: 4–6 g
- Total Fat: 20–25 g
- Carbohydrates: 38–48 g
- Sugar: 30–38 g
- Fiber: 1–2 g
- Sodium: 100–180 mg
Nutritional values vary depending on the brands used, the number of servings, and the amount of additional cookies or toppings. This is an estimate rather than a laboratory-tested analysis.
Recipe Details
- Prep Time: 20 minutes
- Freezing Time: At least 6 hours
- Total Time: Approximately 6 hours 20 minutes
- Servings: 8–10
- Cuisine: American, Southern-inspired
- Course: Dessert
- Method: No-churn freezing
- Difficulty: Easy
Conclusion
No-Churn Banana Pudding Ice Cream is an easy and delicious way to enjoy the comforting flavors of a classic Southern dessert in a refreshing new form. With no ice cream maker required, this recipe makes homemade frozen treats accessible to almost anyone.
The combination of creamy pudding, ripe bananas, and crunchy vanilla wafers makes every scoop satisfying and nostalgic. Prepare it ahead of time, keep it in the freezer, and serve it whenever you’re craving a sweet homemade dessert.
Recommendation
Serve this ice cream in chilled bowls or waffle cones, topped with crushed vanilla wafers and a few fresh banana slices. A drizzle of caramel sauce or a spoonful of whipped cream makes it even more indulgent.
Store the ice cream in an airtight, freezer-safe container for the best quality. For the best texture and flavor, enjoy it within 1–2 weeks. Always keep it frozen between servings, and avoid repeatedly allowing the entire container to soften and refreeze.
Because fresh bananas can darken and release moisture, adding them as a topping just before serving is preferable. The cookies inside the ice cream will gradually soften as they absorb moisture, creating a texture similar to the cookies in traditional banana pudding.
Embracing Healthful Indulgence
This banana pudding ice cream is a rich dessert intended to be enjoyed in moderation. Bananas contribute potassium and some dietary fiber, while the cream and condensed milk create the smooth, indulgent texture that makes this recipe special.
For smaller portions, serve the ice cream in mini dessert cups. You can also experiment with reducing the amount of cookie topping or using slightly smaller scoops while keeping the essential banana pudding flavors intact.
Homemade desserts can be part of a balanced lifestyle, and this no-churn recipe offers a simple way to share a comforting, crowd-pleasing treat with family and friends.
Simplify this into a recipe-only formatRemove the redundant dessert sections