
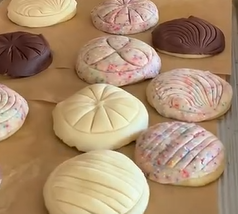
There’s something irresistible about a freshly baked Mexican concha. Beneath its beautiful seashell-patterned sugar crust is a soft, fluffy, buttery sweet bread that practically melts in your mouth.
These homemade Mexican conchas, also known as pan dulce, bring the flavors of a traditional Mexican bakery right into your kitchen. With a tender, lightly sweetened dough and a delicate vanilla or chocolate topping, they’re wonderful for breakfast, an afternoon snack, or a cozy dessert with coffee.
If you’ve ever wondered how to make conchas at home, this step-by-step recipe walks you through everything, from preparing the yeast dough to creating that signature shell design.
Recipe at a Glance
- Prep Time: 35 minutes
- First Rise: 1½–2 hours
- Second Rise: Approximately 45–75 minutes
- Bake Time: 18–24 minutes
- Total Time: Approximately 3–4 hours
- Servings: 12 conchas
- Cuisine: Mexican
- Course: Breakfast, Dessert, Snack
- Difficulty: Intermediate
What Are Mexican Conchas?
Conchas are one of Mexico’s most recognizable sweet breads. Their name comes from the Spanish word for “shell,” referring to the beautiful seashell pattern decorating their tops.
Unlike an ordinary dinner roll, a concha is made from enriched yeast dough containing milk, butter, sugar, and eggs. This gives the bread a tender texture and a rich, lightly sweet flavor.
What makes conchas truly special is the topping. A mixture of flour, sugar, butter, and vanilla is shaped into a thin layer over each bun and scored into a decorative pattern.
As the bread rises and bakes, the topping develops its distinctive cracked-shell appearance, creating a delicious contrast between soft bread and sweet, crumbly crust.
Traditional varieties include vanilla, chocolate, and colorful pink or yellow conchas.
Why You’ll Love This Homemade Conchas Recipe
Soft, bakery-style texture. The enriched dough produces tender, fluffy bread with a delicate buttery flavor.
A delicious sugar crust. The sweet topping adds a satisfying, slightly crisp contrast to the pillowy bread.
Simple ingredients. You can make these Mexican sweet rolls using familiar ingredients commonly found in American grocery stores.
Customizable flavors and colors. Prepare classic vanilla conchas, chocolate conchas, or colorful versions using food coloring.
Perfect for sharing. This recipe makes 12 generous sweet breads, ideal for family breakfasts, gatherings, and homemade gifts.
Ingredients You’ll Need
Making traditional-style Mexican conchas involves two components: the soft yeast dough and the decorative sugar topping.
For the Sweet Bread Dough
- 1 tablespoon active dry yeast (approximately 9 g)
- ¾ cup whole milk (180 ml), warmed to approximately 105–110°F
- ½ cup granulated sugar (100 g)
- ½ cup unsalted butter (113 g), melted and cooled slightly
- 3 large eggs, at room temperature
- 1 teaspoon vanilla extract
- 1 teaspoon salt
- 4 to 4½ cups all-purpose flour (approximately 480–540 g)
For the Sugar Topping
- 1 cup all-purpose flour (120 g)
- 1 cup powdered sugar (approximately 115–120 g)
- ½ cup unsalted butter (113 g), softened
- 1 teaspoon vanilla extract
Optional Topping Variations
- 1 tablespoon unsweetened cocoa powder for a chocolate-flavored portion of topping
- A few drops of pink or yellow gel food coloring
- A pinch of cinnamon for a warm, aromatic flavor
Essential Baking Equipment
You don’t need professional bakery equipment to make conchas, but a few reliable kitchen tools will make the process easier and help produce consistent results.
Stand mixer with dough hook: Helpful when preparing enriched yeast dough because it provides steady kneading without requiring as much physical effort. Hand kneading works too.
Digital kitchen scale: Measuring flour by weight can improve consistency and prevent the dry, dense dough that results from adding too much flour.
Instant-read thermometer: Useful for checking the milk temperature before adding yeast.
Large baking sheets: Give the buns enough space to expand without touching.
Parchment paper: Prevents sticking and makes transferring the finished bread easier.
Bench scraper: Makes dividing the dough into 12 even portions simple and precise.
Cooling rack: Allows air to circulate beneath the finished conchas, helping prevent soggy bottoms.
A traditional concha cutter can also make the shell pattern easier, but a sharp paring knife works perfectly well.
How to Make Mexican Conchas Step by Step
Step 1: Activate the Yeast
Pour the warm milk into a large mixing bowl or the bowl of a stand mixer.
Add the active dry yeast and 1 tablespoon of the measured granulated sugar. Stir gently until combined.
Allow the mixture to rest for 5–10 minutes, until the surface becomes foamy.
The milk should feel comfortably warm, not hot. Excessively hot milk can damage the yeast and prevent the dough from rising.
Baking tip: If your yeast mixture doesn’t become bubbly after about 10–15 minutes, check the yeast’s freshness and the milk temperature before continuing.
Step 2: Prepare the Sweet Bread Dough
Add the remaining granulated sugar, melted and slightly cooled butter, room-temperature eggs, vanilla extract, and salt to the activated yeast mixture.
Mix until the ingredients are well combined.
Gradually add 4 cups of all-purpose flour, stirring until a soft dough begins to form.
If you’re using a stand mixer, attach the dough hook and knead on low to medium-low speed for approximately 8–12 minutes.
For kneading by hand, transfer the dough to a lightly floured work surface and knead until smooth and elastic. This may take 10–15 minutes.
The finished dough should be soft, stretchy, and slightly tacky.
If it is excessively wet and difficult to handle, gradually add some of the remaining ½ cup of flour. Avoid adding more than necessary.
Step 3: Let the Dough Rise
Lightly grease a large mixing bowl and place the dough inside.
Turn it gently to coat the surface, then cover the bowl with plastic wrap or a clean kitchen towel.
Place the bowl in a warm, draft-free area.
Allow the dough to rise for approximately 1½–2 hours, or until it has roughly doubled in size.
Rising time depends on your kitchen temperature and the activity of your yeast. Cooler kitchens may require additional time.
Step 4: Prepare the Sweet Concha Topping
While the dough rises, prepare the signature sugar topping.
In a separate bowl, combine:
- All-purpose flour
- Powdered sugar
- Softened unsalted butter
- Vanilla extract
Mix using a spatula or your hands until everything comes together into a smooth, pliable paste.
The texture should resemble soft cookie dough or modeling clay.
If the mixture is too sticky, add a small amount of flour. If it feels dry and crumbly, work in a little additional softened butter.
For different flavors, divide the topping into portions.
Mix cocoa powder into one portion for chocolate conchas, or add a few drops of gel food coloring to create colorful variations.
Cover the topping to prevent it from drying out.
Step 5: Shape the Conchas
Once the bread dough has doubled in size, gently deflate it and transfer it to a clean work surface.
Divide the dough into 12 equal portions.
Roll each portion into a smooth, round ball by tucking the edges underneath and gently tightening the surface.
Arrange the balls on parchment-lined baking sheets, leaving approximately 3 inches between them.
Press each dough ball gently with your palm to flatten it slightly.
Step 6: Add the Sugar Topping
Divide the prepared sugar topping into 12 equal portions.
Roll each portion into a ball, then flatten it between two sheets of parchment paper or plastic wrap.
Each disc should be large enough to cover the rounded top of a dough ball without extending excessively beyond its edges.
Carefully position one sugar disc over each dough ball.
Press lightly to help the topping adhere.
Using a sharp paring knife or traditional concha cutter, score curved lines into the topping to create a shell-like pattern.
Make sure you cut only through the sugar topping, not the bread dough underneath.
Step 7: Allow the Conchas to Rise Again
Loosely cover the prepared conchas with a lightweight kitchen towel or lightly greased plastic wrap.
Allow them to rise in a warm location until visibly puffy, approximately 45–75 minutes.
The exact timing can vary, so focus on how the dough looks rather than following the clock alone.
As the dough expands, the decorative lines in the topping will become more pronounced.
Step 8: Bake Until Perfectly Golden
Preheat the oven to 350°F (175°C).
Place the baking sheets inside the preheated oven and bake for approximately 18–24 minutes.
The conchas are ready when the exposed bread and bottoms are lightly golden, while the sugar topping feels set.
For more even baking, rotate the baking sheets partway through cooking if necessary.
Avoid overbaking, as this can cause the sweet bread to become dry.
Remove the conchas from the oven and allow them to rest for about 10 minutes before transferring them to a cooling rack.
Serve slightly warm or at room temperature.
Tips for Making Soft, Fluffy Conchas Every Time
1. Measure Flour Carefully
Too much flour is one of the most common reasons homemade sweet bread becomes dense.
For consistent results, use a digital kitchen scale.
If measuring with cups, spoon the flour into the measuring cup and level it with a straight edge rather than scooping directly from the bag.
2. Don’t Overheat the Milk
Milk that is too hot can harm the yeast.
For active dry yeast, a temperature around 105–110°F is suitable for this recipe.
A simple digital thermometer removes the guesswork.
3. Knead Until Elastic
Proper kneading develops the gluten structure that helps the bread trap gas during rising.
The dough should gradually become smoother, more elastic, and easier to handle.
A slightly sticky dough is normal for enriched bread.
4. Give the Dough Enough Time to Rise
Because this dough contains butter, eggs, and sugar, it may rise more slowly than lean bread dough.
Instead of rushing the process, allow the dough to become noticeably larger and lighter before shaping.
5. Keep the Topping Soft and Pliable
Topping that is too dry can crumble when shaped.
It should be soft enough to flatten into discs without breaking apart.
Keeping it covered while the dough rises will also help prevent drying.
6. Avoid Cutting Too Deeply
When decorating the conchas, score only the topping.
Cutting into the underlying bread dough may interfere with the buns’ appearance as they expand in the oven.
Popular Concha Flavor Variations
Once you’ve mastered the classic recipe, experimenting with different toppings is a fun way to personalize your homemade pan dulce.
Chocolate Conchas
Mix unsweetened cocoa powder into part of the topping to create a rich chocolate flavor.
These pair beautifully with hot milk or Mexican hot chocolate.
Pink Vanilla Conchas
Add a small amount of pink gel food coloring to vanilla topping.
The result is a colorful variation that keeps the familiar sweet vanilla flavor.
Cinnamon Sugar Conchas
Add a little ground cinnamon to the topping for a warm, comforting flavor.
This version is especially appealing alongside freshly brewed coffee.
Orange-Vanilla Conchas
Add a little finely grated orange zest to the bread dough for a delicate citrus aroma.
The orange flavor complements the buttery vanilla topping without overwhelming it.
Common Concha Baking Problems and How to Fix Them
| Problem | Possible Cause | Solution |
|---|---|---|
| Dense, heavy bread | Too much flour or insufficient rising | Measure flour carefully and allow adequate proofing |
| Dough doesn’t rise | Inactive yeast or unsuitable temperature | Check yeast freshness and use comfortably warm milk |
| Topping falls off | Poor adhesion or overly dry topping | Press topping gently onto dough and maintain a pliable texture |
| Topping cracks excessively | Topping is too dry or rolls expand rapidly | Adjust topping moisture and avoid overproofing |
| Dry finished conchas | Excess flour or overbaking | Keep the dough slightly tacky and monitor baking |
| Pale bread bottoms | Insufficient baking | Continue baking briefly until bottoms are lightly golden |
A few cracks in the topping are completely normal. In fact, the characteristic cracked pattern is part of what makes conchas so recognizable.
How to Store Mexican Conchas
Homemade conchas taste best on the day they’re baked, when the bread is soft and the topping has its freshest texture.
However, they can be stored and enjoyed later.
At room temperature: Once completely cool, place the conchas in an airtight container for up to 2–3 days. The topping may soften slightly during storage.
In the freezer: Wrap each cooled concha individually and place it in a freezer-safe bag or container. Freeze for up to 2–3 months for best quality.
To reheat: Allow frozen conchas to thaw, then warm them briefly in a low oven at around 300°F until heated through.
Avoid overheating because it can dry out the bread.
Can You Make Concha Dough Ahead of Time?
Yes! Preparing the dough ahead of time can make homemade conchas easier to fit into a busy schedule.
After the first rise, gently deflate the dough, cover it securely, and refrigerate overnight.
When you’re ready to bake, divide and shape the dough, add the prepared sugar topping, and allow the conchas to rise until noticeably puffy before baking.
Cold dough may require additional rising time.
This method is useful when preparing a fresh batch for weekend breakfasts, family brunches, or special occasions.
What to Serve With Mexican Conchas
Mexican conchas pair wonderfully with warm beverages because their sweet topping complements both coffee and chocolate.
Popular serving choices include:
- Mexican hot chocolate: A rich, comforting drink that pairs beautifully with sweet bread.
- Café de olla: Mexican-style coffee often flavored with cinnamon and piloncillo.
- Champurrado: A traditional warm Mexican chocolate and masa-based drink.
- Café con leche: Coffee with milk for an easy breakfast pairing.
- Cold milk: A simple choice that balances the sweet sugar crust.
For a relaxed weekend breakfast, serve freshly baked conchas with fruit and your favorite hot beverage.
Frequently Asked Questions About Mexican Conchas
What is the difference between conchas and regular sweet bread?
Conchas are a type of Mexican sweet bread distinguished by their decorative sugar topping, which is scored into a seashell pattern. The bread underneath is soft and enriched with ingredients such as eggs, butter, and milk.
Are conchas the same as brioche?
Not exactly. Conchas are made with enriched yeast dough and can have a brioche-like softness, but they are their own traditional Mexican baked good with a distinctive sugary topping.
Can I make conchas without a stand mixer?
Absolutely. A stand mixer is convenient, but the dough can be kneaded by hand. It may take additional time and effort to develop the smooth, elastic texture.
Can I use bread flour instead of all-purpose flour?
Yes. Bread flour can create a slightly chewier, more structured bread because it generally contains more protein. All-purpose flour is a good choice for a tender result.
Why are my homemade conchas hard?
Hard conchas can result from too much flour, overbaking, or improper storage. Measuring ingredients carefully, avoiding excessive baking time, and storing the cooled bread properly can help.
How do I know when conchas are fully baked?
Look for lightly golden bottoms, bread that appears set between the topping’s cracks, and a sugar crust that no longer feels doughy. If using an instant-read thermometer, the center of the bread should generally reach around 190°F.
Can conchas be frozen?
Yes. Once completely cool, wrap them well and freeze for up to 2–3 months. Thaw before gently reheating.
Are conchas eaten for breakfast or dessert?
Both! Conchas are commonly enjoyed as a breakfast bread, afternoon snack, or sweet treat alongside coffee, milk, or hot chocolate.
Final Thoughts
Making Mexican conchas at home is a wonderful way to enjoy one of Mexico’s most beloved bakery treats.
With their tender, buttery bread and sweet, delicately crunchy topping, these homemade conchas offer an irresistible combination of textures and flavors.
Although the recipe requires some patience while the dough rises, the individual steps are straightforward, and the results are worth the effort.
Whether you choose classic vanilla, rich chocolate, or colorful variations, freshly baked conchas are a delicious addition to your homemade baking collection.
Save this Mexican conchas recipe for your next baking day, and share it with someone who loves homemade sweet bread!